How to open up display on HP Compaq 8510p 8510w
In this guide I explain how to take apart the display panel and replace the inverter board in HP Compaq 8510p and 8510w notebooks.
The inverter board located inside the display panel below the LCD panel.
The inverter works as a power supply for the backlight lamp inside the LCD.
When inverter fails, the LCD goes dark. The image is still on the screen but you can barely see it.
OK, let’s start taking it apart.

STEP 1.
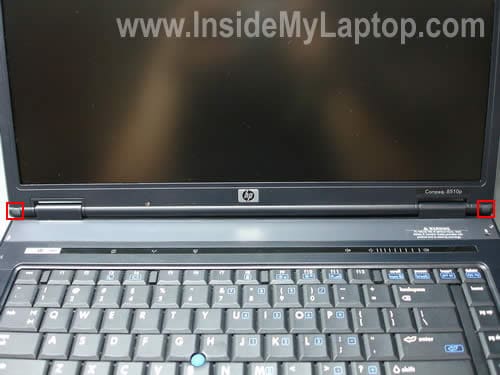
There are two rubber covers in the lower left and right corners of the display bezel.
You can remove these covers with a sharp object.
Laptop does not start. Is it bad power jack or motherboard?
Let’s say your laptop does not start at all. You plug in the power adapter and press on the power button, but the computer will not react. It’s dead and the power or battery charge LED will not light up.
What could be wrong? Is it bad power jack or the motherboard is dead?

By the way, the power jack (DC-IN jack) is the power socket on the side or back of your computer where you plug the AC/DC power adapter.
I’ll explain how to perform basic troubleshooting and find out what is wrong. This is only for experienced people, who know how to disassemble laptops.
ContinuedProblems with power socket in Toshiba Satellite L305 L355
Lately I’ve been seeing exactly the same problem with the power socket in some newer Toshiba Satellite L305/L305D and Satellite L355/L355D laptops.
I don’t know if it’s a poor design or people just not careful enough with their computers, but the power socket in these models breaks very often.
On the picture below you can see a good working power socket. The power jack is seated correctly. It’s tight and will not move when you plug in the adapter.

On the next picture you see a broken socket. There is a gap between the power jack and bottom case and when you plug the AC adapter inside the jack it feels very loose.
In some cases, the power jack separates from the case and you cannot plug in the power adapter at all.
How to disassemble HP Compaq 8510p

In this guide I will disassemble a HP Compaq 8510p notebook PC and remove all main parts.
According to the HP specifications, my disassembly guide should work for a HP Compaq 8510w mobile workstation.
If it works for any other model, I would appreciate if you mention the model name in the following comments.
Before you start, you should turn off the notebook and unplug the power adapter.
How to upgrade RAM in Toshiba Satellite A45
In this guide I explain how to upgrade RAM (memory) in a Toshiba Satellite A45 laptop.
If you search for memory slots on the bottom of the laptop, you will not find any because both slots are hidden under the keyboard.
In order to access both RAM slots you’ll have to remove the keyboard. Don’t worry, it will take about 5 minutes even for inexperienced users.
Before you start, turn off the computer, unplug the power adapter and remove the battery and of course, proceed at your own risk. 🙂
STEP 1.
Insert a small flat head screwdriver under the keyboard bezel and lift it up.

STEP 2.
How to remove screen on HP Pavilion dv6000

In this guide I’ll be replacing failed LCD screen on a HP Pavilion dv6000 laptop.
In my case the lower 2/3 of the screen has become garbled . An external monitor displays image properly.
How to take apart HP Pavilion dv6000

In this guide I explain how to take apart a HP Pavilion dv6000 series laptop.
I will show how to remove the memory modules, hard drive, wireless card, CD/DVD optical drive and keyboard.
How to upgrade memory in IBM ThinkPad T40 T41 T42

Using this guide you’ll be able to replace or upgrade the memory modules (RAM) in IBM ThinkPad T40, T40p, T41, T41p, T42, T42p series laptops.
In my case I’ll be working with a ThinkPad T41.
It came with 512MB RAM installed. There are two 256MB modules.
One of them can be easily accessed through the door on the bottom. The second module is hidden under the keyboard.
How to take apart Gateway NX570X

In the following guide I take apart a Gateway NX570X laptop.
I think my disassembly instructions will work for other Gateway NX570 models too.
In my case the battery started charging intermittently with the AC adapter connected.
In order to charge it I have to adjust the AC adapter plug inside the power socket on the back of the laptop. Apparently, there is a problem with the power socket (DC jack) and it has to be replaced or resoldered.
I’ll be removing the system board so I can access and repair the jack.
Replacing keyboard on Compaq Presario 2580US

In the following guide I explain how to remove and replace the keyboard on a Compaq Presario 2580US laptop.
Also, you can use this guide for replacing the memory modules and hard drive.
The replacement procedure is relatively simple and you can easily do it yourself at home. Proceed on your own risk!
Compaq Presario 2580US is similar to many other HP/Compaq models. The disassembly procedure should be the same (or almost the same) for the following models: