Today I’ll talk about the left hinge separation on Dell Inspiron 15 7000 series laptops, why it happens and how to fix this problem.
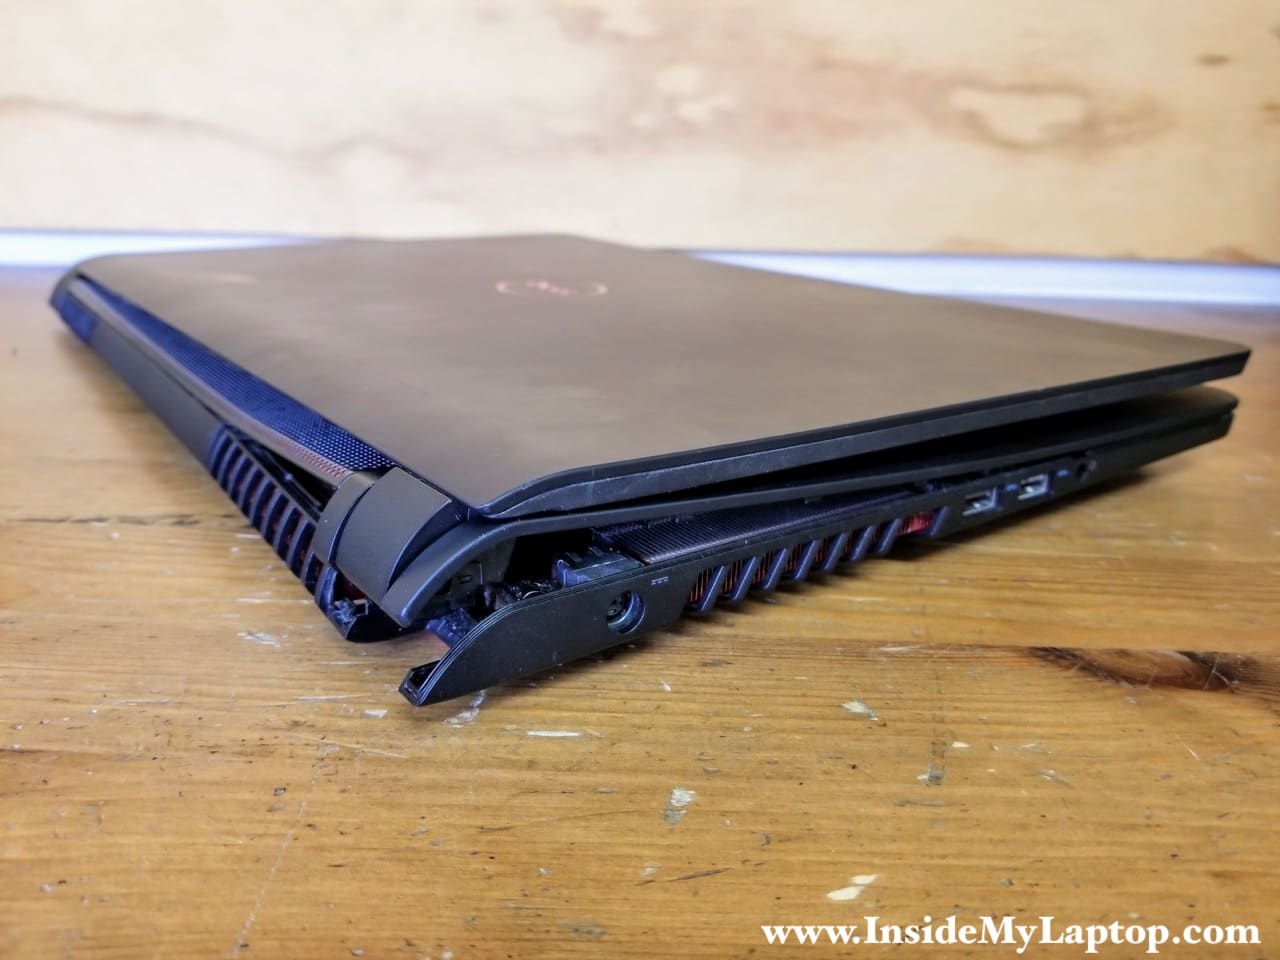
If your laptop hinge looks like one on the picture above, you are not alone. Apparently, the left hinge separation is a well known issue on Dell Inspiron 15 7000 series and many people complaining about it.
Here’s a typical hinge related complaint I found on the internet:
My Dell Inspiron 7559’s left hinge is causing the casing to separate. This problem has been present for about a month or two, which started as a clicking from the hinge when I’d open it, to now the top and bottom halves of the casing visibly separate near the hinge when the screen is upright.
How the hinge fails?
In order to answer this question we’ll have to remove the top cover and take a closer look inside at the problematic area.

The following picture was taken from a “healthy” Dell Inspiron 15 7000. The left hinge (same as the right one) is secured to the bottom cover by two screws.
Let’s remove the display and take a closer look at the screw nuts.

Both nuts that fasten the screws for the hinges are anchored in the plastic housings on the bottom cover.

Now let’s take a look at the damaged laptop.
The left hinge separated from the bottom cover because both nuts got pulled out of their respective housings.

Why the hinge fails?
In my opinion, the hinge screw anchorage wasn’t designed very well. It’s just too weak to support that massive laptop display. When you move the display up and down, you apply too much torque on the hinge and eventually both screw nuts get pulled out.

How to fix hinge separation?
If the housing is not damaged, you can try attaching the nut back in place using epoxy. Epoxy will properly fill the gaps between the nut and the housing and it’s strong enough to secure the nut in place.
On the other hand, if the housing is damaged and plastic walls are broken, you will have to replace the bottom case. I would advice to buy a new bottom case before you disassemble the laptop.

Is it possible for Dell fixing the hinge under warranty? Most likely not. Here’s what Dell Laptop Hinge Policy says about it:
Because a hinge is under the “normal wear and tear” policy, it is not covered by the default Limited Hardware warranty nor the Accidental Damage/Complete Care warranty. You will need to pay for the hinge repair using our “Support Service for Expired Warranties” offering.
Moukthika
So how much would this cost to get it fixed by a professional. Because this is exactly what happened to my laptop.its the same model.
Srikanth
Same here,for me also same problem
Please tell me how much cost of it to replace bottom pannel
Saban
Same problem happened to me, the worst Dell Inspiron case is this one at series 7000, in my case 7559, 15″ Inspiron, experienced same problem, and have to buy bottom case, and upper case – palmrest, as both damaged by this hinge problem! Nobody suggest to buy this laptop! This is same by Dell!
Dell 7559 User
Same issue here. Very poor design
john
My hinge was broken because screws were loose ! i advise to tighten everything and try that before trying this out
Mike Walsh
You can see where Dell have been ‘cost-cutting’ over the years. I have a 2002 Inspiron 1100, which I’ve had apart several times over the years for cleaning/TIM replacement/general maintenance.
In those days, not only were the hinges themselves made of metal, and tightened with Nyloc nuts, but the hinges attached to a metal sub-frame that was firmly anchored into the bottom case.
She’s a heavy old beast (especially that 21.6V battery pack – ‘desktop’ Pentium 4 here!), but built like a brick outhouse…..and definitely designed to last.
NJTECH
You guys are being too kind, its a crap design, and they knew it. This should never happen this late in the game, as Dell has had this same defect years ago. As an engineer, I can’t see how this made it off the design screen. One DIY solution I did was drill those plastic posts all the way through out the bottom. Then, secure the two hinges with small nuts and bolts and a small metal plate under the nuts on the bottom. Its a shame because its an otherwise decent laptop.
Ajaxn
I’d say just by looking at those photos, a couple of M3 * 35 mm screws should fix the hinge.
Use a power drill with a 2mm bit to drill all the way through the case, you can even leave the worn brass from its in place to guide the drill bit. Follow up with a 3mm bit. Then replace the original screws, with the new screws and secure on the other side with the corresponding M3 nuts.
You can find these M3 screws with nuts and washers on eBay.
Ajaxn
Quick follow up . Looking again at the photos above. The marking on the hinges has the holes labels as M2 x 5 which of course means M2 diameter screws 5 mm long.
If your keeping the worn brass gromits then you’ll want the same M2 diameter. As for how long, that depends on the depth to exterior of the case plus the nut and the washers. If the screws you buy are too long, you can cut with pliers and file down to the right size. Better to get too long than too short.
Kevin
Great website! This issue plagued my 7559 and the plastic guards for the cooling fins also started breaking off so the fins are now susceptible to damage.
It would be really helpful if you had a section on the site with some “best” and “worst” laptop chassis designs in your experience if any standout as particularly great or inherently flawed.
I’m considering upgrading to a Dell G5/G7. Is the chassis quality and durability a big improvement over the 7559 or should I look elsewhere for a durable gaming laptop?
IML Tech
Kevin, I’m replacing cracked LCD screen on a Dell G7-7590 as I type this message. I don’t have much experience with this model but it feels like a well built solid machine.
Albert Quist
I own a Dell XPS 15 too. Due to a swollen battery (If you, like me, never heard about that, Google it) the left hinge was torn loose. I really needed the laptop, so ordering a and receiving a replacement palmrest and swapping everything was probematic. Also my eyes are getting week.
I bought a product called Quiksteel Steel Repair. I did some tests. It appeared strong enough and viscosity was OK. Little problem: Gluing has to be done within 4 minutes.
Important:
1. Roughen up the surfaces. I used a Dremel and a little mill and a rotating steel brush.
2. Degrease both surfaces well.
3. I disassembled the hinge, and glued the non-screen half. Placement has to be done very precisely. Mine was about 0,1 mm off, which made it a bit hard to assemble.
It’s been a week now. Opening and closing goes smoothly. And the glue holds.
Rhys
You can get away without having to replace the base (and they’re rarer than hen’s teeth already ..)
I stripped mine down, as per you other post: https://www.insidemylaptop.com/fixing-left-hinge-separation-on-dell-inspiron-15-7000/
Then I simply hot glued both hinges back in. I have no reason to strip it down past this point or remove the screen. It’s 4 years old (at 2022), if something else breaks then I will likely consider replacement based on performance or carry out the minor repair.
To carry out:
Build the hot glue up in the area the metal hinge lays flat against, around and inside the anchoring points – then put the hinges in place, apply firm pressure and hold tight until set (approx 4/5 mins). Let it sit with the screen angled slightly closed to keep pressure on the hinge while it cures fully for 15-20 mins. **NB**: If you need to open the lid, place one thumb on each hinge and open with your forehead – it feels awkward but you need to be careful not to break the base, it’s pretty flexible when not bolted to the other panels.