Today I show how to disassemble Toshiba Satellite L55 L55D L50 L50D laptops. In this particular case I’m taking apart Satellite L55-B5267 model.
This guide will work for the following Toshiba Satellite models and configurations: L55-B5201SL, L55-B5237, L55-B5254, L55-B5255, L55-B5267, L55-B5267RM, L55-B5267SM, L55-B5267WM, L55-B5269SM, L55-B5270SM.
STEP 1.
Remove two screws (green circles) securing the battery. Pull the battery out.
Remove one screw (yellow circle) securing the optical CD DVD drive.
Remove all other screws securing the bottom case.
Replacement battery type PA5185U-1BRS.

STEP 2.
Pull the optical CD DVD drive out.

STPE 3.
Separate the bottom case from the top case.

STEP 4.
Remove the bottom case.
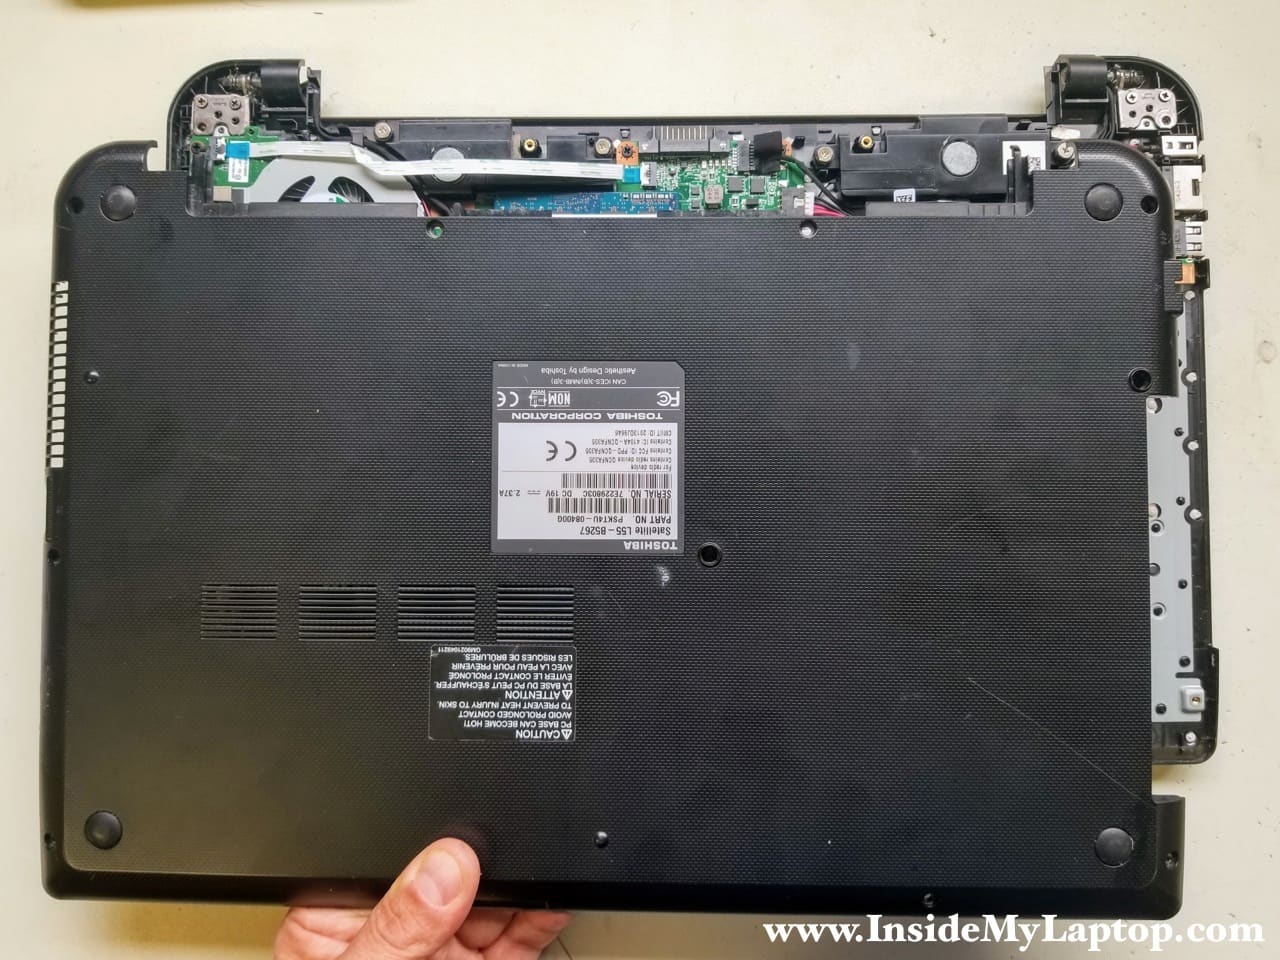
Now you can access all internal laptop components. Let’s remove them one by one.
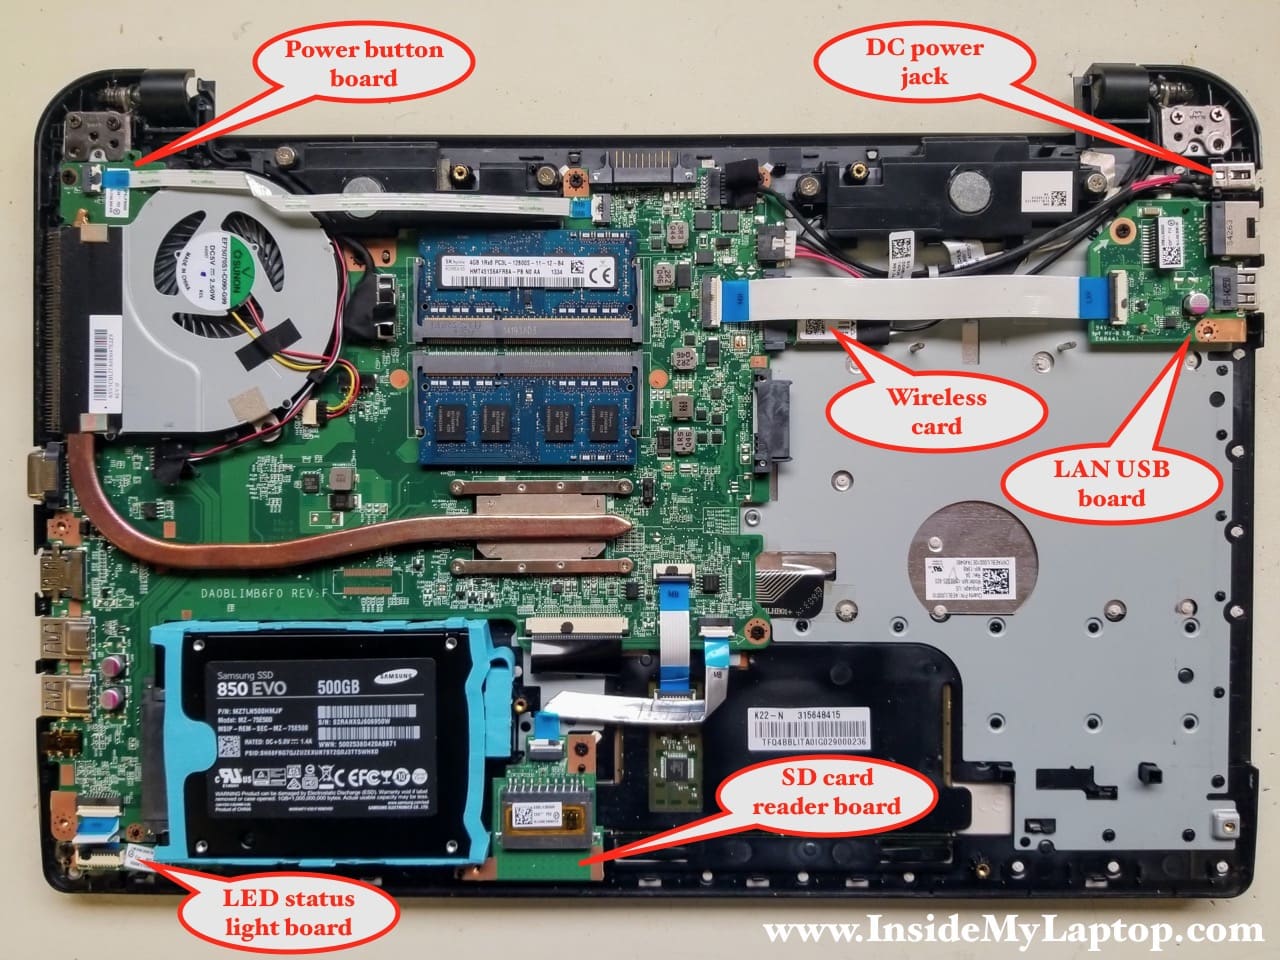
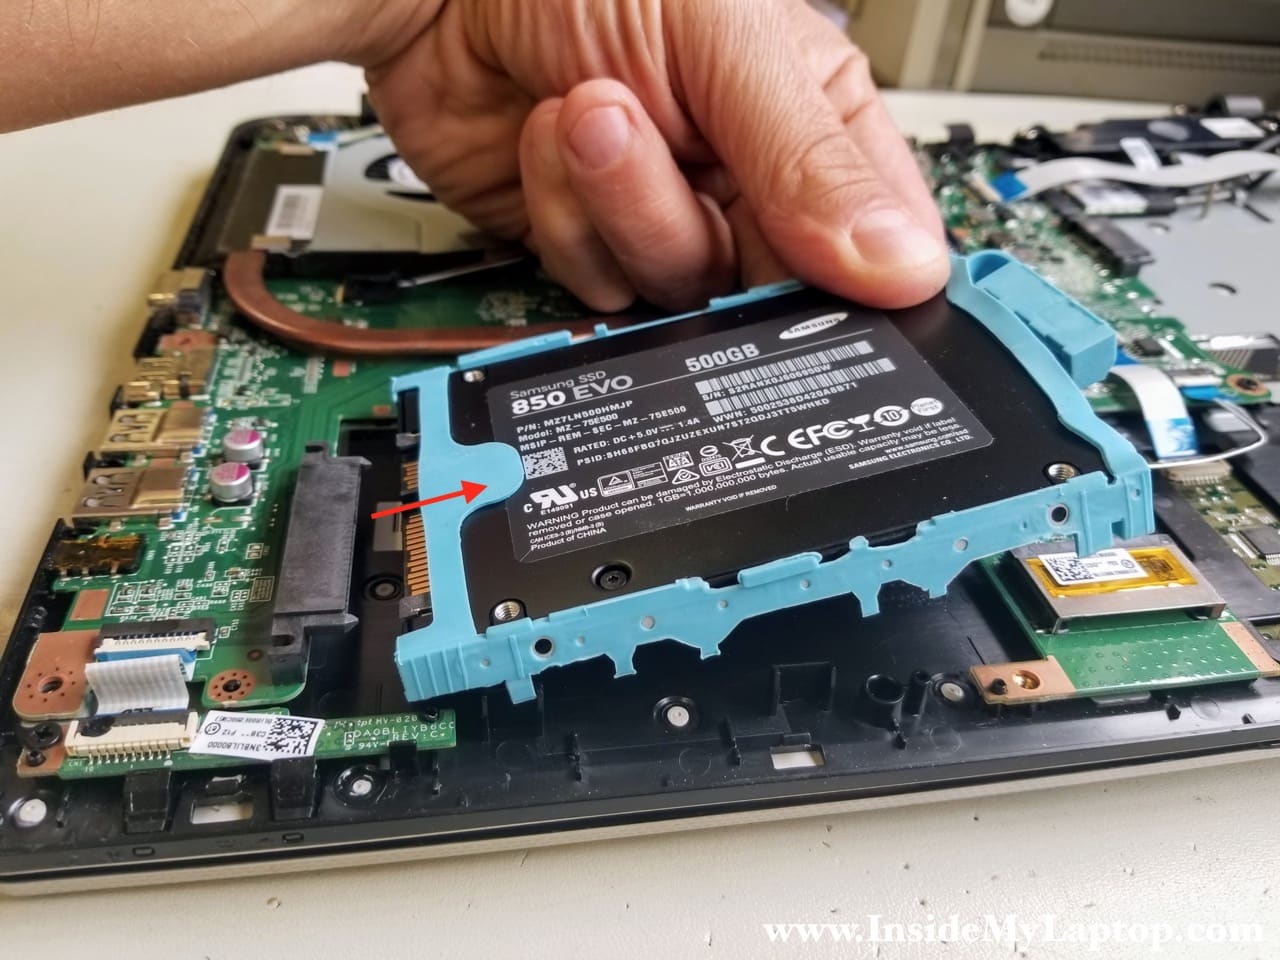
STEP 5.
Lift up the back side of the hard drive and disconnect it from the motherboard. This particular laptop has an aftermarket 500GB Samsung SSD installed.
I recommend upgrading to a 2.5″ SATA solid state drive to improve laptop performance.
STEP 5.
Toshiba Satellite L55 L55D L50 L50D motherboard has two removable memory modules.
Remove both RAM modules if necessary.
You can install up to 16GB (8GBx2) DDR3-12800 SODIMM module into these slot.

STEP 6.
Remove one screw securing the USB LAN board and disconnect the flat cable from the motherboard.
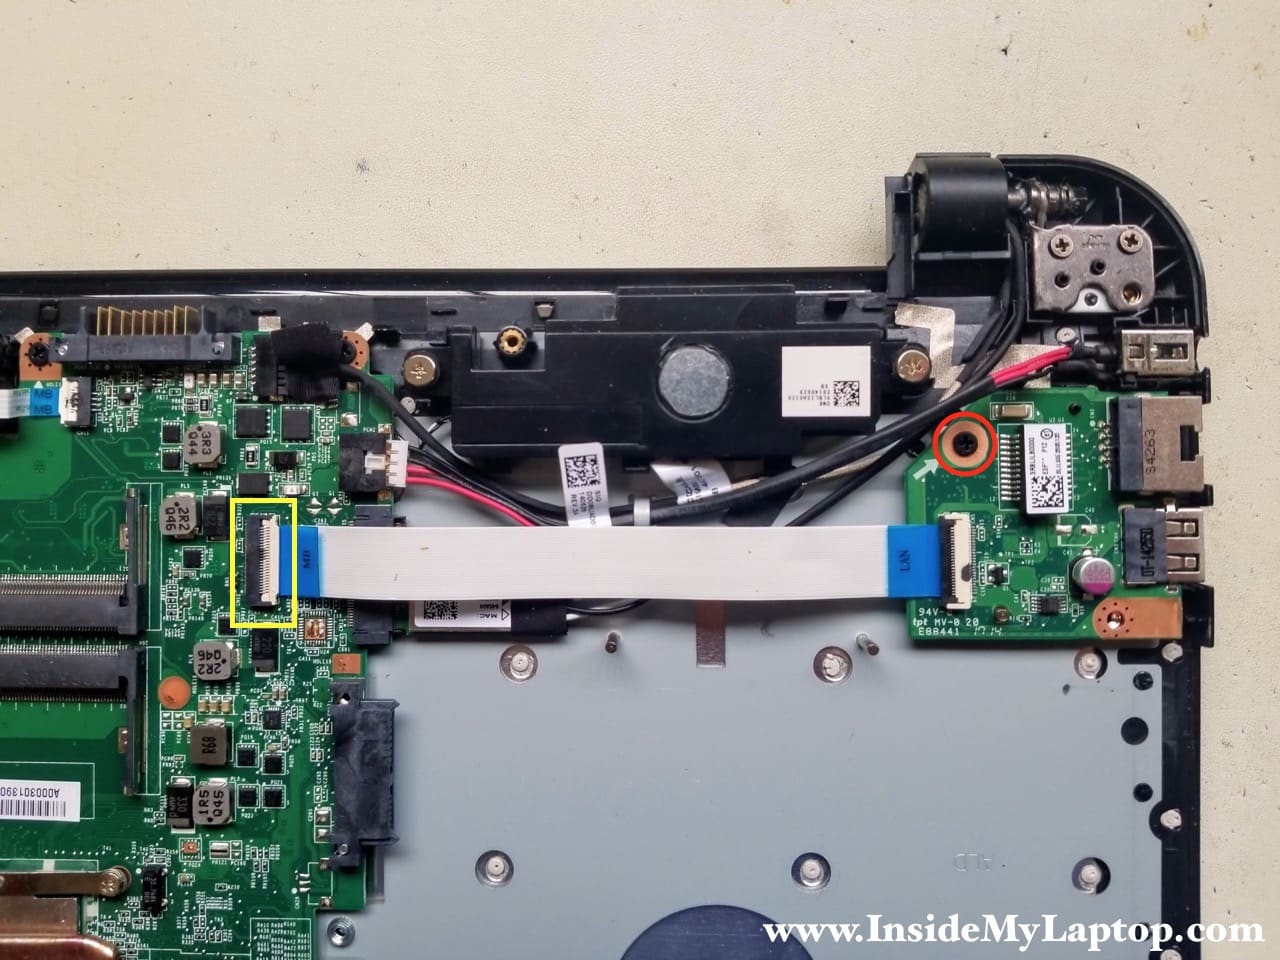
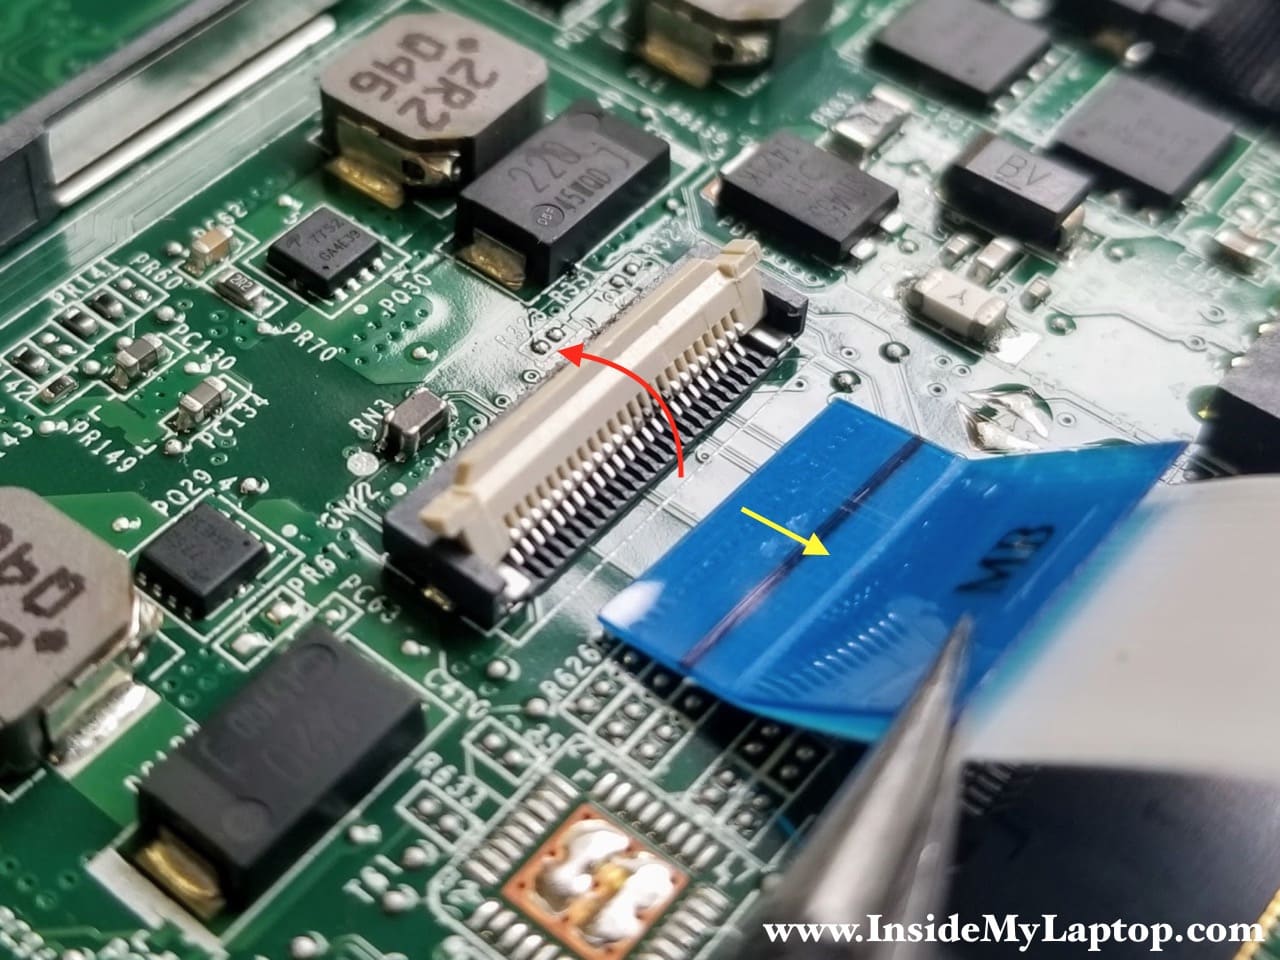
Here’s how to release the cable.
- Unlock the connector by lifting up the locking tab. It will open up at a 90 degree angle.
- Pull the cable out of the connector.
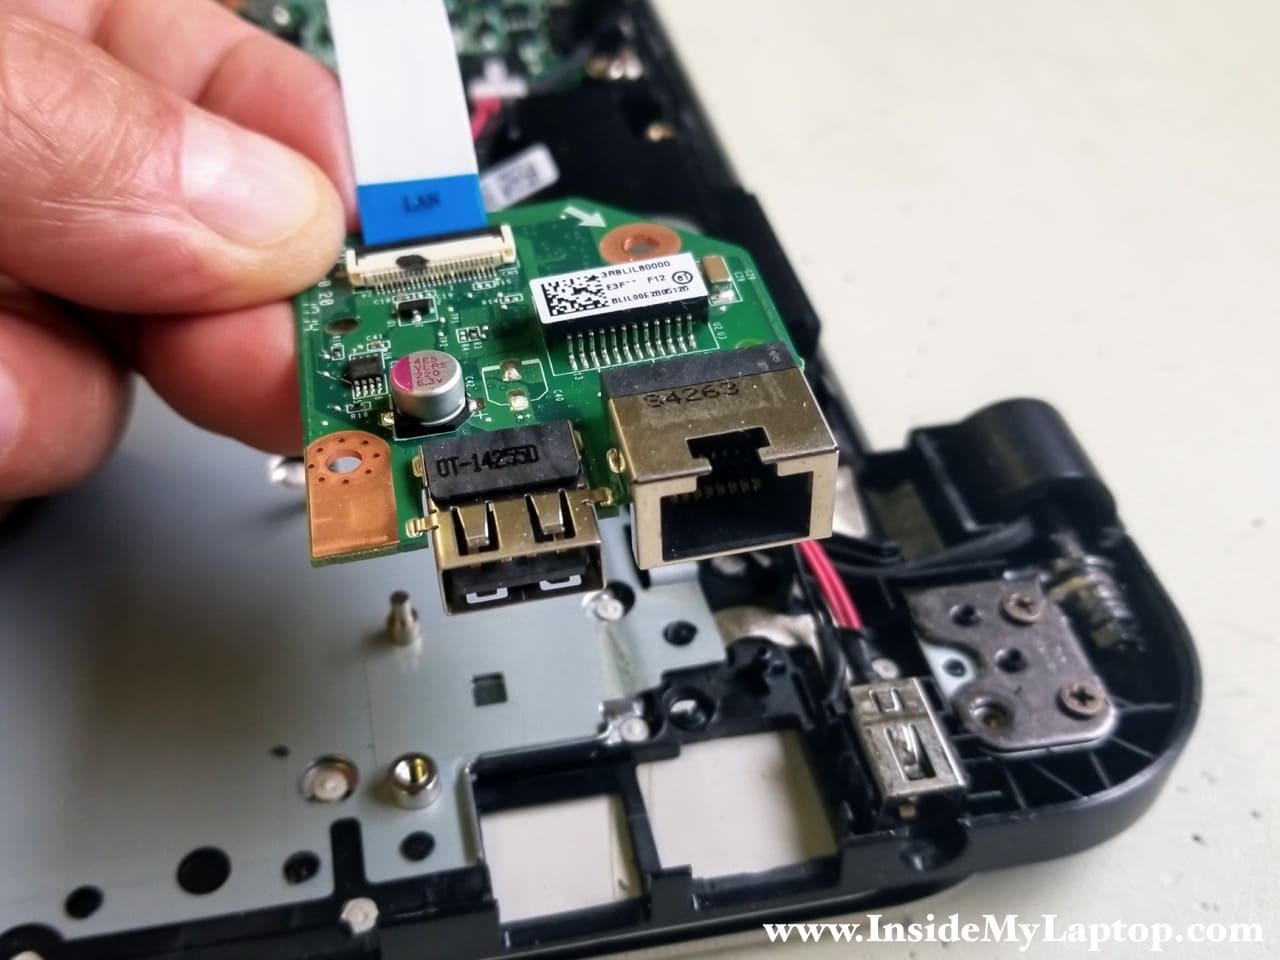
STEP 7.
Remove the USB LAN board with the cable.
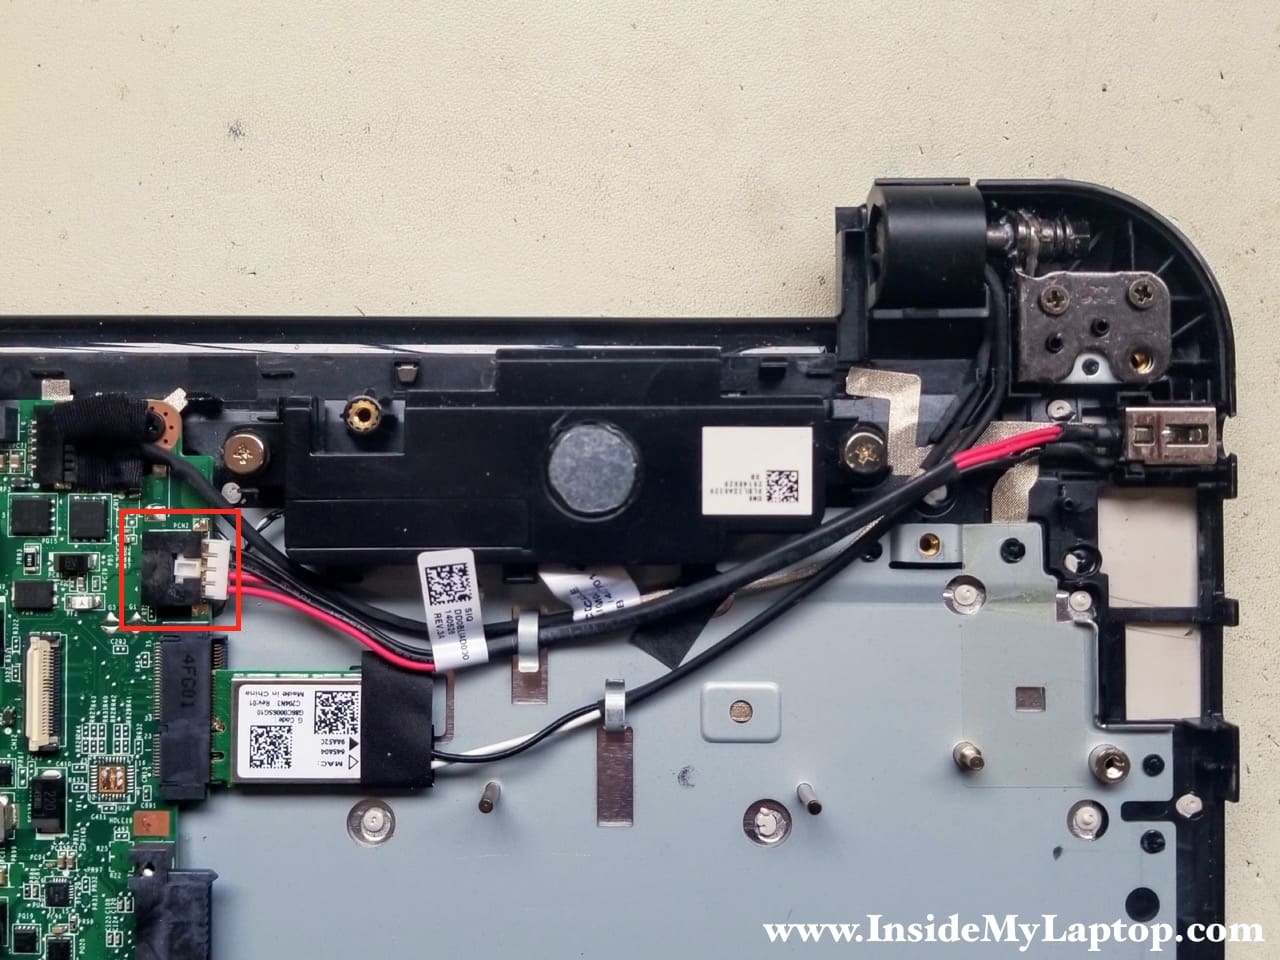
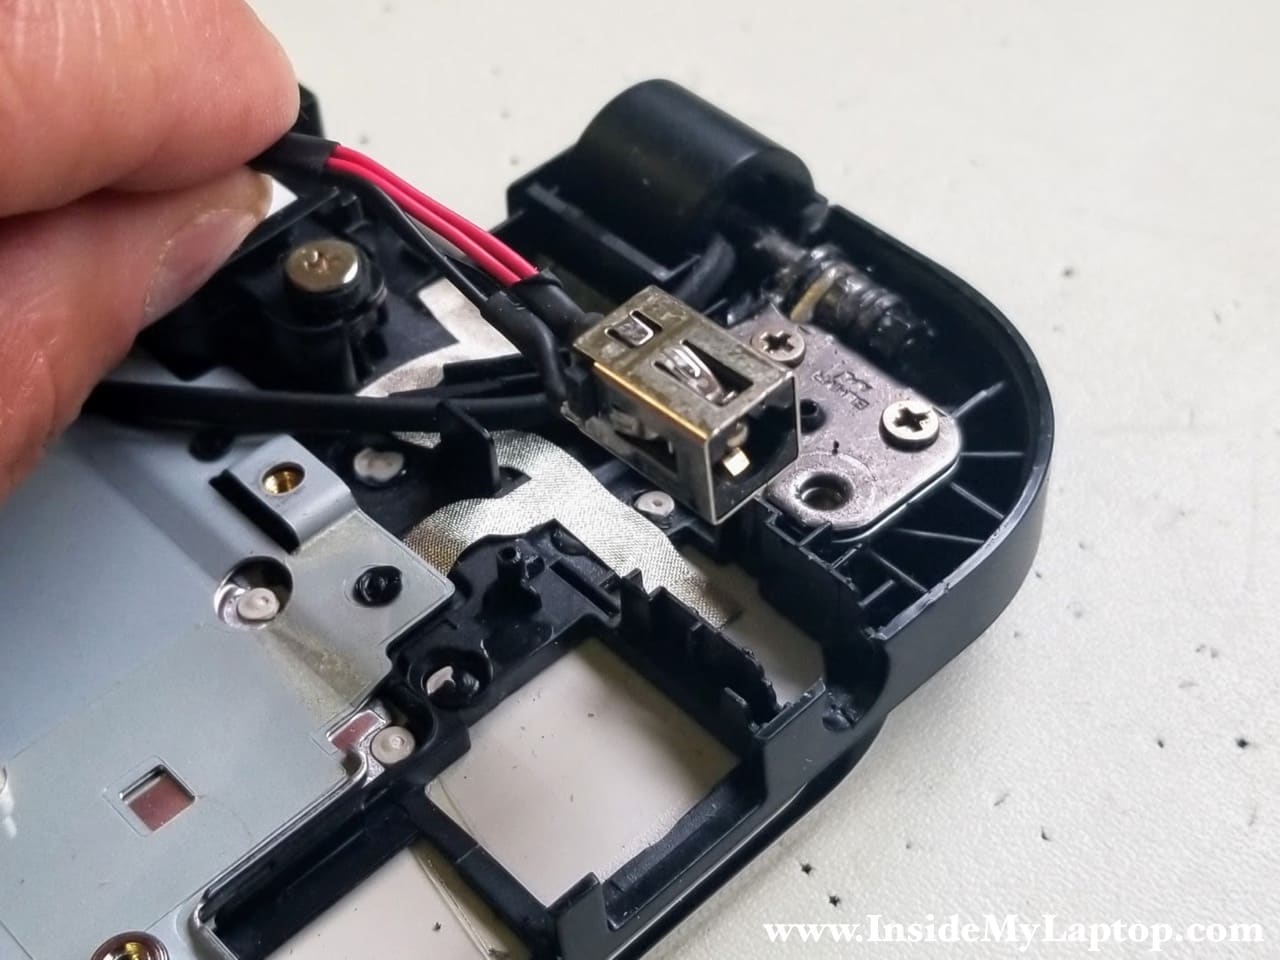
STEP 8.
Disconnect the DC power jack cable from the motherboard and un-route the cable from the top case.
STEP 9.
Lift up the DC power jack from the housing and remove it.
STEP 10.
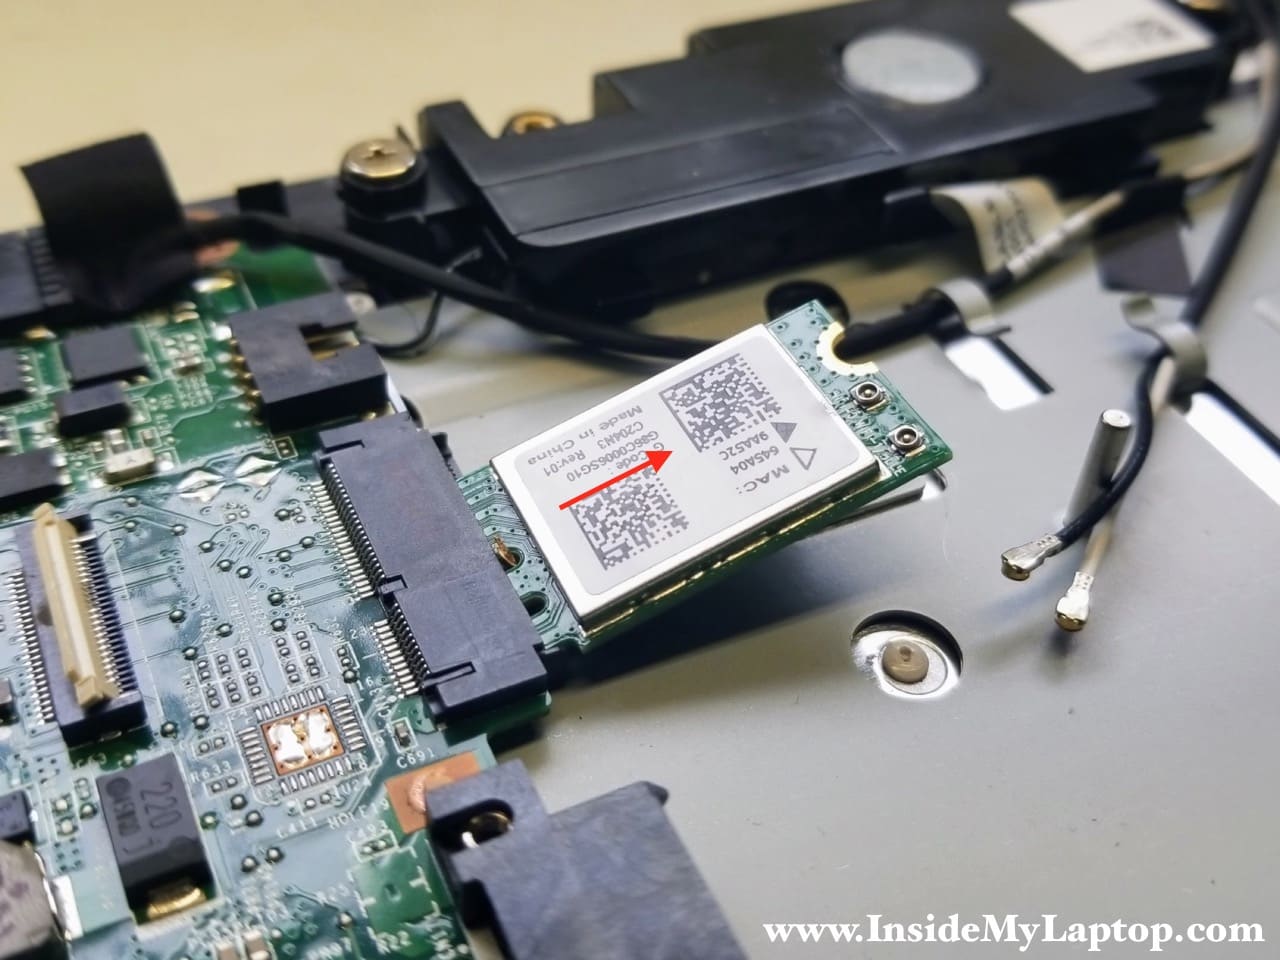
Disconnect both wireless antennas from the wireless card.

STEP 11.
After you remove one screw fastening the wireless card to the case, it will pop up at a 25 degree angle.
Pull the card out of the slot.
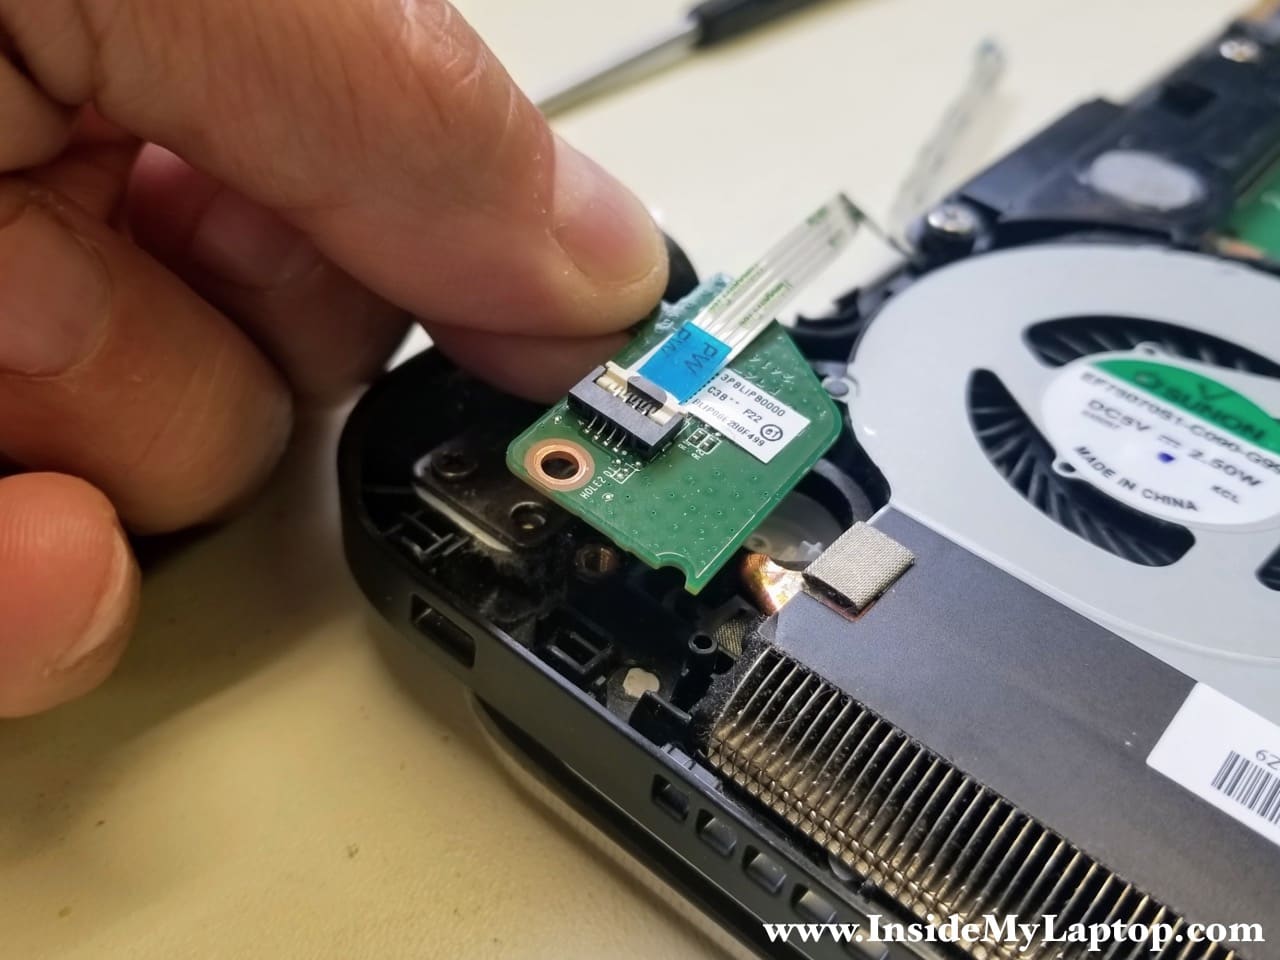
STEP 12.
Remove one screw from the power button board and disconnect the cable.

STEP 13.
Remove the power button board with the cable.
STEP 14.
Disconnect the speaker cable and un-route it from the fan housing.
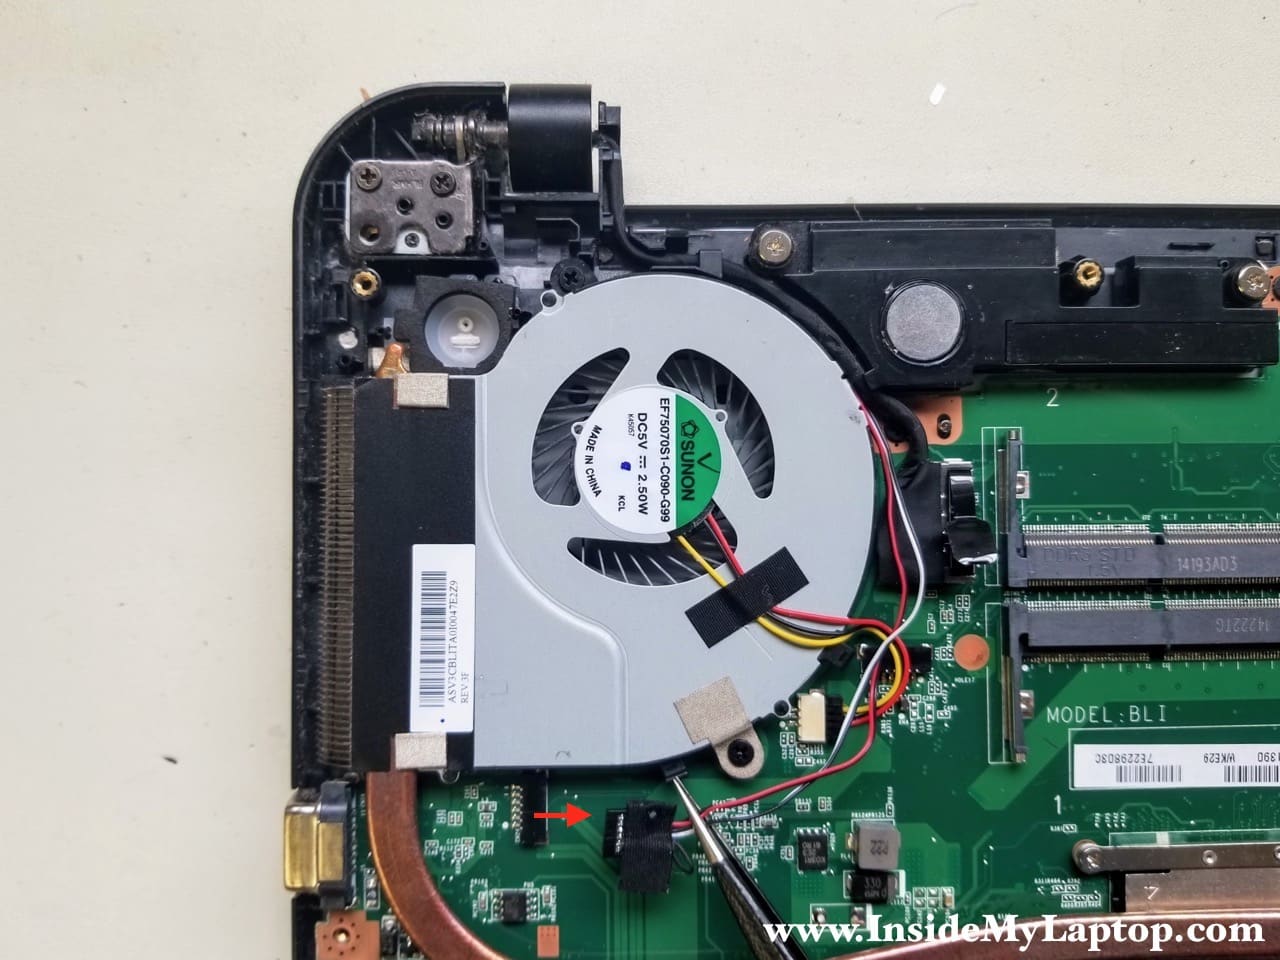
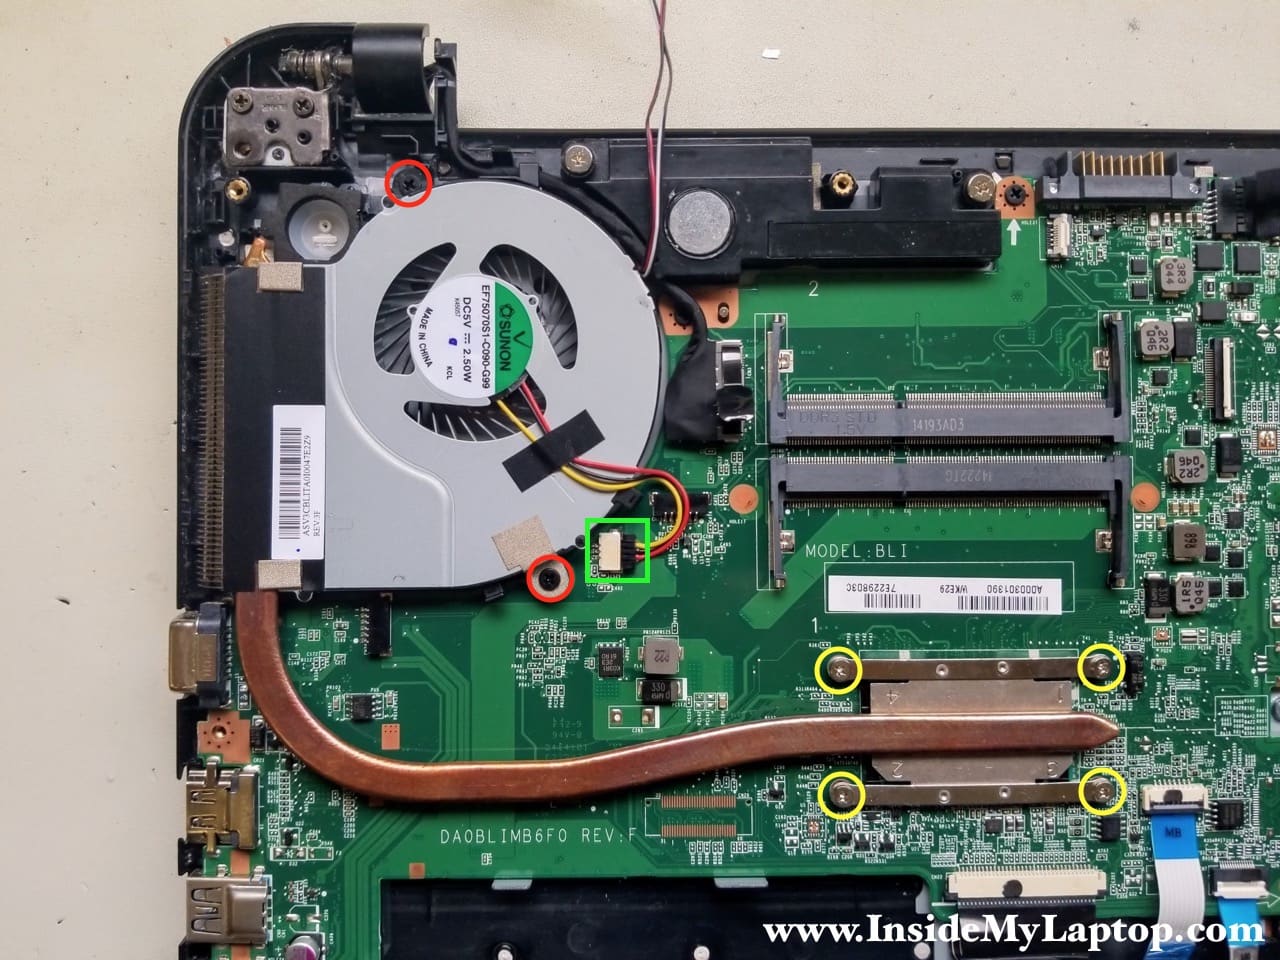
STEP 15.
Remove two screws attaching the fan.
Loosen four screws fastening the heatsink to the motherboard.
STEP 16.
Remove the cooling module.
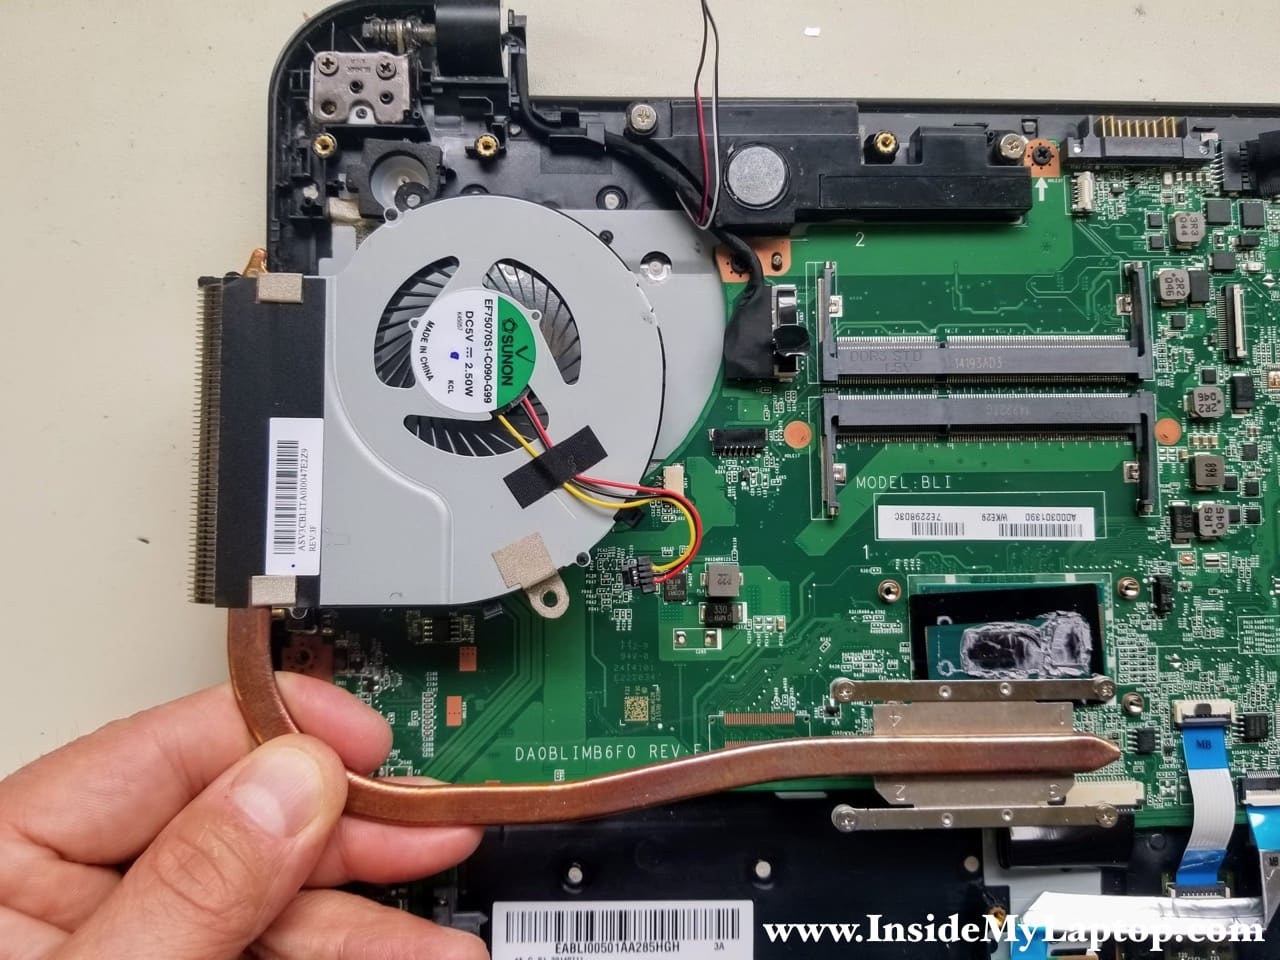
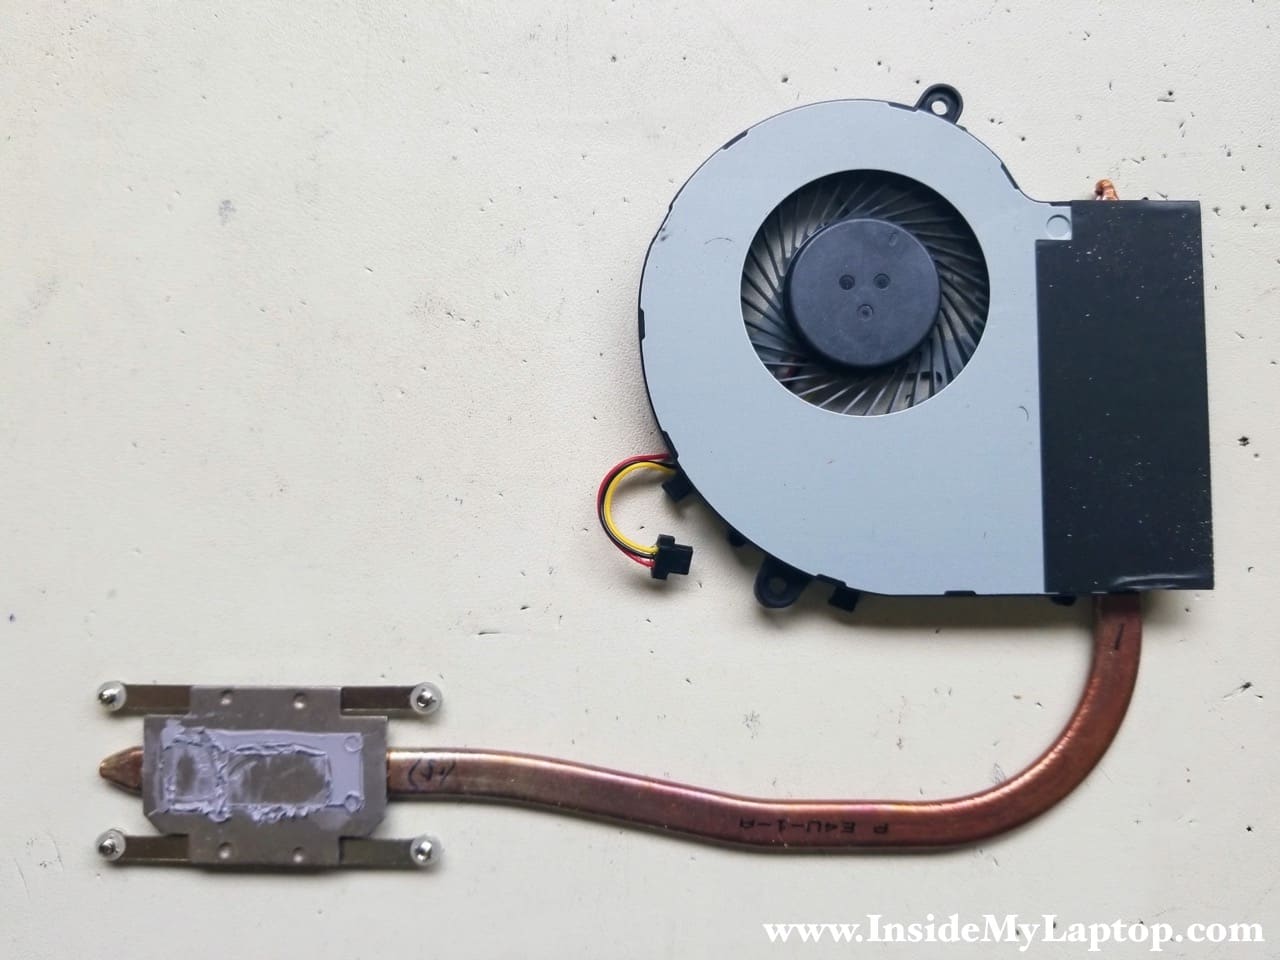
The cooling fan is attached to the heatsink.
If thermal grease on the heatsink dried up, you will have to replace it. If thermal grease looks fresh and still soft, you can reuse it.
STEP 17.
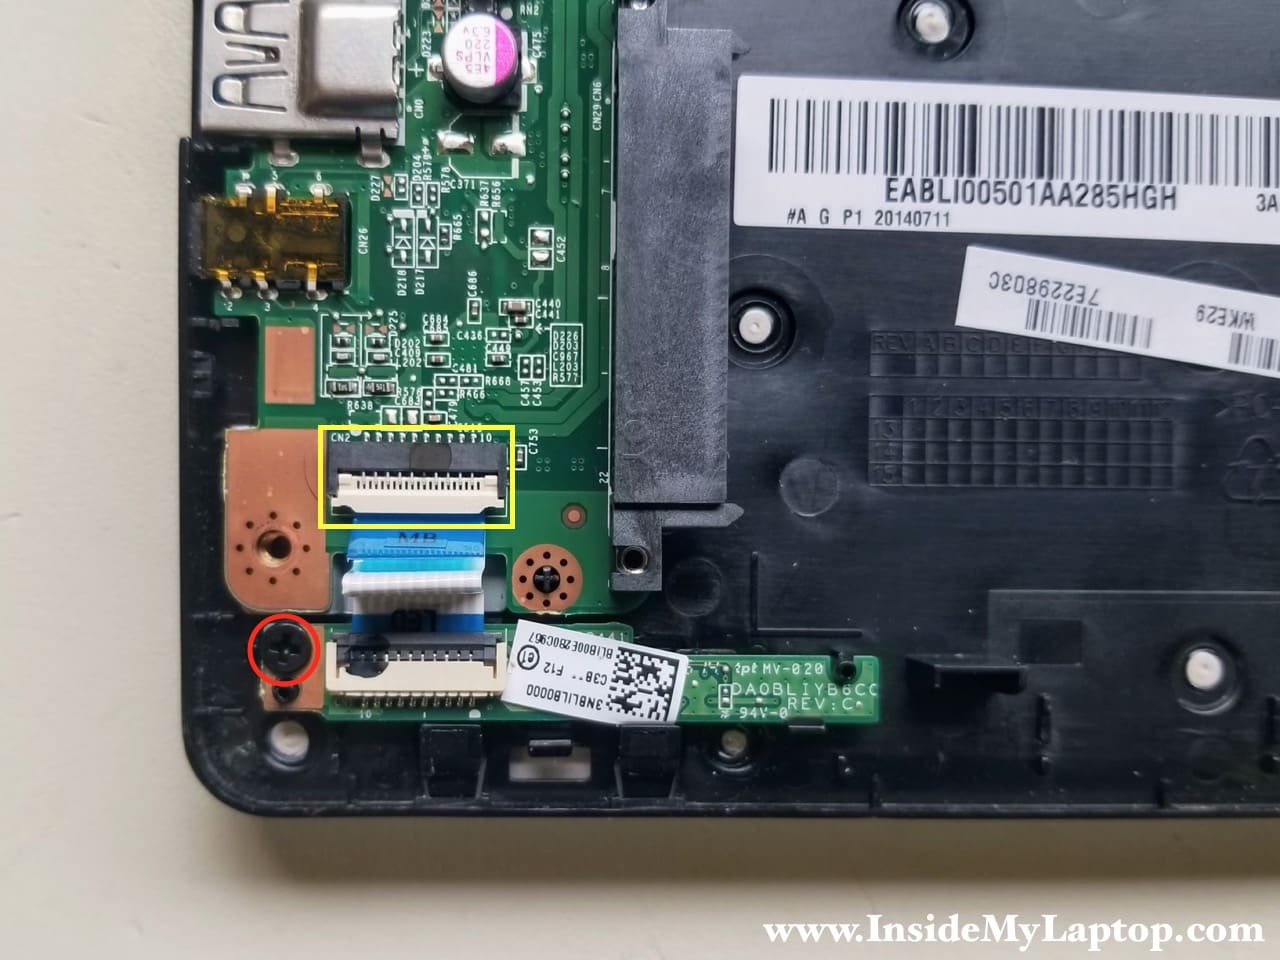
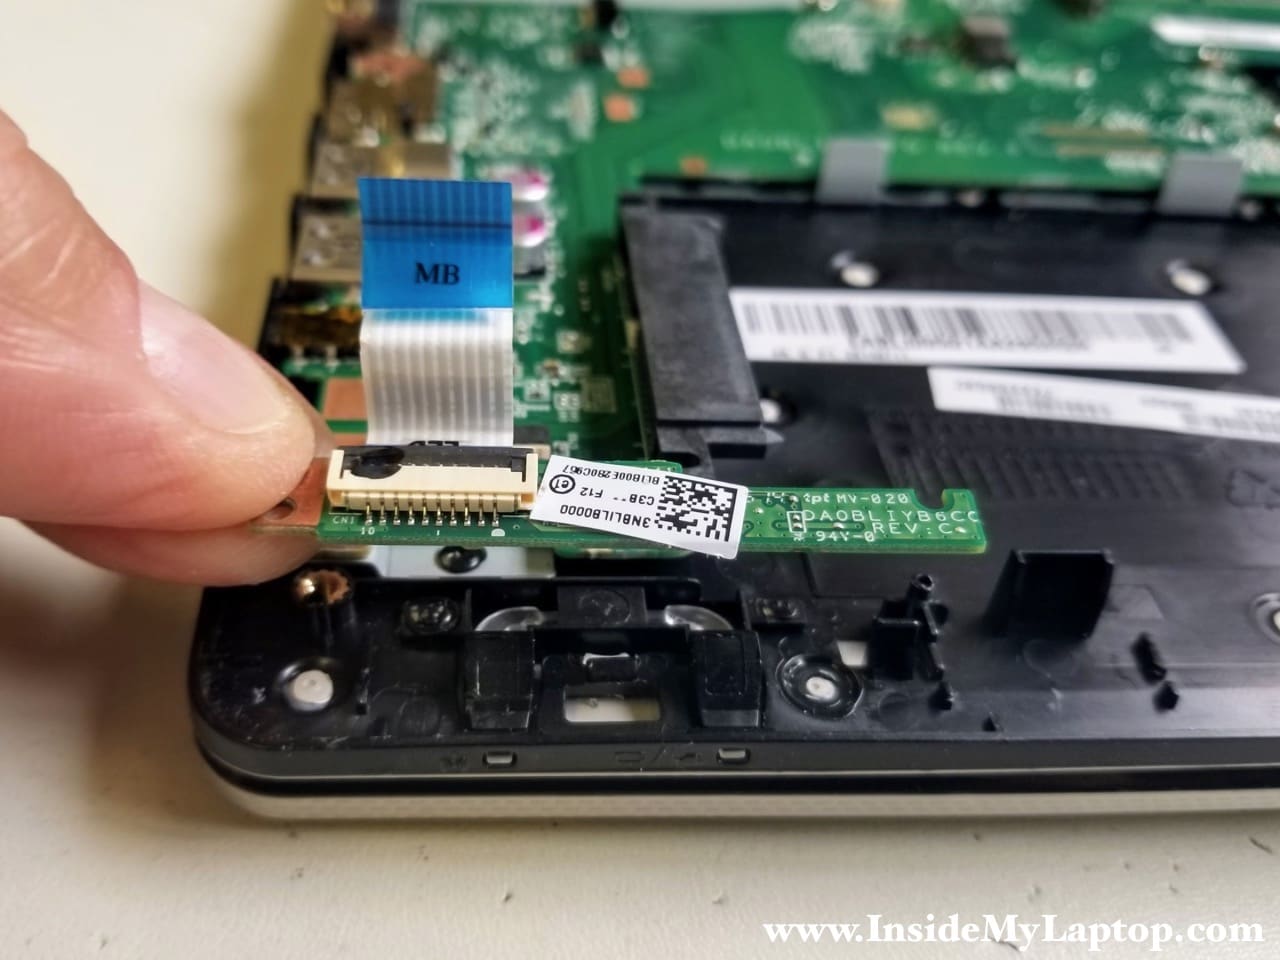
Remove one screw from the SD card reader board and disconnect the cable.

STEP 18.
Lift up and remove the SD card reader board with the cable.

STEP 19.
Remove one screw from the LED status light board and disconnect the cable.
STEP 20.
Remove the LED status light board with the cable.
STEP 21.
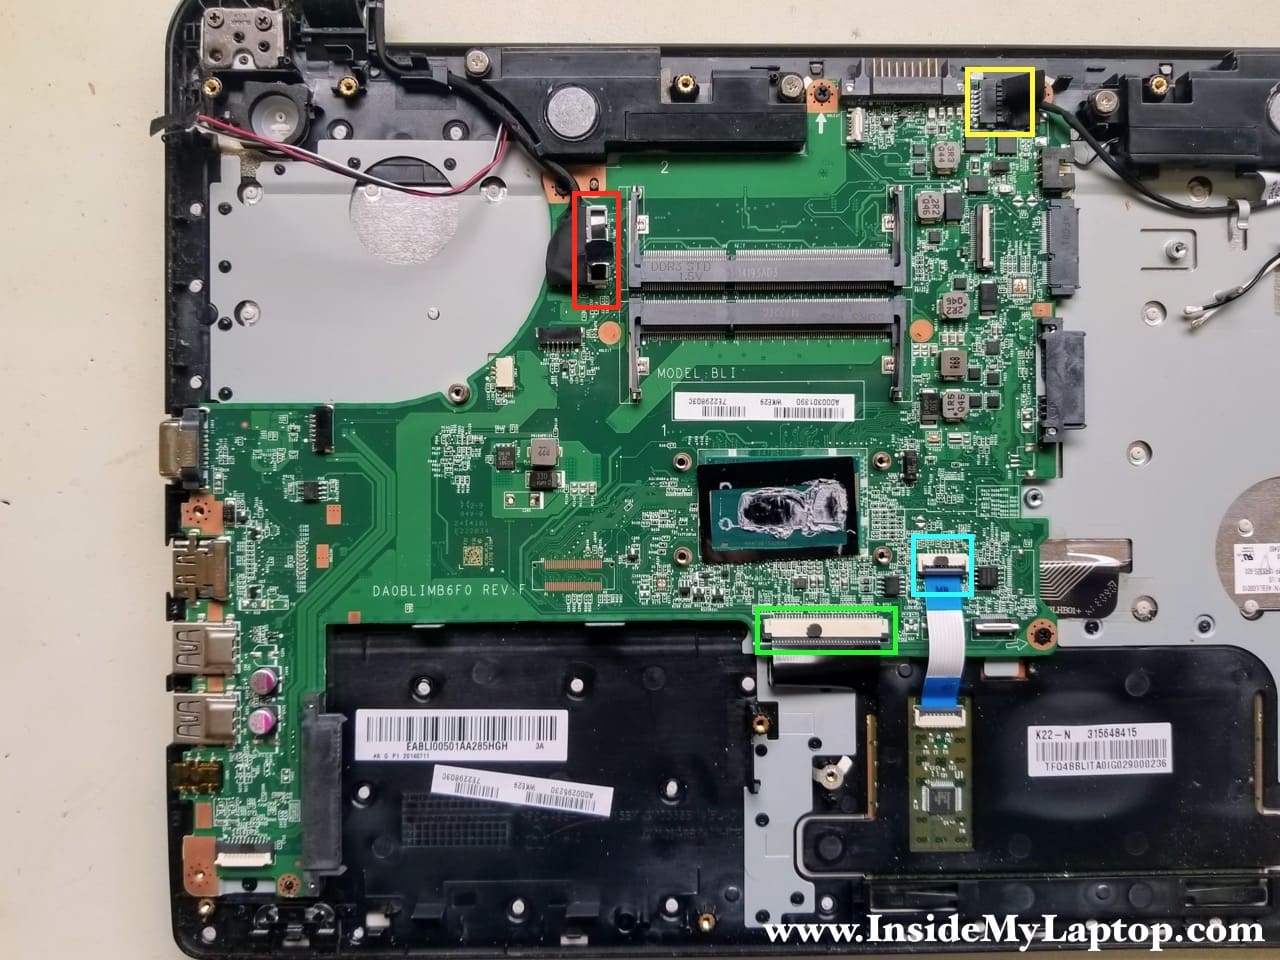
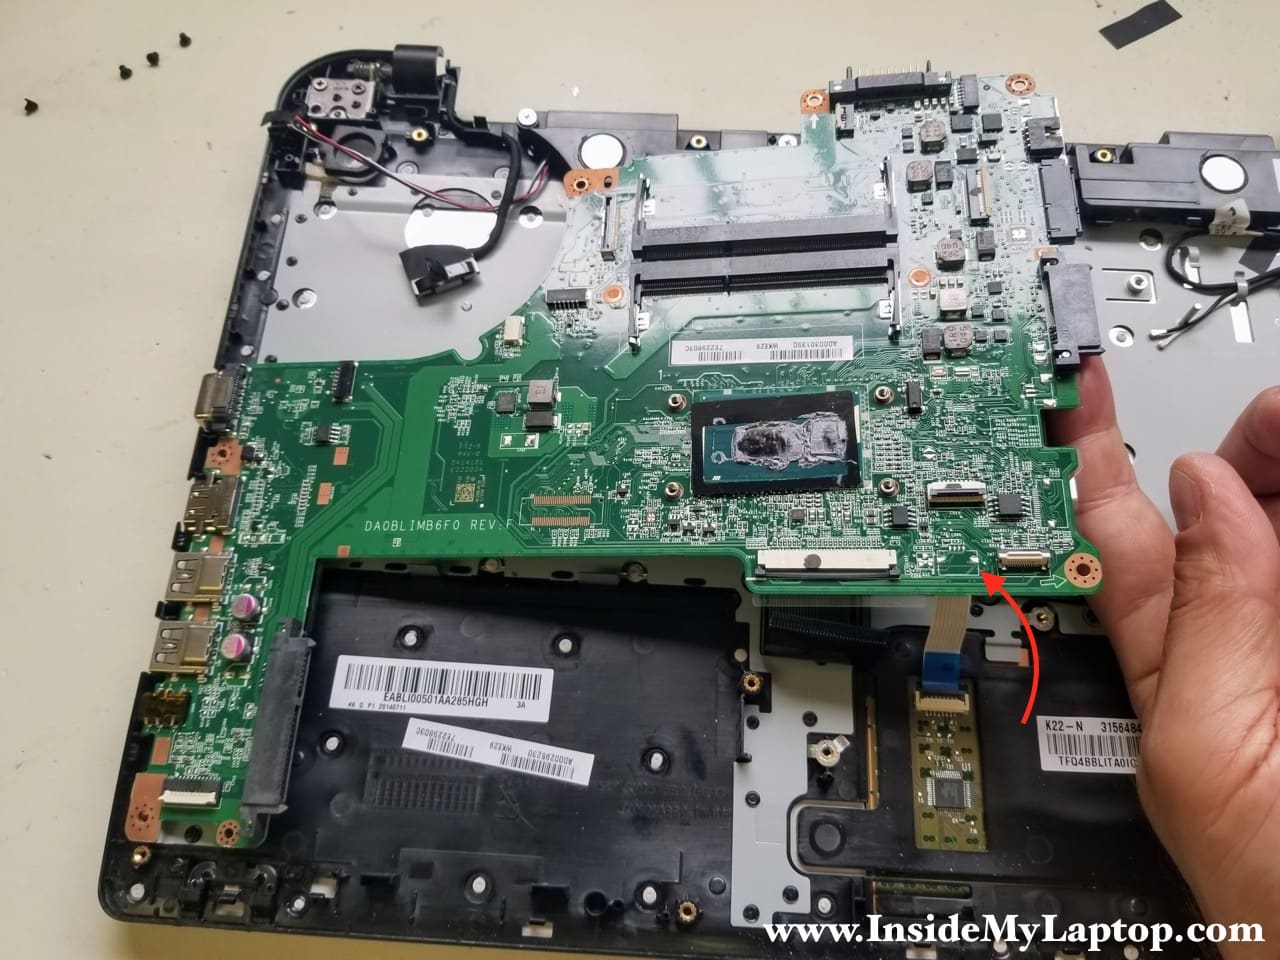
Disconnect the following cables from the motherboard:
- LCD screen video cable (red rectangular)
- Web camera cable (yellow square)
- Keyboard cable (green rectangular)
- Touchpad cable (blue square)
If your keyboard has backlight (unlike mine), you will have to disconnect the backlight cable too.
Here’s how to release the keyboard cable.
- Slide the locking tab about 2 millimeters to the shown direction (two red arrows)
- Pull the cable out of the connector.
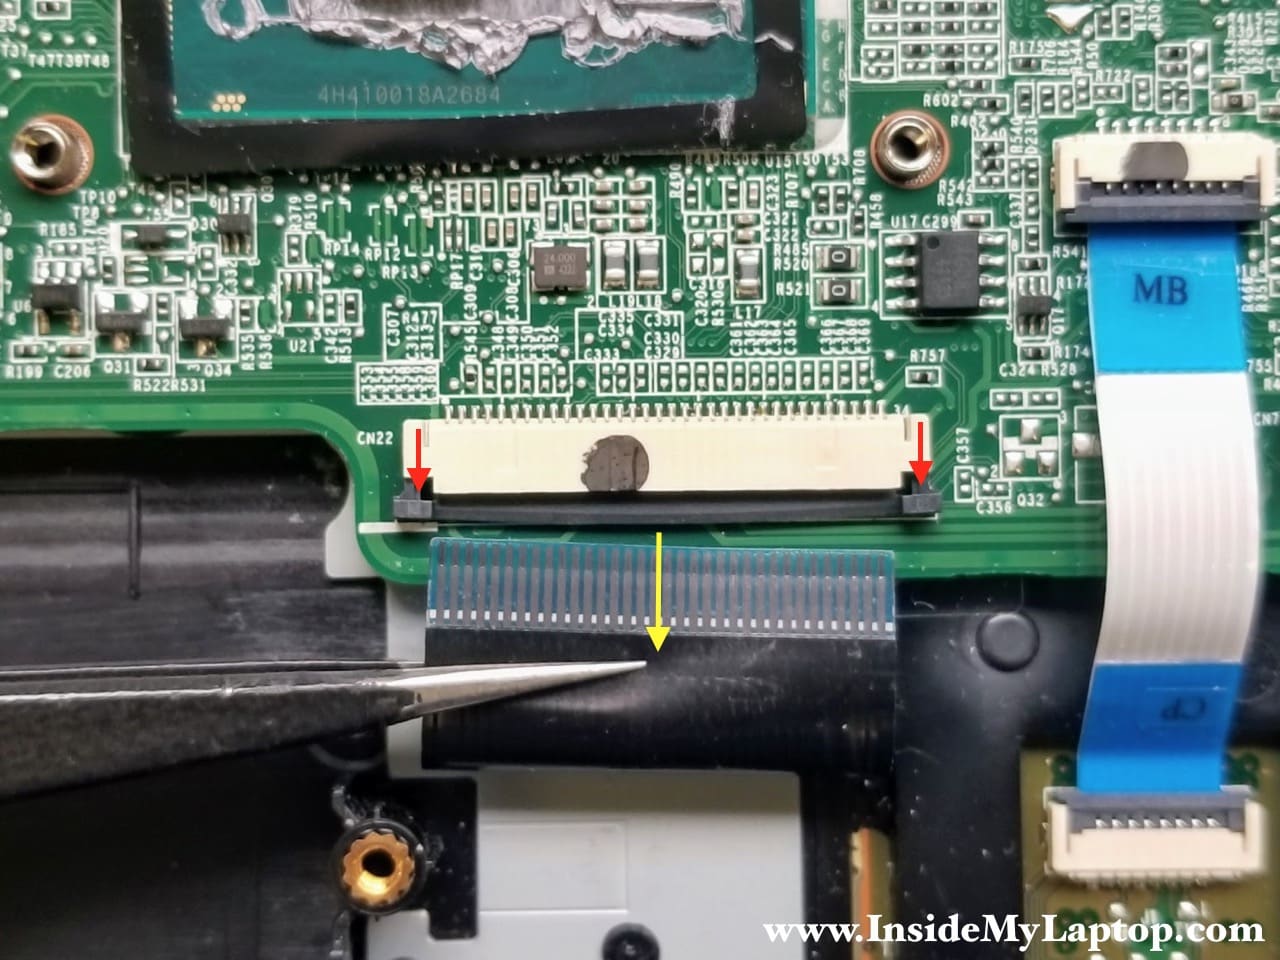
In order to disconnect the LCD video cable you pull up the connector using the black tab on the top.

STEP 22.
Remove four screws fastening the motherboard to the top case.
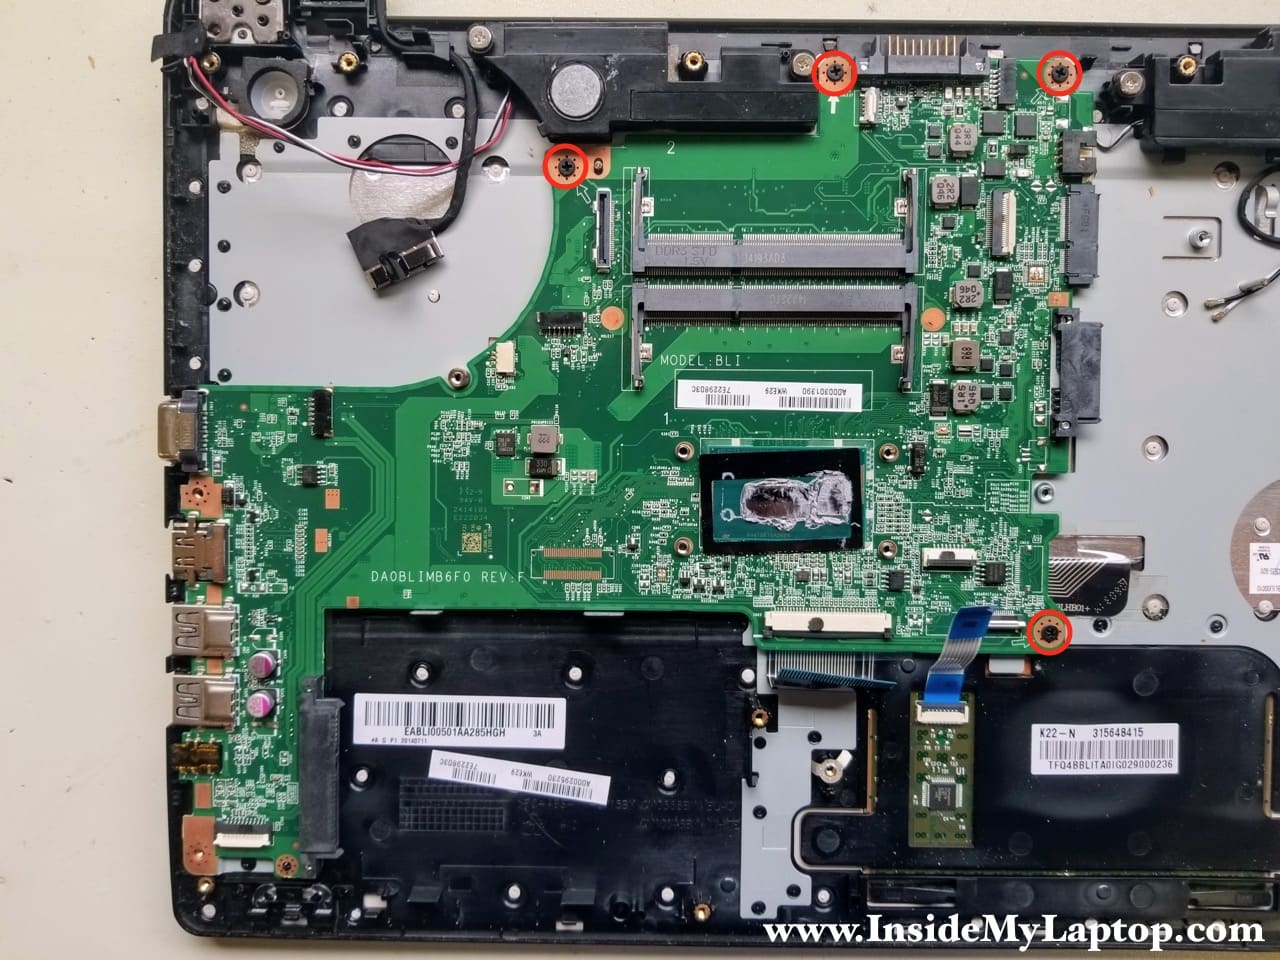
STEP 23.
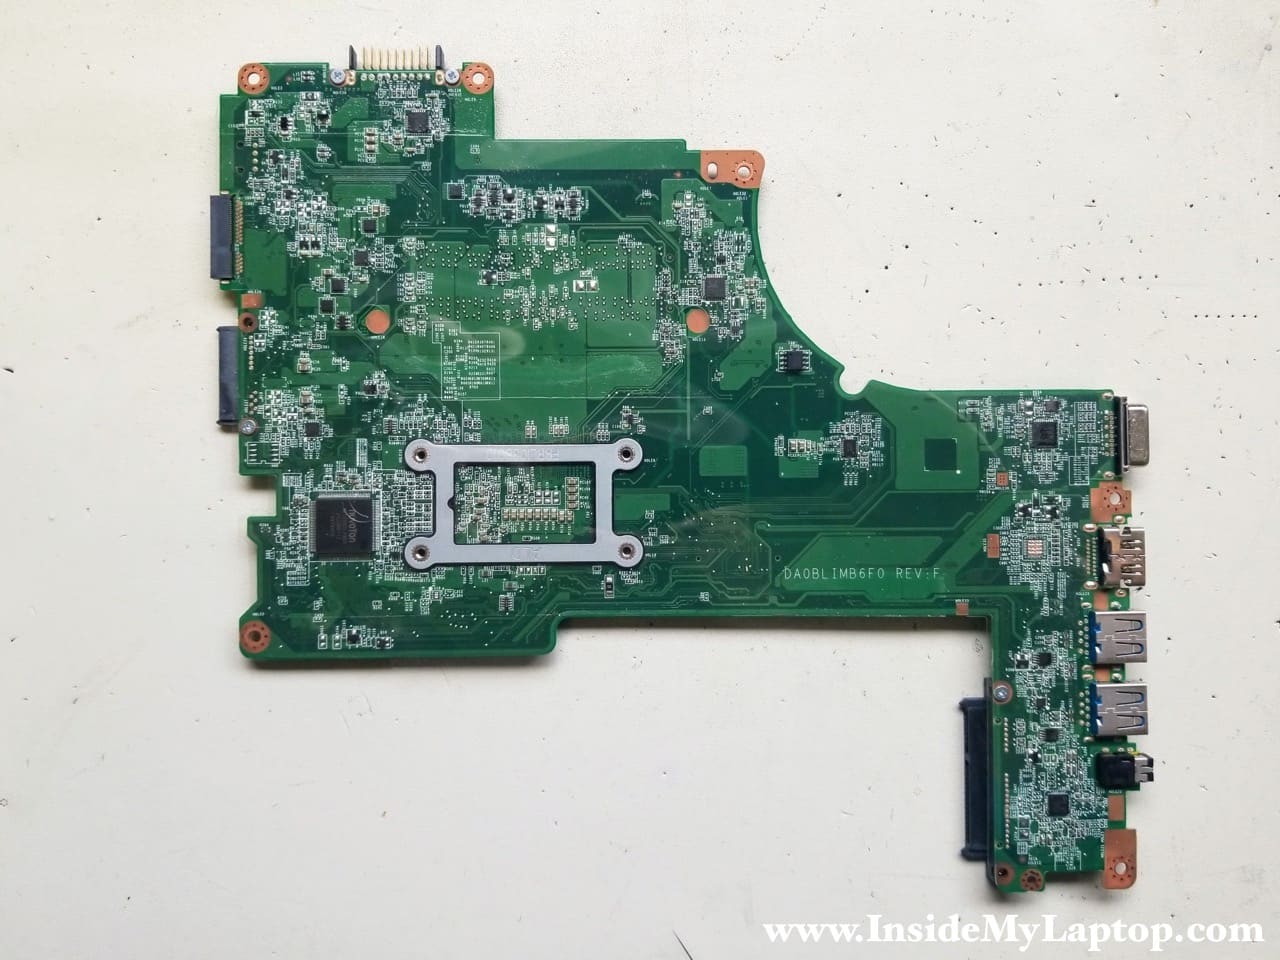
Separate the motherboard from the top case assembly and remove it.
Here’s the other side of the motherboard.
These Toshiba Satellite laptops have the keyboard and touchpad permanently attached to the top case.
The metal plate that holds the keyboard and touchpad in place is riveted to the case and it’s not easy replacing the keyboard without replacing the top case.

mothcollector
Dose not show how to replace keyboard.
IML Tech
@ mothcollector,
The keyboard is part of the top case. In order to replace the keyboard you will have to separate the metal plate which is riveted to the top case. Is it doable? Yes. Is it easy? Probably not.
Mariano
Where´s the batteru 2032 on the motherboard?
Robert
Hello,
Thank you for the effort that you put into this.
My model is a Satellite L55-B5276. It keeps losing the time and date in the BIOS. I cannot locate a CMOS/RTC battery. Unless I missed it I didn’t see in your photos either. Can you advise?
Thank you for your time,
Robert
IML Tech
@ Robert,
I looked at my pictures very closely and couldn’t find it either. :/
Mark Goodson
Same question here!
Ed
How in the world do you reattach the antenna leads ?? !!!
IML Tech
The wireless card antennas? The antenna cable snaps on the connector.
Align the round cable connector with the round connector on the wireless card. Make sure the first is right above the second. Gently push on the antenna connector until it snaps on the wireless card.
DaN
I have this exact laptopp, I been trying to do Step 8 disconnecting the dc jack (to replace it because the one I have is flimsy). But it seems that the thing is just stuck in there.
Is there some sort of trick to remove it? I’ve tried using finger nail and a small screw putting it in the middle (where the white “hole” is) pushing it outwards but it doesn’t budge.
Tried pulling the wires even but I didn’t want to pull too hard in case the wires fell out of the white containerplug-thing or damage the mortherboard which would make it even more of a hassle.
I’ve tried googling and youtubing but unsucessful so yeah I thought I’d ask you.
IML Tech
There shouldn’t be any trick. I think you should apply some more force to pull the harness out.
DaN
Do you have to unscrew the motherboard in order to get some pull from underneath it perhaps? Sorry if I’m a bit of a newbie
IML Tech
In is not necessary to unscrew the motherboard in order to disconnect the DC jack cable. I’m not sure why you having this issue. If you have EXACTLY the same laptop you should be apple to pull the DC jack cable out and disconnect it.
Javi Vente
Hey on the picture for step 4; those 2 metal plates that are screwed on the corners of the laptop, what are those called? I need to buy a set since my screen is hanging off from one, the other side broke.
IML Tech
Javi Vente, they are called “display hinges”. Take a look here: https://amzn.to/2F8ZdHX
Dave C
I would advise not to remove the wireless antennas from the wifi card. The connectors are really tiny and it is easy to bend one of the pins.
Alan
Is it necessary to remove the whole motherboard to replace / repair USB connections ?
Thanks for your excellent step by step process !
I think my USB ports have just become a bit loose. Maybe drop a bit of soder on the connection to the motherboard ?