
Today I reveal to you a full disassembly guide for MSI GE62 GP62 PE60 gaming laptops and it will be very similar for MSI GE72 series.
All teardown instructions should be the same for many different models and configurations: MS-16J1, MS-16J2, MS-16J3… through MS-16J9.
In the first part of the disassembly guide I explain how to access and remove all internal components from the laptop case and I will show how display hinges fail on these models.
In the second part we’ll move to the display disassembly and screen removal.
Part 1. Taking apart the laptop case.
STEP 1.
Remove one screw fastening the optical CD/DVD drive to the case. Pull the drive out.

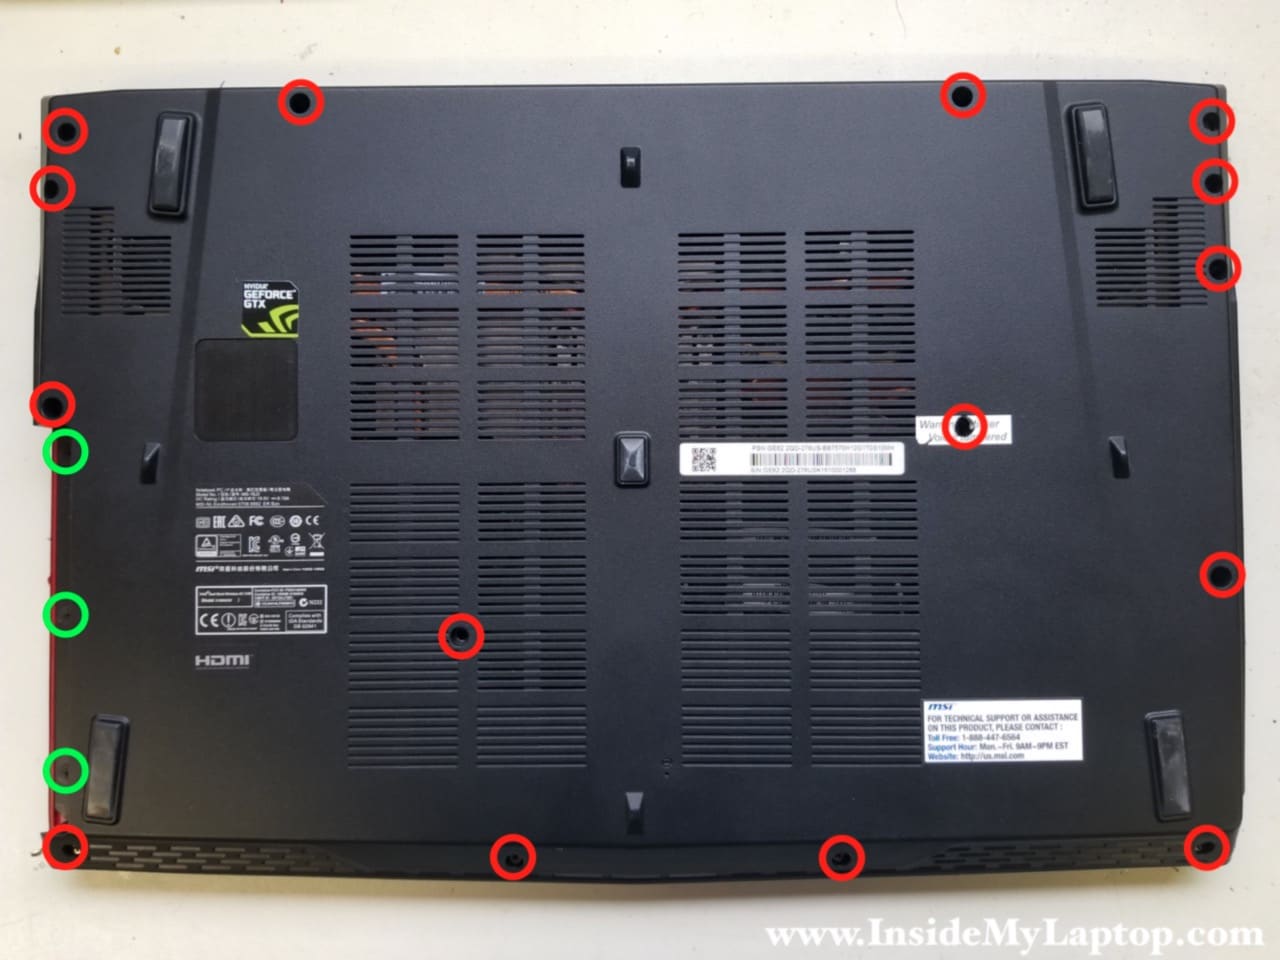
STEP 2.
Remove all screws from the bottom case. Don’t forget about three screws (green circles) located in the optical drive bay.
STEP 3.
Carefully separate the bottom case from the top case starting from the optical drive area. You can use a plastic opener tool to pry open the case.

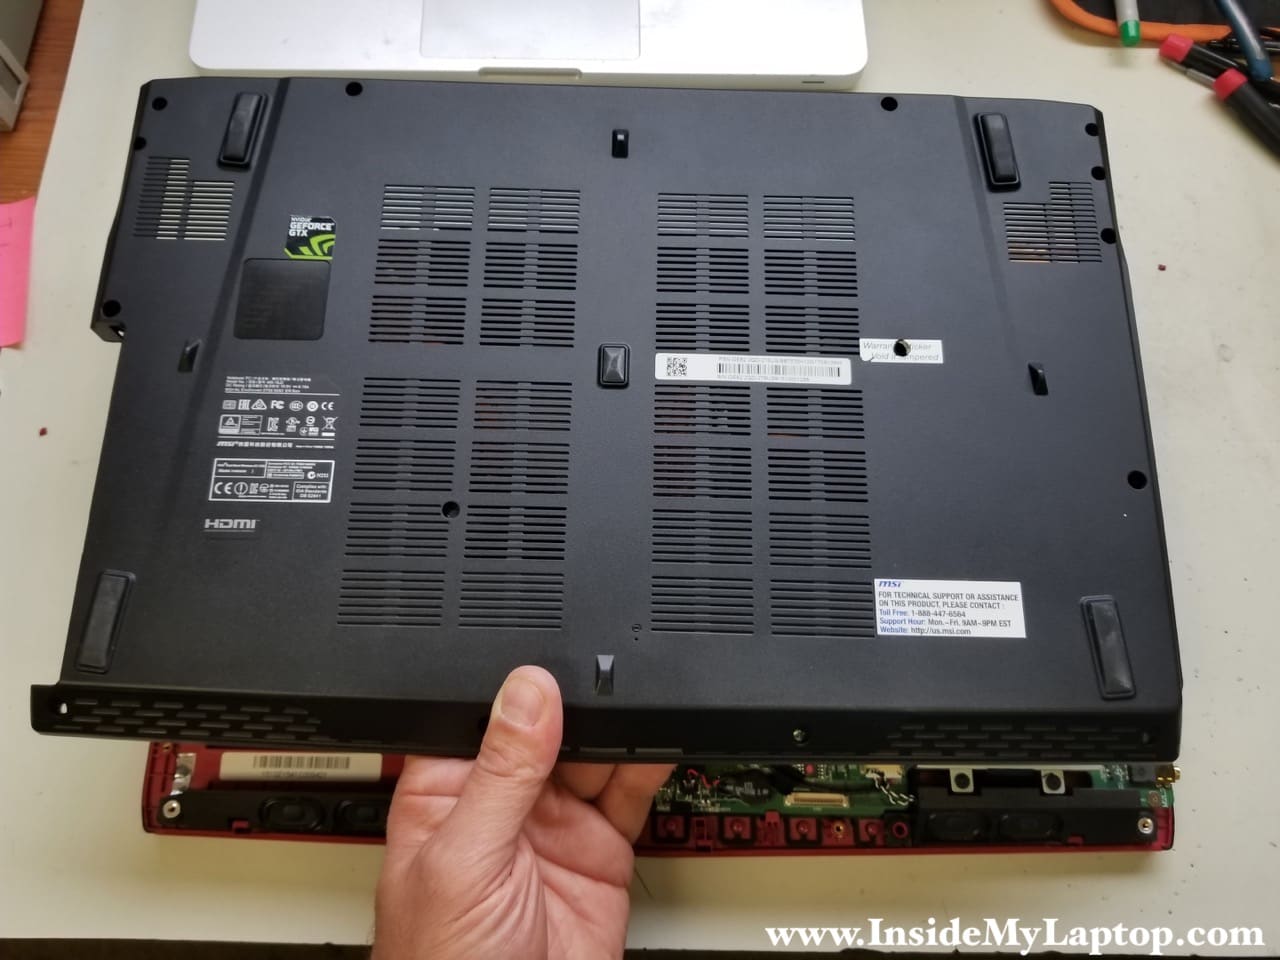
STEP 4.
Remove the bottom case.
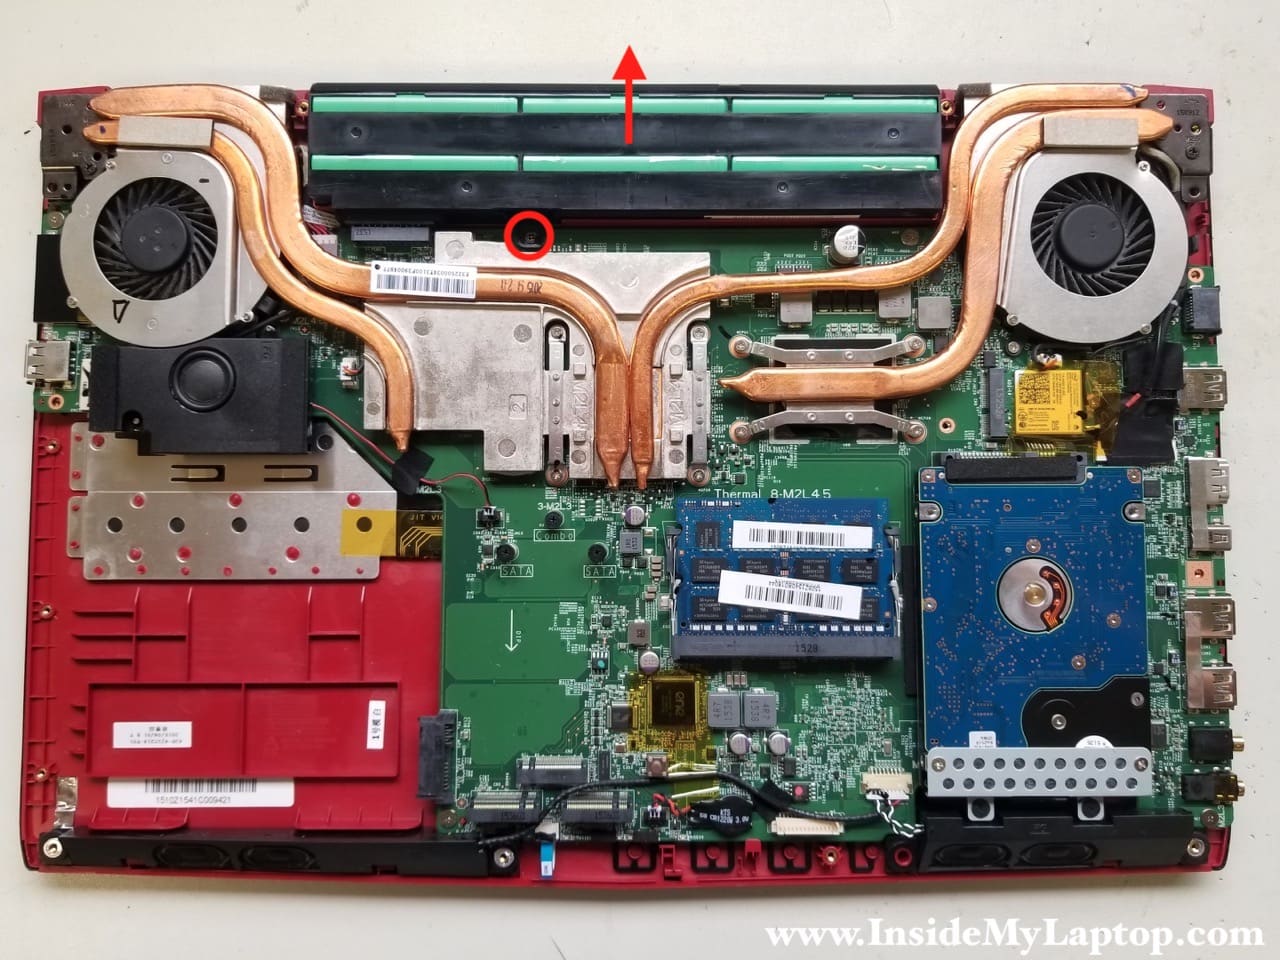
STEP 5.
Remove one screw fastening the battery and slide it to the shown direction to disconnect it from the motherboard.
STEP 6.
Remove two screws from the hard drive mounting bracket.
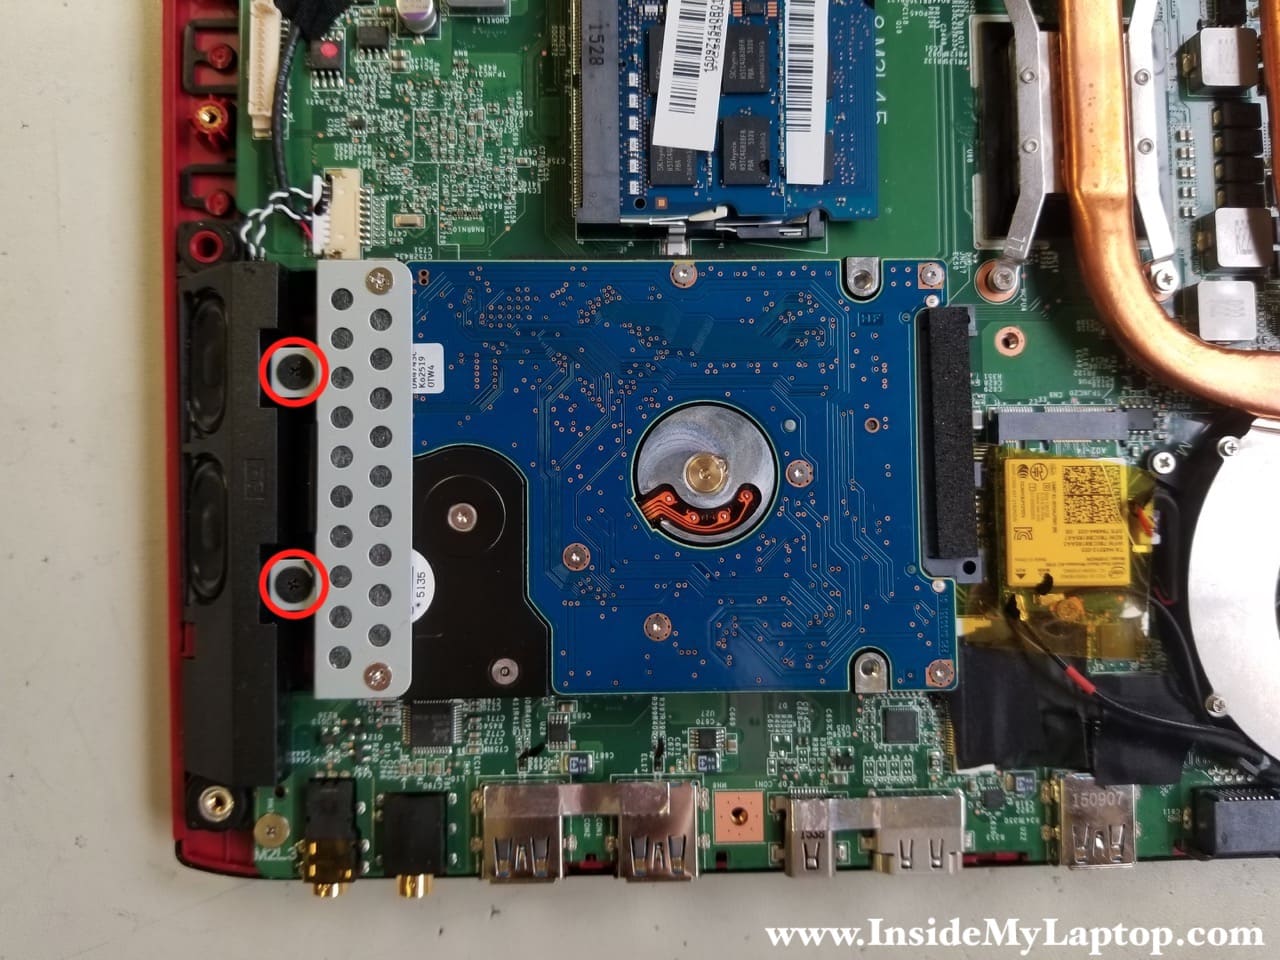
STEP 7.
Lift up the hard drive and disconnect it from the SATA port on the motherboard.

MSI GE62 GP62 PE60 motherboards have two or three slots available for the m.2 solid state drive upgrade. In my case I didn’t have any m.2 SSDs installed but more expensive models come with SSDs installed at factory.
Upgrading regular 2.5″ hard drive to a 2.5″ SATA solid state drive to improve laptop performance.

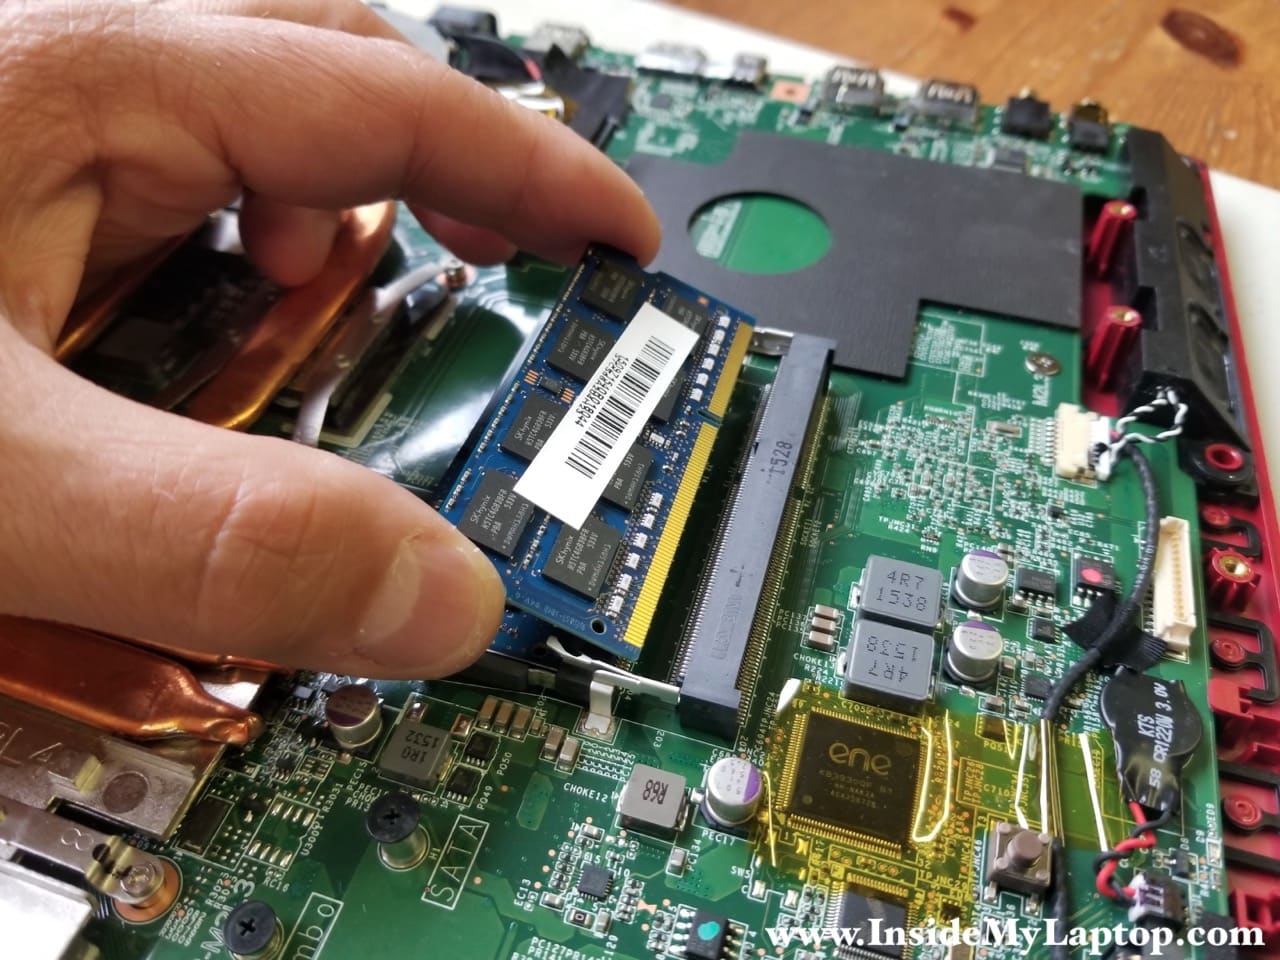
STEP 8.
There are two memory slots. You can remove and replace RAM modules if necessary.
This laptop can take up to 32GB (2x16GB) DDR4 2400/2666/3200 SOSIMM RAM modules.
STEP 9.
Disconnect both antenna cables from the wireless card.

STEP 10.
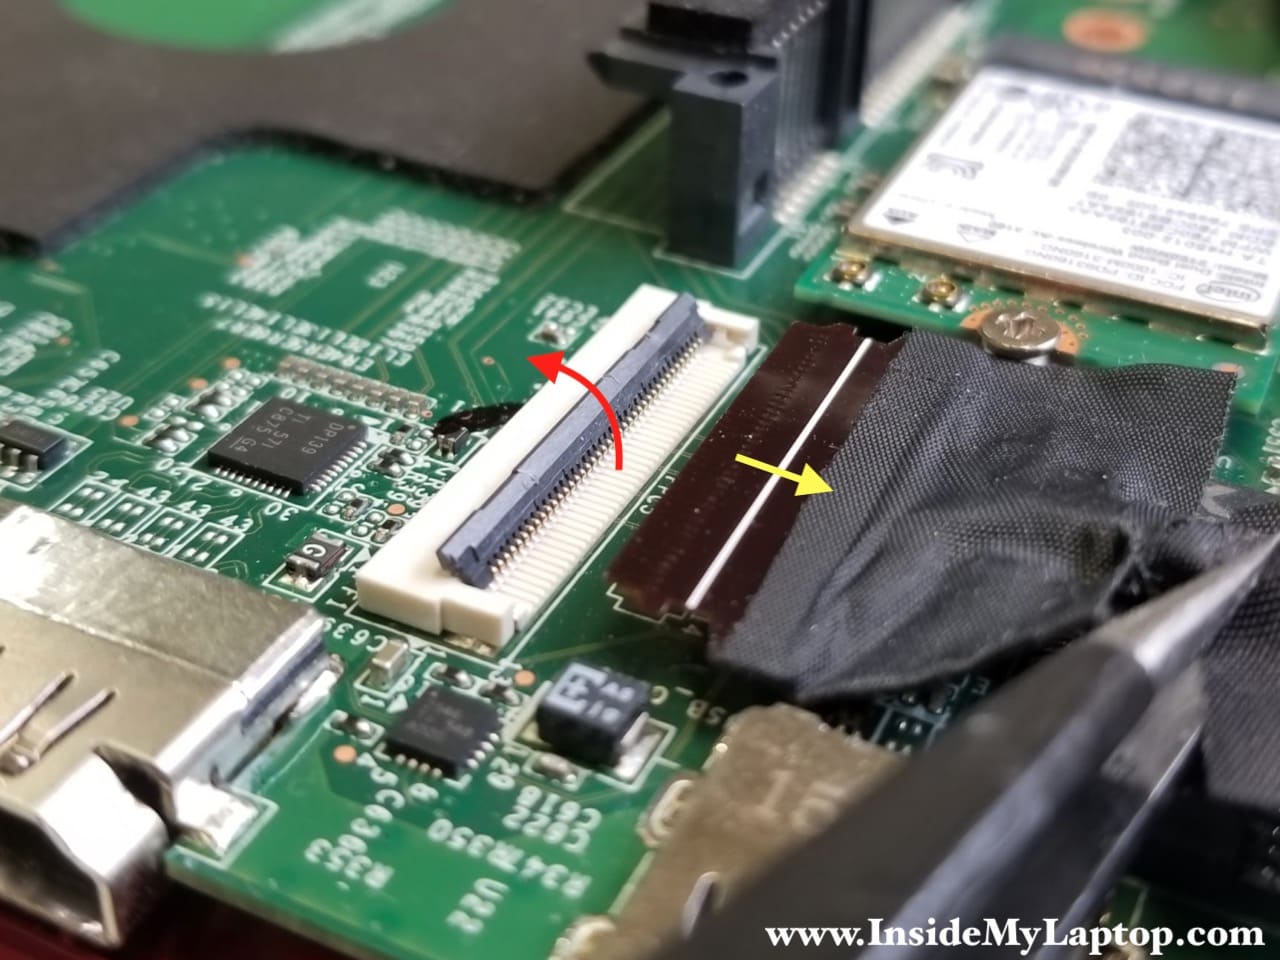
Disconnect the display video cable from the motherboard.
First, unlock the connector by lifting up the locking tab. It will open up at a 90 degree angle.
Second, pull the cable out of the connector.
STEP 11.
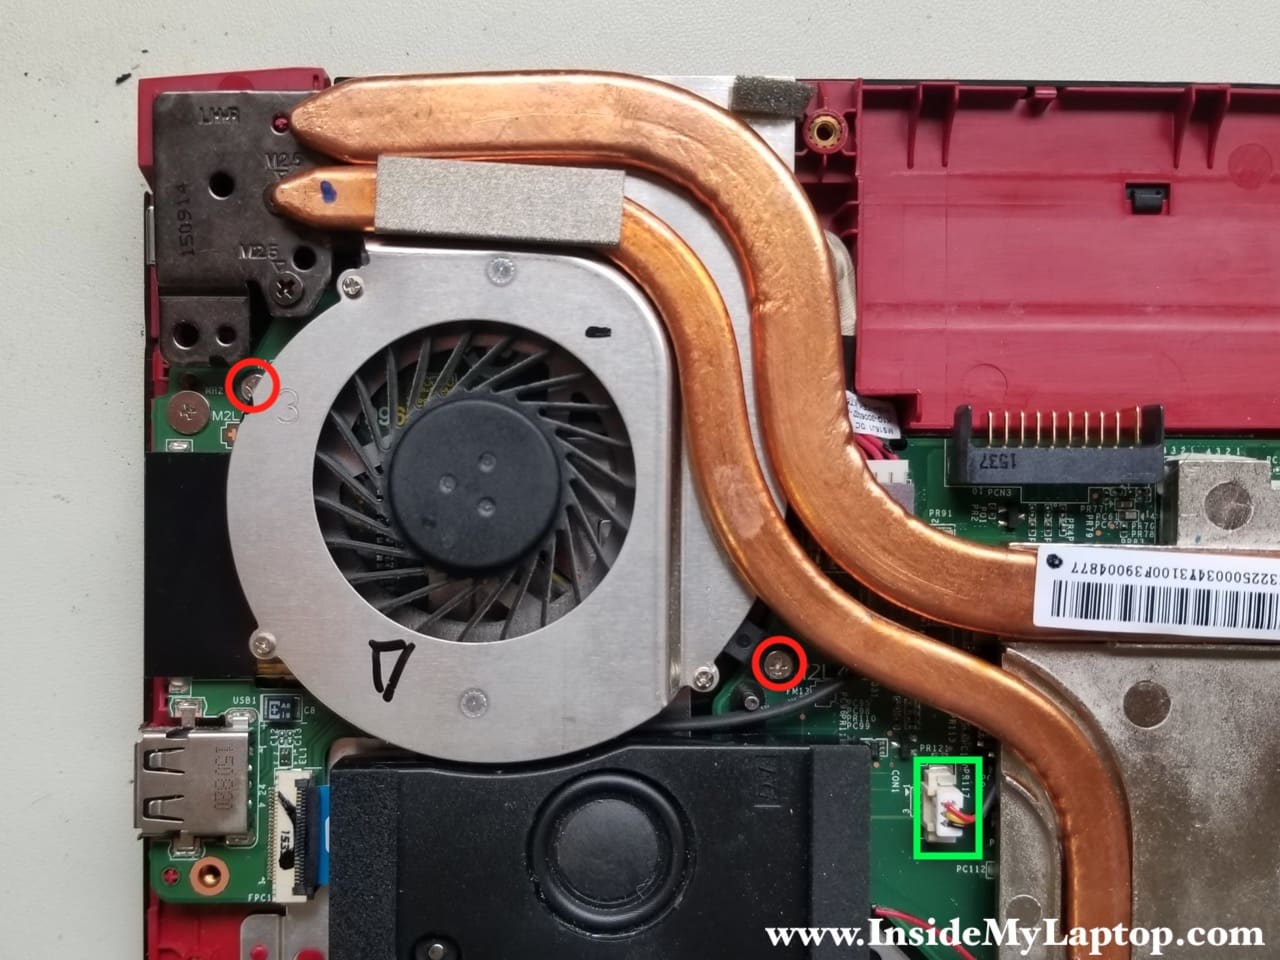
The video cable and Wi-Fi antennas are routed on the side of the left fan. Remove them from the guided path.
Remove two screws securing the left fan and disconnect the fan cable from the motherboard.

STEP 12.
Remove two more screws from the right fan and disconnect the fan cable.
STEP 13.
Remove eight screws fixing the heatsink module to the motherboard.
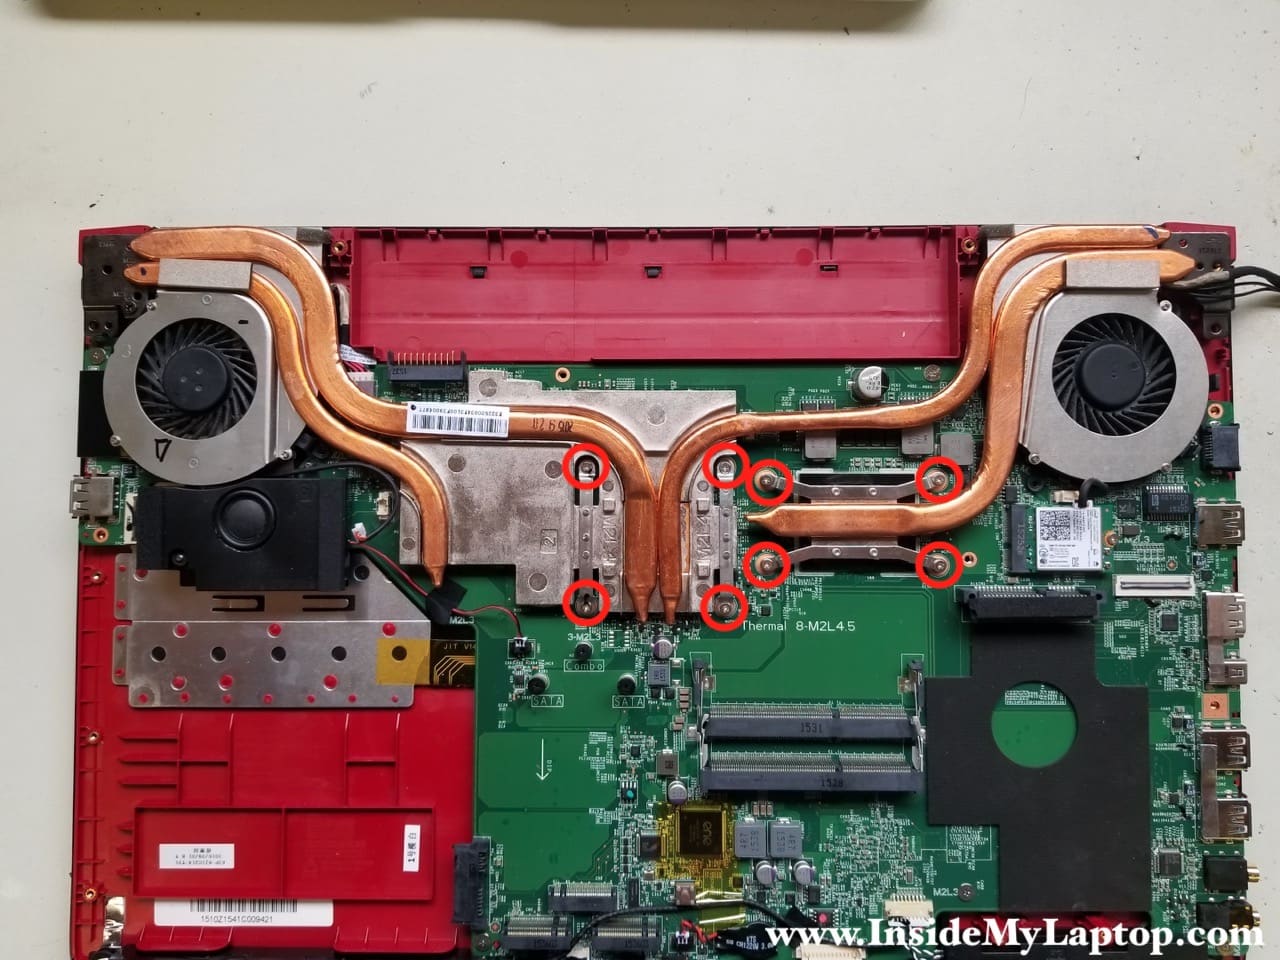
STEP 14.
Remove the heatsink module.
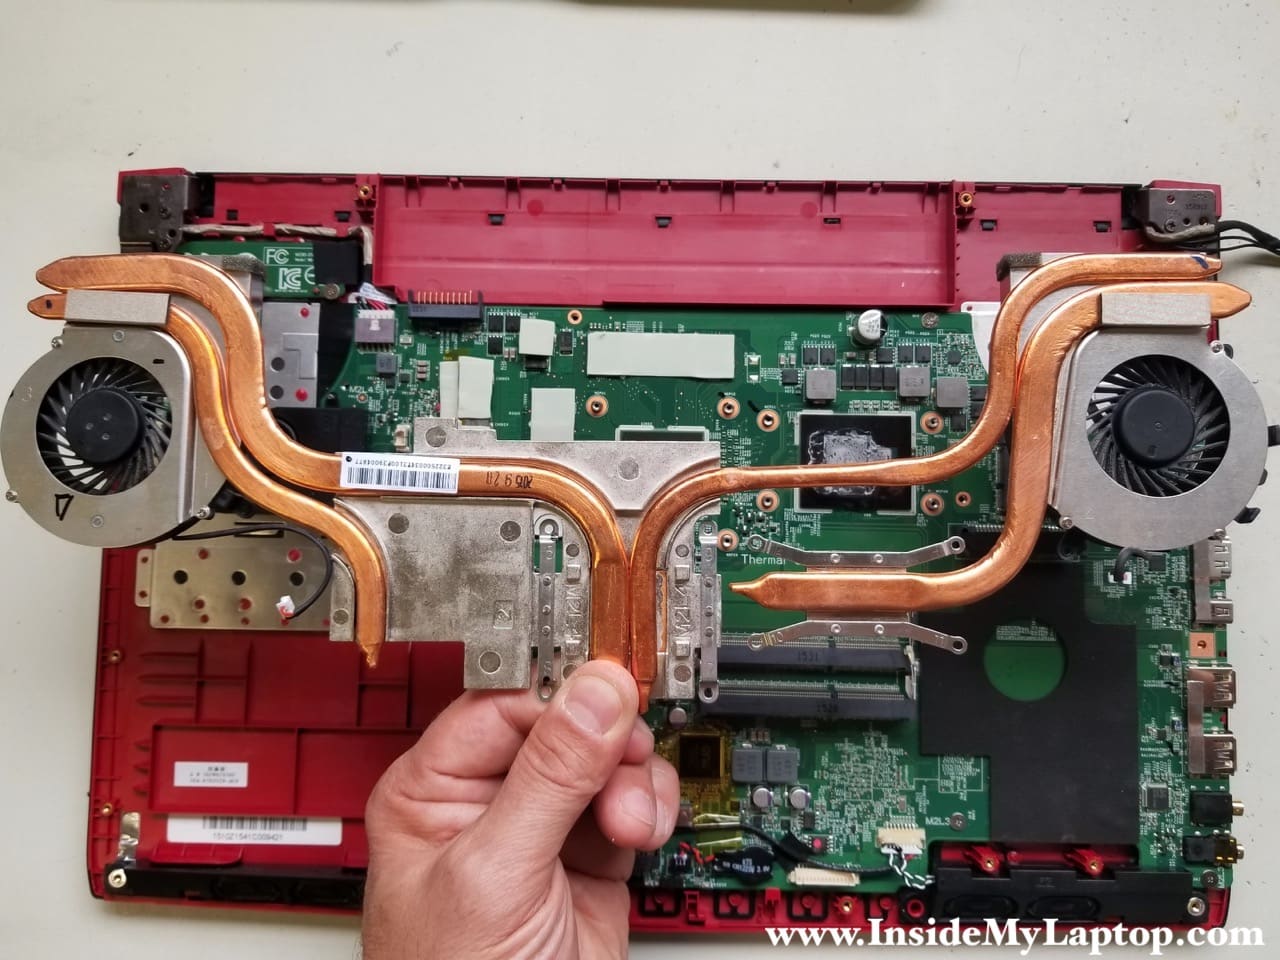
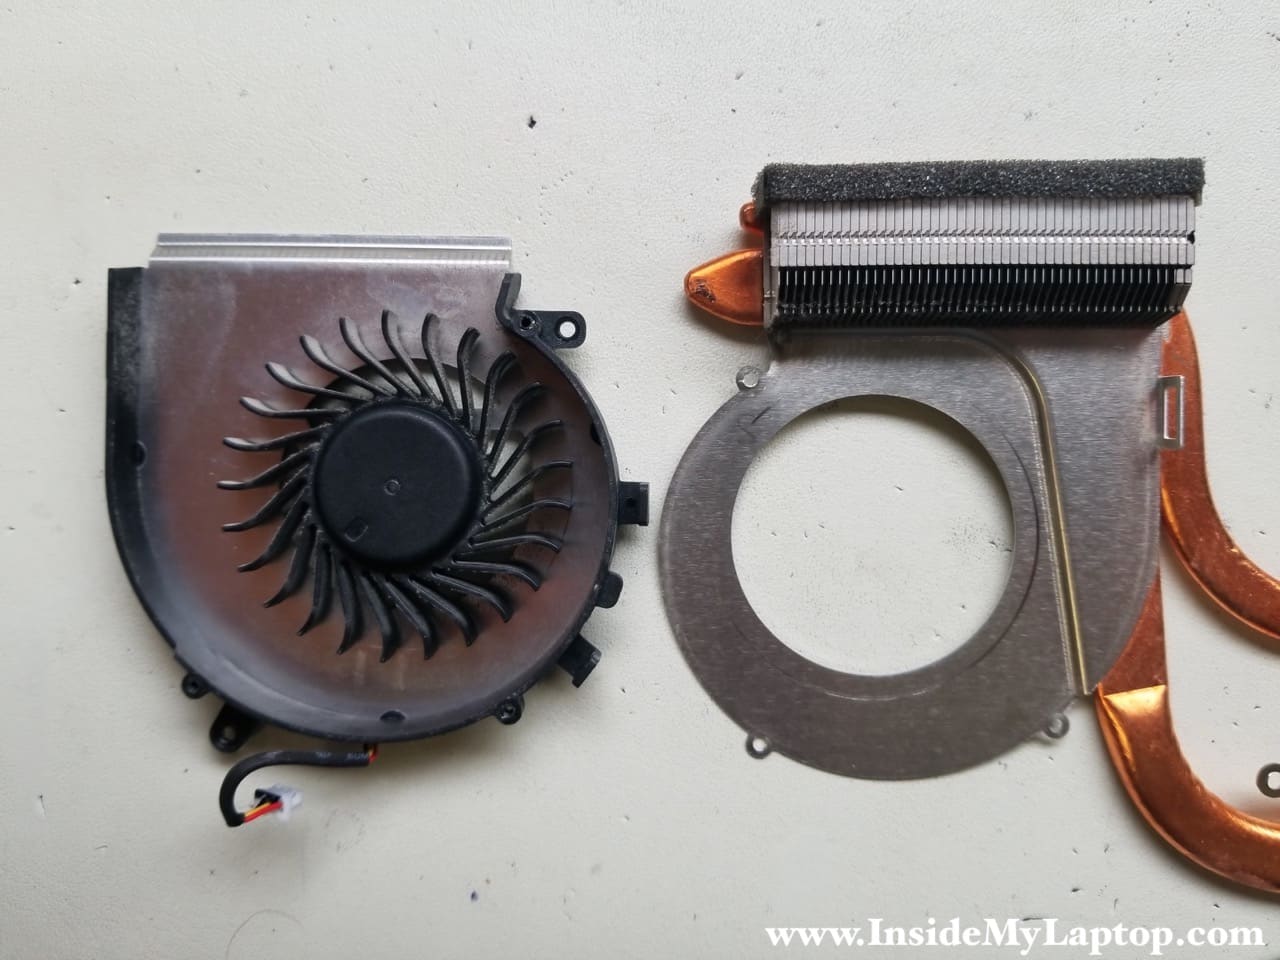
There are three screws fixing each cooling fan to the heatsink.

After you remove the screws, you can separate the cooling fan and replace it if necessary.
STEP 15.
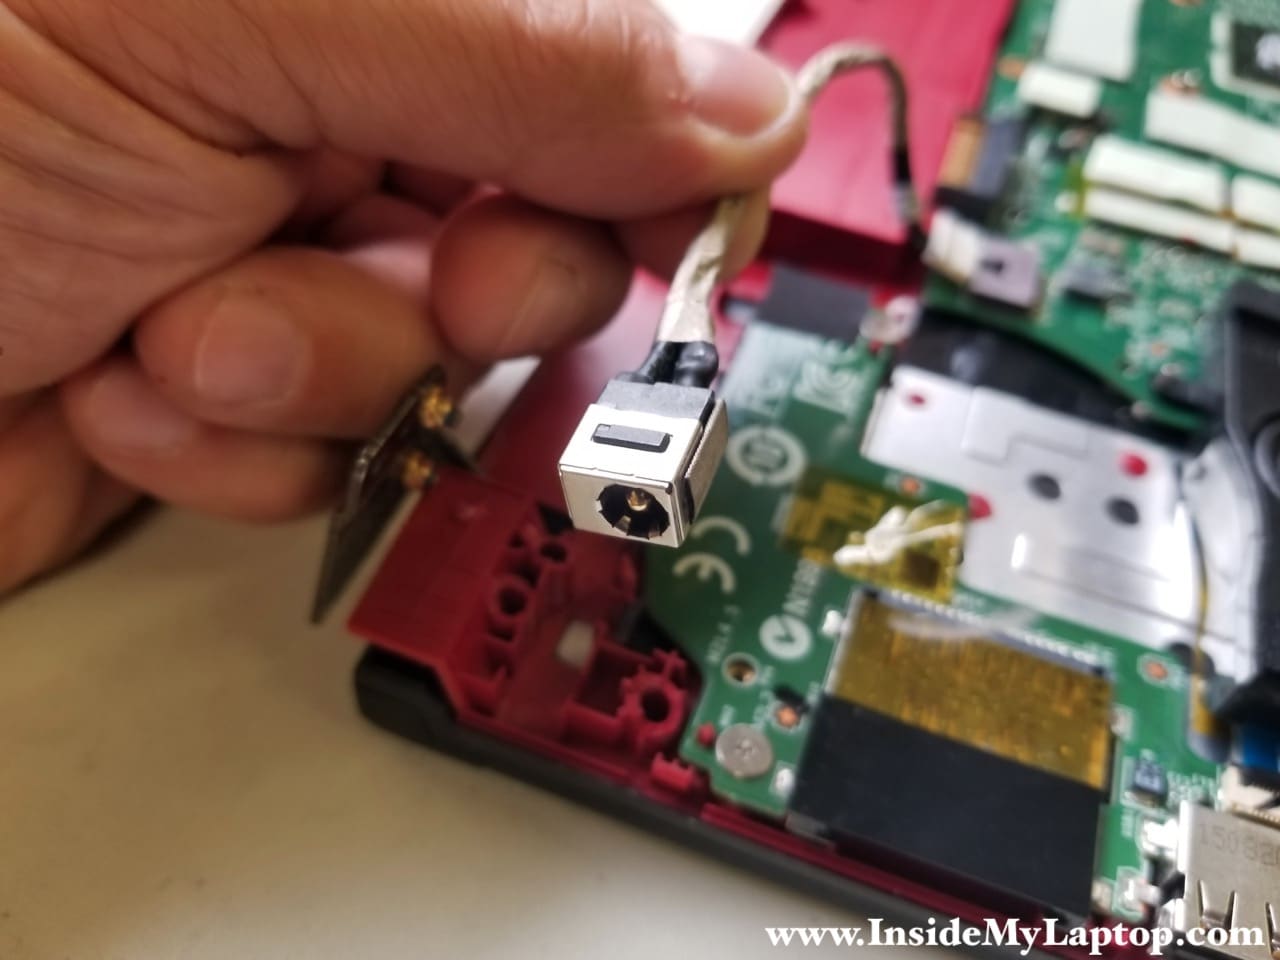
The DC power jack is mounted under the hinge.
Remove two screws from the hinge.

STEP 16.
Lift up the hinge so it opens up at a 60 degree angle.
Do you notice that in my case both screws are still attached to the hinge? That’s because both hinges in my laptop got completely detached from the top case but we’ll talk about hinge problems later in the post.

STEP 17.
Disconnect the DC jack cable from the motherboard and remove it.
Replacement DC power jack available here: https://ebay.to/3bo7KG3
STEP 18.
Disconnect the speaker cable, lift up and remove the speaker.

STEP 19.
There are two screw fixing the USB SD card reader board to the top case. Remove both screws.
Disconnect the cable from the board.
Remove the USB SD card reader board.

STEP 20.
Remove five screws from the motherboard.
Disconnect the touchpad and the speaker cable.

STEP 21.
Separate the motherboard from the top case. Be careful, there are two keyboard cables connected to the board on the other side.
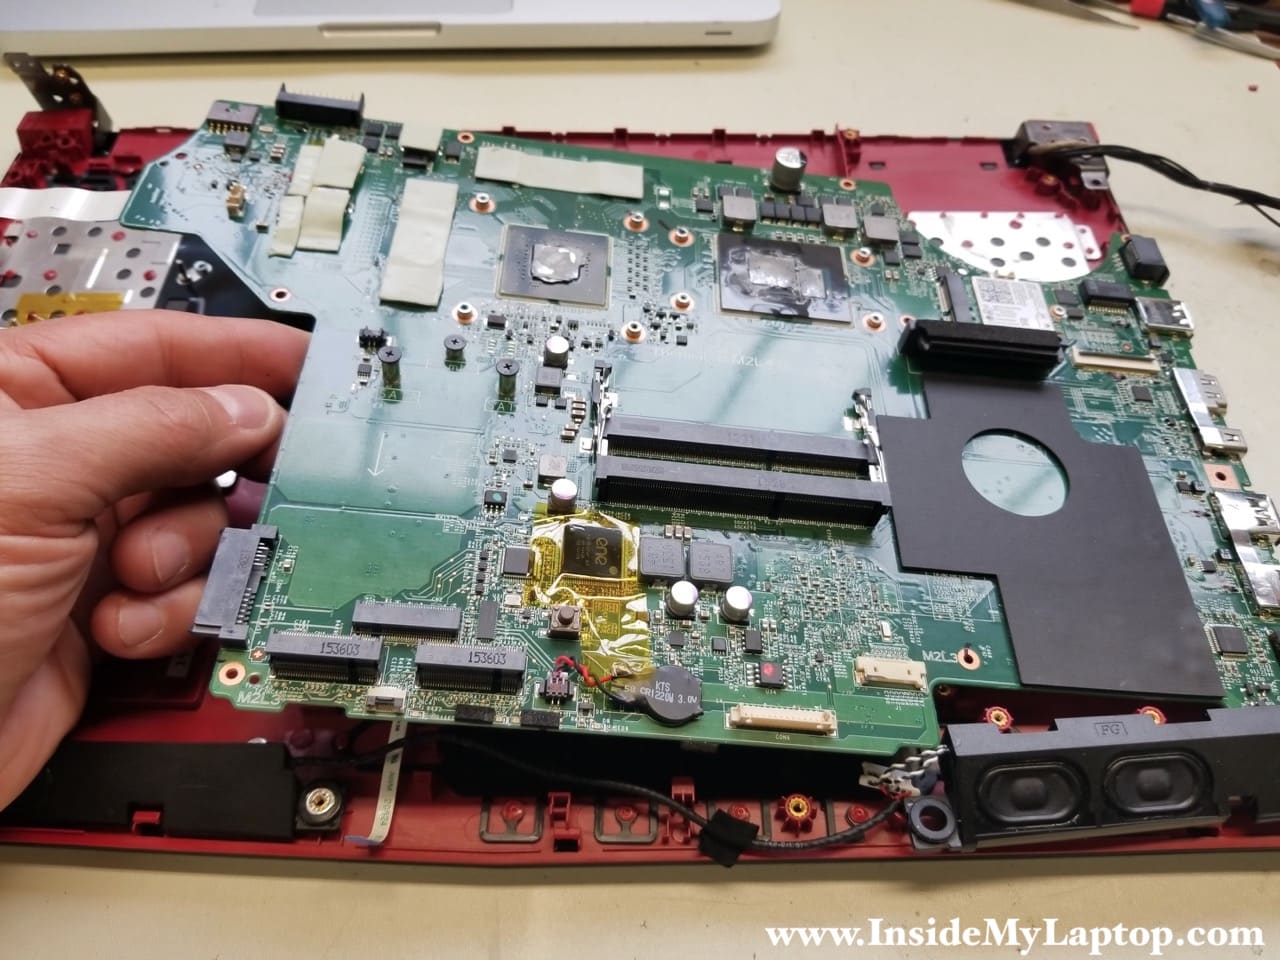
STEP 22.
Turn the motherboard upside down and disconnect both keyboard cables.
The narrow cable is for the backlight and the wide one is for the data.

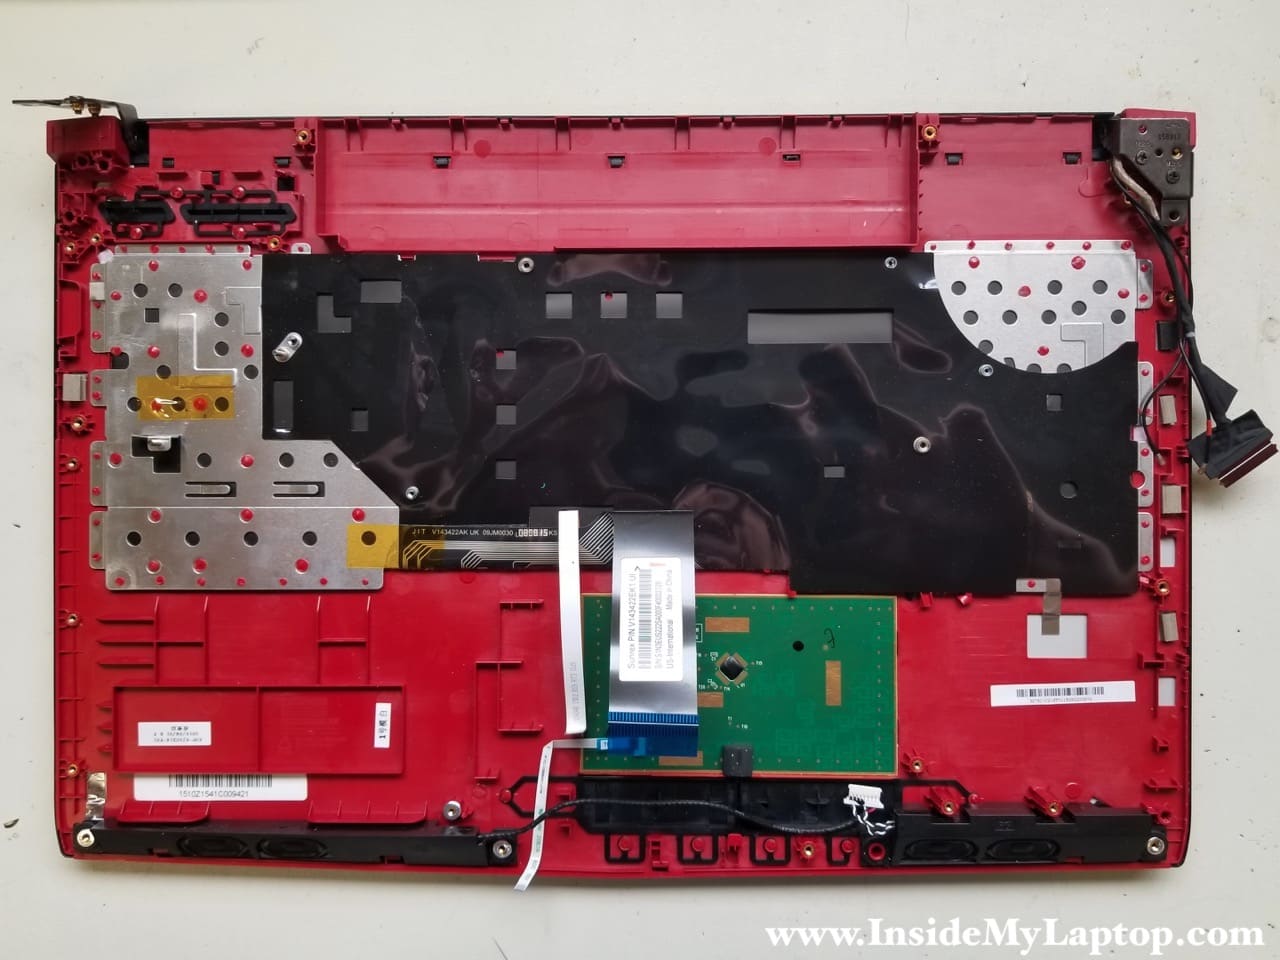
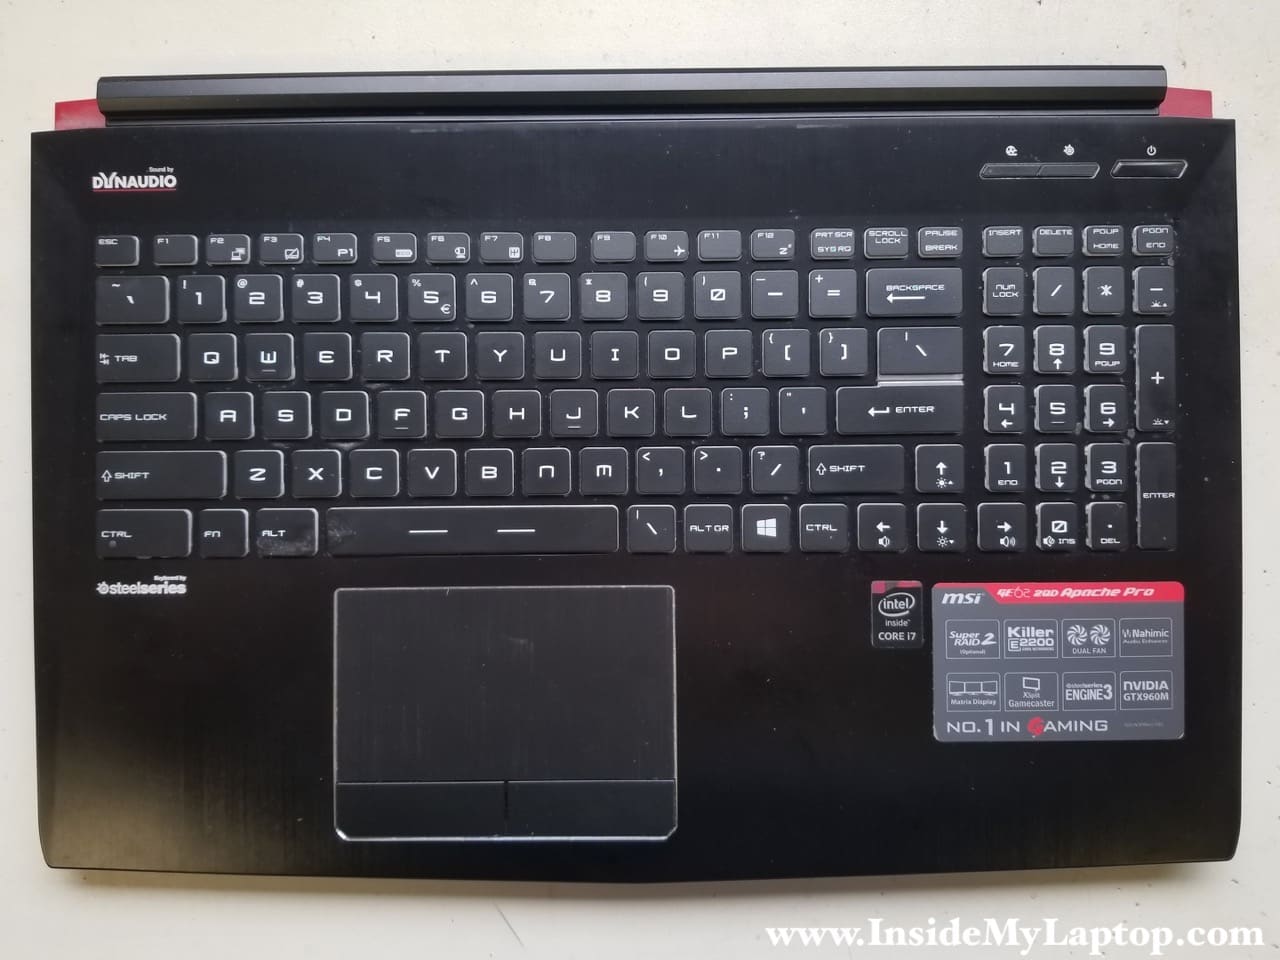
With the motherboard removed, we can take a closer look at the top case.
In MSI GE62 GP62 PE60 laptops the keyboard is permanently riveted to the top case and cannot be easily removed.
The touchpad is glued to the case.
If the keyboard failed, probably you are looking at the full top case replacement or try this keyboard repair hack.
MSI GE62 GP62 PE60 hinge failure
Now let’s take a look at different hinge failures.
When I opened up the laptop for the first time, I noticed it makes a loud clicking noise and the top case separates from the bottom in the hinge area. After I disassembled the laptop, I found the problem right away.
Both hinges were completely detached from the top case. All screw nuts that suppose to be anchored in the plastic housings got pulled out. The plastic sockets that suppose to secure the nuts got completely destroyed.
This is very similar to Dell Inspiron 15 7000 hinge problem.
Here’s the right hinge.

Here’s the left hinge.

If you have a problem with the hinges like that, you will have to remove the top case assembly and replace it with a new one.

As I mentioned earlier, the keyboard is permanently attached to the frame so you’ll have to replace the entire top case or find a way to reattach the keyboard to the new frame.
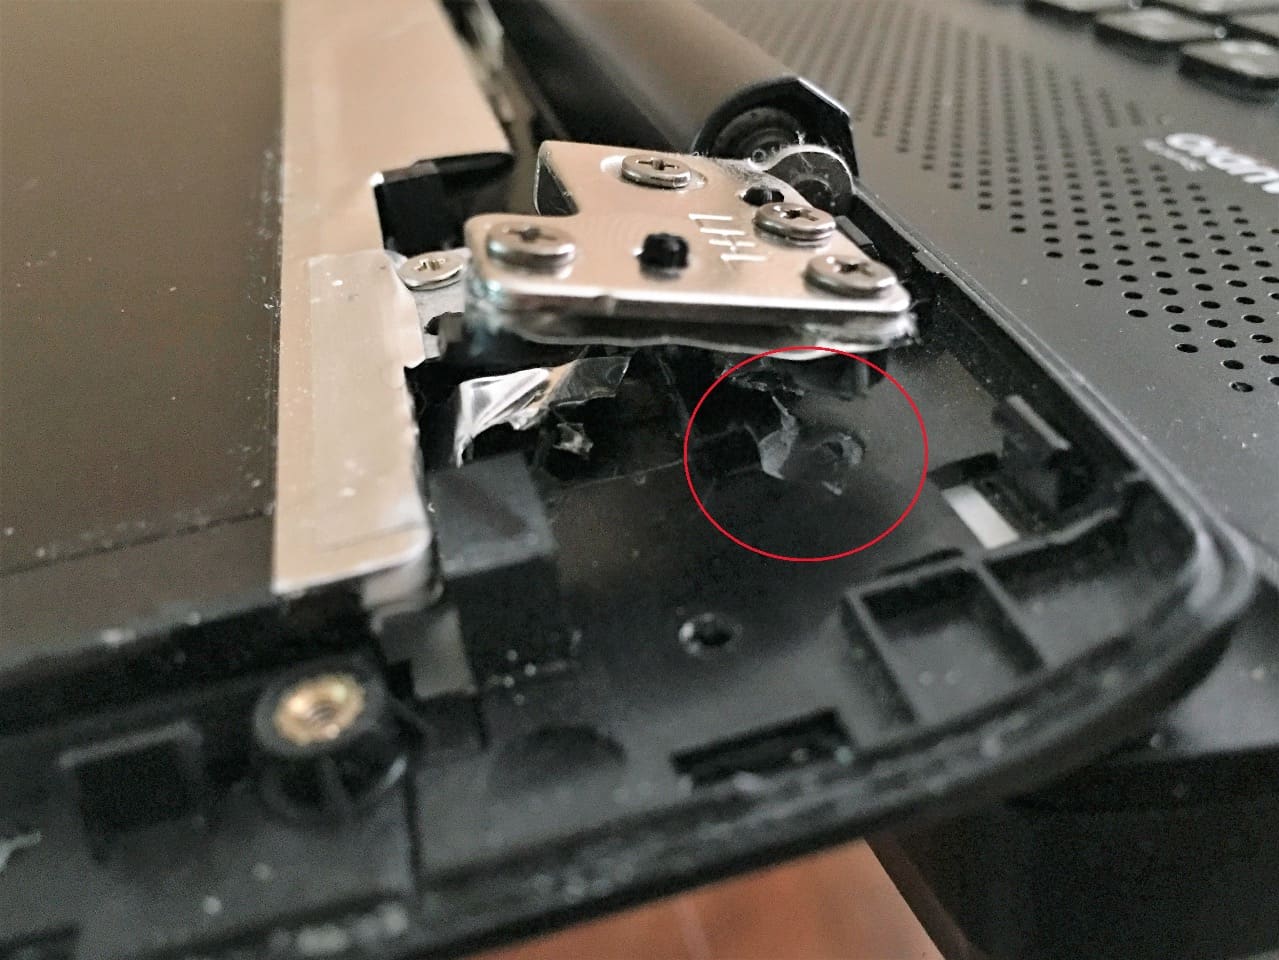
In some cases the hinge problem might occur inside the display panel like shown on the following picture. The hinge gets detached from the display cover. You can try fixing it with standard machine screws but it will not look perfect.
To fix it the proper way, it’s necessary to take apart the display assembly and replace the back cover.
Part 2. Display disassembly and screen removal.
It is not necessary to remove the display in order to disassemble it. It can be done while the display is still attached to the laptop case.
In my example it’s removed only because I was doing the full laptop teardown.

STEP 1.
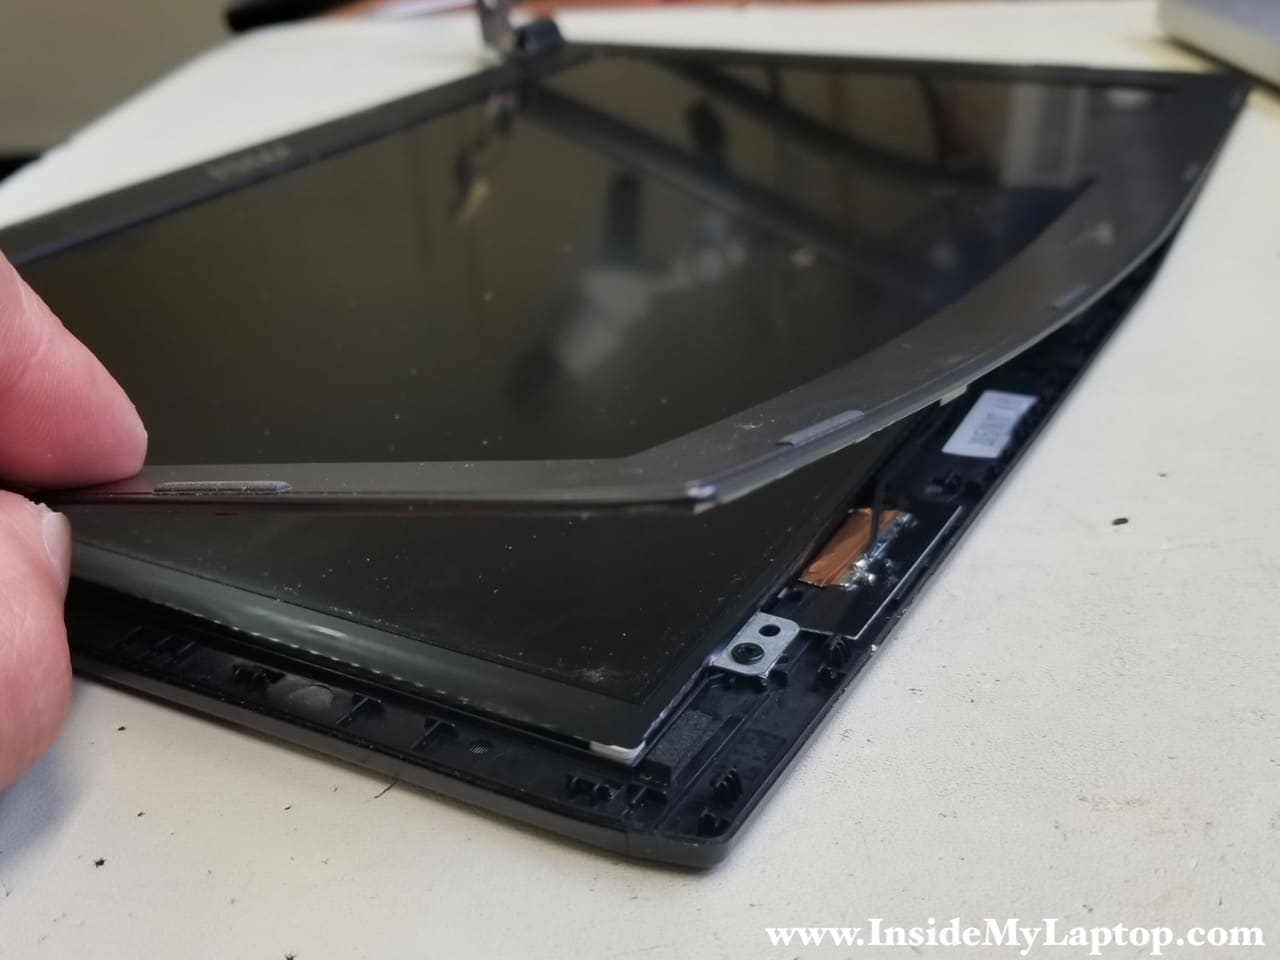
Start removing the screen bezel from the back cover on the top of the display assembly. Use a plastic case opener to separate two parts. Wiggle the bezel to unfasten it from the cover.

STEP 2.
Continue separating the bezel on the sides.
STEP 3.
On the bottom the bezel is glued to the LCD screen with adhesive tape. Carefully separate the bezel from the screen.

STEP 4.
Remove the bezel.

STEP 5.
Remove four screws attaching the LCD screen to the back cover.

STEP 6.
Turns the screen upside down in order to access the video cable connector on the back.

STEP 7.
Peel off clear tape securing the connection and unplug the video cable from the LCD screen.
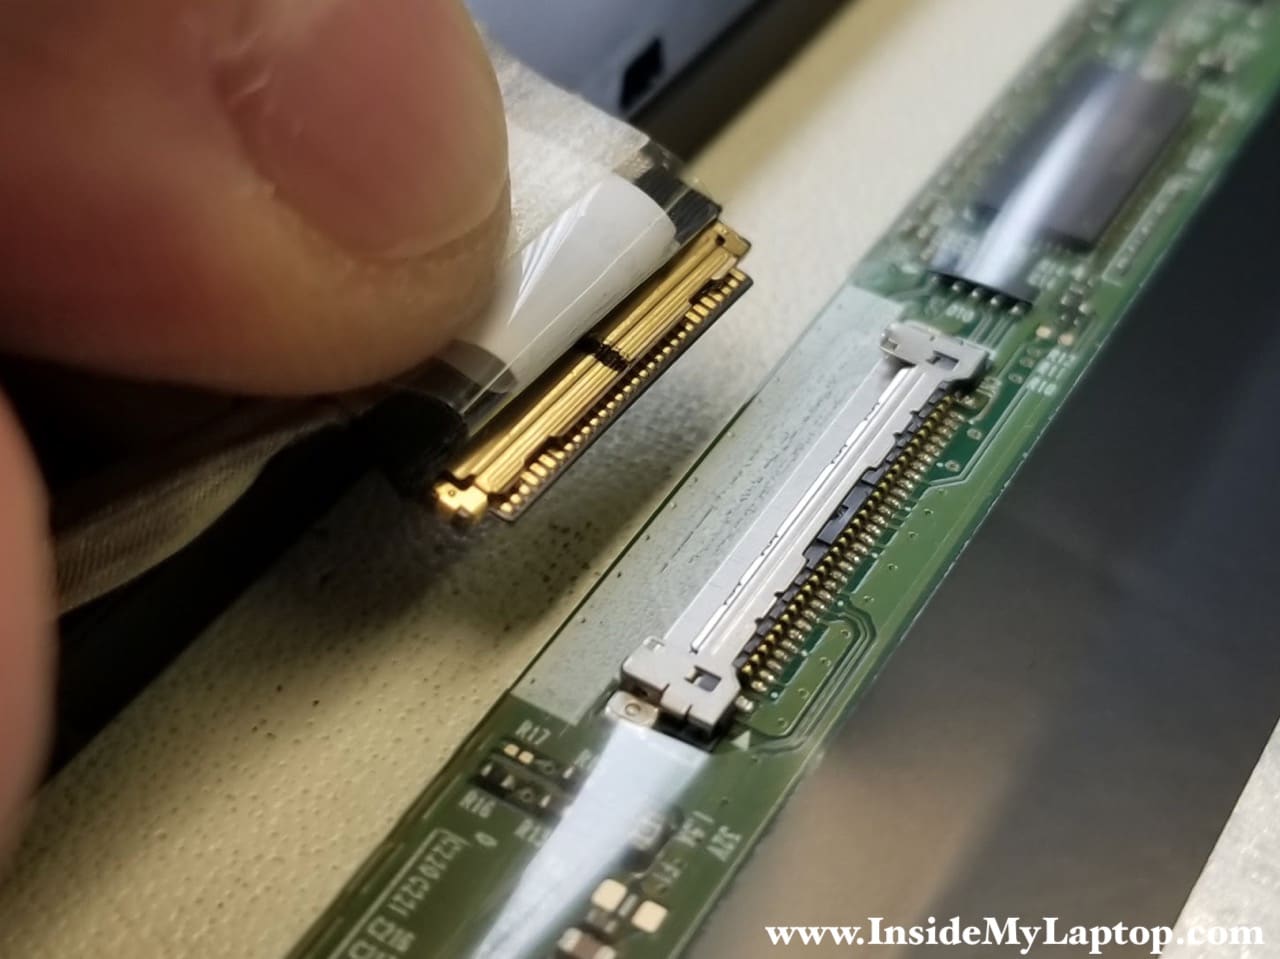
You can find a replacement screen using the part number printed on the original screen. In my case the part number is: LP156WF6 (SP)(B1).

After the LCD screen is removed, you can get full access to the video cable.

Windara
are you able to remove the processor from the board? And do you think the processor can work in desktop motherboard?
I’ve the gp62 6qf model but unforunately the motherboard no longer working as I could not turn on.
IML Tech
@ Windara,
You cannot remove the processor because it is soldered to the motherboard.
Jorge Enrique Valle Suárez
Do hoy know the parte # of the Speaker in step 18, i ask because I have a GL62VR 7RFX and it does not have it and I would like you buy one 🙂
IML Tech
@ Jorge Enrique Valle Suárez,
I don’t know the part number but you can find this speaker on eBay.
Search for “MSI GE62 speaker” and you will see a few listings for whole speaker sets, including one you need.
Studio4
I want to remove the “faceplate” that’s around the keyboard of my GE62 so I can do a custom airbrush job on it. Can you guide me how the remove that while leaving the keyboard itself intact and in place?
IML Tech
@ Stuido4,
I don’t think it’s possible to remove just the faceplate. The faceplate is the top case (aka palmrest). In order to paint the top case you will have to remove the keyboard and trackpad. Both are permanently attached to the top case.
The keyboard is riveted to the top case. The trackpad is glued to the top case.
It’s possible to separate the keyboard from the top case if you break rivets but it’s not easy. Also, if you separate the keyboard, it will be hard to put it back together.
Mohamed Higazy
The three screws in green circles, i can’t remove them, can you recommend a specific screwdriver? They are like stuck
Shy
The keyboard removal will almost invariably require you to replace the palmrest since removing the rivets is not reversible. Has anyone tried removing the glued touchpad? I replaced the keyboard and palmrest, now I am trying to figure out how to transfer that.
Thomas
Hello!
great step by step guide.
I was curious where exactly the wi-fi receiver/transmitter antennas are located? can you circle them for me and show me? I want to make sure my laptop is in the best possible position and direction to face towards my router for the best signal strength!
Thanks!!
IML Tech
Thomas, Wi-Fi antennas located inside the display panel. Take a look at the last picture. Do you see two copper squares at the top? That’s your antennas.
Kyle
Great guide, thank you.
I have the same hinge failure problem on my GE62 2QC.
Do you have the part number for the top case?
IML Tech
Kyle, I don’t have the part number for the top case but I think you can find it on eBay if you search for “GE62 top case”.
Josh
Thank you so much for the disassembly guide! I own an Msi GP62 7RD leopard. I am having an interesting issue with my keyboard and I was wondering if you had any helpful insights. The c, r, f, 0,9,backspace, and delete keys(probably others as well) work intermittently. Often times I have to press the desired key alongside another just to get it to work. Other times they work no problem.
I have done a lot of Googling and that it was a software issue but I fear it is hardware. Do you have any ideas what could be causing this undesirable issue?
Link to my computers spec page: https://www.msi.com/Laptop/GP62-7RD-Leopard/Specification
IML Tech
Josh, most likely this is keyboard related failure. You can download a life Linux OS and make a bootable USB flash drive. Boot your laptop from the USB flash drive and test the keyboard in Linux environment. If the same problem appears in Linux, this is definitely bad keyboard. There is a slight chance of motherboard failure but it’s not likely.
Josh
Awesome thanks. I will definitely try that method to troubleshoot it.
Steven
Hi, I have a huge problem I’ve been trying to figure out what to do for the past 2 days. A few keyboard keys stopped working over the months do I decided it’s time to replace the whole keyboard. I ordered one on Amazon but realized it didn’t come with a backplate to hold it in place so when I go to type the whole keyboard sinks into the laptop. So returned that one and order from a different person except it also didn’t come with a backplate. Took some hours of searching online to find out that the keyboard needed to be pulled apart from the backplate carefully which I didn’t do and now it’s totally bent and looks flimsy. I also noticed the plate isn’t screwable and well the heads that held it down are very short now. Any suggestions?
IML Tech
Steven, if the backplate is damaged, I think you’ll have to replace the top case assembly.
There are some used top cases available here: https://ebay.to/38GEFU8
I don’t think you’ll be able to find the backplate for sale.
Gayan Waidyaratne
Hello I’ve removed the battery as instructed but after reinstalling the battery doesn’t get charged or the laptop doesn’t power on using the battery. Please help!
IML Tech
Try reconnecting the battery. Make sure it’s seated properly.
oscar
did you fix it? happened to me as well, plus touchpad is not working anymore
Sheryl
Are any of the USB ports in the GE62 Apache pro replaceable or are they all soldered to motherboard..?
IML Tech
USB ports on the right side are soldered to the motherboard.
One USB port on the left side, by the card media reader, also soldered but it’s located on I/O board. You can replace the board to get the USB port working.
Otherwise, you have to de-solder the damaged USB and solder a new one in.
mqiiu
hi, ive msi gp62, but i dont like the lcd screen specification, can i replace the screen with another better screen?? maybe from msi too but other better spec of screen, specification of lcd make my eyes tired, like the lack of red
IML Tech
Try f.lux application. Here’s a quote from the description: f.lux warms up your screen at night to help you relax and wind down before bed.
Liz M
It is possible to replace the keyboard on this laptop without changing the palmrest – it’s a horrible job that takes forever but if you have lots of spare time and nothing to lose it’s worth a try. I found this post very useful for how to get at the keyboard to start with, then got a new one on ebay once I had the part number. The keyboard is fixed to the palmrest with lots of tiny plastic rivets; I used a scalpel and chisel to break the heads off the rivets. Then after fitting the replacement and the backplate on to what remained of the rivets I added a blob of glue on top each rivet to hold it in place. Works fine so far, and cost a lot less than MSI charged me last time I broke the keyboard
AdhesiveJoker98
Hi.
By the way, very good post, very informative.
I’m trying to replace the palmrest, because the pc is a version of the GE62 (Camo Squad), and I honestly lost interest on the bright sand camo livery (and its not very sensible taking it to a meeting).
The only problem that is keeping me to change to the normal black palmrest is the removal of the trackpad/touchpad.
Is it very hard to take the board out, or can be done?
spencer
I noticed there is a button on the inside, what is that for? I can’t seem to find any mention of it online.
H. Pronk
Good afternoon,
very interesting and good explaning.
I am curious if you can help me with my laptop.
I have a MSI GP 70 2PE Leopard, and i can,t find a dissambly guide for me. I can not open the back or frontside from my pc. There is something stocked, and i don,t see where,,,model No: MS 175 A.I have to change the hinges and a lvds cable.
So i hope you can help me with that .
Thanks in advance, and kindly regards from Holland.
Henk
IML Tech
Take a look at this guide https://www.youtube.com/watch?v=sJgY1dP2V6g
ozicrypto
I realise this was an obsolete machine in 2017 when I bought it .. the G62 7RD, that is. 128gb m2 and 1tb hdd. I immediately upgraded to ripjaws 16gb which made a great improvement to my workflow.
Its still a daily running machine and while I could upgrade I figure it can last a few more years yet. So I have bought (which I can mostly use again in a future lappy or whatever) 2tb Crucial P5 m.2 and 4tb MX500 ssd and another 16gb of the g.skill PC4-19200 (pure dumb luck that I found one and for really cheap too, AU$77 new, last one).
I managed to get Win11 installed and it, after some getting used to and updates etc is really nice.
I can only imagine that as soon as I upgrade, fresh install etc, newer tech that will meet the top ability of the machine that it will be a vast improvement .. even for old tech like my 7700hq cpu. (my desktop is a 12900k ooohrah – worlds apart)
Its the screen that annoys me. And it has pee’d me off ever since I decided back then to save a few hundred on the then already AU$2k laptop rather than get the better screen. I cant believe I did that.
Is there a replacement screen? For goodness sakes this is bad for the eyes. And yes .. I remove the blue etc. Its the screen itself that is a decade old tech. There were laptop screens in 2006 better than this one. Terrible. SURELY there is a screen but I cant find one for the life of me and even if I did what are the chances it is plug and play?
Take care and LOVE LOVE LOVE your article above. I didn’t need it but I just know that considering the lack of info available you have helped a lot of people.
ps. I dont know the user serviceability stuff in the states but where they ‘voided’ warranties (or threatened it lol) no void of that nature would ever stand in Australia. Even if the re-sellers had to by agreement give their time for free for upgrades. Complete rot!