
In this guide I will be taking apart a Compaq Presario M2000 notebook. The guide should work for all other notebooks in the Presario M2000 line. If it works for you, please mention the notebook model in the comments below. In my case I’m taking apart a Compaq Presario M2005US.
TAKING APART NOTEBOOK
First of all, turn off the notebook, unplug the power adapter and remove the battery.
The following 8 steps explain how to remove the keyboard.
STEP 1.
Remove two screws in the battery compartment. These screws securing the keyboard bezel.

STEP 2.
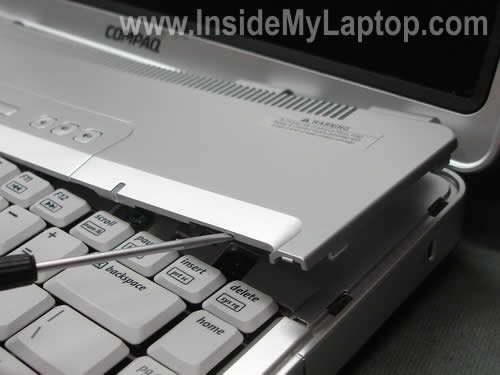
Lift up one side of the keyboard bezel with a small flat head screwdriver. Continue removing the bezel with your fingers.
STEP 3.
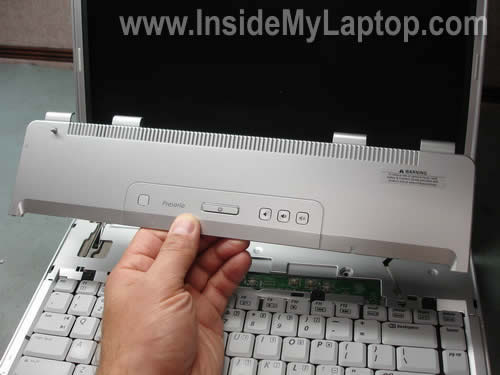
The keyboard bezel has been removed.
STEP 4.
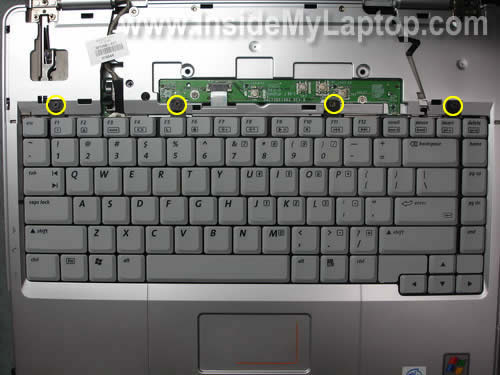
Remove four screws securing the keyboard.
STEP 5.
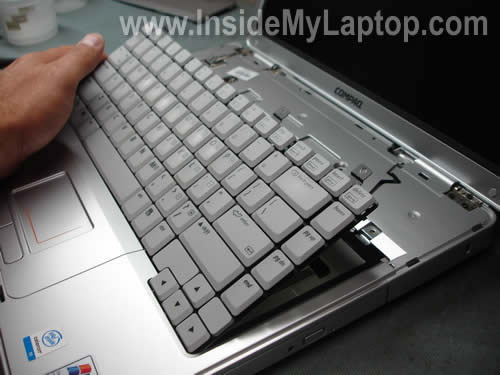
Lift up the keyboard. Be careful because the keyboard is still connected to the motherboard.
STEP 6.
Place the keyboard so you can access the cable connector.
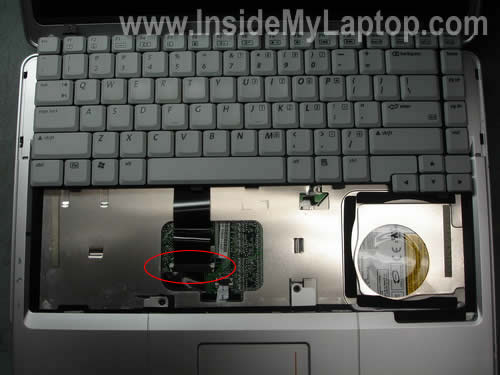
STEP 7.
Carefully unlock the connector by moving the white part of the connector towards the hinges.
WARNING! If you accidentally break the connector, you will have to replace the whole motherboard or use the notebook with an external keyboard.
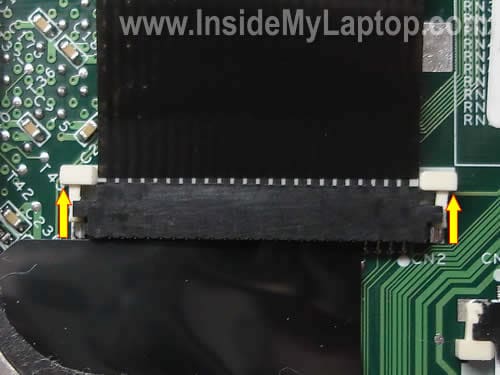
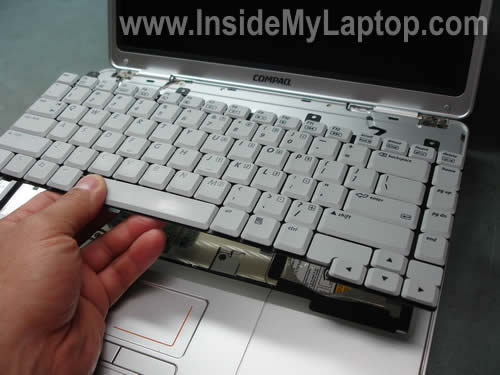
STEP 8.
Now you can release the cable and remove the keyboard.
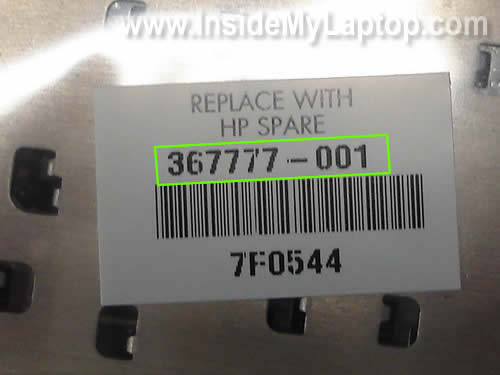
You will find the keyboard part number on the back side of the keyboard. In my laptop the part number is 367777-001.
In the following 2 steps I will remove the notebook LCD panel.
STEP 9.
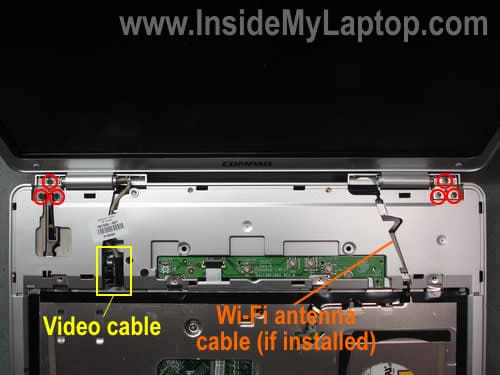
Remove six screws securing the display hinges (three screws per hinge).
Disconnect the LCD cable (video cable) from the motherboard.
If you laptop came with Wi-Fi card, you’ll have to disconnect Wi-Fi antenna cables from the wireless card and unroute the cables. My laptop came without wireless card and because of that there are no Wi-Fi antenna cables running from the display panel.
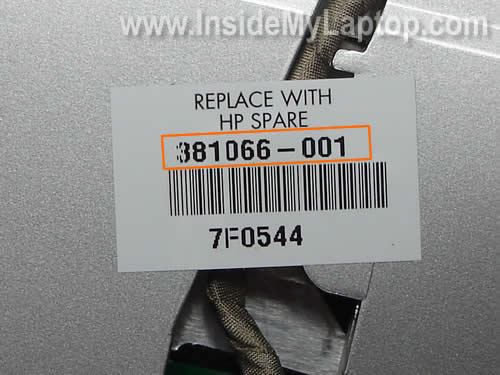
By the way, you’ll find the display panel part number on a sticker above the LCD cable connector. In my case the part number is 381066-001. This is part number for the whole display panel assembly including the LCD screen, video cable, hinges, plastic cover and bezel.
Some sellers use this part number just for the LCD screen. Make sure you know what you are buying, the whole display panel or just the LCD screen. Ask the seller.
STEP 10.
Remove the display panel assembly.
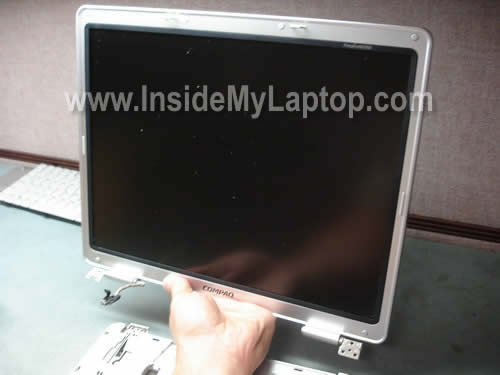
In the next guide I explain how to disassemble the display panel so you can remove the inverter board and LCD screen.
STEP 11.
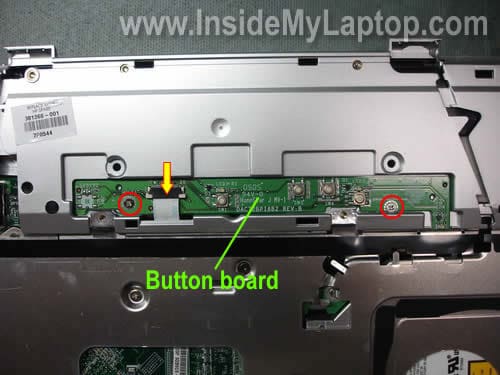
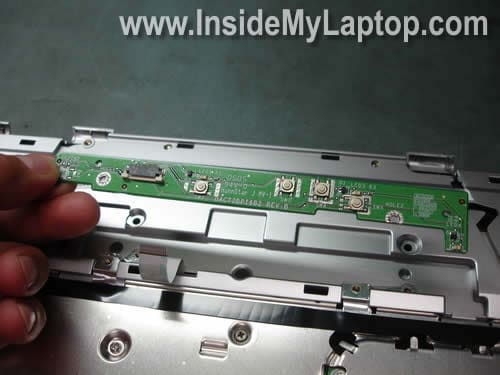
Remove two screws securing the button board.
Disconnect the white ribbon cable from the button board.
STEP 12.
Remove the button board. You can find a new button board using this part number: DACT2BPI6B2.
STEP 13.
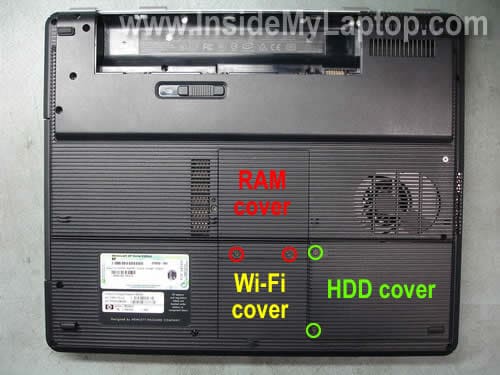
Remove the RAM, HDD and Wi-Fi card covers from the bottom of the notebook.
STEP 14.
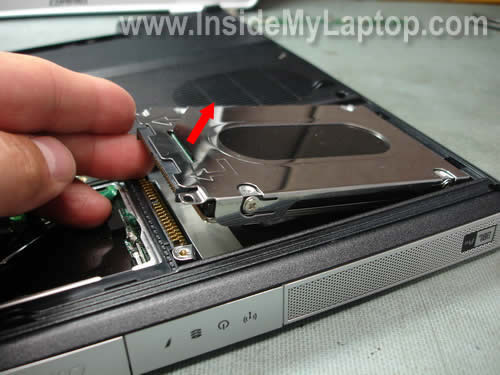
Pull the hard drive up and remove it from the notebook.
STEP 15.
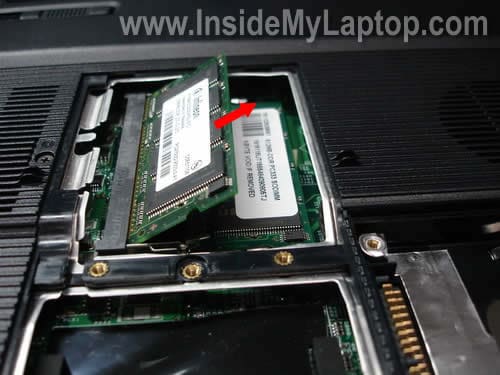
Remove both memory RAM modules.
STEP 16.
Remove one screws securing the CD/DVD drive and pull the drive from the notebook.
If you are just replacing the drive, you don’t have to go though all previous disassembly steps.
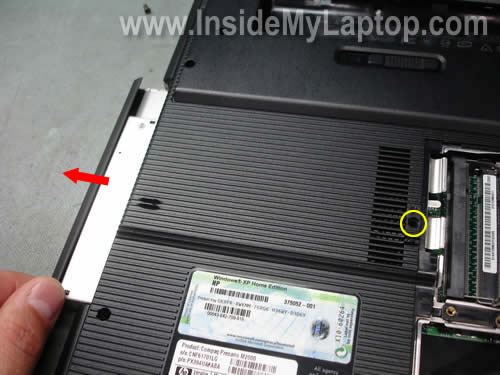
STEP 17.
Remove all screws from the bottom of the notebook.
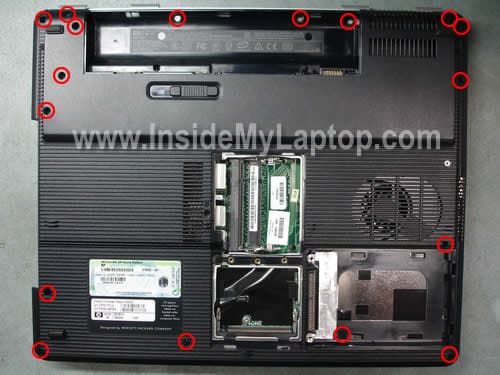
STEP 18.
Remove all screws securing the top cover.
Disconnect the touch pad cable from the motherboard.
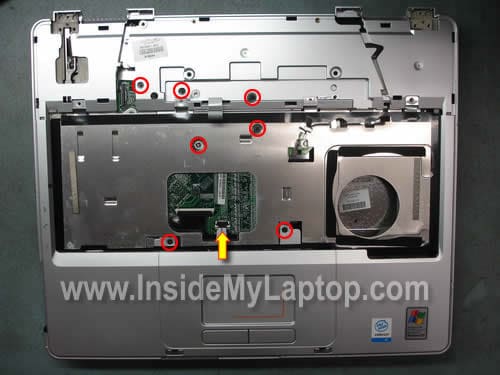
STEP 19.
Turn the notebook upside down and carefully lift up the base cover.
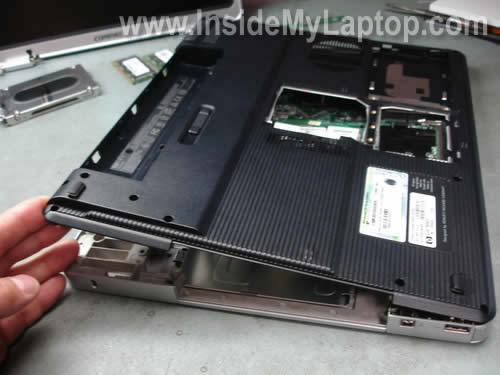
STEP 20.
Remove the base cover.
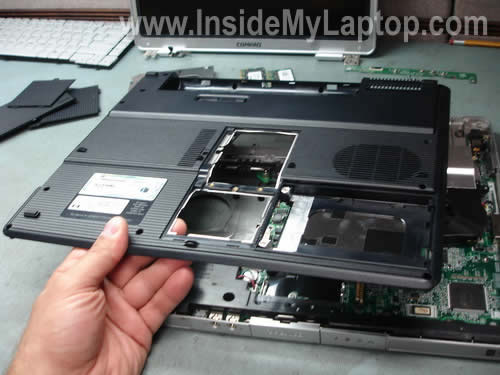
STEP 21.
Now you can access the cooling fan.
In order to remove the fan you’ll have to remove two screws and unplug the fan cable from the motherboard.
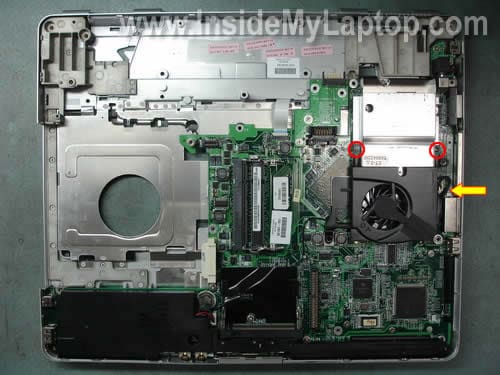
STEP 22.
Remove the cooling fan and replace it with a new one if needed.
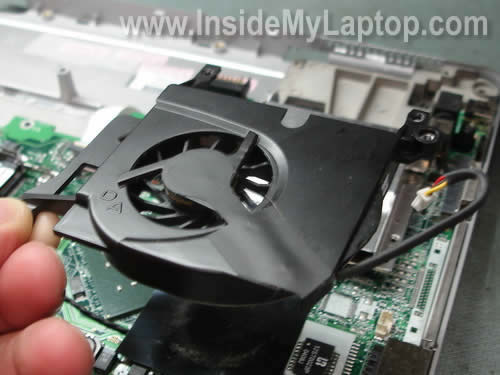
STEP 23.
Unplug the speaker assembly cable from the motherboard and remove the speaker assembly.
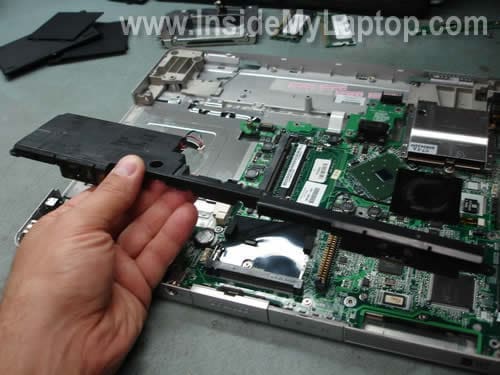
STEP 24.
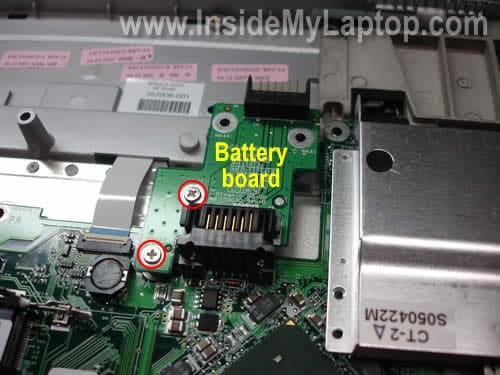
The battery is connected to the motherboard via a battery board.
Remove two screws securing the battery board and disconnect it from the motherboard.
STEP 25.
In a Presario M2000 notebook the power connector (power jack) is located on a separate power connector board. You can remove and replace the power connector board without removing the motherboard.
Remove two screws securing the power connector board and unplug it from the motherboard.
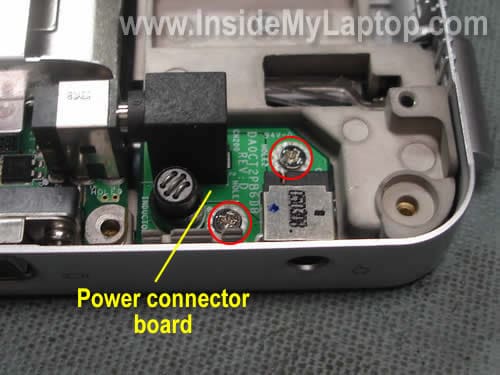
The power connector board is removed.
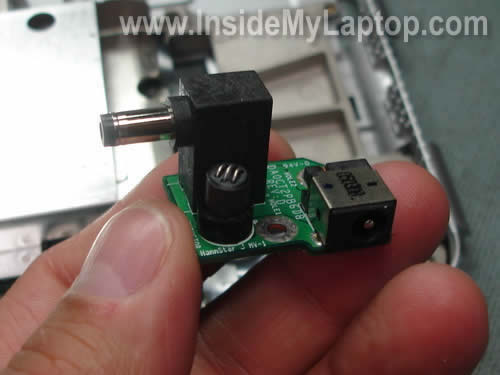
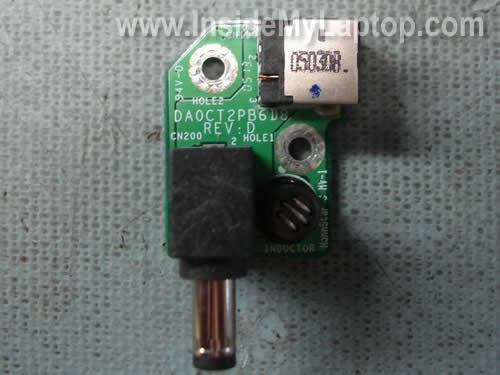
Using the part number DA0CT2PB6D8 you can find a new one on the Internet.
In a case of power connector (power jack) failure either replace the power jack or replace the whole power connector board.
STEP 26.
Remove four screws securing the motherboard.
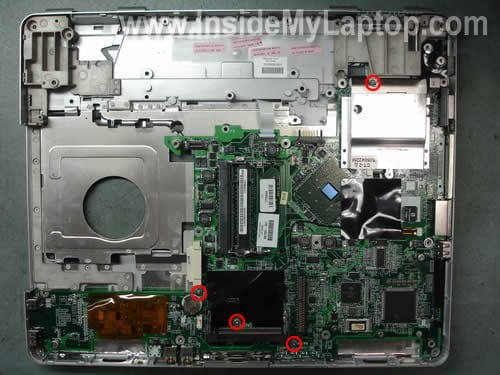
STEP 27.
Carefully lift up the motherboard on one side.
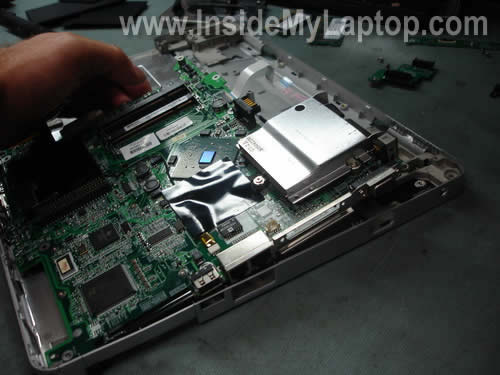
STEP 28.
Remove the motherboard.
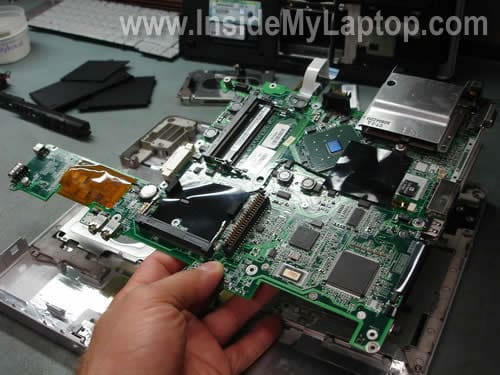
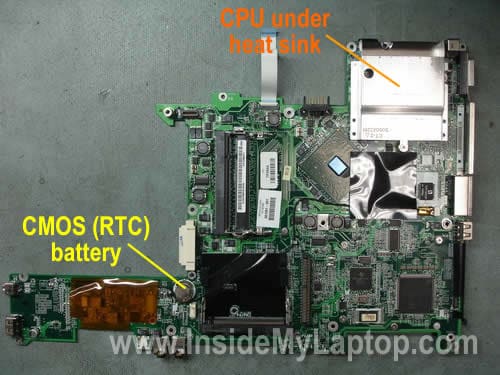
The processor (CPU) is located under the heat sink.
Tom
Thanks! Helped me to replace the fan.
Addy
A huge help… thanks…
Dan
I have a presario M2000 and I used this guide to check the cpu and it worked like a charm. Thanks a lot
Xander
Thanks , It helped opening my laptop to reset the cmos battery , the problem that I still have is that my usb ports gives power but it won`t pick up any usb devices. Can anybody help!
ruben
I was impressed with how easy it was to follow , made replacing keyboard and upgrading ram on my daughters compaq m2000 stupid easy, Thanx
Josue
THIS IS REALLY GOOD GUIDE. IM UPGRADING MY OLD PRESARIO WITH NEW DDR, CPU FAN, WIRELESS N, AND NEW HARD DRIVE. THIS GUIDE COVERED EVERYTHING. I WILL USE IT ONE MORE TIME TO UPGRADE THE SCREEN TO THE HI-RES LCD FROM THE NORMAL 1048×768 IT COMES WITH. REALLY GREAT TO FIND SOMETHING LIKE THIS FOR AN OLDER MODEL LAPTOP.
THANKS!!!!
damla
Thanks it is really help me to replace the mother board , apprecaited for the detail guide.
Josh
Some info works for V2000!
I used your instructions for replacing the LCD inverter by removing the keyboard bezel to remove the front screen bezel on a V2000 (not M2000). The two screws to be removed that hold the key bezel in the battery compartment are in a similar arrangement on a V2000 as the M2000 but closer to the rear of the laptop, about in the middle of the battery compartment. This made is much easier to remove the front screen bezel (without removing the whole screen unit from the laptop), which I was afraid of breaking at the hinges.
Thank you!
philominderia
the perennial broken dc power connection with these models made a cinch to
fix
….was just about to order a repair disc from U.K.
Humble Thanx!
Dominic Asprinio
I followed the directions to take off the bottom cover, but part of it is stuck. A small area near the battery will not release. My goal is to take off the bottom and locate the motherboard. Not sure what I am doing, so I wanted to check before I break the bottom plate getting it off. Any help would be greatly appreciated!!
frenchy30097
The usb ports (all) on the M2000 have stopped working. Techs think it is a motherboard problem. If I try to replace it myself, do I need to remove everything listed before removing the motherboard? Could their be something else wrong to prevent the usb ports from working. sometimes they do and then they die.
IML Tech
frenchy30097,
Yes. Just follow the guide until the old motherboard is removed. Replace it with a new one and assemble the laptop.
Could be software related problem. Before replacing the motherboard, I would try reinstalling Windows from scratch. If no help, you’ll have to replace the motherboard.
prashant
Hello,
Firstly Thanks for publishing excellent pictures of how to dismantle a Laptop.
I used ur pictures for repairing a cpu overheating problem of my compaq M 2010US model.
The blockage of cpu heatsink fins was compelling the Laptop to shutdown after 15 mts or so.
After clearing it my Laptop is working OK.
Thanks Once Again
Prashant
Ashwin
Looks excellent tutorial .i will use this tutorial to open my presario m2000 laptop which is suffering from heat issue and stops suddenly while working.
IML Tech
Ashwin,
Before you disassemble the laptop, try cleaning the cooling module with compressed air.
Find an air compressor (you can use canned air too) and spray air inside the intake on the bottom until all dust is gone. It might help.
imasith
hi;
thanks for useful guide , i disassemble my compaq presario c300 and clean its fan with your help.. but i have a problem; my computer dont start;
firstly i push power button but computer didnt open.. no signal no lights..
then i disassemle rtc baterry and assemble it again..
after that computer open , lights on; but just a black screen on monitor..i couldnt hear reading sound from harddrive.. it is working but wasnt read form computer..
i dont know what is the problem.. i want to fix it myself because in my living place i cant find any computer experts or hp services..
i didnt wear any anti-static things… i dont now if it is the problem..
any idea?
imasith
ok , i fix my problem.. thanks for useful guide..
Rich S
Is there a shortcut to changing the cmos batt on my presario 2100?
thanx, Rich
IML Tech
Rich S,
Not sure if Presario 2100 is any different from Presario M2000, but in the last one there is no shortcut. You have to remove the motherboard first.
Moon
This tutorial was great. It was the first time that I opened a computer, and it was awesome. So I had a bad power connector board that I replaced, and now the computer is back to working just fine…except that the battery won’t charge. The cord, power connector, and battery are all new. Is the battery board possibly my problem? I feel like I’m so close to having my laptop back. It sat, not working for so long. Now I just want to have the freedom to unplug it from the wall. Thanks for the help in advance.
-Moon
IML Tech
Moon,
Did it charge the battery before?
The battery plugs directly into the motherboard. If the battery will not charge, there could be a problem with the motherboard, not the power connector board.
I believe the power connector board simply supplies power to the motherboard, but the battery charging circuit is located on the motherboard.
Moon
No, the power connector board is fine. I bought a new one and now the computer works. I was asking about the battery board (Step 24.) I didn’t know if that connection to the motherboard might be too weak to power the battery. The battery status would say charging on the screen but it would not actually charge it. Also, if the battery charging circuit is the problem, is that something I could have a crack at or would that be too challenging? I don’t have a background in fixing a computer’s internals but think it could be fun. Thanks again. You’re awesome.
-Moon
IML Tech
Moon,
It’s possible but unfortunately I cannot tell if this is the problem.
You can try cleaning contacts on the battery board and try reconnecting it.
It will be too challenging unless you have some experience fixing motherboards on the component level.
Anant
Hi,
Many thanks for all the info. I managed to open my lappy and give it a good cleaning. Though I have a problem now, my wifi is not as strong as it was earlier.. it has become really weak. Any suggestions to improve the performance
Thanks
Anant
Hey man… got it fixed.. connected the wires other way round.. working perfectly now
Cheers
Anant
Jay
Awesome walk through, although there was a couple extra screws I had to take off, that wasn’t pictured. I have a Compaq Presario M2000. Great help. Thank you.
Gorge
My M2000 one day just doesn`t start, what could be ? How can i test ?
Kassim
I was almost giving up my Presario M2000 after several occasions I tried to open it up to clean the Fan and heat sink from dust. I thought it was all over when I couldn’t do anything to put it apart. I am really thankful to the good people who always share their know how (Do it yourself) technique. Otherwise I had to spend $120 to take it for service. Please keep it up with good ideas and help.
Sheikh Waize
i think it is a very usefull for compaq laptop holders .
In my laptop as i turn it on every thing works execpt their is no light on display , sometimes it comes at laptop work properly , but now only their is no light in display so please suggest which part i should replace to repair my laptop.
Johnny
How do I replace modem? Device manager now says it cannot find it
Randy
The above how-to also works for a Compaq Presario M2370EA. This model does have the wireless card onboard (and bluetooth).
Reg Genola
I have an Compaq M2000 that the display has gone very dim, still an image there. Where is the inverter board? Is it under the keyboard or under the display in the top of the laptop?
IML Tech
Reg Genola,
I have another guide for Compaq Presario M2000. This guide explains how to take apart the display panel.
The inverter board mounted inside the display panel, below the LCD screen. Take a look at the guide and you’ll see it.
Reg
Sorry about my previous post, I found the tutorial on removing the display and the inverter. There is no mention of a specific part number for the inverter board is this a universal part for Compaq or should I remove the old one first to check for a part number?
Thanks for your help.
IML Tech
Reg,
Probably you can find HP part number for the inverter board in the service manual. You can download manual from HP website.
What is your exact part number, not just Compaq m2000 but something like Compaq m2010us?
Roly
Hi there
Awesome guide, thanks for putting it up.
I have to now put all the gear than ran my wireless from my old M2000 (just stopped going) to another old one (that works great). Do I just have to change the wireless board and the button board and the antenna inside the screen, any tips? cheers
Nykole
Thank you so much for posting these instructions! I found them to be very useful.
Sumit Ajitsaria
My compaq presario m2000 doesnot boot nor it shows bios setup. please help.
Angelo Greco
Hi there
Many thanks for the guide, excellent, very, very helpful.
Regards
Angelo
Della
Do I have to remove the keyboard and screen to take the bottom off? I just need to replace the fan.
Mustafa
Thanks very much for posting these instructions! It helped us pull the laptop apart in order to clean the fan area which was clogged up and caused the device to overheat and shut down.
Cheers!
swami
very nice thank u so much
john black
Once again thank you for an excellent web page.
About 6 months ago I disassembled my Compaq Pressario M2000 to fit new speakers.
It worked but kept on overheating.
So I have just disassembled it again and found that I had not screwed the heatsink to the cpu.
So I replaced the screws and the heatsink compound and now seems ok.
Easy not to do.
There are so many screws and so many of them are seized and so break when undone.
So now I have rather less screws then ever before.
I wish that they would make a laptop with a strong aluminum case and a standard size and shape like a PC.
BERNDOG
THank you so much!!!!!!!!!!!!!!!!!!!!!!!!!!!!!!!!!!!!!!!!!!!!!!!!!!!!!!!!!!!!!!!!!!!!!!!!!!!!!!!!!!!!!!!!! this helped me.
Tony
Thanks much for your time and effort in this laptop,
Aarthi
Many thanks for the instructions..very helpful
Druveen
Thank you.
Joe Blazer
Thank you for your time to do this video! It allowed me to repair myDC power port.
thanks again!
Joe AB8ZK
dean
my laptop works without those two ram modules. How?????
IML Tech
@ dean,
Cannot be. If the laptop has only two memory slots and you removed both memory modules it will not work.
Jeff Taylor
this is the best website ever if i were rich i woiuld throw money at you ,,, thank you so much for the instructions VERY helpful i knoew where to go for instructions for my next repair no matter whet make or model it is i m fixing … THANKS A MILLION
JT
Gene
I would like to replace the bios battery before it goes bad or leaks.
Does anyone know what number it is? (Like 2032)
IML Tech
@ Gene,
I wouldn’t touch it if the battery still works.
I believe it’s a regular CR2032 battery.
eric
The battery is smaller than normal. not a 2032. number is ML1220 3 volt + on top. maxell Rechargeable.. Ton of screws to get to it. Hp has some good guides.
http://www.hp.com/ctg/Manual/c00312740.pdf
Javier Romero
Thank you so much for this guide, you helped me a lot.
Greetings.
steve scripps
ive stripped and replaced 2 usb, on re assembly, had a drive lock problem, so got a new HD… now it is booting up to a multimedia cable fail error message, not finding the HD,……. which is the multimedia cable? is it the white ribbon one from the button board? everything seems to be connected ok.
Windows will start to install, but shows no partitioned drive…. so its not finding the HD.
IML Tech
@ steve scripps,
Hard drive in this laptop doesn’t have a cable. It’s connected to the motherboard via an adapter (attached to the hard drive).
If the laptop doesn’t see the hard drive most likely it’s one of the following:
1. Bad connection between the drive and motherboard. Try reconnecting the drive.
2. Bad hard drive adapter. Try replacing the adapter.
3. Bad nard drive. Try connecting the hard drive to another computer and see if it’s recognized.
4. Motherboard failure. In this case laptop not worth fixing.
missnaem
thank you very much
you site helps lots
Mark
Thank you very much, couldn’t have accessed power connector board without these detailed and excellent instructions. One note, my Presario M2000 has one more screw than illustrated (Step 18). Great job!