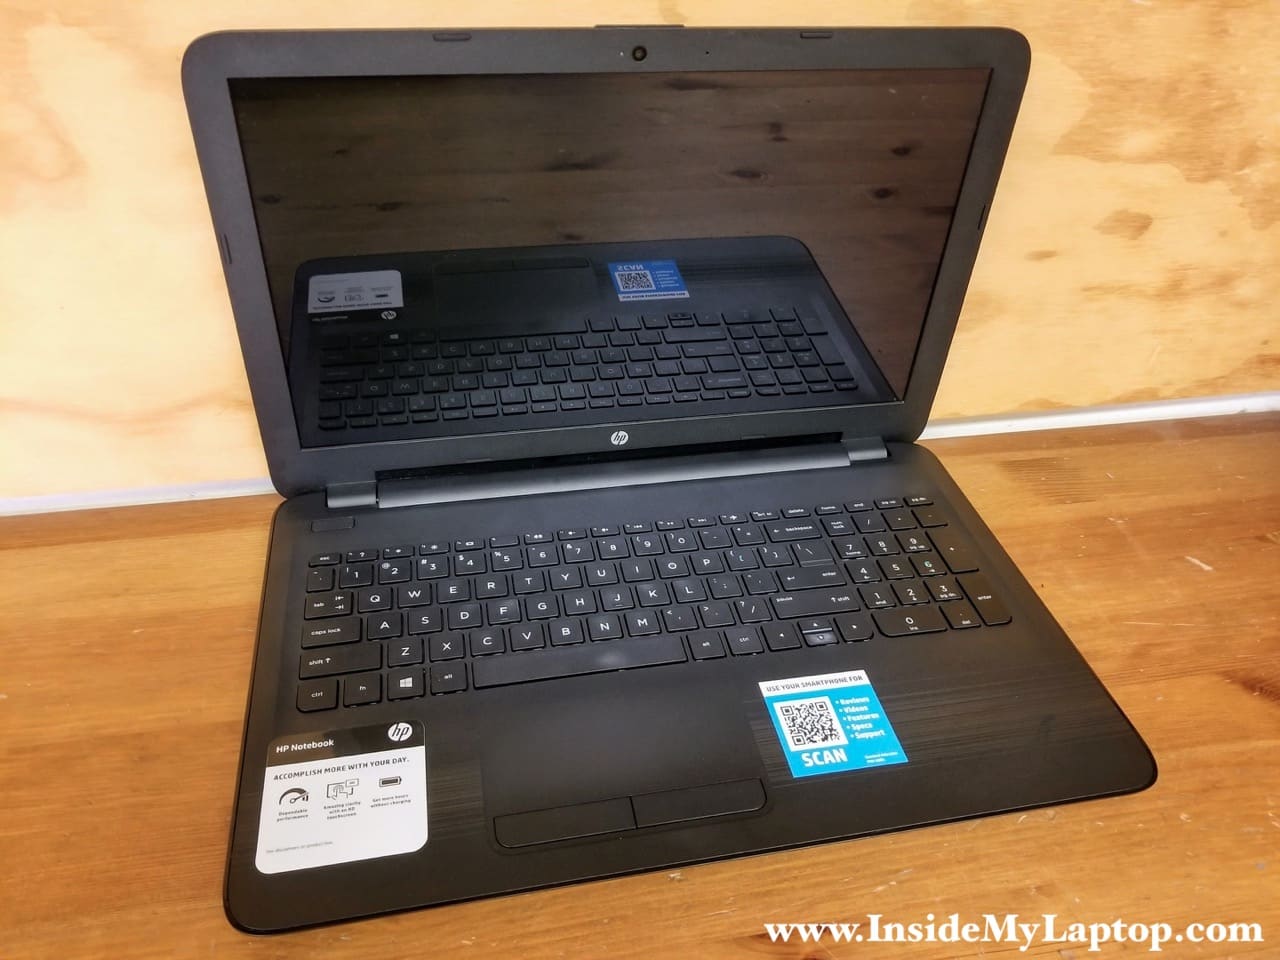
Today I will walk you through a full disassembly of HP 15 notebook PC aka 250/255/256 G5 Notebook PC. All these models are very similar.
In the first part of this disassembly guide I will show how to take apart the notebook base. In the second part I will take apart the display assembly and remove the LCD screen.
There are many different HP 15 Notebook PC flavors and configurations. You should be able to use this guide for one of the following models:
HP 15-ac series
15-ac020nr, 15-ac113cl, 15-ac120nr, 15-ac121dx, 15-ac130ds, 15-ac136ds, 15-ac137cl, 15-ac143dx, 15-ac143wm, 15-ac147cl, 15-ac151dx, 15-ac157cl, 15-ac158dx, 15-ac161nr, 15-ac163nr, 15-ac177cl, 15-ac183tu, 15-ac185nr
HP 15-af series
15-af015nr, 15-af087nw, 15-af093ng, 15-af112nr, 15-af113cl, 15-af123cl, 15-af127ca, 15-af131dx, 15-af135nr, 15-af139ca, 15-af141dx, 15-af152n, 15-af175nr
HP 15-ay series
15-ay009dx, 15-ay011nr, 15-ay013nr, 15-ay018nr, 15-ay020ds, 15-ay039wm, 15-ay041wm, 15-ay065nr, 15-ay067nr, 15-ay068ca, 15-ay068nr, 15-ay078nr, 15-ay103dx, 15-ay122cl, 15-ay145nr, 15-ay163nr, 15-ay196nr, 15-ay173dx, 15-ay177cl, 15-ay191ms, 15-ay196nr
HP 15-ba series
15-ba009dx, 15-ba015wm, 15-ba018wm, 15-ba039au, 15-ba044au, 15-ba053nr, 15-ba057cl, 15-ba067cl, 15-ba079dx, 15-ba088nr, 15-ba113cl, 15-ba043wm
HP 15 notebook PC base disassembly.
STEP 1.
As always, start the disassembly process with removing the battery.
Remove one screw securing the optical CD/DVD drive (yellow circle). Pull the optical drive out and remove it.
Remove all screws securing the bottom case.
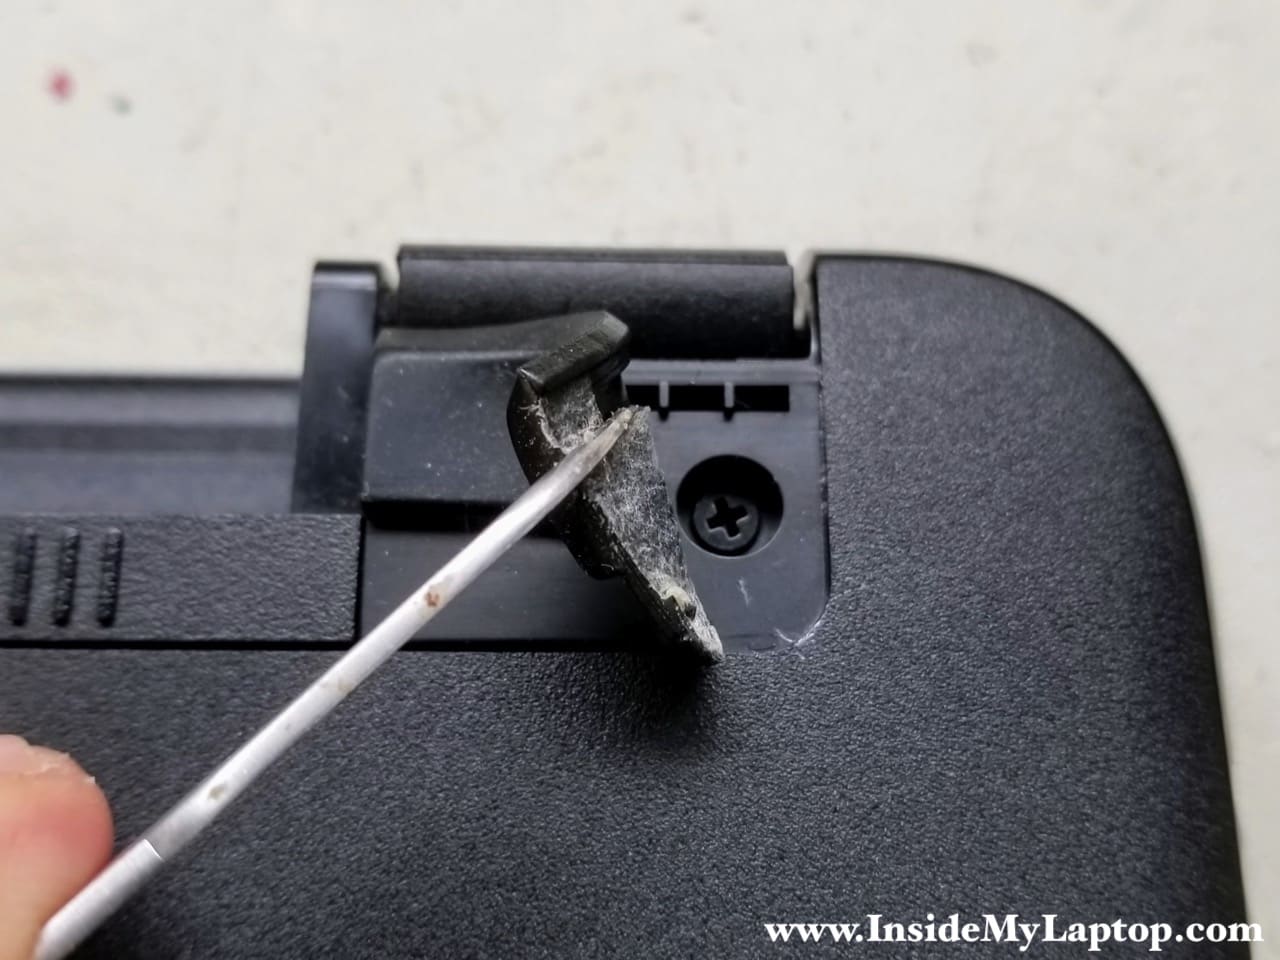
Attention! There are two screws (green circles) hidden under two bottom feet.
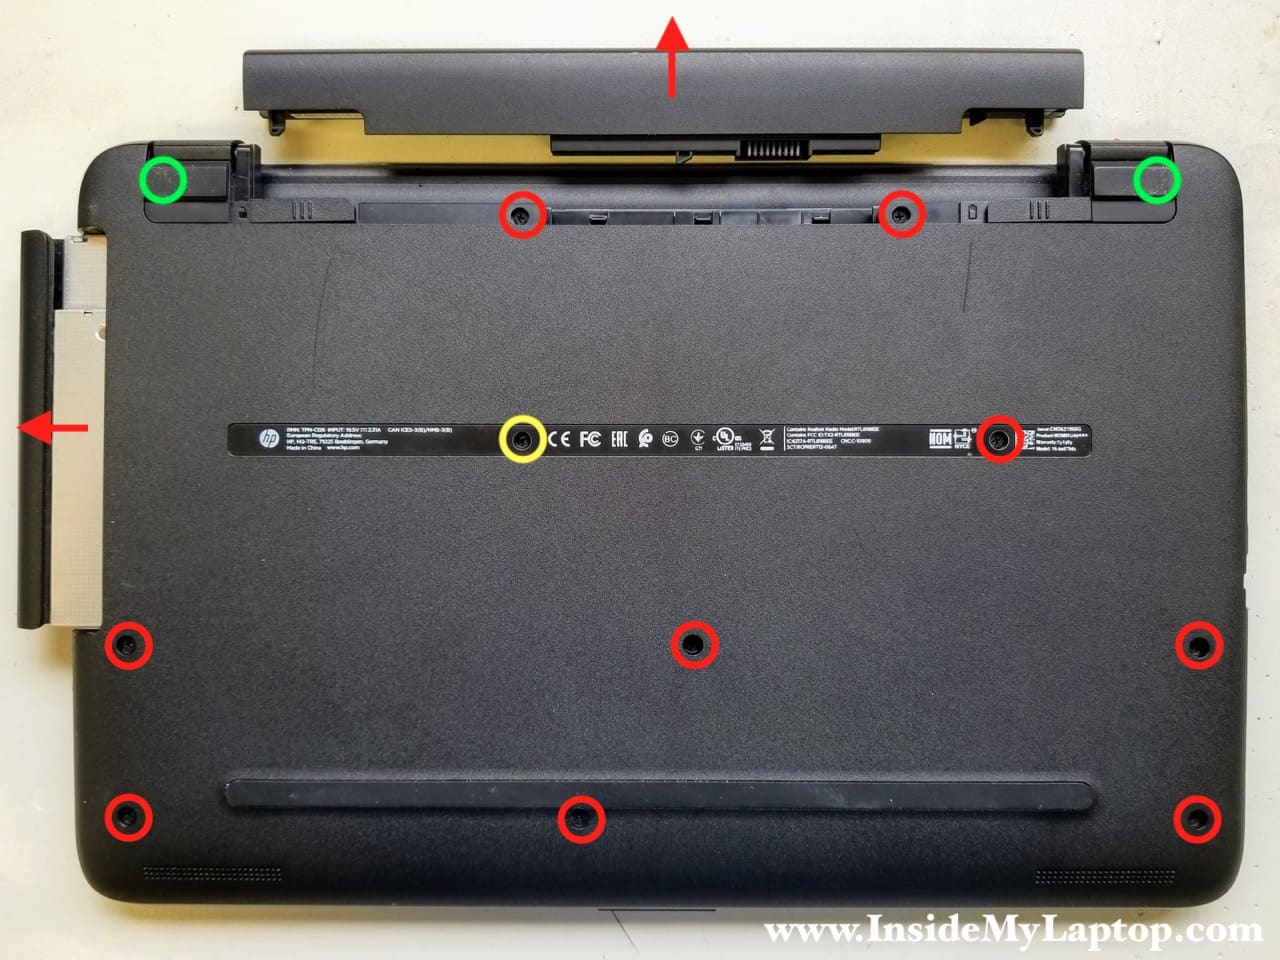
Peel off the bottom foott from the case to access the hidden screw. Remove hidden screws from both sides of the notebook.
STEP 2.
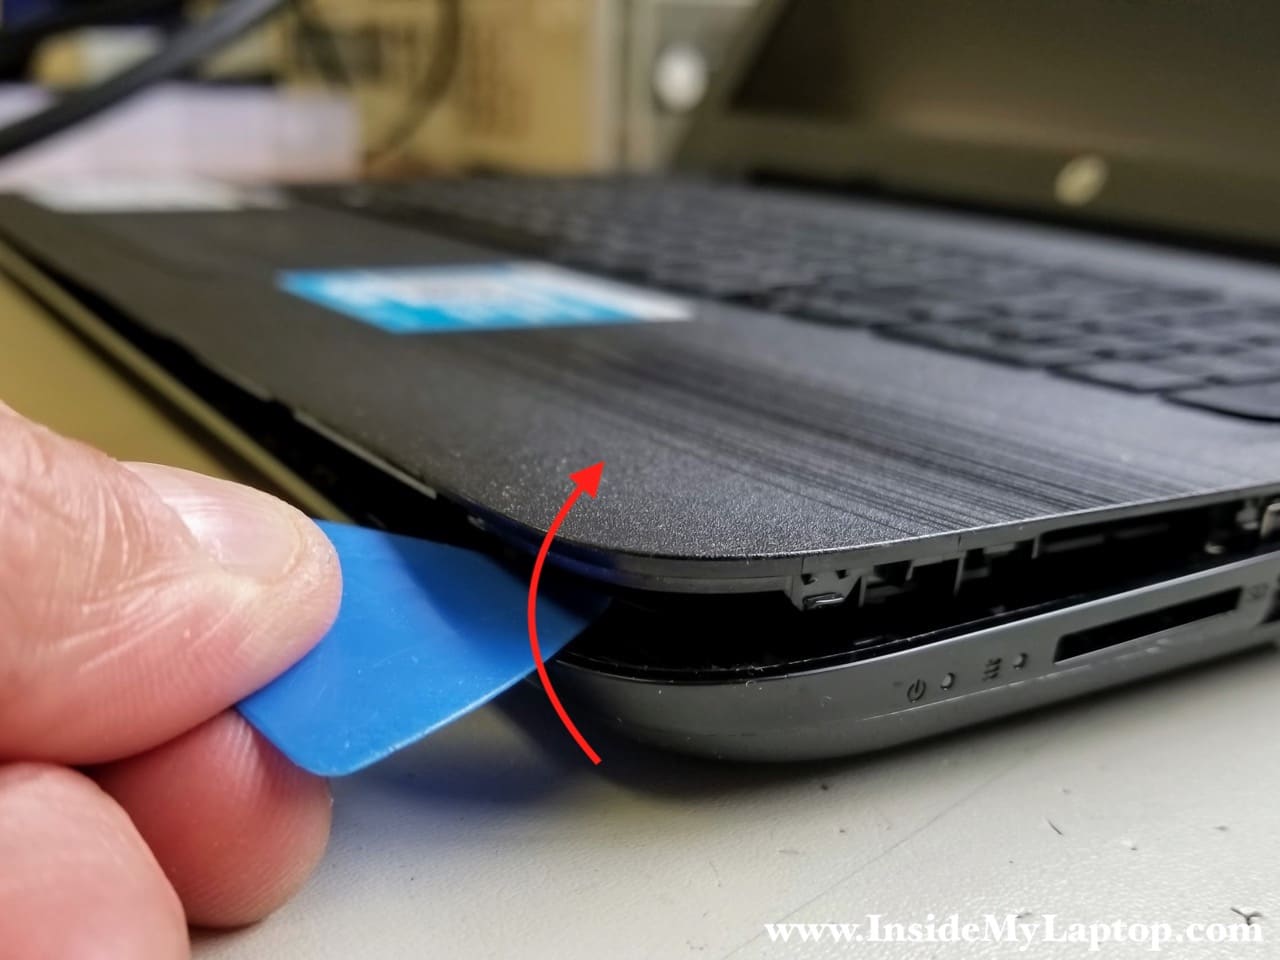
Using a plastic case opener separate the palmrest from the bottom case.
STEP 3.
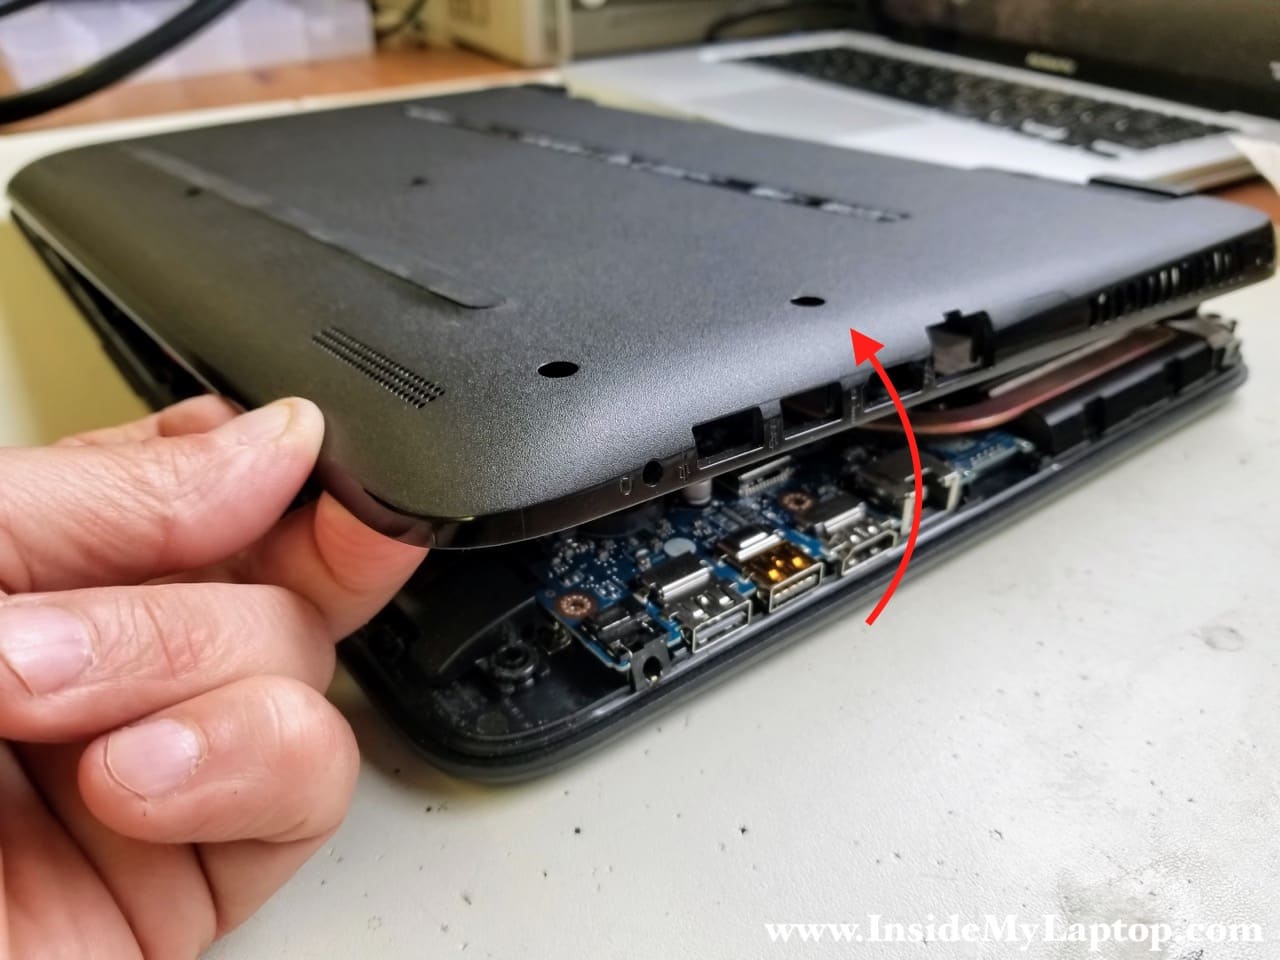
Turn the notebook upside down and remove the bottom case.
STEP 4.
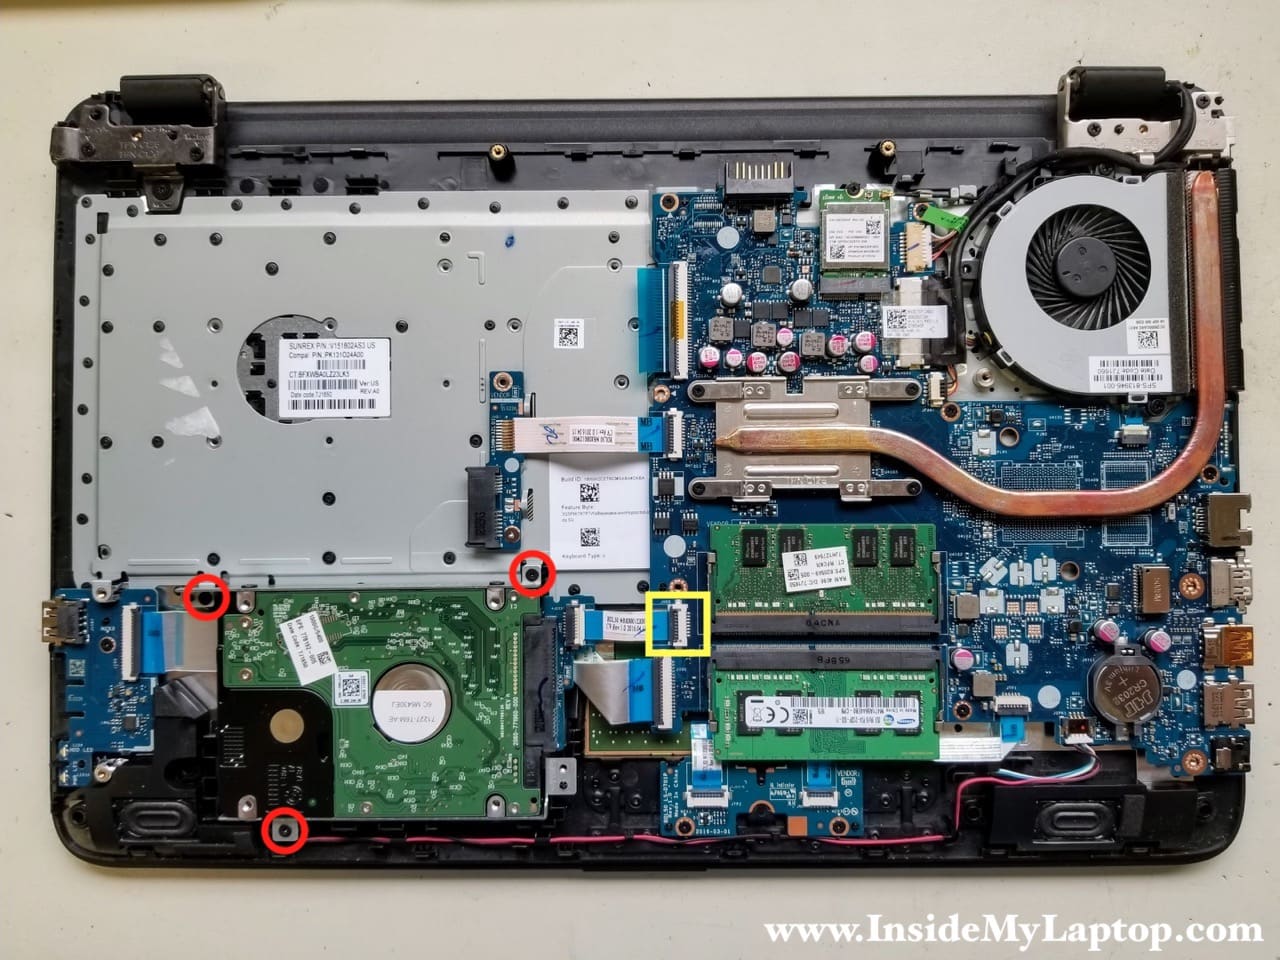
Remove three screws fixing the hard drive bracket to the case.
Disconnect the hard drive cable (yellow square) from the motherboard.
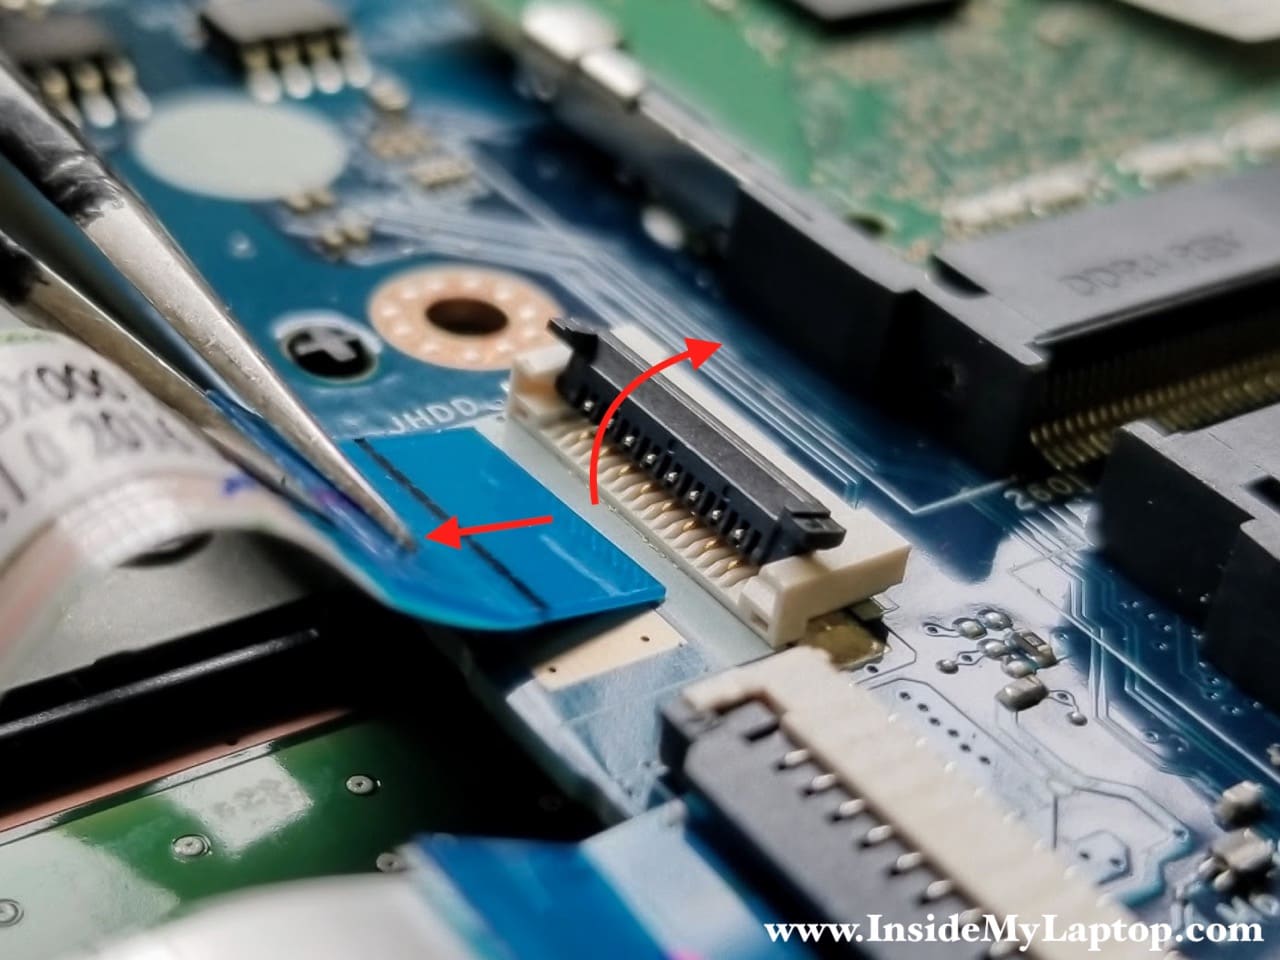
On the following picture I show how to unlock the connector and release the cable.
- Carefully lift up the locking tab to release the cable.
- Pull the cable out of the connector.
STEP 5.
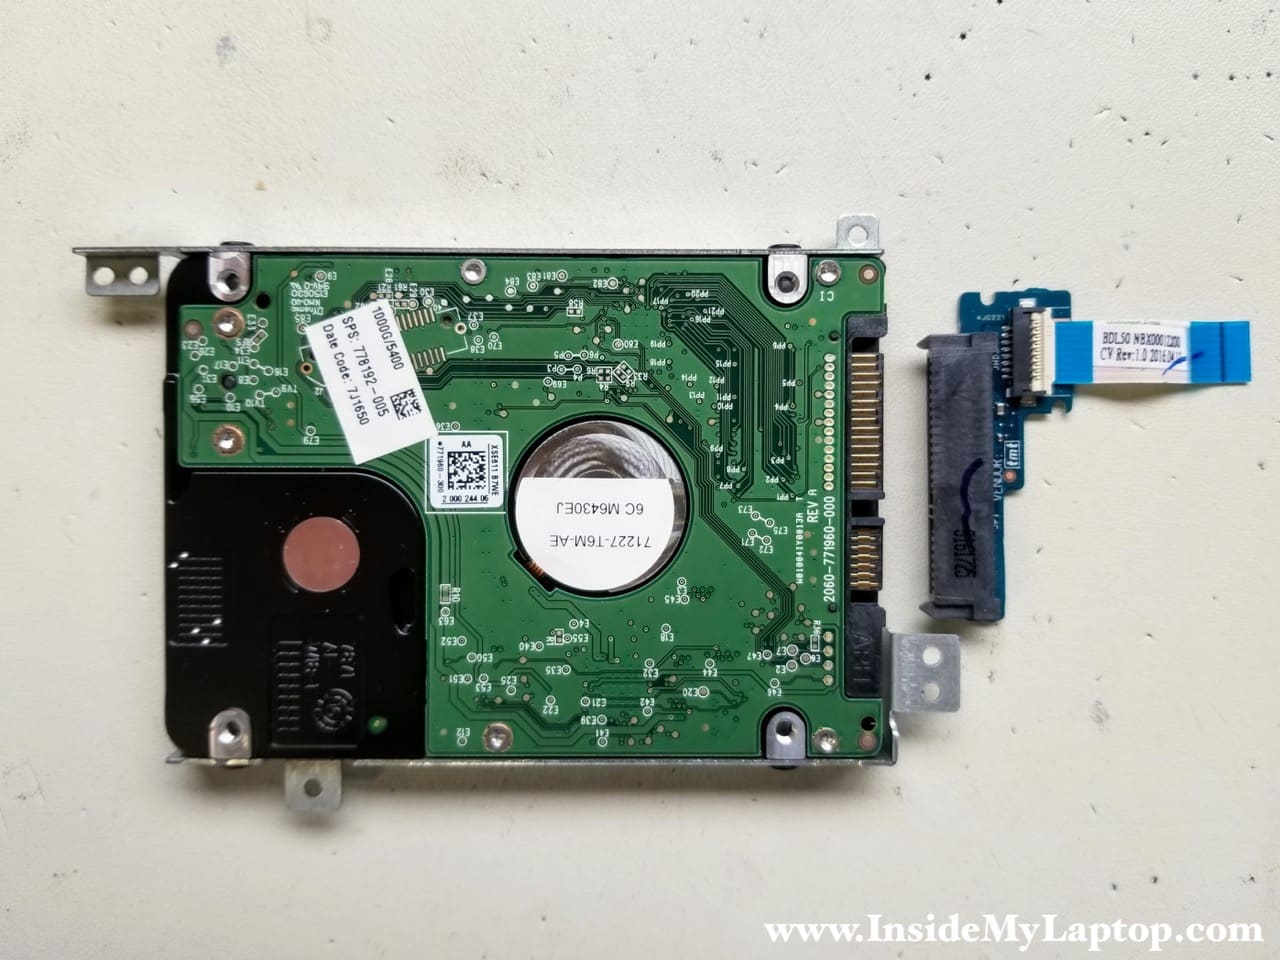
Remove the hard drive assembly from the notebook.
I recommend upgrading this regular hard drive to a 2.5″ SATA solid state drive to improve laptop performance.

If you are going to replace it with another hard drive or SSD, you will have to transfer the mounting bracket and the SATA cable.
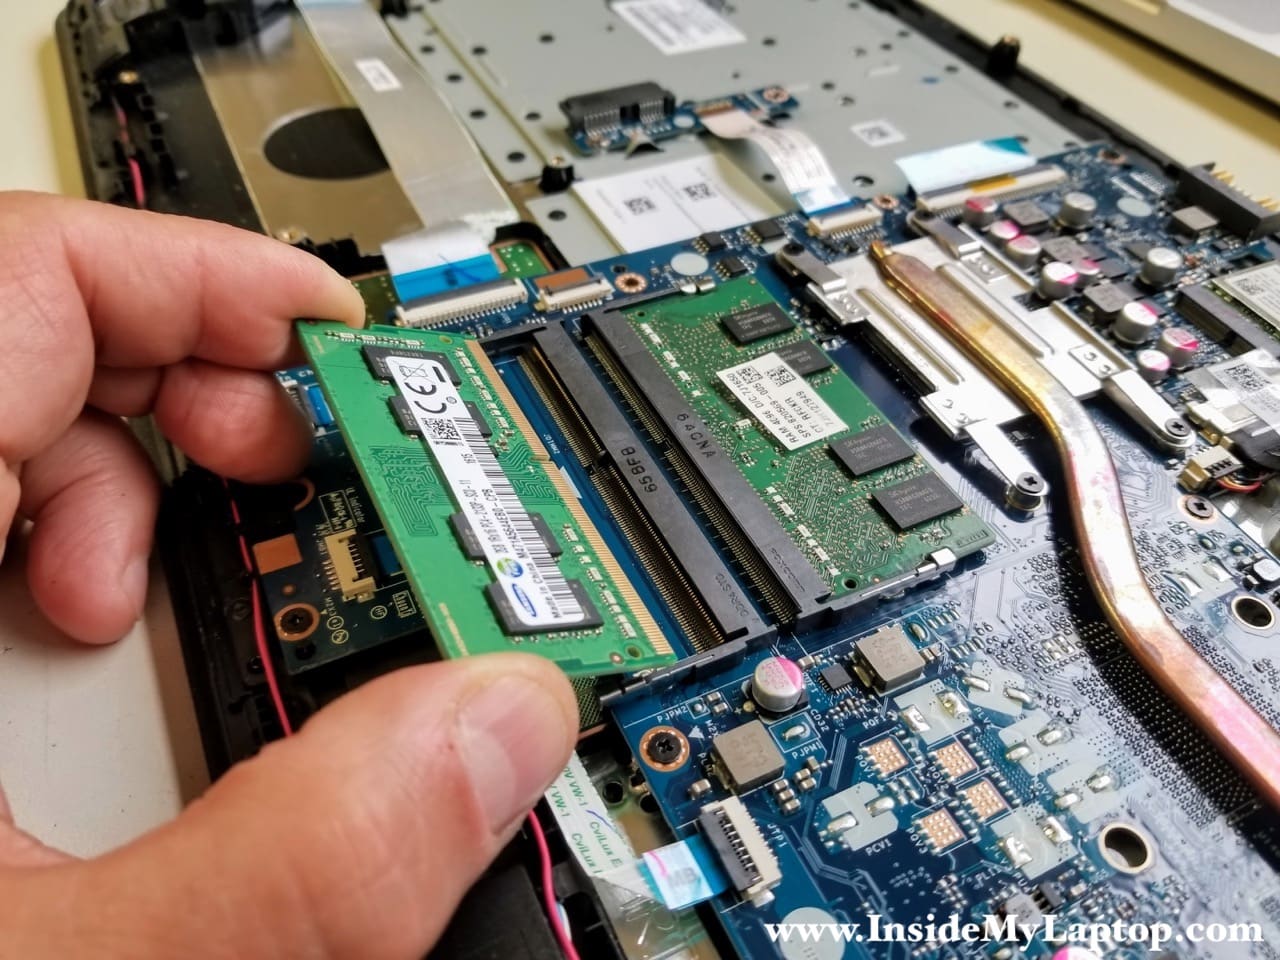
STEP 6.
HP 15 notebook PC motherboard has two memory slots. Remove both RAM modules if necessary.
You can install up to 16GB (2x8GB) DDR3-12800 SODIMM RAM modules into these slots.
STEP 7.
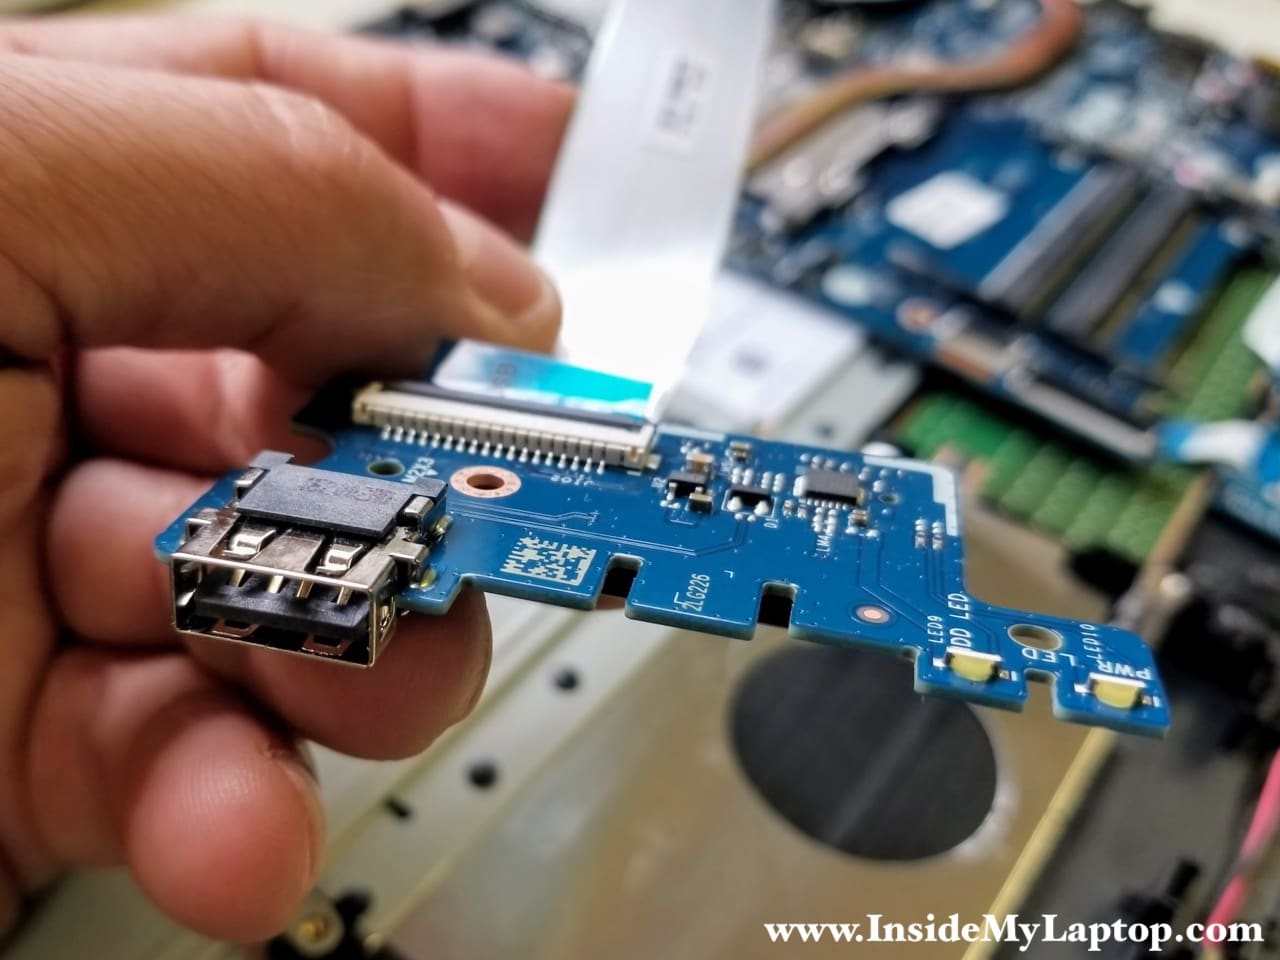
Remove one screw fixing the USB LED status board. Disconnect the cable from the motherboard.

STEP 8.
Remove the USB LED status board.
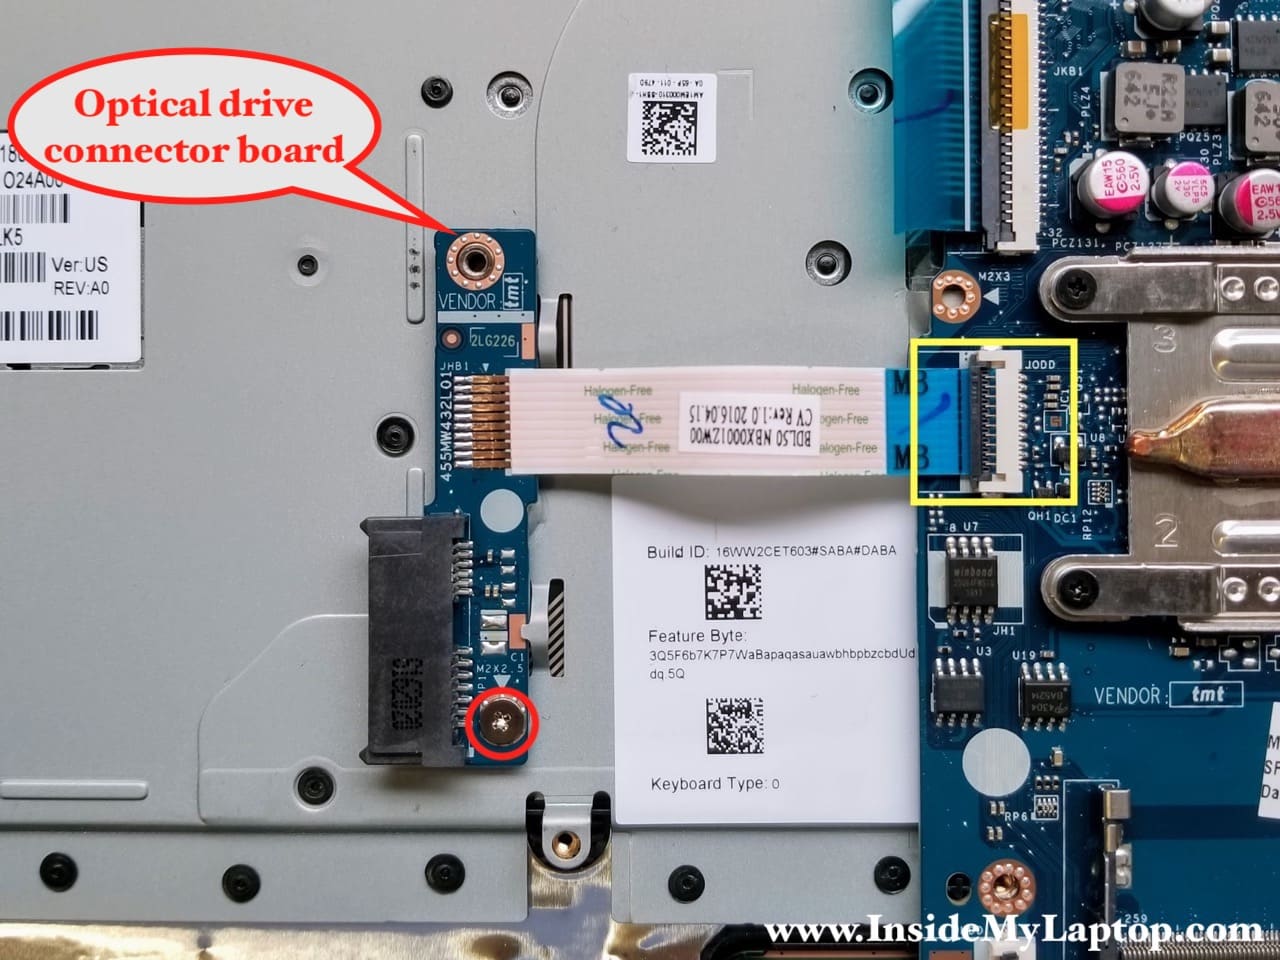
STEP 9.
Remove one screw fixing the optical CD DVD drive connector board. Disconnect the cable from the motherboard.
Remove the optical drive connector board.
STEP 10.
Remove two screws fastening the cooling fan to the case. Unplug the fan cable from the motherboard.

STEP 11.
Remove the cooling fan. Fan part number: 813946-001.

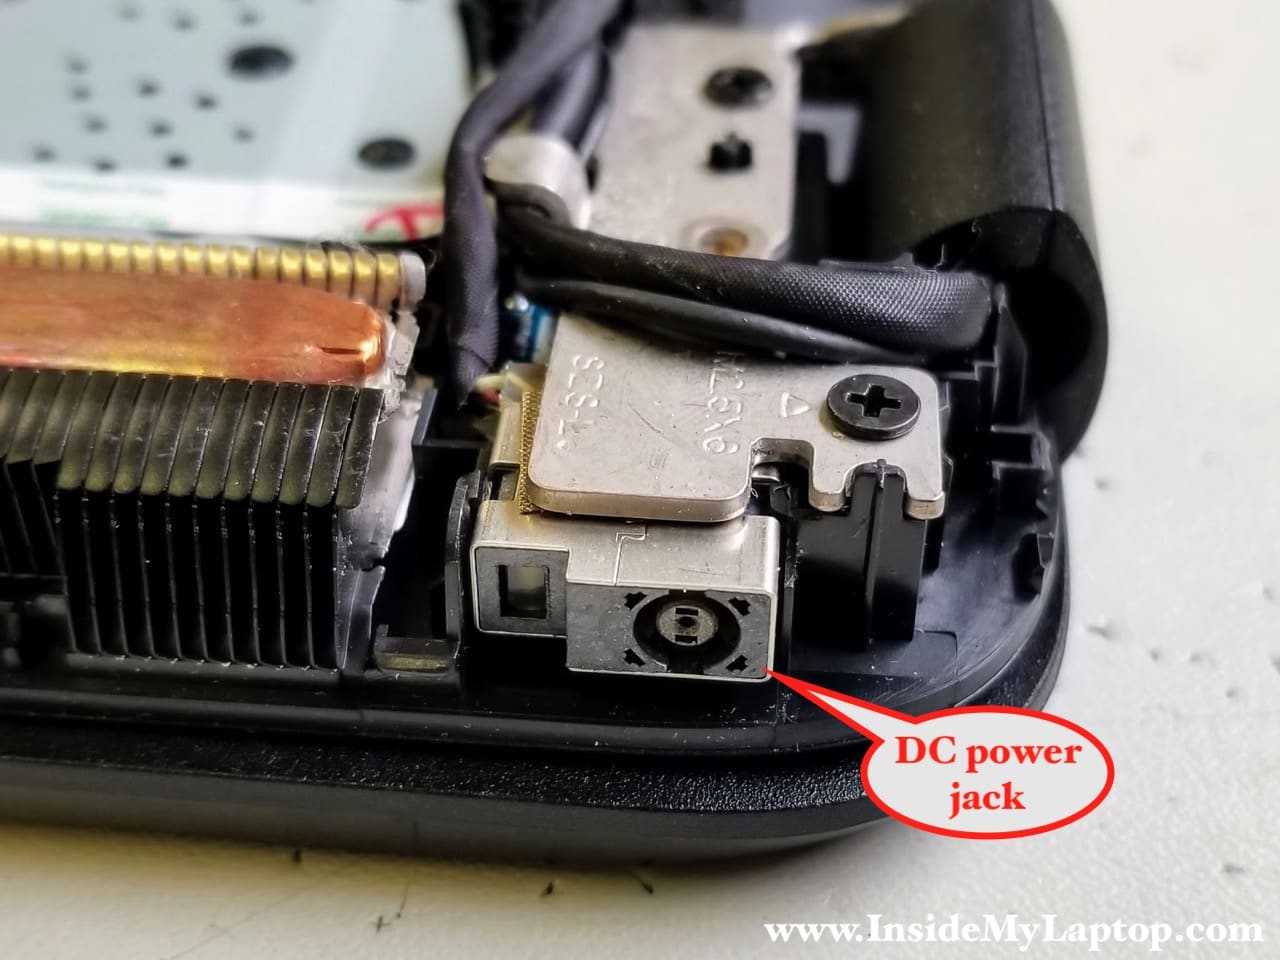
In HP 15 notebook PC the DC power jack mounted under the hinge. Let’s remove it.
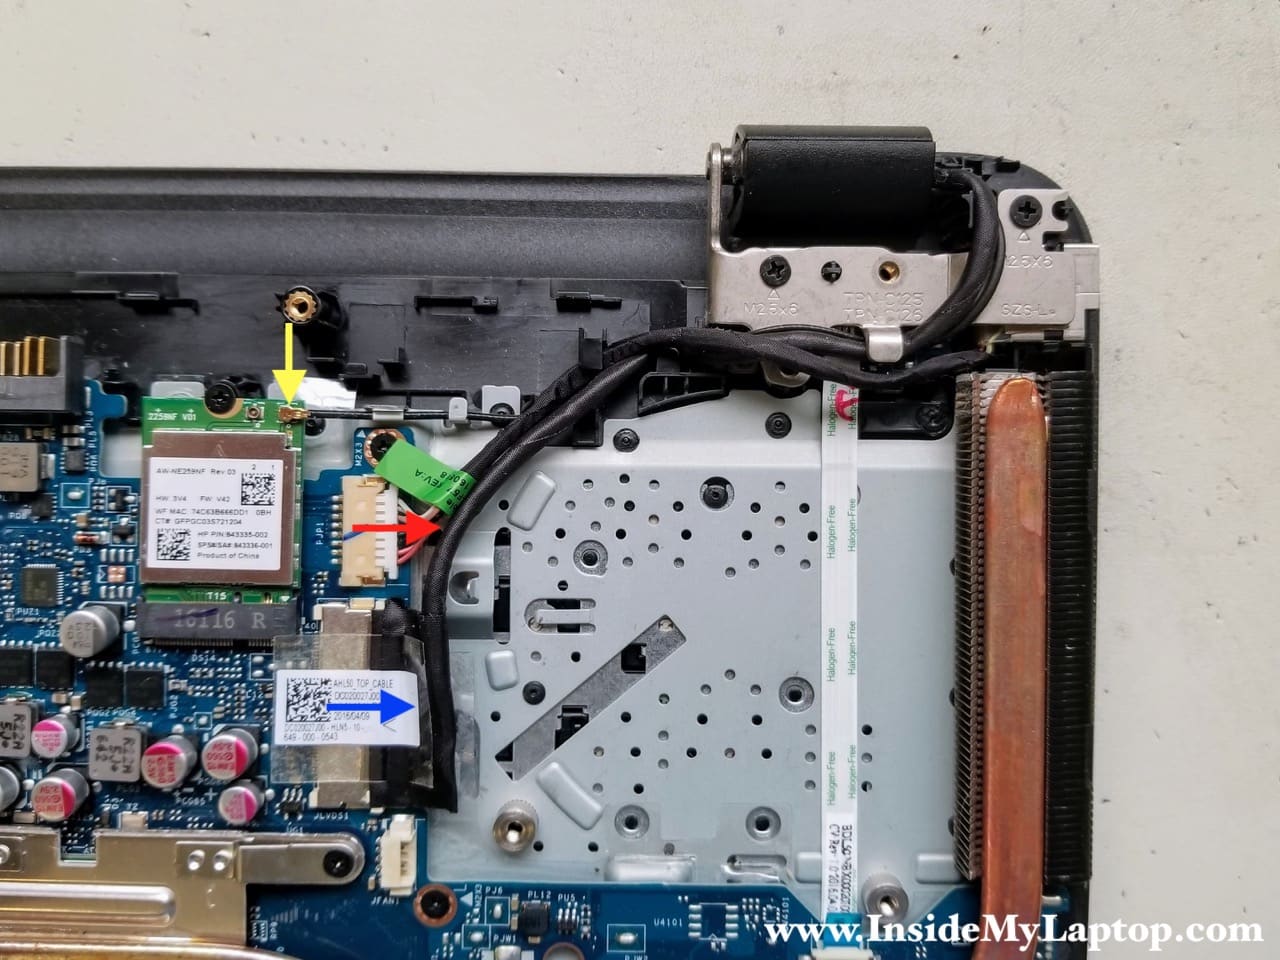
STEP 12.
Disconnect the Wi-Fi antenna cable from the wireless card (yellow arrow).
Disconnect the DC power jack harness from the motherboard (red arrow).
Disconnect the display video cable (blue arrow).
STEP 13.
Move all cables aside and remove two screws from the display hinge.
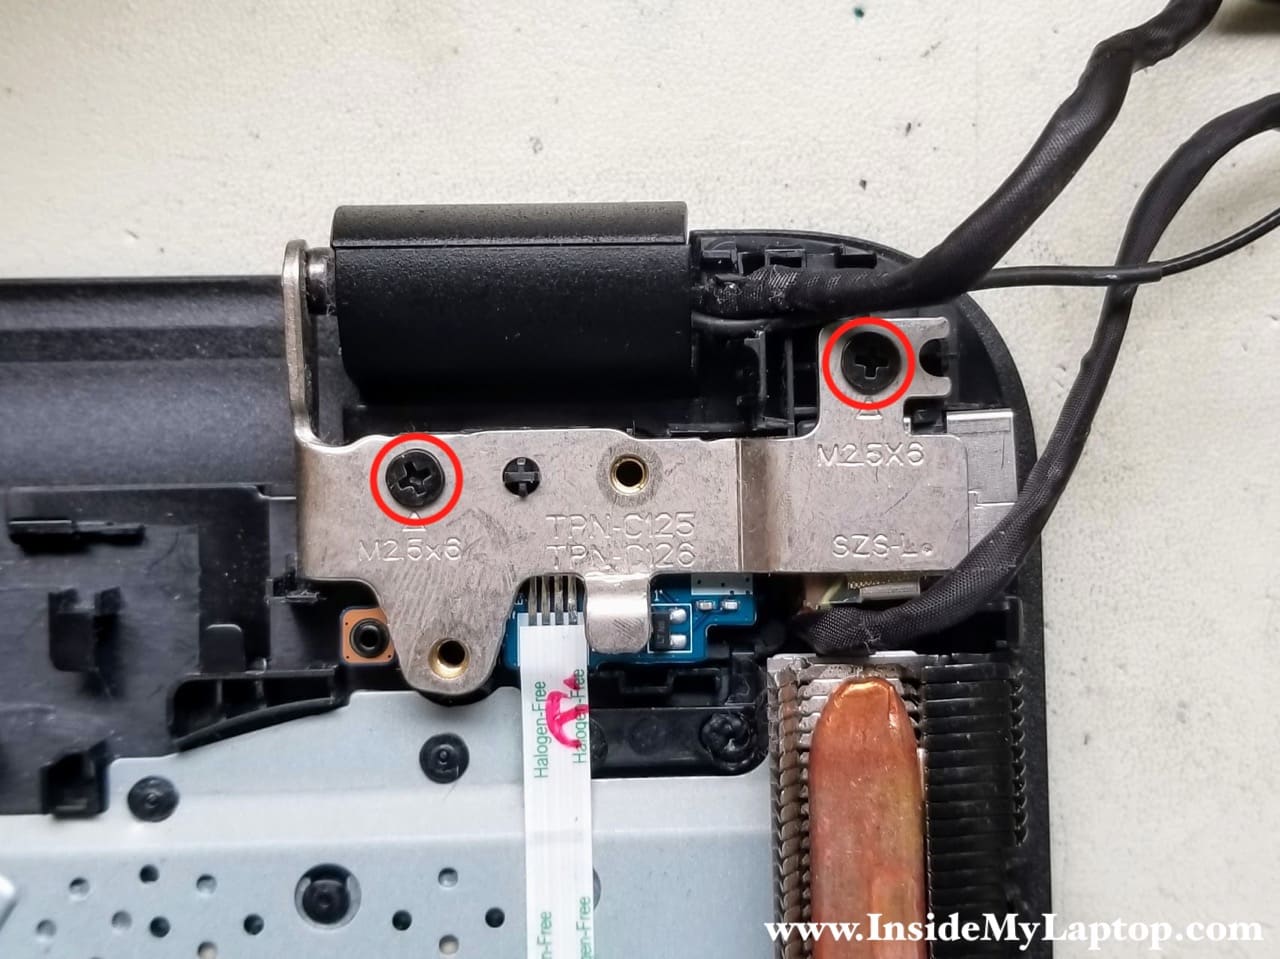
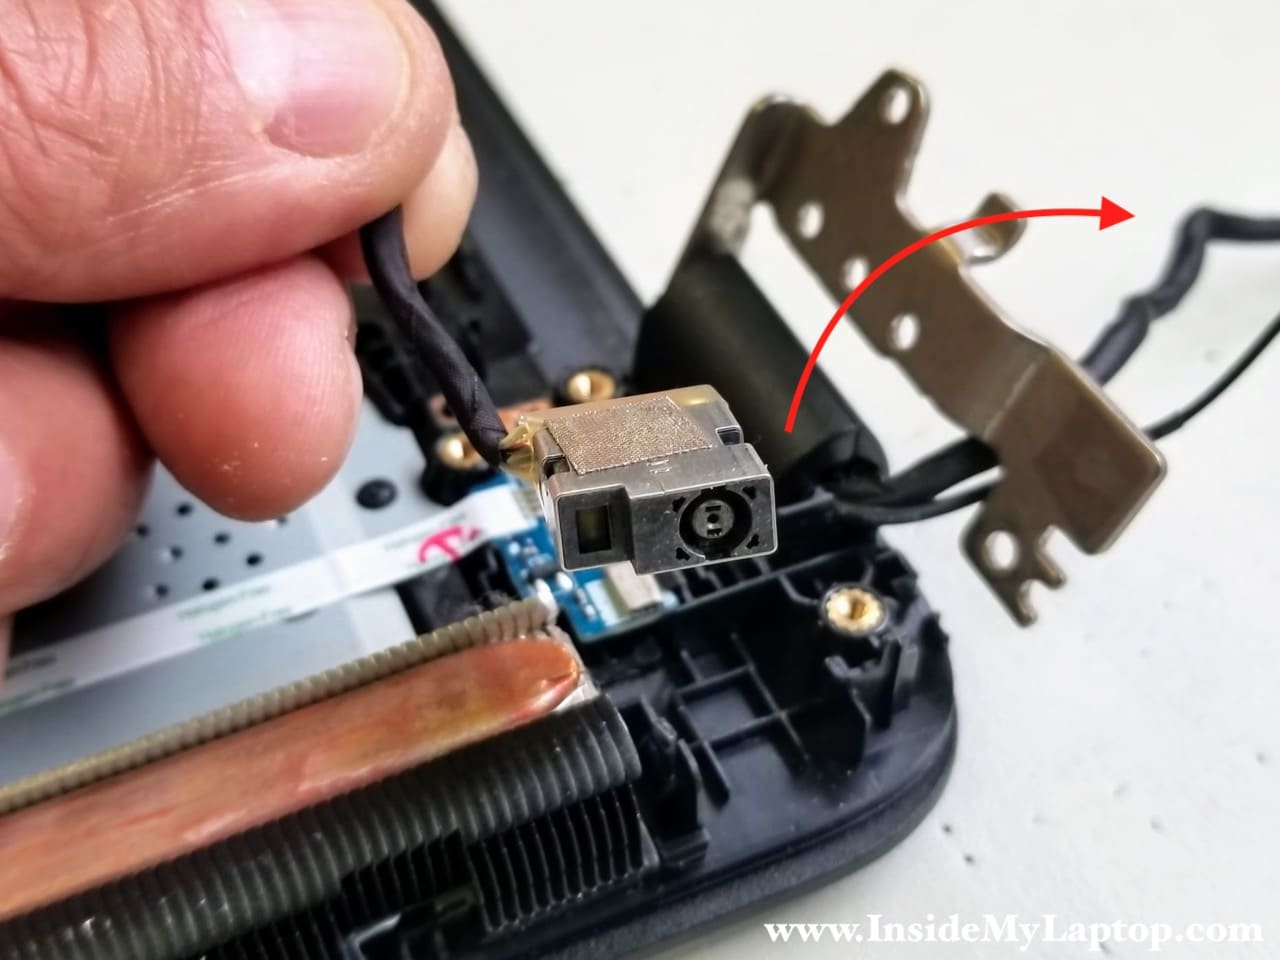
STEP 14.
Open up the hinge and remove the DC power jack.
STEP 15.
The power button board also mounted under the same hinge.
Remove one screw securing the board and unplug the cable from the motherboard.
Peel off the cable from the case (there is adhesive underneath) and remove the power button board.

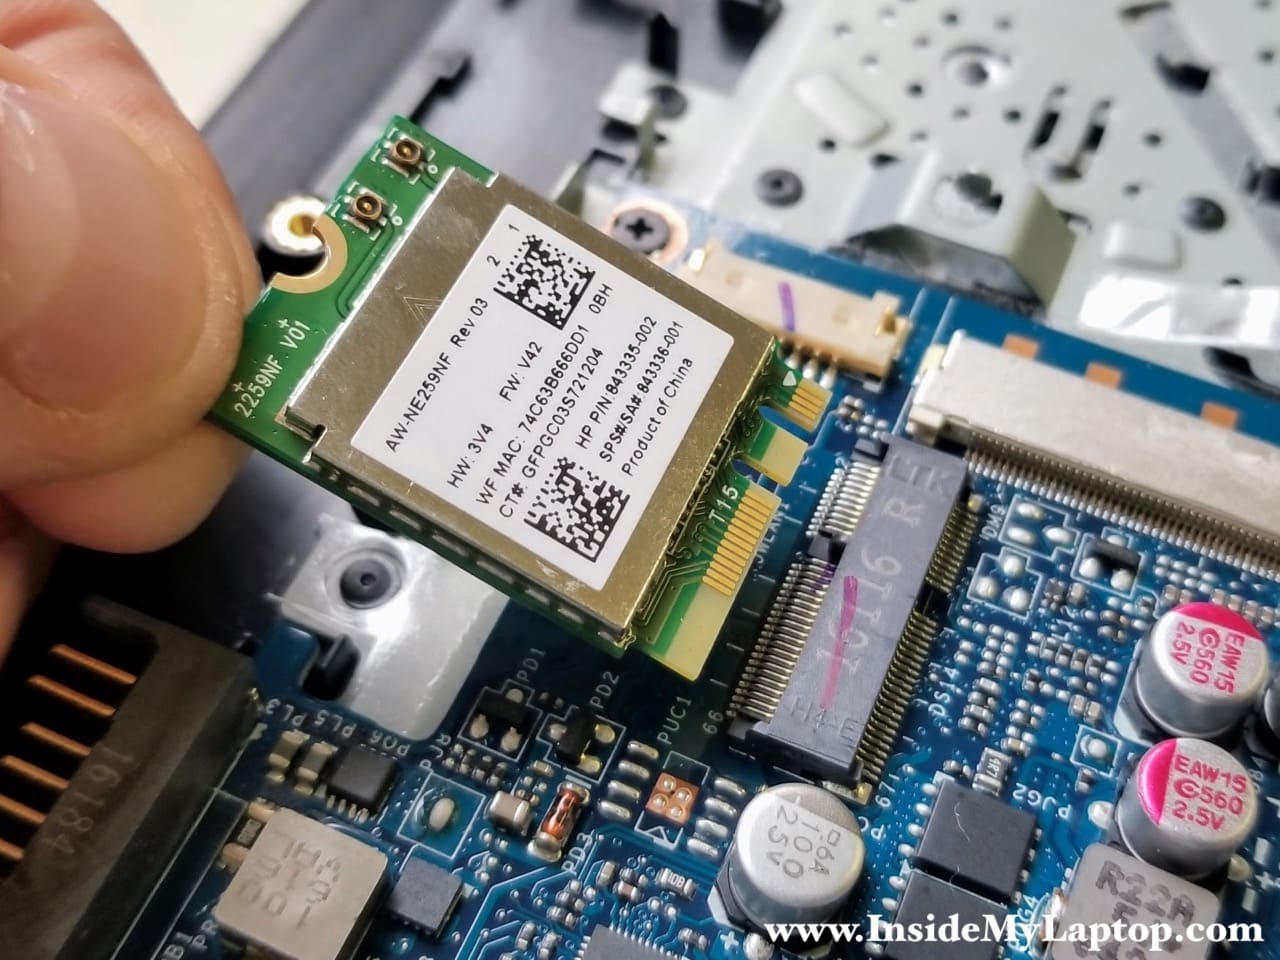
STEP 16.
Remove one screw securing the wireless card and pull the card out of the slot.
STEP 17.
Remove five screws fastening the motherboard to the case.
Disconnect the keyboard cable (red rectangular), touchpad button board cable (yellow square) and speakers cable (green square).
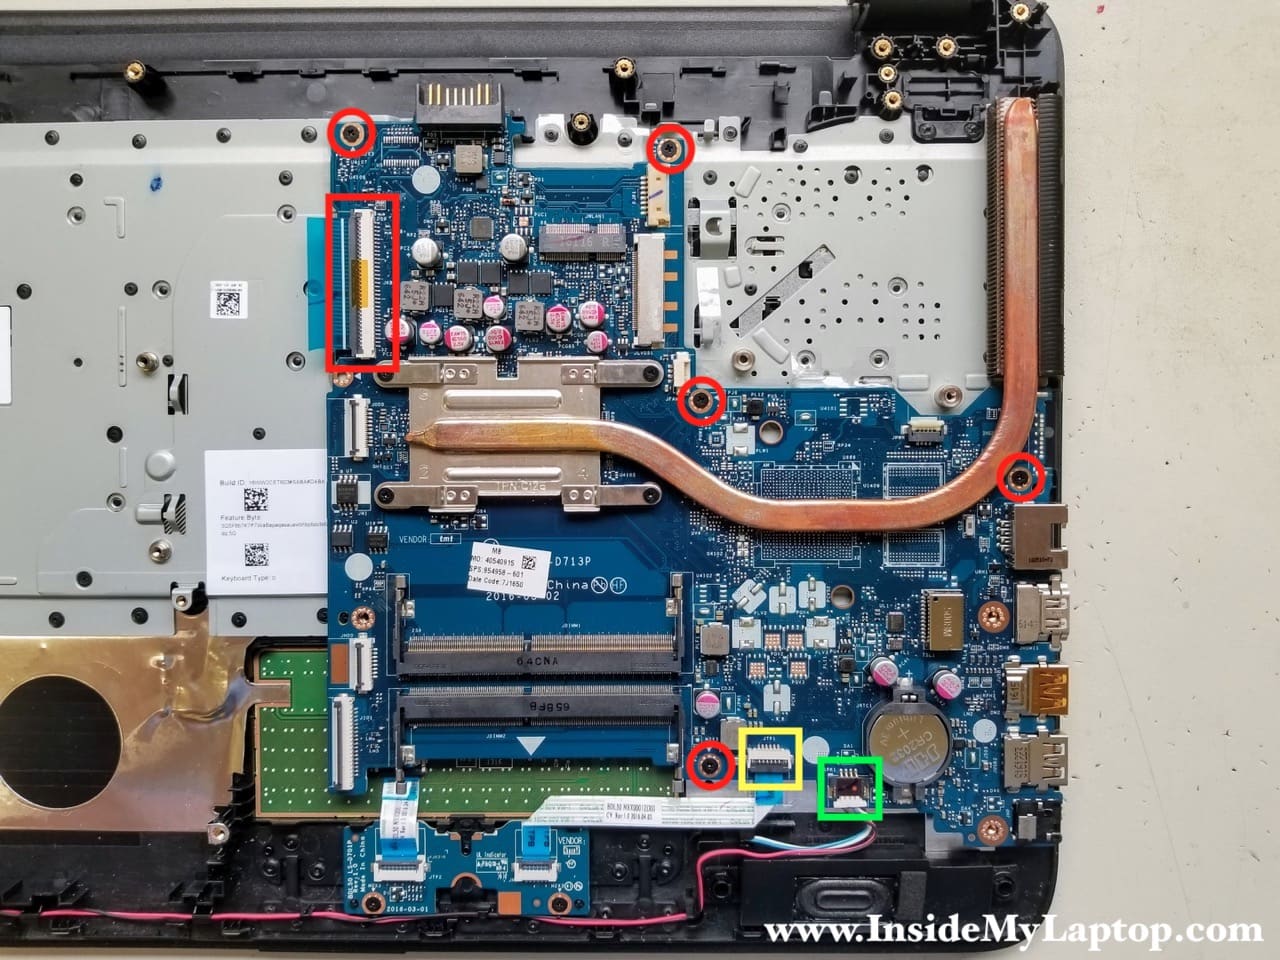
STEP 18.
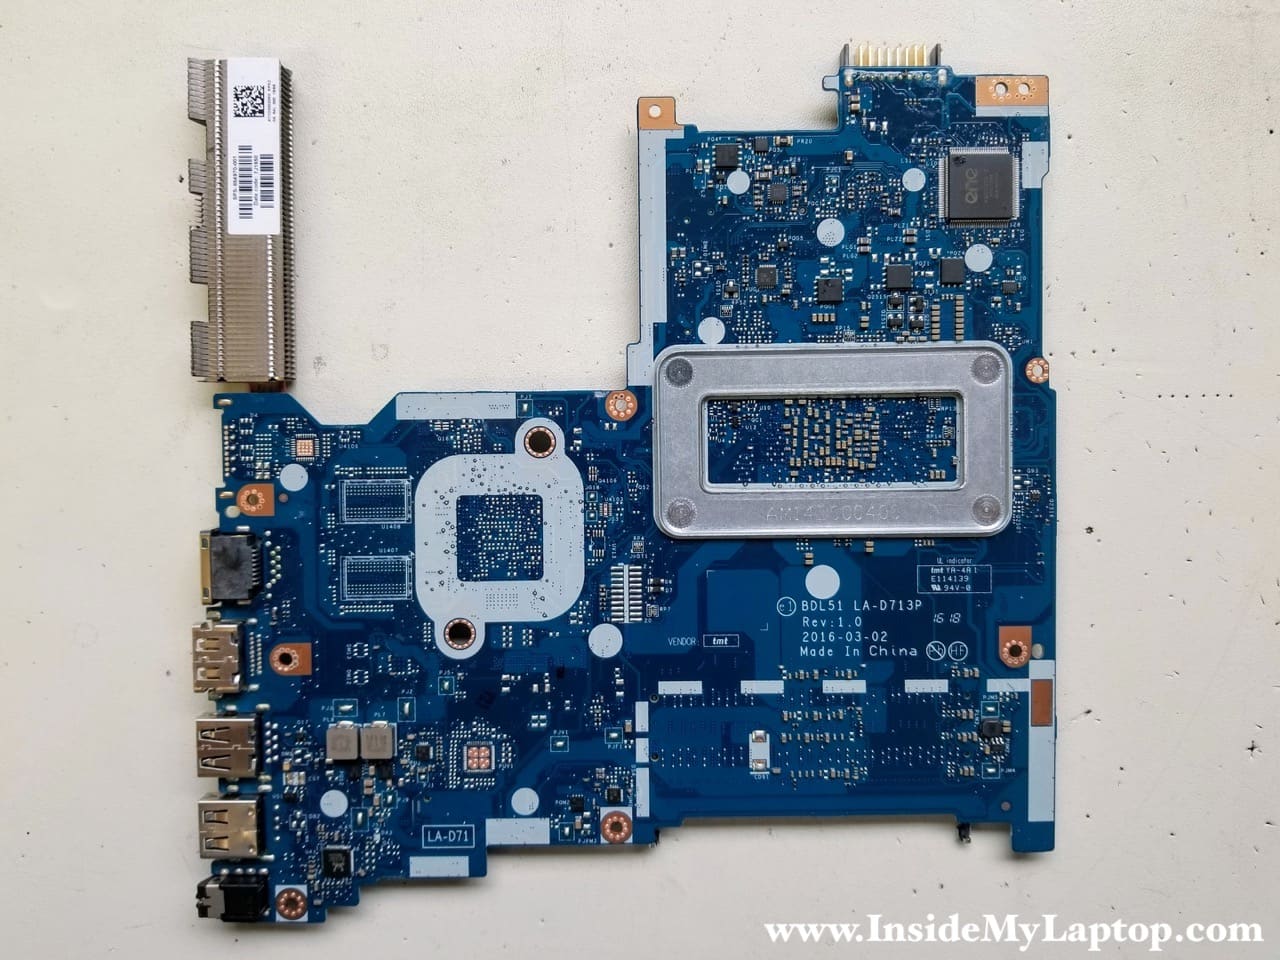
Separate the motherboard from the top case and remove it.

Here’s the other side of the motherboard.
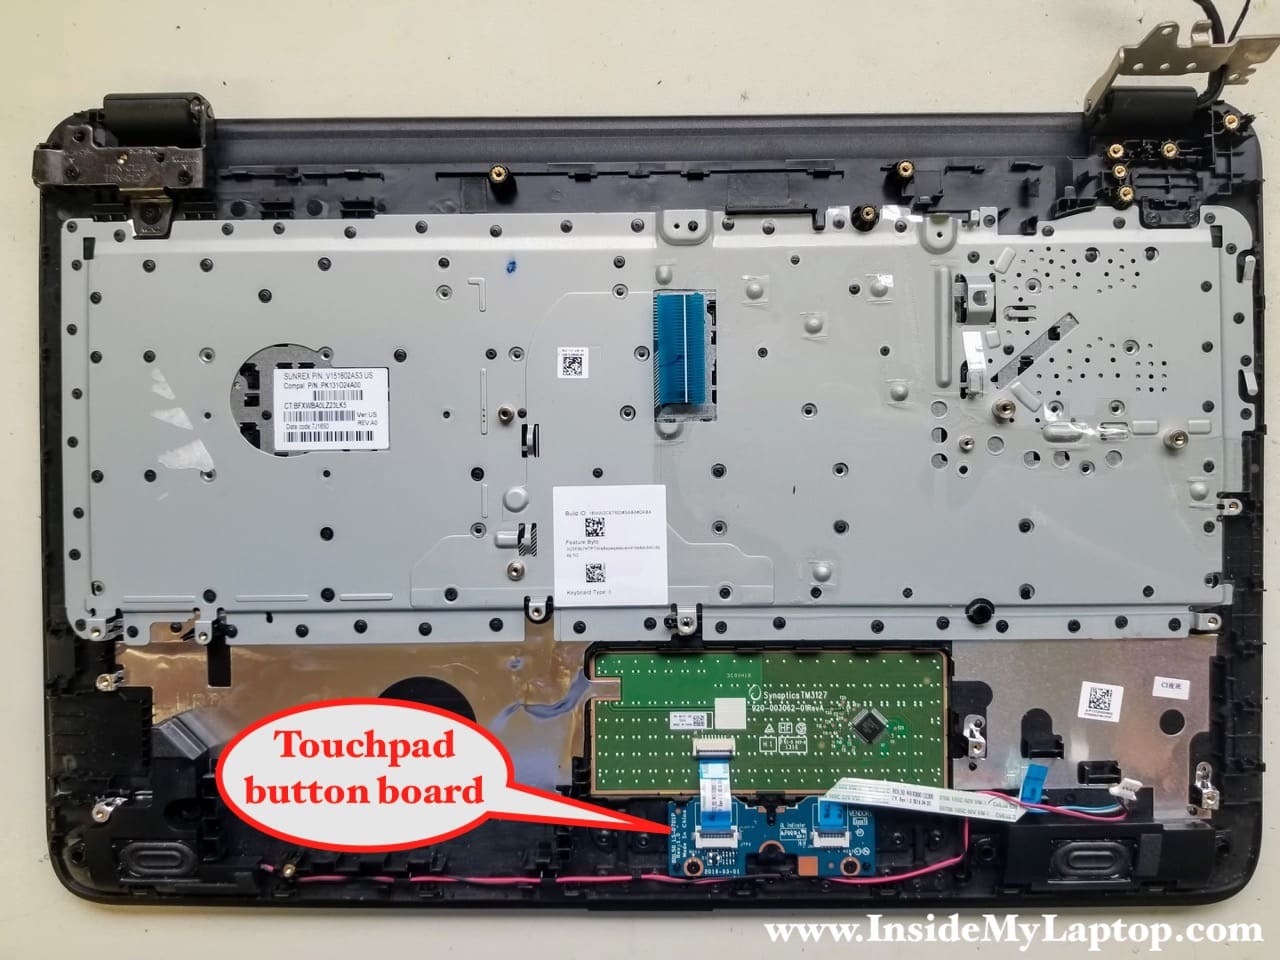
In HP 15 notebook PCs the keyboard is permanently attached to the top case with rivets.
When the keyboard fails, it’s necessary to replace the top case or try this repair hack.
The touchpad is glued to the top case but the touchpad button board can be removed.
HP 15 notebook PC LCD screen removal.
This part of the disassembly guide is independent from the first part. You can disassemble the display without going through all previous steps but don’t forget to disconnect the battery before you start.
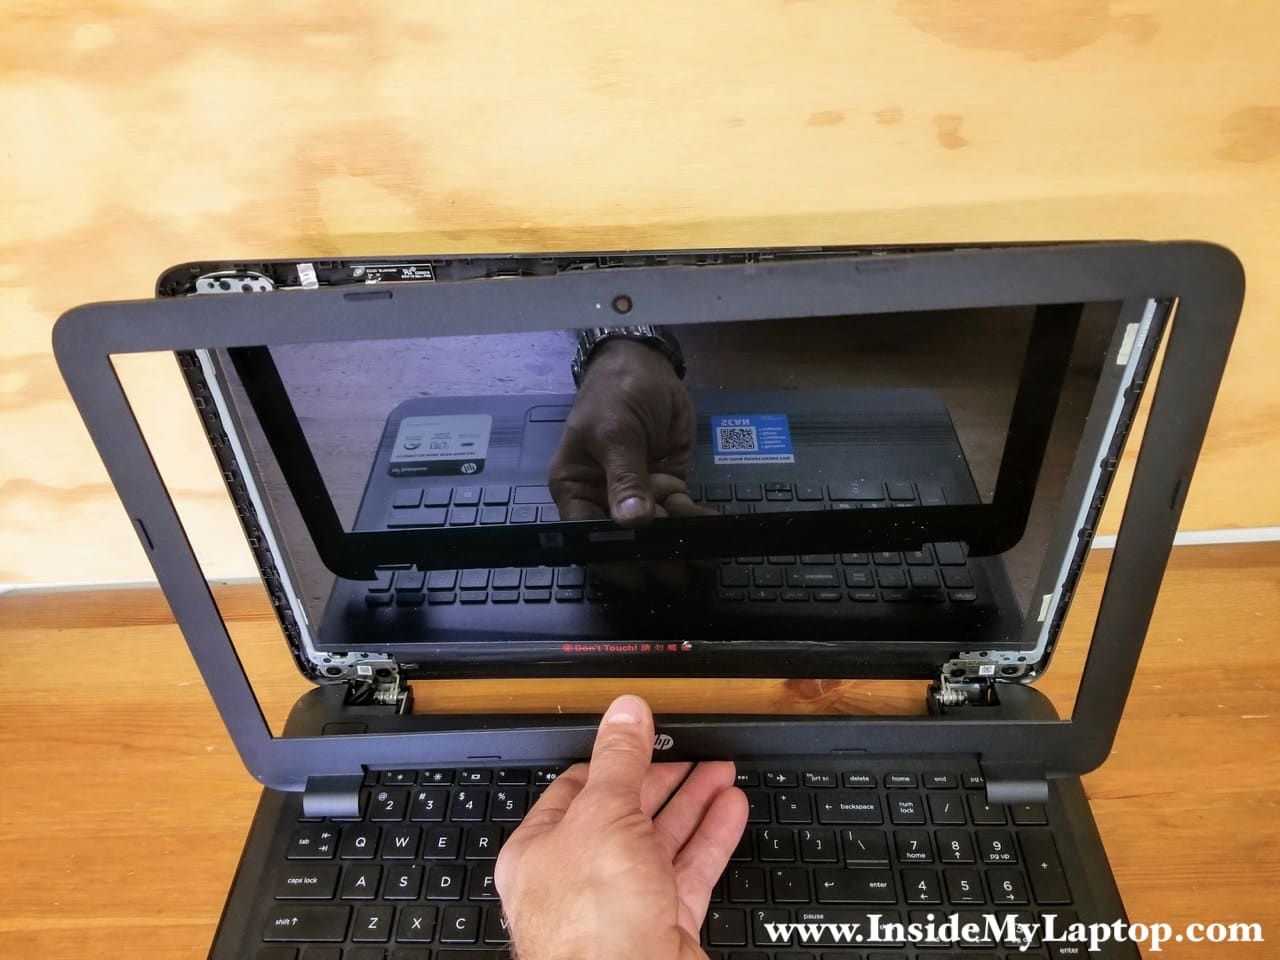
Start separating the display bezel from the back cover. You’ll have to wiggle the bezel to unfasten it from the cover. Start on the top and move to the sides fo the display assembly.
On the bottom the bezel is attached to the LCD screen with adhesive tape. Carefully separate it from the screen.
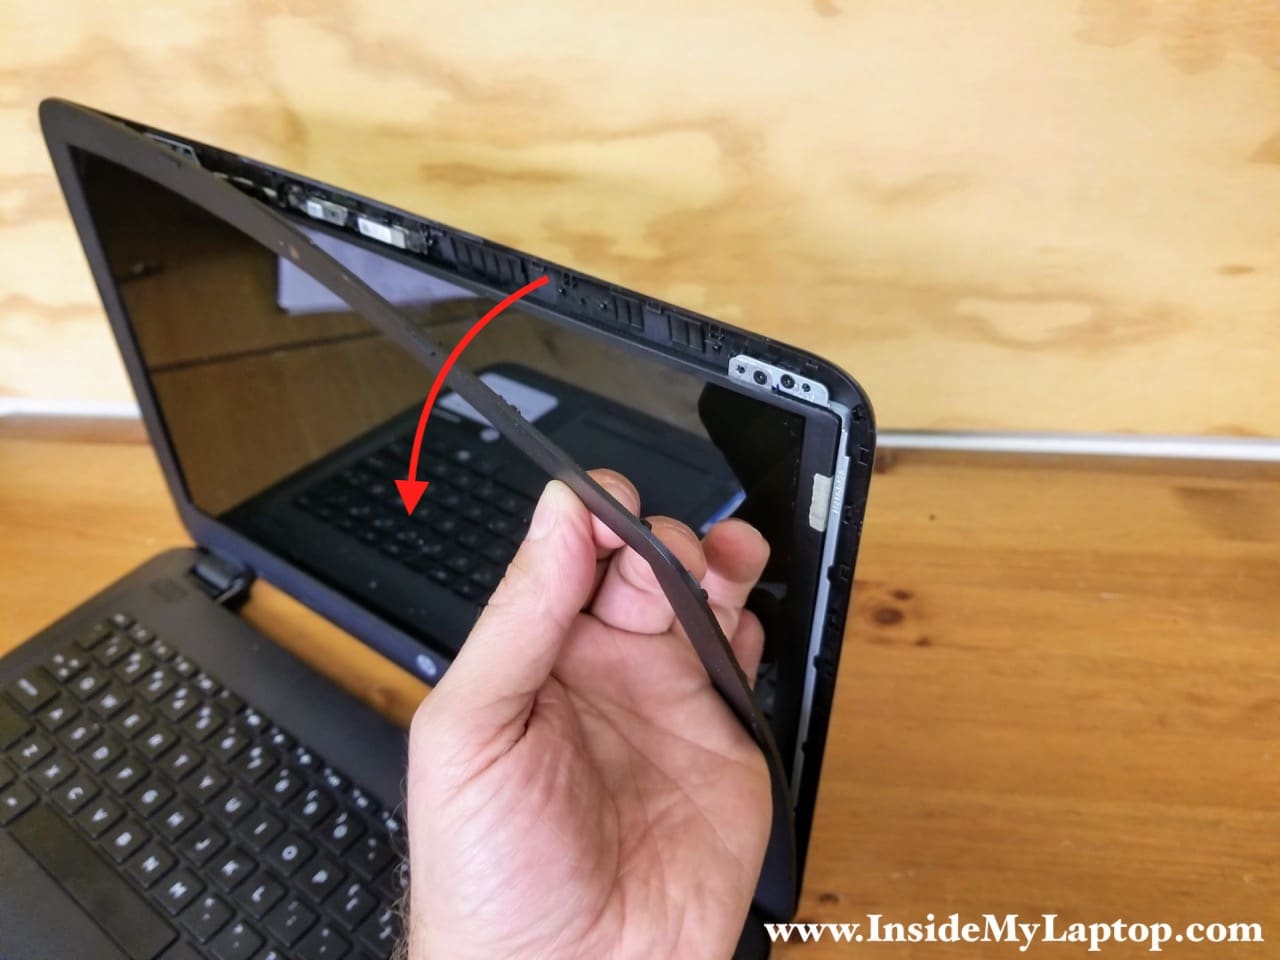
Remove the bezel completely.
Remove four screws securing the LCD screen to the side brackets.
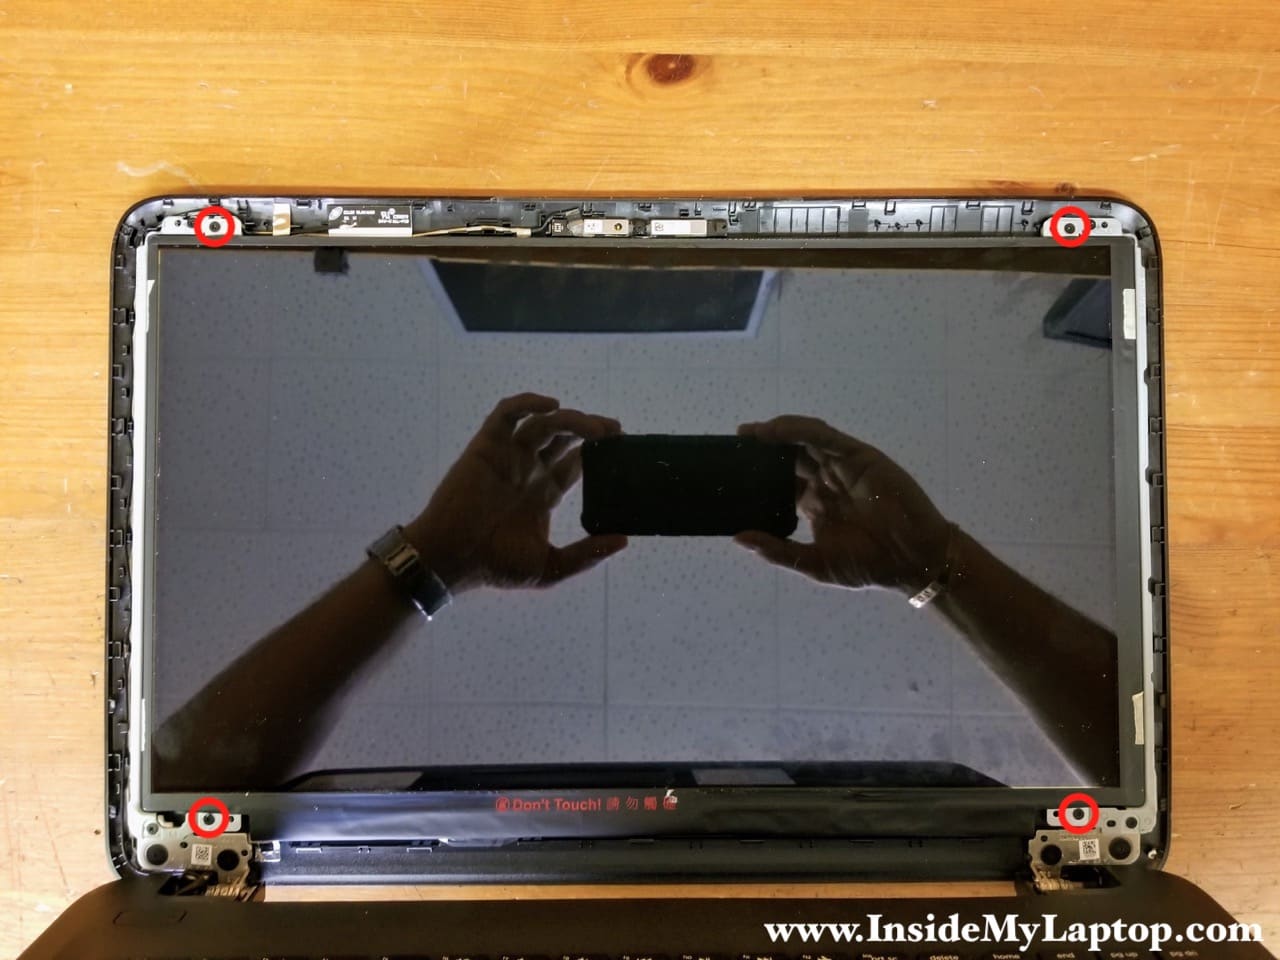
Separate the LCD screen from the back cover and place it the front side down on the keyboard.
Now you can access the video cable connector.
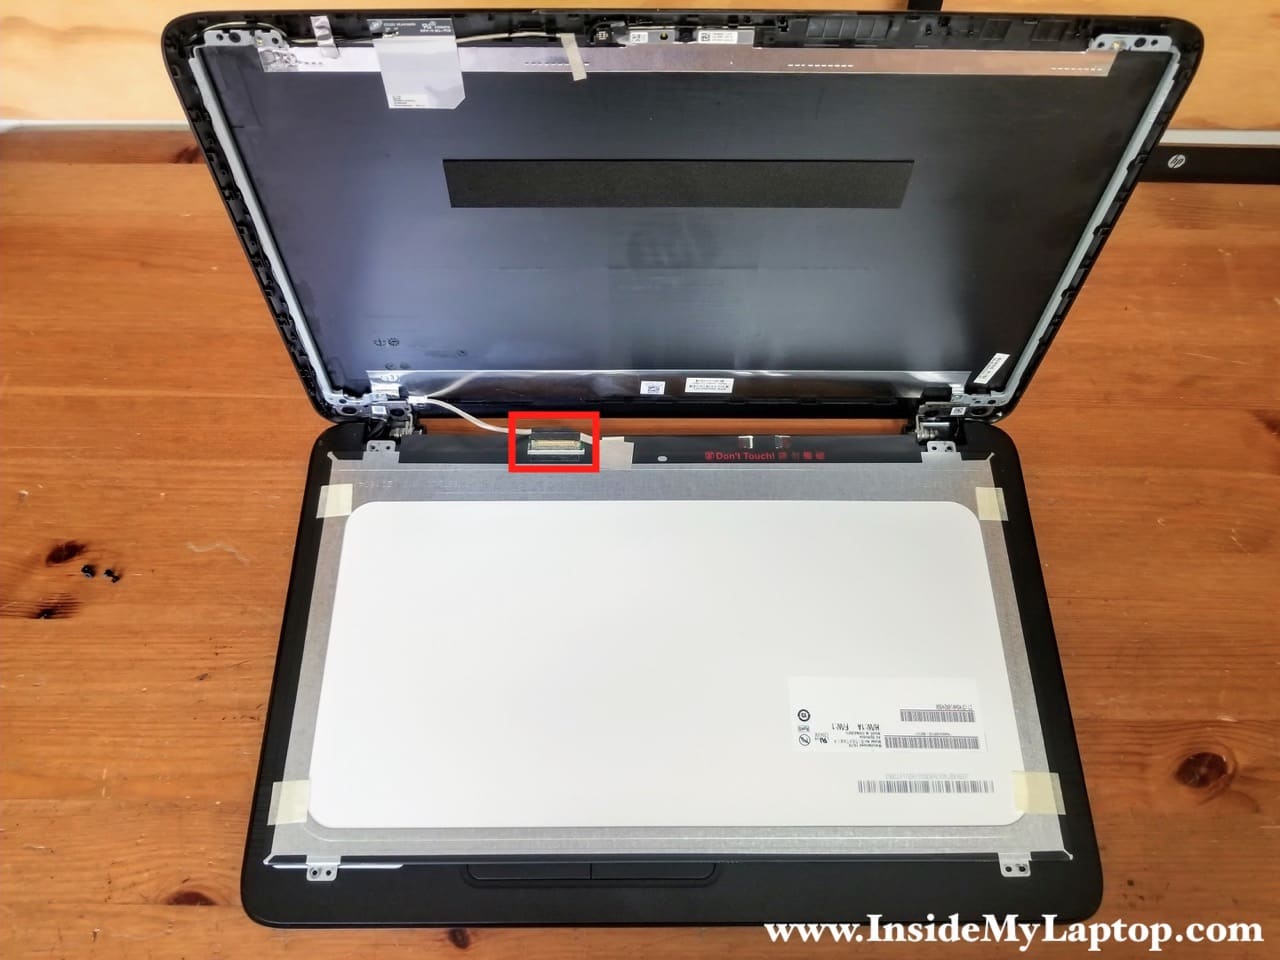
Peel off the grounding tape from the screen.
Peel off the clear tape securing the connection and unplug the video cable from the screen.
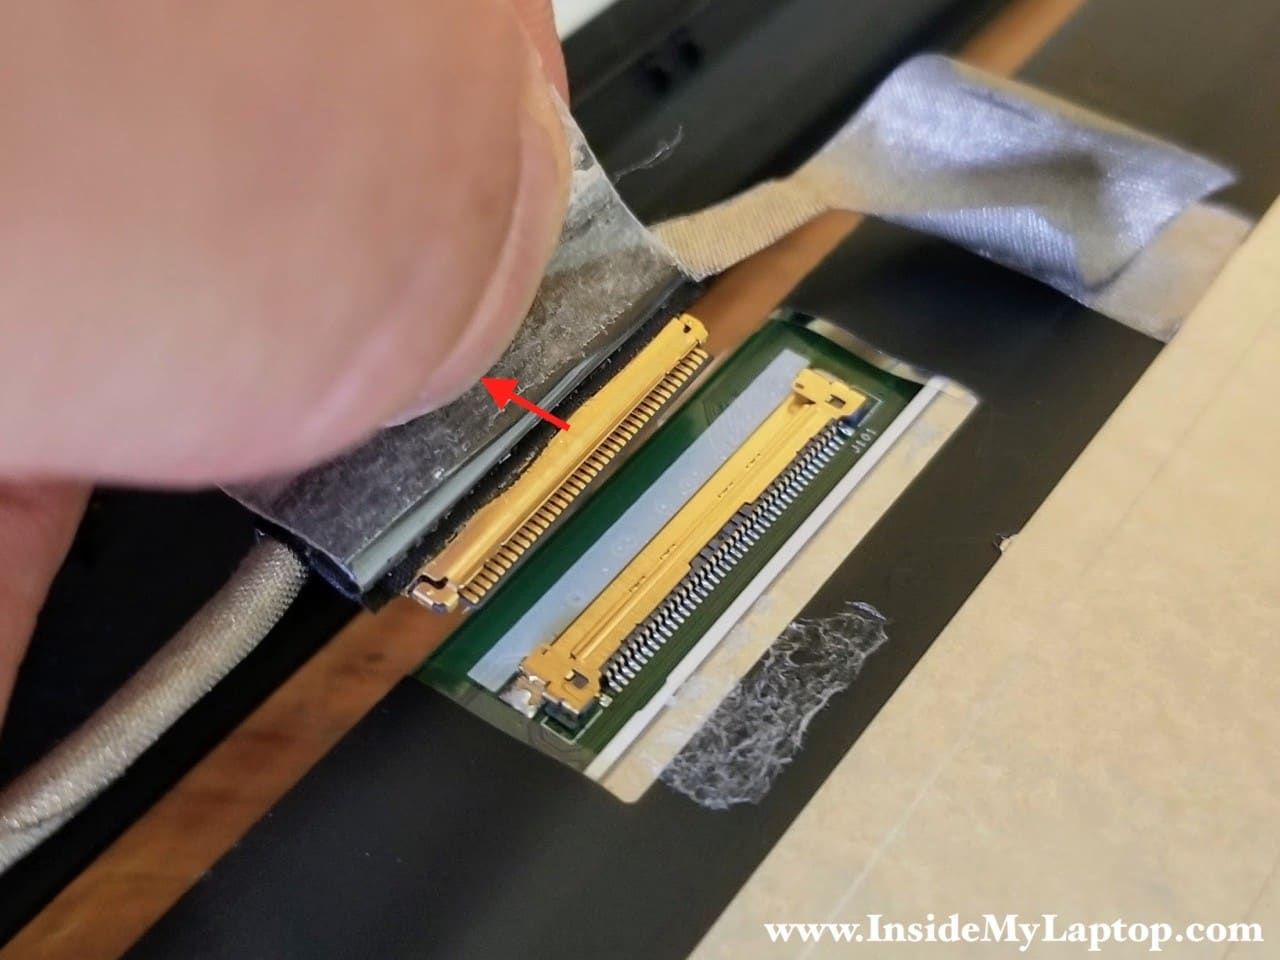
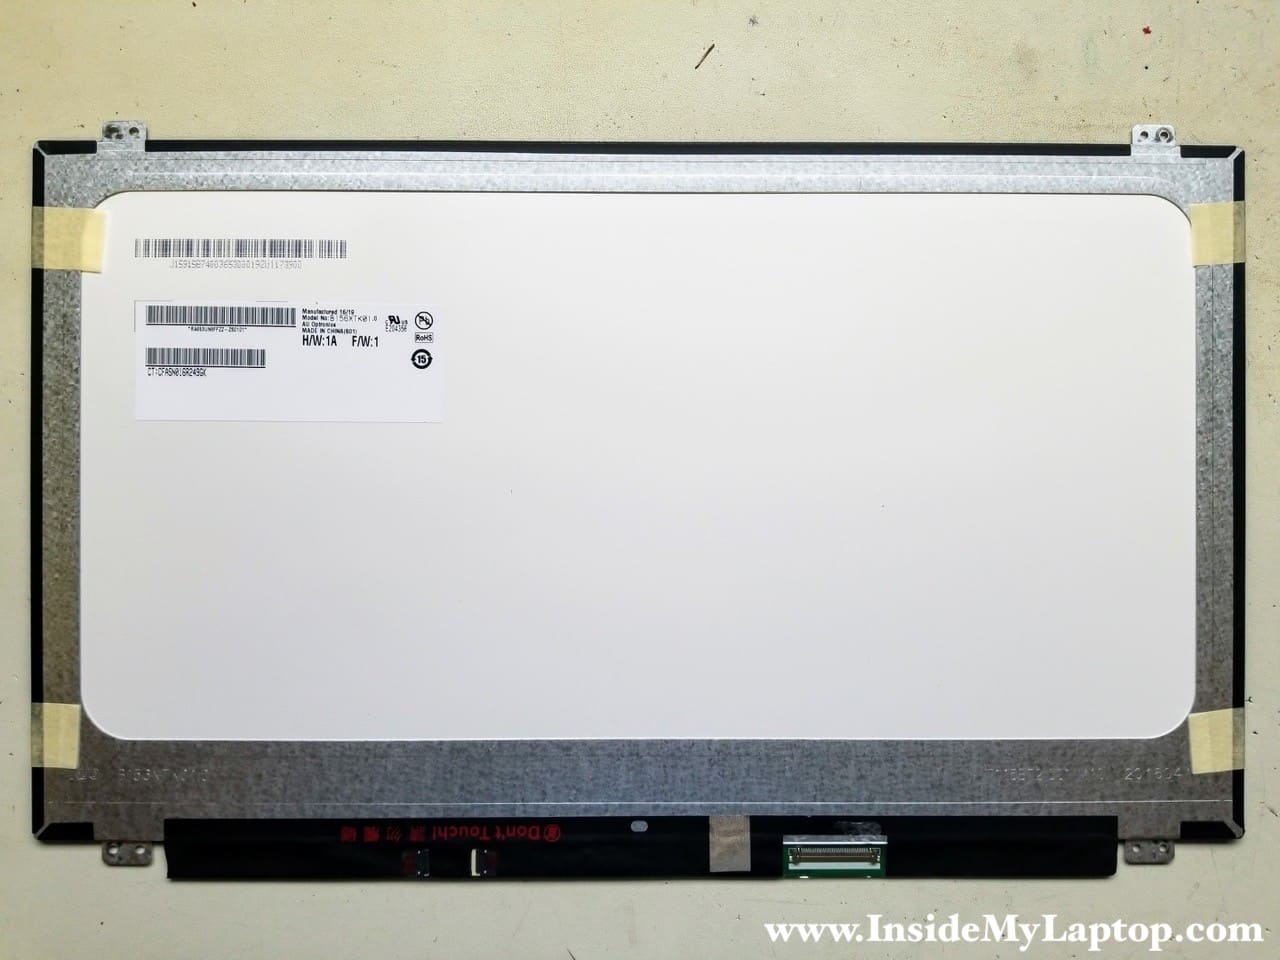
Remove the LCD screen completely and replace if necessary.
You can find a new LCD screen using the model number from the original one. In my case the model number is: B156XTK01.
Related posts: Disassembly guides for HP 15-au series and HP 15-bs series and HP 15-cs series.
Ken Lizotte
Post a guide for disassembly of the HP series notebooks that include HP 17-BS061ST and you will get a donation from me.
IML Tech
@ ken Lizotte,
I’ll do the guide as soon this laptop for repair. Check out the official service manual for disassembly instructions.
http://h10032.www1.hp.com/ctg/Manual/c05963248
Ashish
Is laptop topcase hinge screwed in palmrest?
IML Tech
@ Ashish,
I’m not sure if I understood your question correctly.
The laptop display (I guess you call it top case) is screwed to the palmrest. You can see it in the step 13.
Ruth
could I do this to clean the laptop fan, or should I get it done professionally?
IML Tech
@ Ruth,
Buy a can of compressed air (or use air compressor) and spray air into the fan grill on the side. This should be enough to clean up the fan.
Ruth
I already did, sprayed into the fan until the bottle was almost empty, but still the loud noises continue…
IML Tech
@ Ruth,
It’s possible the cooling fan makes noise because the bearing has failed. In this case cleaning the fan will not help and it has to be replaced.
Replacing the fan is relatively easy.
1. Remove the bottom case as it shown in the steps 1-3.
2. Remove and replace the fan as it shown in the steps 10-11.
A new replacement fan can be purchased from eBay.
Ruth
I decided to open the laptop and see for myself and turns out you’re right, I cleaned the fan but that didn’t help at all with the noise. I’ll try to purchase a new fan as soon as possible, thank you for your help! 🙂
spotify95
Hi, how easy is it to replace the back cover on one of these things? I’ve seen an ad for a HP 15 at a reasonable price but it has damage to the back cover (the bit that the screen is mounted on) and wondered whether it was worth getting and replacing the cover.
I have a HP 15 myself for my main PC and they’re nice PCs.
Regards
Austin
Is it possible to replace individual keys that have stopped working? The right half of my space bar doesn’t respond while the left half works fine.
Dan
Do i understand correctly that you have to do ALL 18 steps just to get to the keyboard and replace?
IML Tech
@ Dan,
You are correct. The keyboard is mounted to the top case under other components. You’ll have to disassemble it completely if you want to attempt keyboard replacement.
Alex
So, I can’t just replace my keyboard, I have to buy a whole new section of the case? Also, do I need to remove the display in order to replace the top case?
IML Tech
That’s correct. The keyboard is permanently attached (riveted) to the top case.
Yes. The display is attached to the top case. You have to disassemble the entire laptop in order to replace the top case with keyboard.
Alex
I have to ask how would I remove the case around the monitor? I can find information on how to remove the monitor from it’s casing, as shown here, but have yet to find anything on separating the top case from the monitor casing.
IML Tech
You have to disassemble the laptop as it shown here. When you are at the step 18, you remove two screws from the display hinge shown on the left. Lift up the hinge and separate the top case from the display assembly.
Vince Gabel
I trashed the board side HD connector (JHDD) any idea where I can get this 8 pin board level molex connector?
gabriyl
please I have hp notebook 15 dy0013dx…which came in without a hard drive connector…I have plan on getting it from a shop or ordering for it from abroad…buh I simple don’t know which type is compatible with for my notebook laptop…is there anyway anyone one could help me,,,??
IML Tech
gabriyl,
It looks like HP Notebook 15-dy0013dx can support two types of drives – a regular 2.5″ HDD and a solid state drive PCIe, NVMe.
Here are part numbers for the connector boards for both drives (found in the service manual):
(5) Hard drive bracket L20455-001
(6) Hard drive connector board L20454-001
(7) Hard drive/solid-state drive cable L20456-001
(8) Solid-state drive bracket L20458-001
(9) Solid-state drive connector board L20457-001
Melissa
Thank you! I was able to diagnose and fix my laptop with your help. It was a loose video cable behind the screen! The complete disassembly you did was extremely valuable. It is the only one I was able to find that actually aligned with the model laptop I had.
IML Tech
You are very welcome! I’m glad to help.
Gary M Balanesi
I have a HP 15 db 0043nr that has no Cd rom/ dvd writer. I ordered a proper
Drive for the model, even the texture is the same on the case. Im
wondering if i can order a lower case bottom that has the cd rom cutout in it.
So i can use it.
nick
is it possible to change the processor in the laptop which is shown in the images?also can you mention the motherboard model name.Thank you!
IML Tech
No, you cannot change the processor because it’s soldered to the motherboard. If you need a faster processor you’ll have to replace the motherboard. You can find a list of different motherboards in the service manual. The link is at the end of the disassembly guide. For Intel motherboards the list of part numbers located on the page 73.
Terry
OK, I’m having quite the trouble figuring out how to route the display cable, wifi adapter lead, etc. through and around the hinge, while trying to get the bezel and bottom case back on. Is there any way you could show this procedure?
Fernando
Sorry I don’t have money, but I learned from you that my hinges can be tightened via the back via the little rubber holders. Thank you laptop man.
Jim Holden
I just wanted to compliment you again on having the most well-designed laptop repair tutorials out there. The world is full of amateurish videos attempting to show people how to take apart their laptops and do repairs, but your outstanding photos and explanations are spot on, every time. The video sites are usually poorly done. Other pictures only sites are not well thought out and complete like yours. Good job my friend! Keep up the good work.