
In this guide I show how to disassemble a Sony Vaio VGN-FW170J laptop.
Most likely this guide will work for the entire Sony Vaio VGN-FW line.
Before you start, make sure the computer is turned off and battery removed.
STEP 1.
I start the disassembly process with removing two service covers from the bottom.
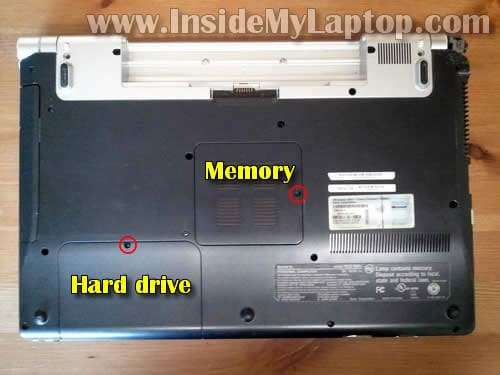
STEP 2.
Remove three screws securing the hard drive caddy to the base.
Slide the hard drive to the left and disconnect it from the motherboard.
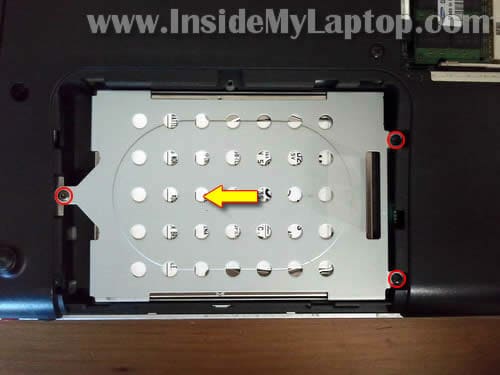
STEP 3.
Lift up and remove the hard drive.
This laptop uses a regular 2.5″ SATA HDD.
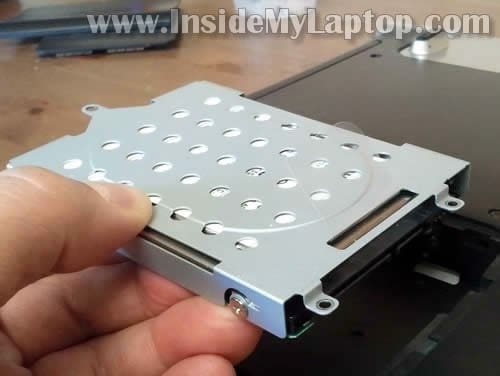
STEP 4.
Both memory modules can be accessed on the bottom.
In order to remove the memory module you’ll have to spread latches located on both sides of the memory slot.
The memory module will pop up at a 30 degree angle. After that you can pull the memory module from the slot.
Sony Vaio VGN-FW170J can handle up to 4GB RAM max.
You can install up to 2GB RAM module into one slot. Use DDR2 PC2-640 memory modules.

STEP 5.
Remove two screws securing the DVD drive.
Pull the DVD drive to the left and remove it.
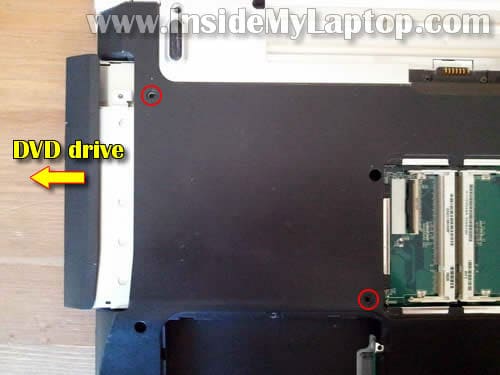
STEP 6.
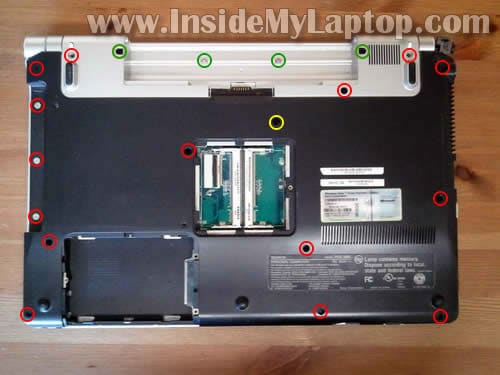
I remove all screws because I’m going to remove the top cover assembly.
If you only removing/replacing the keyboard, you should remove four (green) screws securing the speaker cover and one (yellow) screw securing the keyboard.
STEP 7.
Carefully lift up one side of the speaker cover with a sharp object.
Continue removing the cover with your fingers.

STEP 8.
Lift up the side of the keyboard and place it upside down on the palm rest.

STEP 9.
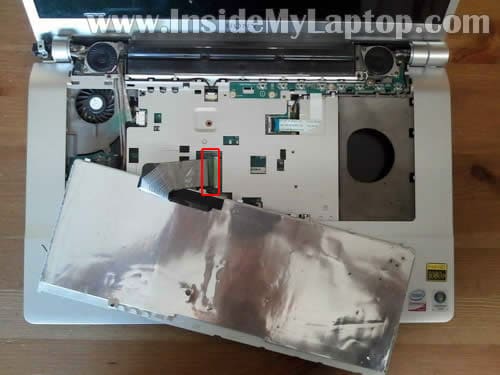
Now you can access the keyboard cable connector.
Before you remove the keyboard, the connector has to be unlocked and cable released.
STEP 10.
On the following picture the connector is shown in the locked position.
In order to unlock the connector, move the brown locking tab about 2 millimeters towards the LCD screen.
WARNING! The brown locking tab must remain attached to the connector base.

STEP 11.
On the following picture the connector is shown in the unlocked position. As you see, the brown tab still attached to the base but the cable is release now.
Pull the keyboard cable from the connector.

STEP 12.
Remove the keyboard. Now you can replace it with a new one if needed.
The keyboard color depends on the laptop model.

STEP 13.
Remove four screws securing laptop speakers.
Disconnect the cable from the motherboard and remove the speakers.

STEP 14.
Remove four screws securing the media button board.
Disconnect the media button board cable from the motherboard.

In order to unlock the connector you lift up the right side of the locking tab at a 90 degree angle.
After that you can pull the cable from the connector.

STEP 15.
Lift up the media button board.
You’ll have to disconnect the power button cable on the bottom of the board.
Remove the media button board.

STEP 16.
Disconnect display cables from the motherboard.
Disconnect two wireless card antenna cables from the wireless card (grab the gold connector with your fingers and lift it up).

STEP 17.
Remove four screws securing display hinges.

STEP 18.
Lift up and remove the display assembly.

STEP 19.
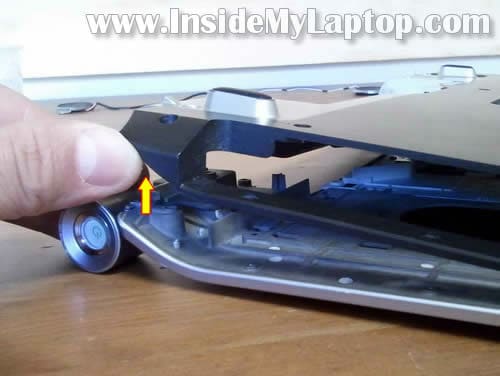
Separate the bottom cover from the top cover.
In this Sony model the motherboard is mounted to the top cover.
STEP 20.
Continue removing the bottom cover.

STEP 21.
The bottom cover removed.
NOTE: You can skip steps 7-19 if you only want to remove the bottom cover.
Warning: When installing the bottom cover back on the laptop pay attention to the wireless switch on the motherboard. The wireless switch located on the motherboard and it’s very small and weak. Make sure the wireless switch positioned correctly. The knob on the switch (located on the motherboard) has to match opening on the ON/OFF slider (located on the bottom cover) and fit into it. If the knob on the wireless switch positioned incorrectly, you can break it while installing the bottom cover back in place.
On the following picture it’s hard to see ON/OFF slider but it’s located on the right side of the case.

STEP 22.
When the bottom cover removed, you can access the cooling fan, CMOS battery and DC jack.
Also, you can access the processor (CPU) after you remove the heat sink.

STEP 23.
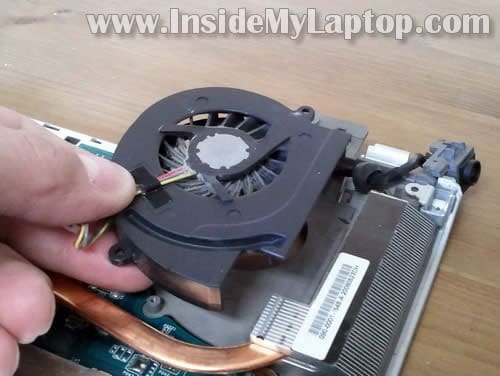
Remove three screws securing the cooling fan.
Disconnect fan cable from the motherboard.
NOTE: In my case a piece of metal frame (where DC jack mounted) broke off of the main frame. That’s why the DC jack looks dislocated.

STEP 24.
Lift up and remove the cooling fan.
p/p
r
Hi, fantastic tutorial! i will be using it when i replace my palm rest.
funnily, i have the same problem with my vaio vgn power adapter: the chassis and the dc connection have come loose.
did you ever get around to repairing yours? any tips if so?
cheers!
r.
IML Tech
r,
In my laptop the part of the chassis (where DC jack is mounted) broke off of the main frame.
I believe the metal frame (chassis) is part of the top cover assemble (palm rest assembly). If you have same damage as mine, you’ll have to replace the entire top cover assembly.
Also, when you replace the palm rest, I think you’ll have to buy a new touch pad. I believe the touch pad is glued to the palm rest and it’s very hard to remove it without damaging. Again, if you decide to replace the top cover assembly (palm rest assembly) be ready to replace the touch pad too.
Dell
Hi, excellent tutorial and thank you for sharing. I will need to replace the screen of sony vaio FW11M soon as it has cracked. Does this mean that I have to remove the speaker cover, both speakers to access to the screws to the hinges? I noticed that there are two additional screws at the bottom of the screen bezel that could not possibly be access without detaching the hinges. Am I right? Or is there a better and easier way of replacing the screen? Many thanks.
Luke
sony vaio vgn fw292c looks exactly like this, my power button has fallen of of the device. i want to remove the bottom cover and reconnect the power button, but am having difficulty removing the power button.
JB
Hi, a quick question, im not sure you remember but:
Is it posible to remove og disassemble the screen on this model? I have 5-6 small insects on the inside of the screen, and I wanted to disassemble it and gently try to “blast or suck” them out.
Tsu
Thanks so much for this tutorial. My DC Jack has also been broken away from the chassis by my friend pulling the power cord by accident with his foot while it was plugged in. Im actually really pleased at the engineering behind not soldering the DC jack plug into the mobo, stopped my laptop being dead. Any ideas where I can find a replacement plastic cap for the DC jack and speaker cover?
para
Excelent tutorial. My FW11E needed some cleaning after a couple of years of gathering dust. I managed to do it because of this tutorial. Thank you a lot . Oh and by the way my DC Jack has also broken of a hinge and it’s now a bit loose. I see this is a problem with most fw’s.
Ruben Di Battista (TiD91)
Hi!
This worked for me (Vaio FW21-E). Can i translate it in italian and publish it on my Tech Blog?
IML Tech
@ Ruben Di Battista,
You can if you follow these:
1. Link back to the original post (without nofollow).
2. Do not remove watermarks from images.
3. Take just one post about this Sony laptop.
Steve Schmeltz
Thanks for the disassembly tutorial on the Sony Viao VGN FW series laptop it was well done and extremely helpful in my replaceing the DC jack in the hinge of my unit. Keep up the nice work!
Farhad Sarvar
Hi
Thanks for the fantastic work. I need to replace the DC jack in mine which is broken(it seems to be very common problem with these). How much of this disassembly do I need to do to access the connector and replace. Any advice and suggestions is appreciated.
Thanks
George
Many thanks!!!
jose marti
Hello. Thank you so much for your very nice work here.
After a few years withot problems wit my “Sony VGN-FW21J” I have to repair the screen, beacuse is broken, and the jack conector too (the central pin have dissapeared).
I have to do it by myself and i don’t know how to begin to do it.
Can you help me with this questions.
Thanks a lot and kind regards
IML Tech
@ jose marti,
First, I would replace the jack. Just to make sure the laptop still works fine. You’ll have to disassemble the laptop as I explained in this guide and unplug the damaged DC jack harness from the motherboard. You can see the DC jack harness on the last picture.
If DC jack replacement works fine, move to the LCD screen replacement.
I have many different guides here for the LCD screen replacement. Read though a few of them and you’ll get the idea how to replace the screen.
G COOPER
Dc jack replacement (complete with cable) might be part number: 073-0001-4504_b
also M760 DC IN CABLE
FOXCONN 080927
If you search, there appears to be two different types:-
1. Short cable with earth attached.
2. Longer cable without earth
Stripped a VGN-FW21M (PCG-3D1M) – needs longer cable without earth.
Differences for disassembly:-
1. Keyboard connector also has ‘sticky-tape’ covering.
2. Either side of the battery terminal are screws, I removed both before the base could be separated from the palm rest.
3. Also removed screws located near speaker cable runs, adjacent to the left and right speaker recess, I removed both.
4. Impossible to insert fingers to disconnect wifi antenna cables, used mechanical means.
5. Don’t forget to disconnect the touchpad cable before separating the palm rest and base.
This excellent tutorial is very much appreciated.
Chris
Hi,
I am thinking about replacing my mainboard with a differnt one of the FW series to upgrade my graphics card. Although I am sure this should not be a problem, do you know anything I need to look out for? Different LCD connectors etc.?
Thanks!
IML Tech
Chris,
Are you sure you can find a new motherboard with better graphics card?
In most cases laptop motherboards are not upgradable.
Alex
Hi,
Im hoping you can save me a lot of time?
I have a sony PCG-3D1M which needs the power jack replaced, ive cut the exsisting wires and tested that the system is charging with a new power pack and now know for sure thjat it needs a new power jack.
My question is this,
1. Do i have to dissasemble the front end of the laptop to be able to remove the round silver power jack housing and replacve the jack or can this be done from the backend by removing the cooloing fan?
The back is off but the keyboard , screen etc have not been touched and i would prefer not to unless i really have to?
I would really appreciate ytour help with this, im fixing this for a friend who doesnt have much money.
Thanks
Alex
IML Tech
@ Alex,
I believe the silver power jack housing can be removed without laptop disassembly. You should be able to remove it using a small flat head screwdriver.
Not sure about the DC jack. Remove the jack housing and see if you can remove the jack after that.
Giovanni
Good morning,
congratulations for your website. It’s very enteresting !
I would very much like to know if it is possible to get Sony Vaio VGN-FZ21M guides: to disassemble, change key-board, fan and LCD screen.
Best regards.
Giovanni
IML Tech
@ Giovanni,
Take a look at this disassembly guide for Sony Vaio VGN-FZ220 laptop. Isn’t is similar to your model?
https://www.insidemylaptop.com/take-apart-sony-vaio-vgn-fz220-repair-power-jack/
This guide explains how to disassemble laptop base. You can use it for replacing the keyboard and fan.
The LCD screen replacement will be similar to many other laptops. Just read though a few guides (you’ll find in the categories) and you’ll get the idea.
Probably you can use this guide as an example:
https://www.insidemylaptop.com/open-display-panel-remove-lcd-screen-inverter-sony-vaio-pcg-k-laptop/
Giovanni
Thanks a lot for the guides.
They are very useful.
Willybui
Hi IML Tech,
This is a very excellent tutorial (step by step ). I am really appreciated and thank you very much
Colin R
The on’off switch has broken from the chasis and I cannot switch the computer on. Please could you tell me how can I change this?
IML Tech
@ Colin R,
The power switch button is attached to the top cover assembly. You can see it in the step 16.
I guess you’ll have to remove the top cover assembly and see what exactly is broken. I cannot tell without looking at the laptop.
Theramidam
Thank you very much for this info it worked.
Miguel
the DC jack mounted that broke the same thing happened to me and i was looking for the part all over the web but cant find it can you do you have any ideas? What is it called or the part number
IML Tech
@ Miguel,
I believe this is part of the metal frame attached to the palmrest assembly (aka top cover assembly).
Unfortunately I couldn’t find it either. It’s not even available on eBay. My DC jack just hanging out on the cable. 🙂 Still usable.
Darren
What an excellent guide! Unfortunately I found this page after getting it open. Could you tell me what, other than the screw, holds the dc socket cover on. I’m trying to replace a faulty power connection and cannot seem to get the end cap off the socket. btw I have not taken the KB and LCD off the palm rest.
Best regards
Darren
IML Tech
@ Darren,
Cannot tell. I didn’t fix the jack. I’m using it as is. It’s just hanging on the cable.
Simon
Do you know what the parts called that the cooling fan and dc jack screws into?
The Gray bit in fig 23-24!
My dc jack has snapped off and I can’t re-attach it!!
IML Tech
@ Simon,
I believe this metal frame is part of the top cover assembly and not sold separately.
Probably you’ll have to find a new top cover assembly (palmrest assembly) and it will come with the metal frame.
Roger
Hi!!
I`am look for sony vaio fw590 service repair, but I didn`t found here. The two models are similar (VGN-FW170J and VGN-FW590F).
FW590 Image: http://imageshack.us/photo/my-images/252/sonyvaiovgnfw590.jpg/
Can I use this Manual for my model? Do you know where I get the disassemble tutorial step by step for FW590F model?
Thanks.
IML Tech
@ Roger,
I’m not sure 100% but I think you can use this manual. I think it will work for all VGN-FW models.
Roger
I think that I’ve the same problem with DC jack. My laptop fell off the table and after that the DC Jack plug was limp and flexible. Did you fix this problem…..somehow?
Thanks again
IML Tech
@ Roger,
No, I didn’t fix it. The laptop still works with the DC jack hanging out of the case.
When the laptop was disassembled I put some electrical tape on the DC jack harness to make it less flexible. It works like that for me.
Joel
Can the wifi card be removed or disabled?
IML Tech
@ Joel,
You can disable it in the device manager.
1. Right click on “Computer” or “My Computer”.
2. Click on Manage.
3. Click on Device Manager.
4. Find your wireless card in Network Adapters.
5. Right click on the wireless card and disable it.
crispexi
I almost had the case open until I found this guide. Now I have it fully open.
Anyways here is my question.
I switched the screen before because the lamp died. Upon putting it all back together I noticed my WIRELESS switch stopped working, it would just move freely from side to side and not click.
I just opened her up again but I do not see any damage or anything missing in regards to where the wireless switch is.
Is there a way to get the wifi permanently on? Perhaps by soldering a thin wire to create the link.
I only see a WLAN Switch on the top (top of the mobo as you are looking at it with the entire laptop upside down), and on the underside you can see a “WIRELE”… oh on second look thats just the wireless LED.
tl;dr
Is there any documentation on, or a way to permanently switch the WIFI on permanently while the wireless switch is broken.
Laptop: VGN-FW series
crispexi
In response to my response….
I successfully enabled the wifi to be permanently on. I say permanently because the only way to switch it off now would be to unscrew everything and move a piece of metal inside this “chip” for lack of a better term, which has the letters ” DIP ” on the top of it.
Apparently what happened is the wifi switch, which is plastic, had a VERY thin connection from itself to this “DIP” chip where it would move something inside it to one side or the other. When I originally opened up the case to take out the screen apparently this part broke off, but you wouldn’t be able to tell that easily just by looking at it.
The only way I can describe this piece of metal inside the “DIP” is that it is about 1.5 hair widths, so extremely small. It was hard to see if there was anything even there, but I took a small screw driver and was able to move it to the other side, which was the ON position.
Ahhh feels good not to have to buy an external adapter for this laptop.
Cheers
Vinz
Hi,
Thanks for this great tutorial.
Can you tell me where I can find the lid switch on my laptop (VGN-FW41) similar with the one you dissembled ?
Is it magnetic ?
I’m really suspecting it to be the cause of my problem : when I turn on my computer, HD starts but no work on it after 2s, nothing else happen, nothing on the screen, no bip, nothing… the on/off button stays green but I can’t turn the computer off pushing it for few seconds.
Thanks again for your help
Cheers
V.
IML Tech
@ Vinz,
If there is no physical switch somewhere close to hinges, most likely it’s magnetic.
Try minimizing the laptop to bare bone system and test after each step.
James
Hey, can you please tell me how to disassemble the left hinge part ‘coz i have problem with it.. it was starting to shake.. I mean, it gets loose.
What are the possible alternatives to this?
(I don’t know how to get spare parts here in the Philippines, so I think there’s no available here in my country. BTW, my dad bought my computer in computerxpress – Mr. Ezequiel Perez in Long Beach, California..)
Pls help..
cheers!
IML Tech
@ James,
You can try tightening two hinge screws shown in the step 17. Maybe they got loose.
James
And by the way, just to make sure..
what’s the brand of your memory?
dvd drive?
hard drive?
I doubt that my laptop was being manipulated by a Filipino technician here..replacing the genuine parts of my laptop (geez… I wish I have full knowledge about these matters as early as before..=|
dvd drive : Panasonic (made in the Philippines)
memory : samsung..
Having a laptop repair here in the Philippines is troublesome. Some technicians are abusive.
#justsaying
IML Tech
@ James,
Cannot tell. I don’t have this laptop anymore.
Jay
Could you please upload an instruction to disassemble Sony Vaio SR-390, particularly the power jack? It’s broken so that I have to replace it. Thank you very much for you help.
Ant
Hi,
I’m having the same issue as Vinz with my VGN-FW270J it will turn on with the green like on and hard drive will spin but no fan activity at all the screen remains blank and can’t hold down the power button to turn it off, it shows the battery charging when it’s in but aside from that there’s nothing else, i’ve stripped it down to the bare and it’s the same problem have taken out the battery, DVD drive, memory, Cmos battery, tried external monitor but with no luck just the same problem.
Ryan Manes
Question, Do you have to take apart the laptop as described in this how – to if you just want to access the cooling fan?
JoeRandy.tx
This Guide worked for me. The Laptop model number was Sony Vaio VGN-FW351J. Everything was exactly. I used your directions to replace the audio/usb board. Excellent step by step instruction… Question; Under the RAM memory modules, there is a connector. What is it used for?
Ben lee
Consider placing “Note: I think you can skip steps 7-19 if you only want
To remove the back cover” before Step 7. I cut my finger on that speaker and all I wanted to do was remove the back cover. To that end, your instructions (save for steps 7-19) were helpful.
k
Can you show the Wireless on/of switch after you’ve taken off the bottom?
azreal
cool am looked at this to take do my fan.. have to take out hard drive and memory chips..out to remove back cover. all with power off then once cleaned the cpu fan put back together.. and turn back on wont have to do anything else?
azreal
hi guy stripped laptop down cleaned out all the shyt.. but the laptop keeps freezing/crashing when idle for like 5mins or playing a game on this vgn-fw56e series.. was wondering if that if i have a driver not workin correctly is the caause of he problem.going to system device manager i have ! in a yellow triangle on a bluetooth peripheral device and i cant get it to load.. properly 🙁 would this be cause off my laptop crashing?
ben
i had the same problem (and i guess a lot people more, because there is no mention in the tut)
with the wlan switch broken.
@crispexi: thanks a lot! i would have never found the tiny little plastic switch inside this connector that swiitches it back on.
ps. i agree its a good idea to mention that you can take of the back cover without all the steps before, and not mentioning it after step 20!!
IML Tech
@ ben,
It was mentioned in the step 21.
I made same changes to the guide and added a warning about the wireless switch. I didn’t have any problem with the switch myself and didn’t think about mentioning it in the guide before. Thanks for this advice.
Dino
Hi,
Have a vgn-fw-378j USA version with black screen. When I approach a light I can see the text picture etc.
How I can check the inverter or backlight before I will order ?
Thank,
Dino
IML Tech
@ Dino,
There is not much you can do without spare inverter or backlight lamp. You’ll have to guess. I would try the inverter first.
Nigel Harrison
What is the name of the chassis on which the hinges are mounted as the right hinge mount of my laptop is broken and I am seeking a replacement.
Artem
Help please! Need schematic for Sony Vaio laptop fw21e. thanks in advance
Behruz
Thanks a lot for this tutorial.
This is very similar to VGN-FW100 (PCG-3B2L) that I own.
As Ben mentioned, placing the skipping steps 7-19 to remove back cover somewhere in early steps are better for viewers like me (though I had already disassembled everything prior to finding your useful instructions!).
pabina
please let me know how to turn on and off wireless key. i dont find key on VGN -fw21l
saadia
i broke my laptop screen……….ur tutorial is very good….keep it up
Chris
Can you please help me, can You send me a picture of the ” power button circuit board ” I accidently ripped off the circuit board from the wires going to it. I know how to solder them back on but I don’t know which wire goes on which spot. There are Four wires ” Brown, Yellow, Green, Blue ” I would very much appreciate this. Thanks in advance to any one who can help.
IML Tech
@ Chris,
I don’t have this picture.
Here’s what you can try. Search on eBay for “VGN FW170 power button”. You’ll see some pictures. Maybe it will help you.
raul
Found this great info little too late. I broke wireless on off switch. Somebody can tell me how to fix it?
IML Tech
@ raul,
The wireless switch located on the motherboard. I assume you you broke off the little knob on the switch while removing or reinstalling the bottom cover.
If the switch is in the “off” position, you can turn it on using a needle. Just slide the switch into the “on” position and leave it turned on all the time. The wireless should work after that.
You can always disable it in the device manager when not needed.
Carlo
I have a pgn-3d1m but it is the same as the VGN-FW170J. Had a broken display. No problems with replacing but aferwards the keyboard doesn’t work correct anymore. Ther are som keys which bring mismatch. a=ax,s=sy or sx depending on locale, k=kn c=cv, b=bm, ,=.,, <=same but shows menu, and the down-key goes backwards.
Do you have an idea what the problem may be? It is not the keyboard itself, because i bought already a new one.
IML Tech
@ Carlo,
Try cleaning the keyboard connector and reset the cable. If cleaning doesn’t help, most likely there is a problem with the keyboard controller on the motherboard.
Dorothy
What a great tutorial!
I just installed a new power jack on this computer model but the electrical power appears to stop where the jack connector connects with the motherboard. The electrical power and function is intermittent. What can I look for to remedy the situation?
Thank you.
IML Tech
@ Dorothy,
Did you test the AC adapter? Maybe it’s not working properly.
Test voltage on the AC adapter and at the same time move/wiggle the power cable. If power cuts off when you wiggle the cable, there is a short inside. In this case replace the adapter.
Dorothy
Thanks for your answer, IML Tech!
The adapter tests positive to the connector where it enters the motherboard. I was able to charge my battery to 50%. When I change the position of my computer, there is an interruption to the power. The computer runs on battery power but at times I cannot even get it to recharge the battery.
Do you have any other thoughts on what I can check next?
Thank you.
IML Tech
@ Dorothy,
Again, double check the AC adapter and here’s how.
Remove the battery and plug the AC adapter. Turn on the laptop and try moving the power cable. If power cuts off, this could be defective adapter cable.
If it’s not the adapter relate problem, probably you got defective DC jack or failing motherboard.
Also, check if the laptop assembled correctly. Make sure the motherboard seated properly. If the motherboard not installed correctly, it’s possible you shorting it by moving the laptop.
Dorothy
Thanks IML Tech!
I appreciate your quick response and your expertise.
Alex
I used your guide to replace my keyboard with a failed space bar. Everything worked out fine, but in step 6 there should be TWO screws marked yellow that attach the keyboard. The one that needs to be changed from red to yellow identifier in your picture is the one just onside of the lower right of the battery compartment. Other than that, your guide is very well written. Thank you.
Caluser
Thank you, great demonstration of the process.
I need to reach the fan inside my sony vaio vgn-fw290 laptop. The laptop gets overheated near the cpu/fan area, I suspect it might be because of accumulated dust there.
Do I need to take off the keyboard tray, speakers and the top cover, in order to take off the base plate ?
IML Tech
@ Caluser,
If you want to remove the fan, than yes. It’s necessary to disassemble the laptop completely.
If you want to clean it up, probably it should be enough to remove the speaker cover and keyboard as it shown in the step 9. When the keyboard removed, you’ll get some limited access to the fan. You can use an air compressor or canned air to blow off the dust.
Michael
excellent tutorial
just one question, where is the bios chip located
Mike
alan
Thanks for the excellent tutorial,
I have a VGN FW41zjh when trying to open the closed lid I managed to open the lid half way and I accidently. Drop the laptop back on the table since then the screen has been fuzzy green and not displaying a steady picture only working on external I have been told this may be a damaged inverted ot just a lose connection could you please advise how to get The inverter and try to fix Thi which steps should I take thanks
Jitendra
I have same laptop, when i push the power button only green light is coming. Screen is blank, cant hear fan and HDD noise. what could be the reason. I have removed the RAM and again fit them but no luck.
IML Tech
@ Jitendra,
Try removing RAM module by module. Test the laptop with each module separately, try different slots.
It’s possible one of the modules is bad.
Leigh
Hi. I need to replace DC jack cord on fw-290. I followed your directions and it took a while but I finally got the cord out of the round housing but then I ran into a snag. The cable I removed had a grounding logout side of the square plastic that surrounds the DC socket. The replacement cable is the same but has the grounding lug inside the square plastic. I suspect I might be able to pull it out without damaging it but I’m not 100% sure. Does it matter if the lug is inside the plastic or outside? I can send picture of part I’m referring to ifI have email address to send it to.
Franco
Has anyone figured out how to remove the plastic cover of the power jack? I have seen several posts asking about it but no useful suggestions. I have seen a video where the repairer fiddle with a small flat screwdriver, but I could not figure out what he did to get it off.
jim
Hi IML tech ,
Thanks for your tutorial, the screen on my FW series laptop is displaying a multi colored (mostly green ,pink & blue & flashing ) pixalated picture ,Like what you get when a loose cable connection between your vga card and the monitor , the output to a monitor works fine (on both hdmi & VGA) I managed to follow your tutorial and re seat the VGA cables to the mother board , but no luck same problem, could your kindly offer me your advise as to what could be wrong?
Many Thanks