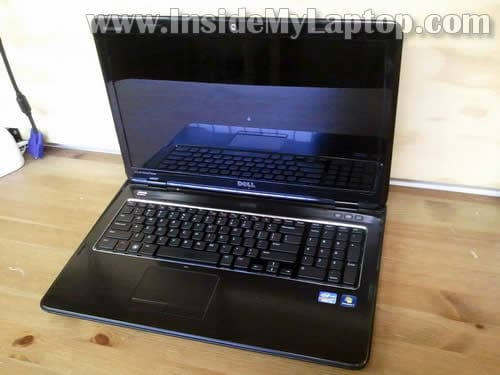
In this guide I will disassemble a Dell Inspiron 17R N7110 laptop.
My goal is to access and replace the hard drive which is mounted inside the case. But I will disassemble it even further. I will show how to remove the motherboard and other internal components.
This laptop has two different names: Dell Inspiron 17R and Dell Inspiron N7110.
Before you start make sure the computer is turned off.
STEP 1.
Remove the battery.

STEP 2.
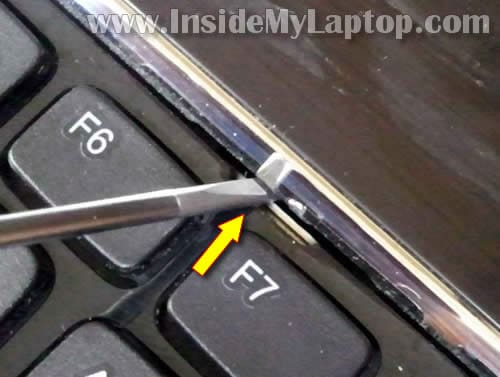
There are four locks securing the keyboard on the top.

STEP 3.
Each lock has a spring behind it.
Push the lock into the case with a small screwdriver.
STEP 4.
At the same time lift up the keyboard a little bit. You can use a knife blade to lift up the keyboard.
While the keyboard is lifted, push in all other locks.

STEP 5.
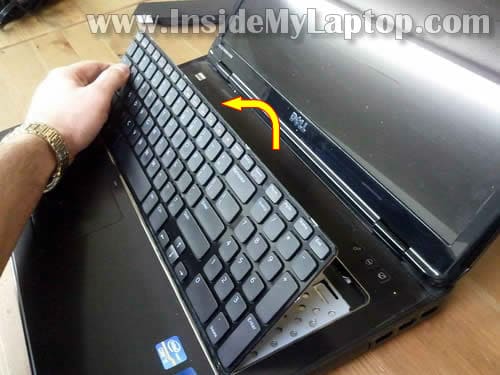
Finally, lift up the top side of the keyboard and place the keyboard upside down on the palmrest.
STEP 6.
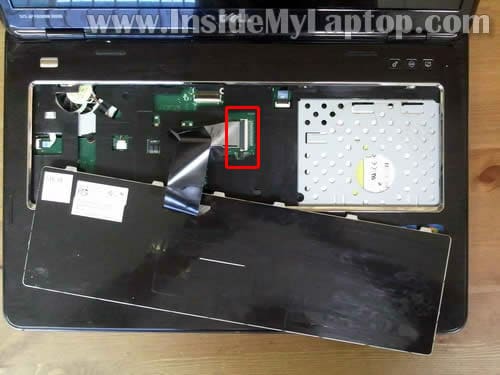
Now you can access the keyboard cable which is connected to the motherboard.
In the following two steps I explain how to unlock the connector and release the cable.
STEP 7.
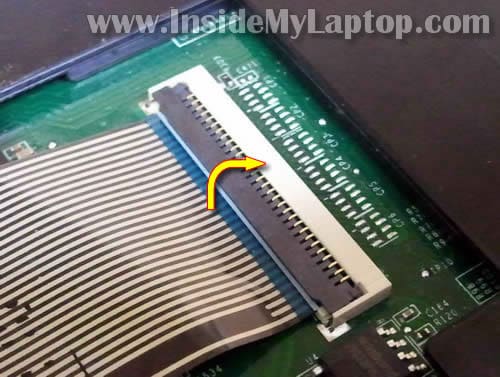
On this picture the keyboard connector shown in the locked position.
Lift up the left side of the brown tab with your fingernail. The tap will open up at a 90 degree angle.
STEP 8.
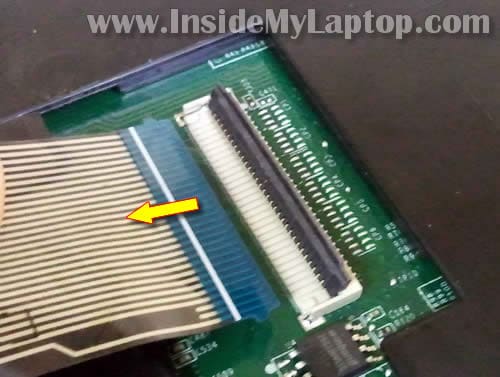
On this picture the same connector shown in the unlocked position.
Now you can pull the cable from the connector.
STEP 9.
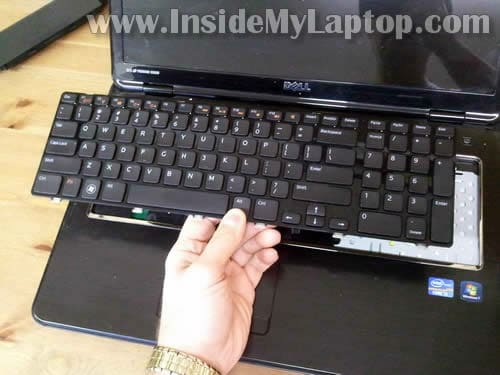
Remove the keyboard.
STEP 10.
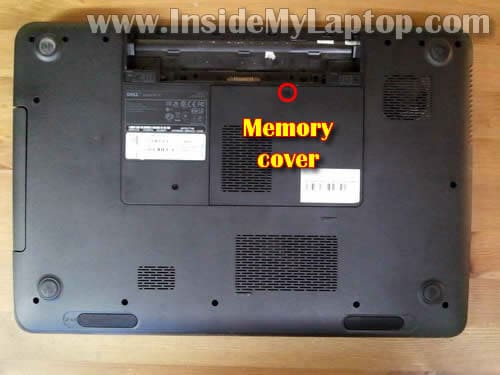
Remove one screw securing the memory cover on the bottom.
Remove the cover.
STEP 11.
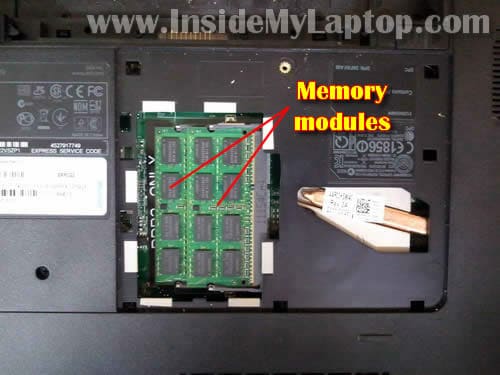
You’ll find both memory modules under the cover.
For the purpose of my guide it’s not necessary to remove memory modules.
By the way, Dell Inspiron 17R N7110 uses PC3-10666 DDR3-1333 204pin SDRAM SODIMM memory.
It can take up to 8GB RAM total. It means you can install up to 4GB RAM module into each slot.
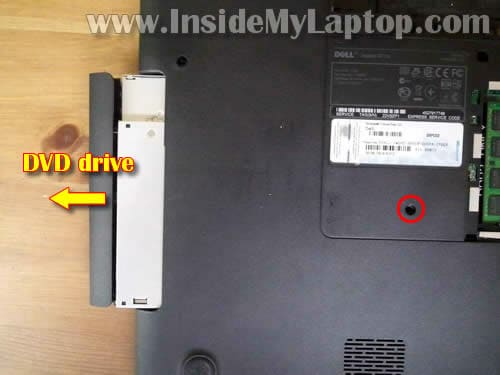
STEP 12.
Remove one screw securing the optical DVD drive.
Pull DVD drive to the left and remove it.
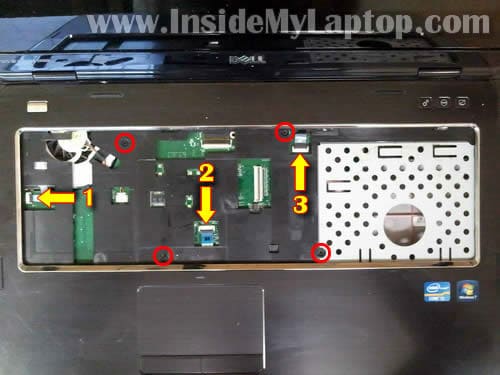
STEP 13.
Remove all screws from the bottom.

STEP 14.
Remove four screw securing the palmrest assembly.
Disconnect the following cables:
1. Power button board cable.
2. Touchpad cable.
3. Hot key board cable.
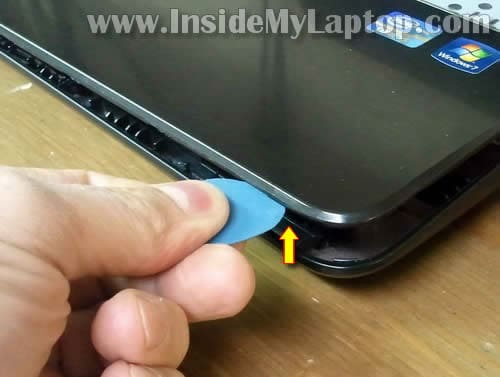
STEP 15.
Separate the palmrest assembly from the bottom case with a piece of soft plastic.
I’m using the guitar pick.
STEP 16.
Lift up and remove the palmrest assembly.
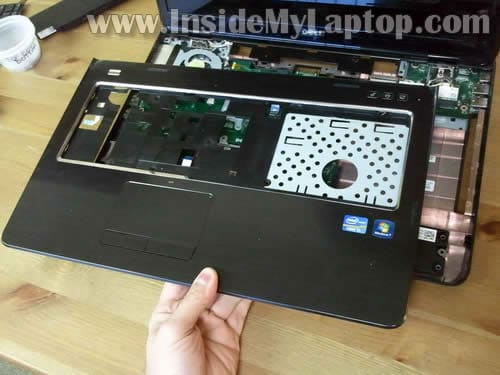
STEP 17.
When the palmrest assembly removed you can access the following internal components:
– Cooling fan.
– CMOS battery.
– Hard drive.
– Speakers and subwoofer.
– I/O board. Both wireless cards mounted on this board.
– Motherboard.

STEP 18.
Remove three screws securing the hard drive.
Slide the hard drive to the left to disconnect it from the motherboard.
Lift up and remove the hard drive from the laptop.
In my Dell Inspiron 17R N7110 I had a regular 2.5″ SATA hard drive installed. It’s possible to replace it with any other large capacity SATA hard drive or SDD.

STEP 19.
Remove two screws securing the cooling fan.
Disconnect fan cable from the motherboard.
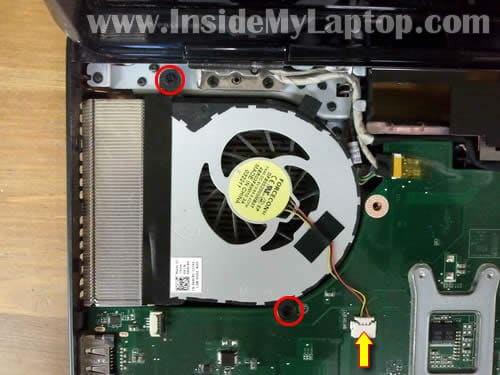
STEP 20.
Lift up and remove the cooling fan.
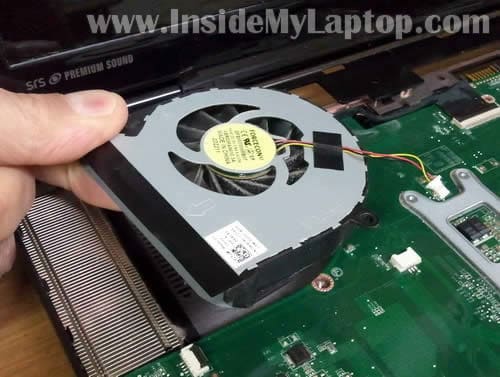
STEP 21.
Remove four screws securing the motherboard to the bottom case.
Disconnect the following cables:
1. DC power jack cable.
2. Webcam cable.
3. LCD screen cable.
4. Status light board cable.
5. Laptop speaker cable.
6. Subwoofer cable.
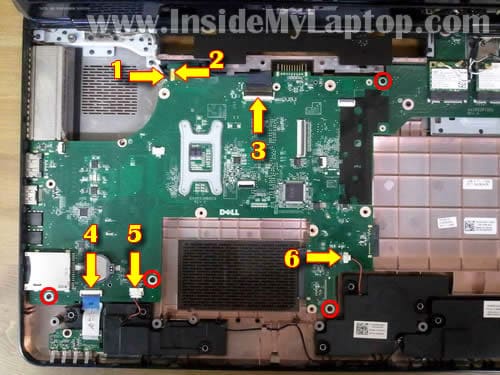
STEP 22.
Carefully lift up the left side of the motherboard and disconnect it from the I/O board.
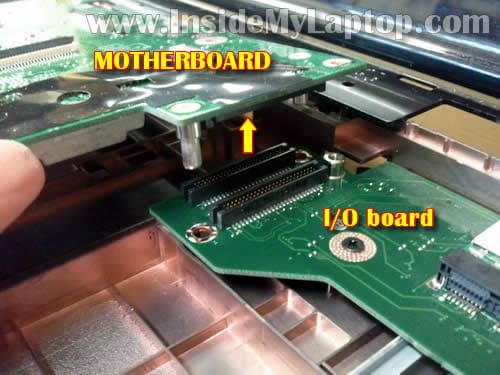
STEP 23.
Remove the motherboard.
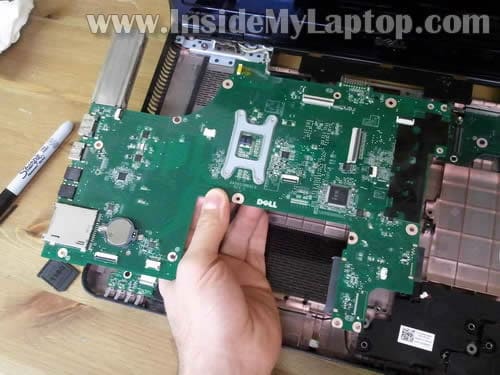
STEP 24.
On the bottom side of the motherboard you can access the heatsink and processor (CPU) which is located under the heatsink.
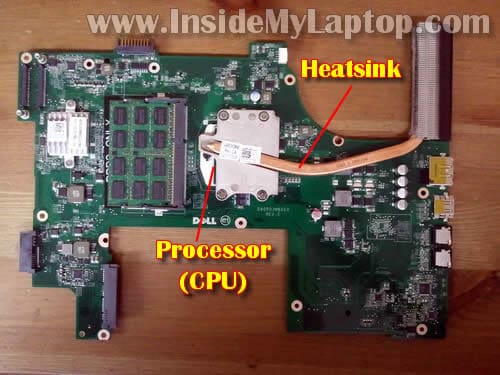
Ashok Kumar
Hi I also owned Dell N7110, you done a better job. It will help me infuture. I have doubt can I add extra internal WWAN card with this laptop. If it is possible please give the procedure. Because many peoples now a days using 3G network for internet.
Regards
ASHOK
IML Tech
@ Ashok Kumar,
I don’t think you can install a WWAN card into Dell N7110.
I tried searching for “Dell N7110 WWAN card” and didn’t find any. Probably it’s not supported.
Bala
Hi
I have Acer Aspire laptop the display is not working when opening the screen fully but works when
Keeping down @ 45 degree. I don’t know which hardware causing the problem. Kindly help me in this issue to fix.
IML Tech
@ Bala,
Most likely it’s one of the following:
1. Poor connection between the video cable and motherboard or LCD screen. Try reseating the video cable connectors on both ends.
2. If reseating connectors doesn’t help, probably this is defective video cable. Try replacing the cable.
beto
Hi there, great tutorial, just two questions:
Do i have to remove the dvd drive to access the hdd and replace it?
Do i have to remove the keyboard to access the hdd and replace it?
thanks a lot
IML Tech
@ beto,
Yes and yes.
The hard drive mounted inside the laptop, under the top cover.
You’ll have to follow steps from 1 to 18 in order to remove the hard drive.
ASHOK KUMAR
@IML Tech
Thank you for your reply, now I am clear to buy a external data card.
sbs
Really awesome work. You might even put up a video in youtube about this and also try to install a intel 510 series or ocz vertex 3 ssd on this machine. It would be really helpful for the owners of this laptop and even i am also the owner of this machine.
austin ani
Hi I have a dv6000 pavilion laptop any time I try playing a cd in the dvd rom it keeps ejecting. Please I need help
IML Tech
@ ausing ani,
Here’s what you can try.
1. Go to the Computer Management (Right click on Computer icon and then Manage).
2. Go to the Device Manager.
3. Find CD/DVD-ROM drives line and and expand it.
4. Now right click on the DVD drive and Uninstall it.
5. Reboot the laptop and let it detect the drive and reinstall the driver. I think this might fix the problem. It did fix the same problem for me a couple of times.
austine ani
Thanks alot I have tried it and it actually worked for mean am grateful and thankful, this site is the best site and forum I have ever visited……..
Chris
This article really, really rocks. It saved me big time. Replacing the hard drive was tough on this laptop compared to my previous Inspiron. Not sure if I would have been able to without this article. Thank you!
niCK
Whats the brand of the ram? Does it matter if they are the same brand?
IML Tech
@ niCK,
Brand shouldn’t matter. You can use any known brands like Crucial, Kingston, etc…
adarsh
thnks a lot……..
Christie
Hi i have exactly the same laptop as this one, but there’s one thing i couldnt get use to its missing backlit keyboard what i wanted to know is i found backlit keyboard for dell 17 inspiron R N7110. If i replace my keyboard for a backlite keyboard is it going to work as well ? Thanks
IML Tech
@ Christie,
I did some research and I didn’t find any US backlite keyboard available.
I think if it would be possible to install a backlit keyboard on this model, it would be available on the US market too.
The one you showed to me is from UK. Maybe it’s a typo?
To the best of my knowledge, backlit keyboards have a separate cable for the backlight. The keyboard on the picture has only one cable.
Christie
From what i saw and searched, XPS 17 And Inspiron 17R have the exact same keyboard, They did backlit keyboard on XPS 17, I had a Dell studio 17 before with backlite keyboard, for replacing it myself i know that it has only one cable do you think it could be compatible ?
IML Tech
Christie,
I don’t know. I guess the only way to find out is try to replace it. I don’t know if the motherboard will support the backlit keyboard.
Please let me know if it works.
Christie
Hum maybe i’m mistaken maybe it has 2 cable… i’m not sure if it has 2 cable would it be hard to replace a normal keyboard for a baclit keyboard on this computer.
MadBrozzeR
Thank you very much for this article.
Only one question: memory cover is fixed very hard; Is it possible to damage latches acting by force? Or how do I need to act to minimize risks?
Thanks in advance.
IML Tech
@ MadBrozzeR,
You’ll have to apply some force but not too much.
While lifting up the cover wiggle it a little bit.
Cata
Hallo,
I can’t see the video card; is it possible to change the gt 525 with a gt 555 ?
Thanks
IML Tech
@ Cata,
I believe the video card is integrated into the motherboard and cannot be upgraded.
Cata
It has two video cards, on board and dedicated. the gt 525m is the dedicated one, so I believe it can be upgraded; but I need an exact answer, to be sure and not to buy it and not to be able to use it.
Thanks
MadBrozzeR
to IML Tech
Thank you for you reply. But I wasn’t too fast to realize that there was no need to uncover memory if I only wanted to change HDD. So I was forced to do it five or six times already and your guide was vitaly helpfull.
I have found at least one difference: you don’t have graphic card on the motherboard. May I ask you what configuration does this laptop have? It could answers some questions like Cata’s.
Mine is:
Core i7 2670QM
6GB DDR3-1333
nVidia GeForce GT 525M
The last one is to the left to CPU at your 21 step’s image. You have a free space there. But anyway it still doesn’t looks like possible to be upgraded without soldering iron.
IML Tech
@ MadBrozzeR,
I don’t have this laptop anymore and cannot give you exact model number. I know it’s Dell Inspiron 17R N7110 laptop.
Here’s Dell’s service manual for Inspiron N7110 laptop. There is no discrete video card in their guide too.
ken
How did you connect the two wireless cards on the i/o board ?
IML Tech
@ ken,
Antenna cables connected to the wireless card, not the I/O board. The wireless card is located on the I/O board.
Take a look at this picture: https://www.insidemylaptop.com/images/Acer-Aspire-5820T/Acer-Aspire-5820T-disassembly-23.jpg
Twisticks
Hi ,
I have a Dell Inspiron N7110 :
—————————————-
Intel ® Core i7-2670QM (2.2GHz, 6MB cache)
8GB DDR3
Hard Drive 500 GB SATA
17.3” in High Definition (1366X768) WLED
1 GB nVidia GeForce GT 525M
—————————————-
Can i Upgrade The GT 525M To Nvidia GTX 560m?
Is it Compatible With the Motherboard & Power Supply ?
If Yes, How to Install it , because I disassembled the laptop and I have not Found the Gt 525m .
I think that This Graphics Card is integrated into the MotherBoard ! o_o
Is That Possible ?
Thank you 🙂
STEVE
I HAVE A DEL INSPIRON LAPTOP WHEN I TURN IT ON IT SAYS MEDIA FILE NOT FOUND BOOT FROM DIFFERENT DRIVE THEN THE LAPTOP SHUTS OFF THE SCREEN SAYS POWER SAVING ENABLED THE MONITOR WILL SHUT DOWN IN A MOMENT WHAT COULD BE THE PROBLEM AND HOW DO I GO ABOUT FIXING YHIS PROBLEM
IML Tech
@ STEVE,
Could be faulty hard drive.
Try running internal Dell diagnostic utility.
Turn on the laptop and press F12 when Dell logo appears on the screen. Select Diagnostic and press enter.
Wait for results.
Quinn
Hello I was wandering if you could tell me the phsical differance in the board with the nvidia graphics and the one without, will the one with nvidia have a chipset (soldered i know, but still curious). and is there a part number differance in the two boards. Thanks in advance.
Paul
Does the Inspiron N7111 support 2 harddrives or just 1?
Roland
I have DELL Inspiron N7110. It will not turn on. I have tried all the basics steps such as taking the battery off and leave it for 30mins or more, hold the power button for 30secs or more then plug in only the power adapter vice cersa with battery or both, but nothing. Charger is good, even bought new one to test, still no power. Still under warranty, but thought basic steps will do before I send it back for replacement.
Your advice will be much welcome.
Thank you.
S33s4w
Is there any guide how to assamble it after doing all these steps?
IML Tech
@ S33s4w,
How about following same steps in the opposite direction?
Jason
if i upgrade from a motherboard with intel graphics 3000 to a 9nwtg nividia motherboard will i need a new heat sink?
michael wheeler
I followed these steps, my screen had been having some problems so I assumed the screen cable was loose. I unhooked the screen while the computer was on to see if that would change things, now the whole computer has shut off and I can’t get the computer to turn back on. I hooked the power button cable back to its correct place, but when I push the button I get nothing.
IML Tech
@ michael wheeler,
I cannot tell what is wrong with the laptop without looking at it. Most likely this is just some kind of connection issue. Make sure it’s assembled correctly and all cables seated properly.
Clive
i have hp 630 it just switched off now not showing anything to the screen but the fan is moving and shows processing
IML Tech
@ Clive,
1. Wait for a while and try turning it on again. Maybe the laptop turned off because of overheating. If that’s the case try cleaning the cooling module (heatsink and fan) from dust.
2. Unplug the AC adapter, remove the battery, push on the power button for a few seconds. Now plug in the AC adapter and try turning it on again.
3. Try removing memory modules one by one. Maybe one of the modules failed.
Willaim
THANK YOU very much for this tutorial. I’m sorry about my poor english. I do own a N7110 and the hard drive fail. I almost gave it away to someone but my last shot was look on line for a solution and after 13 seconds of search, i found this page! I bought a 500gb hard drive, followed your steps very with caution ’cause I’m not a tech guy. After almost a hour later, VOILA, the computer works again. I just installed the windows 7 and went to dell website for the drivers. Thank you for helping my family. William Santo
suhail
can i put a half mini ssd in dell inspiron n7110 instead of the wwan card.
jsblume
Excellent instructions! They worked like a charm. I disassembled my laptop to put new thermal compound on, and then reversed the steps to put it back together. The only problem I had was with steps 2-5, removing the keyboard. I had a hard time springing the locks, and the keyboard doesn’t feel like it’s locked back in place. Other than that, thank you!
JennCan
hey i have the inpiron n7110 and im having screen issues….the screen is got lines in it and u can barley see the picture. is their a way for me to take appart the screen to check the wires?? or how can i check my self??
IML Tech
@ JennCan,
First of all, test your laptop with an external monitor. Check the external video. If external video works fine and the problem appears only on the laptop screen most likely it’s either failed LCD screen or the video cable problem. If you have to guess between the screen and cable I would try replacing the screen first.
Check out this service manual for Dell Inspiron N7110 notebook. The manual has step-by-step display removal and disassembly instructions.
Antoine
Hi. I am currently looking if it is possible to fit a baklight keyboard on this computer. So far I’ve only found one keyboard, a Russian version… I’m looking for a French version. Do you know if there is some kind of connector to plug a backlight on this laptop ?
Thank you.
Matt
Hi there! I have one of these machines. It is equipped with an Nvidia Geforce GT 525m which generates humongous quantities of heat resulting in the laptop overheating every time I try to play a game. What do you think the chances are of fixing this if I clean out all of the dust and put fresh thermal compound between the CPU/GPU and the heatsink?
Ashok Kumar
Hi,
My motherboard got problem, No display coming, service person suggested to change the mother board. Currently I have the motherboard with integrated graphics card. Can I change the board with dedicated graphics card. Do I want to use new power card with new heat sink. Please give me the details any other components I want to alter. Your answers will be appreciated. Thanks.
Sharpe
Tonight, I installed a backlit keyboard from China. I was apprehensive because this laptop did not come with the option for a backlit keyboard, so I was worried there would be no power source on the motherboard.
But, it actually did. There was some sort of special edition that had one, or this model uses the same motherboard as an XPS with one. Either way, there is a small connection for power right beside the keyboard ribbon’s port.
Just wanted to let anyone know who might be searching Google or whatever for backlit keyboards for the Inspiron N17 N7110. As you can see from these pics, there is power.
-Sharpe
http://en.community.dell.com/support-forums/laptop/f/3518/t/19404778.aspx?PageIndex=2
Josephine
Excellent post your article was very informative. It really helped me dismantle my Dell computer. Thanks again.
Ray Dio
Do you have a page with info on how to disassemble the screen side? Or is it a no-brainer once the other side is done? I’ve done a lot of work on desktops but never a laptop.
Frank Richter
Thank you for the detailled walkthrough.
I was just about to clean the keyboard. However, your pictures and text (page 1) make it look like you push the springs INTO the case, not into they keyboard. Even the screwdriver AND the arrow point in the “wrong” direction. I believed the images and started wreaking havoc.
Fahro
Thanks a lot for these instructions. While disassembling my laptop keyboard, I removed connector latch and thought I broke it. After reading this guide, I opened the keyboard again, placed the latch on the right way, and now I’m typing on my fully working old good keyboard.
So happy. Thank you!
Kaufmania
Oh… dear… god…. I’ve built tower systems before quite often but this is my first foray into notebook repair, and I am FREAKIN’ OUT NOW!!!!!
Sparkopolis
Great tutorial, Very helpful. However I was hoping that you would point out the location of the video cards since you had it taken apart. Apparently some models come with dual video cards. They are the Intel HD3000 and a discrete NVidia GT 525M. I believe mine only has the Intel as it is the only one listed by my device manager but I would like to locate where they are so I can find out for sure. I want to add a 525M if the mount is there for it. I’m also finding motherboards for sale online that have the 525M already installed and that may be the way to go. I’m still researching my options.
Sparkopolis
I know the question about the backlit keyboard is a couple of years old but I if anyone is interested, the answer is yes you can add a backlit keyboard. I did this recently and am very glad because even in a decently lit room I sometime had trouble seeing the keys on the very dark standard keyboard. I was constantly tilting the LCD down for extra light. I had no problem finding a US model on ebay. I had to wait for it to ship from China but it was well worth it. The backlit keyboard has two power ribbons. One is for the keyboard (see steps 7 and 8) and one is for the lights so be sure to look for that when purchasing.
You will want to remove not only the old keyboard but the top cover as well. The power connector for the lights is to the bottom right of the keyboard connector (again reference steps 7 and 8). You will want to cut away a small, square section of plastic from the cover in order to expose the connector for the lights so the power ribbon can attach. You can use a rotating dremel type cutting tool for this if you have one. It took a little longer but I just used a small box cutter to carefully and precisely cut away the area. Once this is done simply re-attach the cover and the three ribbons. Then you can attach the new keyboard and its two ribbons.
I hope this helps somebody.
Shirley
I have a question about the Power Button, Hot Key and Touch Pad connectors. Are they released like the keyboard cable (flip up) or do they just unplug. Reason I ask is I ‘inherited’ a Compaq laptop to put back together and some of those connectors had a tiny piece of plastic that I had to slide back into place over the top of the cable. It was a real pain to get it positioned right to slide into place. Please tell me the connectors on this laptop are not like that.
IML Tech
@ Shirley,
All three are similar to the keyboard connector. You flip up the retainer and pull the cable from the connector after that.
Jim
Hey, I broke my keyboard connector RETAINER. Do you know where I can find/buy another?
Elena
I put my laptop back together and I plugged correct tabs back in for ac adapter, display and camera and I put everything back and my screen doesn’t seem to be working… I have no clue. My laptop turns on and it makes this beeping noise. I’m not sure what to do maybe you can help !?! Pleaseee it will be much oh appreciated.
Jay Kutt
I was working on a N7010 when I realized your post I had called up was about N7110. Removing the keybd was the toughest part of disassembly. The assembly problem was the power connector lockdown latch came out of the connector socket. After struggling and almost loosing it I got a small hemostat the enabled me to hold it securely and put it place. Thanks for your great pics and info.
Jay
Deb
Thank you for the detailed instructions. This was my first foray into laptop guts and I successfully took it all apart and fixed the loose connection caused when my son dropped it. Seems all better now.
ScottJ
Got a new SSD drive for my N7110, and this guide was exactly what I needed. Perfect replication of steps to replace the HD, fully dis- and re-assembled in less than 20 minutes. Thanks!
Dave
how to disconnect power button ribbon from mother board on Dell Inspiron 17R N7110.
Sharni
Hello, I did all of this, I connected it all back up, but for some reason all of my keys are working except for my ESC key. Do you know what I would have to do to get this working again? There are no driver problems and I connected the cables perfectly, I even disconnected and reconnected them about three times. I have no idea what else to do.
Linda
Please I need help I look it apart to clean it because it was get hot. I went to put it back together no problems but now for some reason every time I put the keyboard it the monitor shuts off. and the touch pad will not work. the computer says it is turned off and I can’t turn it on. I need this computer for work. Can you please help me. I am desperate.
Matthew
I was wondering if anyone could tell me the model # of the CMOS battery holder for this laptop Dell Inspiron N7110. Any help would be great. I broke the clip that holds the battery in snug.
Matt
Have always HATED taking apart laptops. Your guide, though, is the BEST one I’ve ever seen! Thank you so much! I followed it forwards and backwards and for once I only ended up with ONE extra screw. Amazing. Thanks again…
PJ
Hey, many thanks for this guide. My Dell was shutting down, probably due to heat issues and your guide helped me take it apart and clean the whole computer! Seems to be running great. Thanks again!
Jeff
The cable retainer came loose when unplugging the power button board cable. How do I re-install it?