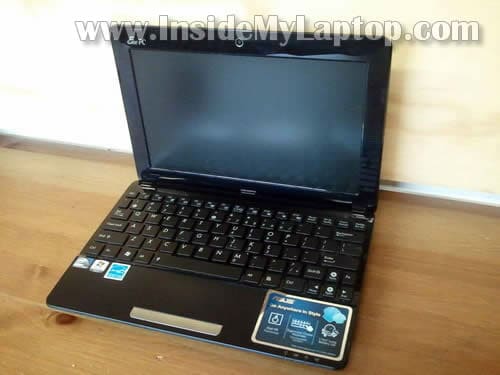
In this guide I show how to disassemble an Asus Eee PC1015PX netbook.
My main goal is replacing the hard drive which started to fail. In order to remove the hard drive it will be necessary to remove the top cover assembly.
The hard drive mounted deep inside the netbook case.
Before you start make sure the computer is turned off.
STEP 1.
Remove the battery.

STEP 2.
Lift up the screw cover located on the memory cover.
Remove the screw. Lift up and remove the memory cover.

STEP 3.
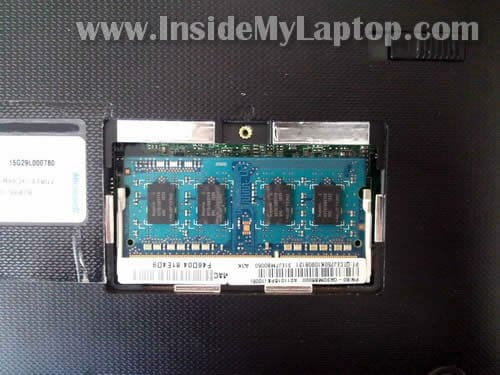
Under the cover you’ll find one memory module.
Asus Eee PC 1015PX has only one memory slot.
This laptop can take 2GB RAM maximum.
Memory type: DDR3 PC3-10600 or DDR3 PC3-8500.
STEP 4.
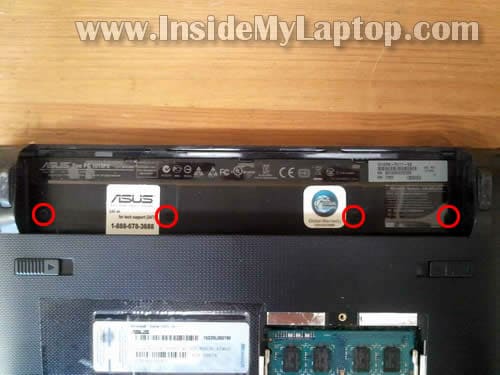
Remove four screws located in the battery compartment.
STEP 5.
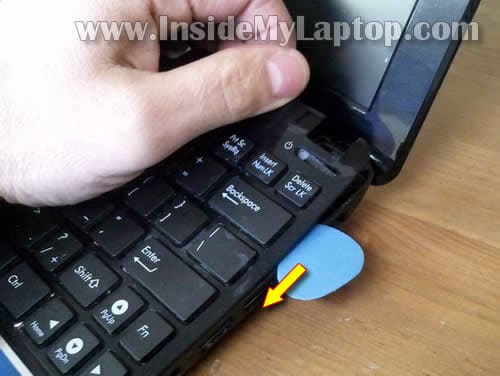
Start separating the keyboard assembly from the base.
You can use a piece of soft plastic to separate two parts (I”m using a guitar pick).
There are small plastic latches securing the keyboard assembly.
STEP 6.
Lift up the top side of the keyboard assembly and slide it towards the screen.
Be careful. The keyboard still connected to the motherboard.

STEP 7.
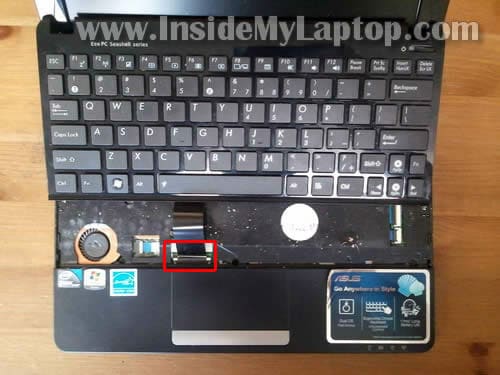
Now you can access the keyboard cable connector which is located under the keyboard.
Before removing the keyboard you’ll have to unlock the connector and release the cable.
STEP 8.
Here’s how to unlock the keyboard cable connector.
Move the white locking tab about 1 millimeter towards the netbook display.
The locking tab must stay attached to the connector base.
The cable jammed between the locking tab and base.

STEP 9.
On the following picture the connector shown in the unlocked position.
Now the cable is released and you can pull it from the connector.

STEP 10.
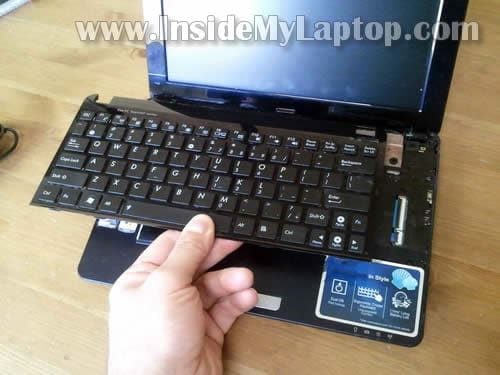
Remove the keyboard assembly.
STEP 11.
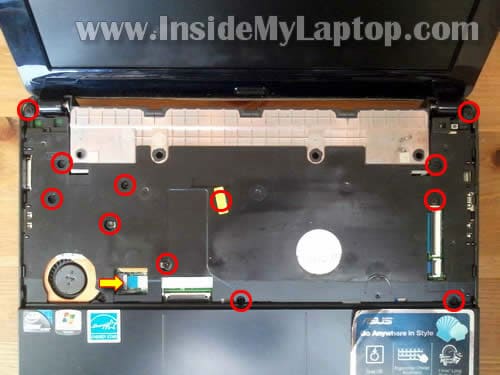
Remove all screws securing the top cover assembly.
Disconnect the touchpad cable.
STEP 12.
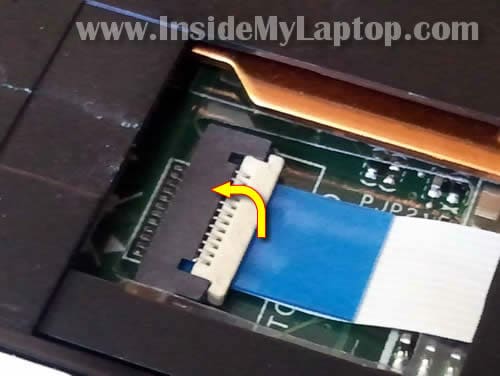
Here’s how to unlock the touchpad connector.
Lift up the right side of the white locking tab with your fingernail.
The locking tab will open up at a 90 degree angle. The locking tab must stay attached to the connector base.
STEP 13.
On the following picture the same connector shown in the unlocked position.
Now you can pull the touchpad cable from the connector.

STEP 14.
Start separating the top cover assembly from the base.
I’m using the same guitar pick as a case cracker.

STEP 15.
Remove the top cover assembly.
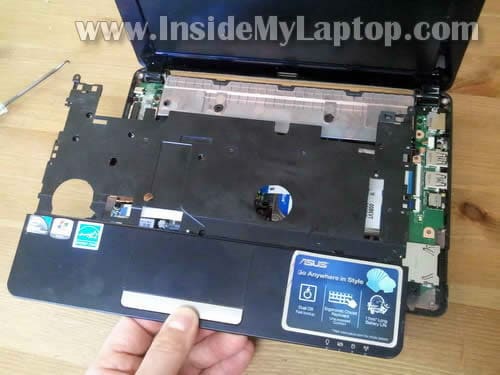
STEP 16.
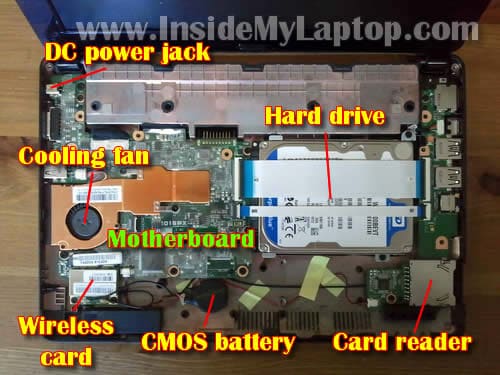
Under the top cover you can access the following internal parts:
– Cooling fan.
– Wireless card.
– Hard drive.
– CMOS battery.
– Card reader/USB board.
As you see, in Asus Eee PC 1015PX netbook the DC power jack soldered to the motherboard. If the DC jack fails, it will be necessary to remove the motherboard for the jack repair.
While the top cover is removed, take a look inside the cooling fan. If the fan looks dusty, blow off the dust using canned air or air compressor.
STEP 17.
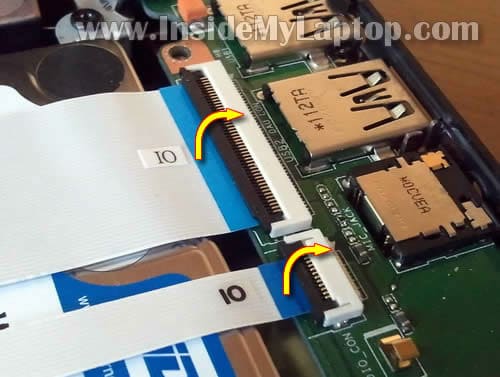
The hard drive mounted under two cables connecting the USB board with the motherboard.
Disconnect both cables from the USB board.
Unlock both connectors the same way you unlocked the touchpad connector in the step 12.
STEP 18.
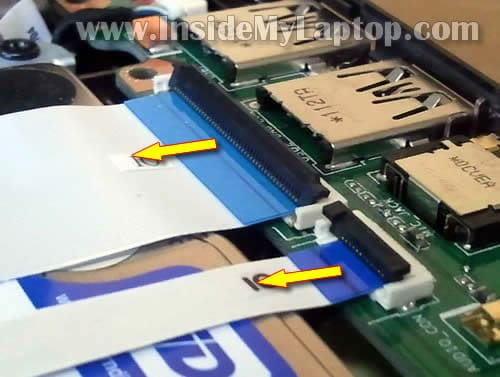
Remove both cables from connectors.
STEP 19.
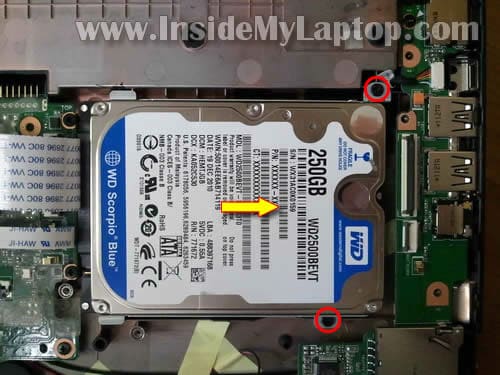
Remove two screws securing the hard drive.
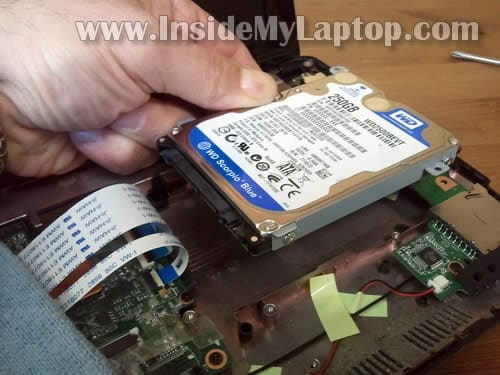
Lift up the right side of the hard drive and slide it to the right to disconnect the hard drive from the motherboard.
STEP 20.
The hard drive has been removed.
My Asus Eee PC 1015PX had a regular 2.5″ 250GB SATA hard drive installed. You can replace it with any other large capacity 2.5″ SATA hard drive or SSD.
Justabrake
Do you know where I could get spare parts for these acer netbooks ?
Thanks ! Especially for this important pictorial
IML Tech
@ Justabrake,
Try eBay or Amazon.
Seth
Hey, thanks for this great article! I have been searching forever on how to open this thing up so I can remove the hard drive and back it up to my desktop. Thanks again!
gomsy
please upload same deassmebling
for asus ee pc 1015cx
doosan916
Thanks You!!
Deltabeard
Thanks a lot for this guide! 🙂
Is there a mini PCI-E slot on the motherboard?
Is there wifi adapter attached to a mini pcie slot?
I was wanting to replace the wifi adapter with a SSD.
Thanks!
Phil P
You missed one screw in Step 11 – just by the cooling fan, almost at the end of your yellow arrow.
Carlos
Thanks for the guide! after removed the keyboard, and reinserting the keyboard back in, the enter key and backspace key on my keyboard do not work. Any idea why that happen?
IML Tech
@ Carlos,
Check connection between the cable and motherboard. Try reseating the keyboard cable. Could be just loose connection.
Carlos
I have done that many times, it seems does not solve the problem. Is there only one that the keyboard cable can go in? The first time I reseat the keyboard cable it worked fine. The second time, some of the keys do not work.
IML Tech
@ Carlos,
Yes this is the only keyboard connector.
Look inside the connector. Maybe you got some dirt stuck in there? Just guessing.
astrablaster
Thanks! The 1015PX looks similar to my 1225B except that the keyboard and touchpad make one piece. It would be nice if somebody coud disassemble 1225B. There are two screws under the battery and two under the RAM cover (the RAM modules are soldered to PCB though making the RAM cover totally useless).
Shittu Olalekan
Thanks for the article.
But my Eee PC 1015 seem to have a different problem. I was working with it when suddenly the internet network failed. I decided to watch movie with it till it was restored. When the network came back, I tried typing but then I discovered that only few keys were working.The spacebar was only changing the power mode. other alphabet keys are serving as arrow keys and most of the alphanumeric keys show different things when typing but it shows they are working. Please what can I do and my laptop has this arabic signs on it which I dont understand there meaning.
Hope to hear from
Sumit Ghose
please upload Eee pc 1015cx W11 BLK
Thaks You
Omer Zeki
Hi;
Thanks for the instructions. They were quite useful in disassembling my Asus Eee PC 1015PED.
Your instructions, however, are missing two very crucial steps at the very start. Removing the four screws inside the battery compartment is not enough to detach the top end of the keyboard. You need carry out two additional steps:
1. The three tabs above the screws in the battery well. They need to be gently pryed out.
2. Two retaining clips at the bottom of the side walls of the battery well. These need to be pushed in with a small flat screw driver.
Only after these two steps you can start removing the keyboard with the guitar pick as you have described.
Best regards.
Omer
desmond
Hi
Thanks a lot for this guide!
was the upgrade to SSD worth the work. did you get a remarkable speed increase?
Thank you
sunsetlover
This is testament that Asus doesn’t want you to replace the hard drive. Plus one slot for RAM. Instead they want you to buy a new netbook. Shame on you Asus.
farhan
how can we upgrade RAM?? please tell me i wanna upgrade it…thanks in advance
Witek
OK but how to disassemble screen to replace for instance broken LCD????
subhadeep
how much speaker on board asus eee pc 1015cx note book?
Arosh
Thanks
nazrin
hi, my notebook of this model cannot be switched and during that problem occur the connection of the charger cannot be detected by the notebook? why is that so?
Renaud
Hello,
Thanks for all these explanations. I succeed in disassembling my new Asus Eee PC1015BX netbook.
In fact, I try to reset the Bios password in vain. Do you how to do ?
Thanks very much in advance for your help.
Renaud
A precision, I followed the instructions described there also :
“How to BIOS reset ASUS EEE PC netbook and remove BIOS password” http://www.guruht.com/2011/11/how-to-bios-reset-asus-eee-pc-netbook.html.
MJ
Hi.
Thanks for such descriptive info. My question is which screw driver I need ( size of screw driver) to open its screw as shown in step 2. Just at top of RAM. I am planning to upgrade the RAM.
Also which RAM I should by for Asus EEE pc 1015PEM? any 2GB DDR3 ram will do ?
Thanks.
IML Tech
@ MJ,
Probably Phillips PH1 will work just fine.
According to Crucial, it’s 2GB DDR3 PC3-10600.
Chris
Hi,
Excellent instruction – very helpfull, I managed to remove dust from inside.
I would like to say, that there are two screws you don’t need to touch, and I am not sure if you should. In step 11 you may leave screw next to touchpad connection (right from it) and the first one above it. they hold heatsink and I am not sure if detaching that bit is ok if you don’t have heat conducting paste.
Also if you have a paste it is fairly easy to clean or replace the fan, but still all of it is medium level of difficulty.
Lloyd
Hi, thanks for this guide it really helped. I rescued my netbook with a broken power supply that would not charge no matter how much I wiggled the lead. It turns out that the back had come out which houses the centre pin. I got a spare off ebay for a couple of quid but I am no solderer so I managed to push the back section back into place and behind it wedged a small piece of clothes peg I cut to size to prevent it being pushed out again. I replaced the cover and its now held firmly in place! Hope this helps others out there, these charger sockets are so prone to breaking with people tripping on or yanking the charger wires.
JJP
Excellent, however, I have the same device, but when I open the memory lid, there is no memory., but a heatsinc like part is shown. So this is a deviant motherboard. Is it still possible to replace the memory with an upgrade by disassembling the the notebook completely, because I would have to get to the underside of the motherboard for me to see if the memoryslot is yet located there.
IML Tech
@ JJP,
What is your laptop model number?
JJP
This Asus Seashell notebook reports under Configuration – System: ASUS EeePC 1015BX. It has a lid underneath, where you would expect the 1Gb memory to be located. Opening up the lid reveals an unpleasant surprise: no memory bank but some unknown parts.
IML Tech
@ JJP,
I believe this model (1015BX) has RAM soldered to the motherboard which cannot be removed, replaced or upgraded.
Unfortunately, I cannot find a good image of both sides of the motherboard to confirm that.
Suedeace
Hello ive got a prob.. Under step 17, disconnecting cables. What if my connector is pulled out? (Broken) due to excessive force while pulling up to remove cables.
Suedeace
Then, can i just use a clear tape to tape on the cables? Cuz now the connector is broken and i cant secure it using the connectors anymore
Alvin
I have the same device as mention above, I’m facing a problem now which my net book can’t detect hard drive even though I already replace a new hard drive, may I know what is the problem and how to solve it? Thanks in advance.
aljon
hi Alvin, we have the same problem.. Hope somebody can answer, TIA
MANDEEP
can I replace asus mini eee pc r051cx motherboard to asus mini laptop 1015cx, need help urgent…thx a lot in advance
IML Tech
@ MANDEEP,
I don’t know. I looked up both models on Asus site and they look very similar.
You’ll have to compare both motherboards side by side and if they have same dimensions and connector locations probably you can do that.
Mar
Hi!
Mine is Eeepc Asus 1015px is it advisable to change the hard drive it’s hanging when I play a movie and sometimes the screen becomes color blue and sometimes so slow. Kindly give me some advice regarding this matter do I have to upgrade the hard drive, the advantages and disadvantages.
Thank you in advance.
Mar
IML Tech
@ Mar,
The symptoms you described could be related to hardware OR software.
First, I would run tests on the hard drive and memory.
For testing hardware you can use utilities on Ultimate Boot CD (google it).
dogsblox
Hi I have the Asus Eepc 1015PX Seashell. Thank you for the really helpful guide to removing the Keyboard, but do you also know, (or can you guide to any links), how to separate the keyboard from the main upper case part of the laptop? In all the sites where I see the keyboard for sale, it is not the complete top with cut outs round the hinges, it is just the keyboard only. Thanks in advance for any help that you can give.
IAmDisappoint
Please include more steps/details for removing keyboard assembly, I ended up separating the cover from the keyboard. The thing was held on by a bunch of 1mm wide pegs that fit into the metal backing and melted at the tips to hold it together. Luckily the cover is made of ABS plastic so some nice runny modeling glue should hold it back together.
If you are going to take apart a complex package like this, and write instructions for others, please include much more in depth instruction!
Everyone else, please consider using a professional service for this. A desktop is one thing, even standard notebooks are easier than a netbook in certain aspects.
IAmDisappoint
Yep. Okay everyone. If you are planning to disassemble your 1015px netbook, DO NOT ATTEMPT!!! I am very savvy when it comes to this stuff, and I don’t know how many perfectly good netbooks this guy went through to do this, or if the thing looked even half decent when he was done. Bottom line is, if you absolutely have to do something with your netbook like this. Bring it to a professional!!! Do not try to do this yourself! The step of removing the RAM cover doesn’t even make any sense if you are trying to switch out the hard drive! I should have known from that step alone that this was a bad set of instructions. I stopped before completely removing the cover, (after the keyboard), and put the thing back together. My netbook is destroyed as far as appearance, and my keyboard, as I mentioned in my last post, is separated from the top cover, so now my keys are basically flush with it. That must be some magic guitar pick this individual was using there too. There are too many variations in the design for these computers, one batch is not necessarily identical in design and parts. I am lucky I stopped when I did. I can still at least use my computer. The way I see it, you sir are not owed a donation, you sir own me a brand new Asus Eee PC 1015PX, with a matte red finish. I just wanted to extend the life of this little guy, but now I have shortened it by following your instructions.
I am realm broken up with this man. I love this computer, and now it has gone from a sleek, efficient, and portable tool for school to being the PC equivalent of a beater go cart…..
IML Tech
@ IAmDissappoint,
I’m sorry that my disassembly guide wasn’t helpful to you. The main goal of my guide is to show GENERAL disassembly steps and location of the internal components.
Some people can do that and some cannot. I just provide the guide and it’s up to you to decide if you can handle it or not.
Lacy
Hy!
Can someone tell me what size(thickness) has the thermalpad?
I have Asus EeePC 1011, but I think is the same.
Thanks!
Carley Thompson
This is a badass thing you got here. I’m not the “internet presence” type, especially not to comment. But the fact that there I haven’t been able to find anything remotely on what is the most straight-forward method of swapping the hdd from this specific netbook, and here you have this step-by-step with pictures. Thank. YOU. I don’t want to get into the dirty details of why I absolutely MUST get this netbook apart, but you are a beast man! Thanks.
Herbert
Hi.. Whats happend my Laptop hes not turn on.. and i see the board one Broken transistor How to Fix My Laptop.. Please Help me..
sajjad fani
I am proud of Iran
Greetings from the right training you very much
Dc power jack connection is just what I am
that was perfect
mr30
Neil
Thank you…my 1015PX hard drive failed a few months ago and I recently replaced it with an SSD using these instructions. Other than breaking a couple of the clips/latches it went OK, and the netbook is now running OpenBSD 5.8. Small donation on its way.
to: IADisappoint
Obviously you’re not very savvy! The only way you are going to damage a netbook (or any computer for that matter) is by forcing something open or apart that’s made of plastic. I’ve been building, programming and repair computers of all kinds (especially Netbooks and Laptops) for as long as they have been making the them. The guide that this guy wrote is just that, a guide so if you damaged a bunch of netbooks or whatever then obviously you have no idea what you are doing. You actually unknowing state that in your comment by telling people to take their computers to a professional which obviously you should have done yourself.
Matt
Hi,
with all due respect: I am totally incompetent when it comes to technical things. I bought a used 11 year old Asus eeepc 1005 PX and it is showing signs of weakness. I bought it for € 60 (about $ 60 currently) and of course there would be no real point for me to pay more by taking it to a professional for repairs. I found this site “by accident” and I am very impressed by the list of items “IML Tech” has disassembled, step by step. Consider the hours put into this, probably on his/her spare time! This only deserves some respect.
I understand the frustration of damaging something that is very new by trying to repair yourself, if this is what happened to you. But then again if it is very new/possibly under guarantee, why try and disassemble yourself?
I would like to learn about these technical issues and might buy a defective EEE PC (or whatever I want to buy next) for a few € on e-bay, and then use this guide here to try and “educate myself”. I believe this is what “IML Tech” is trying to do here: help people with little knowledge to be self reliant in a society where you have to give your hard earned cash for every little thing (look at how cars have become more complicated – although safer – over the years: you cannot as a layman repair anything yourself. Same is happening with the good old bicycle by the way). Just look at his “guide for beginners” if you have not done so yet.
After this long speech which I guess three people in the whole world will read, here is my point, again, respectfully: if the instructions here are so bad, why don’t you try and make a guide yourself and submit it to “IML Tech” for publication? This would be more constructive than just criticising.
Sincerely yours,
Matt
IML Tech
Hi Matt, thank you for your kind words. Yes, it take HOURS to make this guides and yes, I do it on my own time.
These guides are for people willing to learn.
Flamegal
Wow this tear down is really accurate. Mine was an Asus eee pc seashell w matt red finish. I was taking it apart to throw away the HDD and didn’t put it together to see if it works though. Thanks!
ChaoticThinker
Could you do one for the same model but regarding the Cooling Fan?.
Dagoberto
Can you do one for the same model but only regarding the cooling fan replacement?. Please!!!
Matt
Dear “IML Tech”
just wanted to say thanks for your hard work in making these assembly guides (which as a layman I have not tried yet, I must say) to a wide audience. It could give enough confidence to people like me who were “born with two left hands” 😉 to “get their hands dirty” 😉
I wrote more details in my reply to “IADisappoint” above (currently awaiting moderation) and certainly will get back with (constructive) comments in case I really try to become somewhat more knowledgeable on IT hardware. As I also have other interests, I do not know when/that may be… probably when my Asus really gets bad and I have no choice but to open it/replace parts etc…
Again, big thanks for your involvement!
Matt