In this guide I will disassemble a HP Pavilion g6 laptop.
In this particular case I’m taking apart a HP Pavilion g6-1c55nr but the guide should fit all models in Pavilion g6 line.
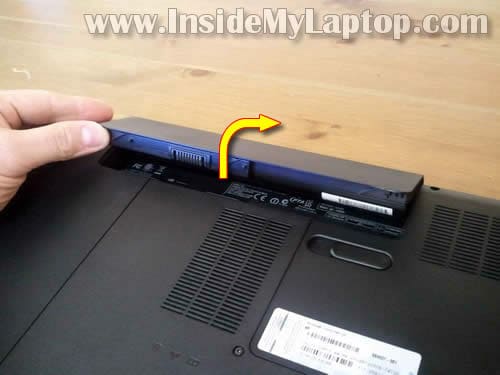
STEP 1.
As always start the disassembly process with removing the battery.
Replacement battery available here: https://ebay.to/39p94qr
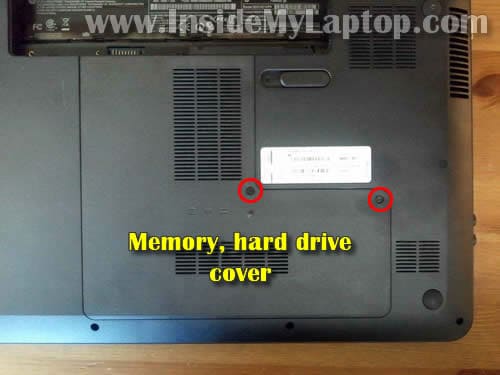
STEP 2.
Remove two screws securing the bottom cover.
Lift up and remove the cover.
STEP 3.
Under the bottom cover you’ll find the following components:
– hard drive.
– memory modules (in my case I have only one 4GB module installed).
– wireless card.
– CMOS battery (standard 3V battery).

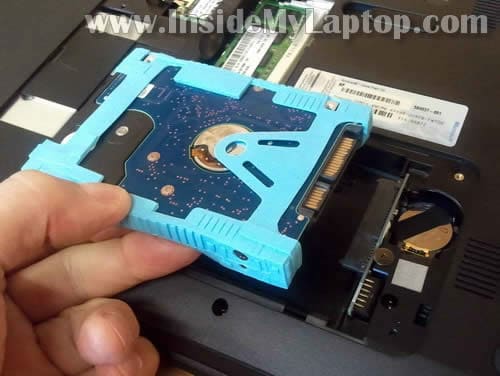
STEP 4.
Slide the hard drive to the left and disconnect it from the motherboard.
Lift up and remove the hard drive.
HP Pavilion g6 uses a regular 2.5″ SATA hard drive.
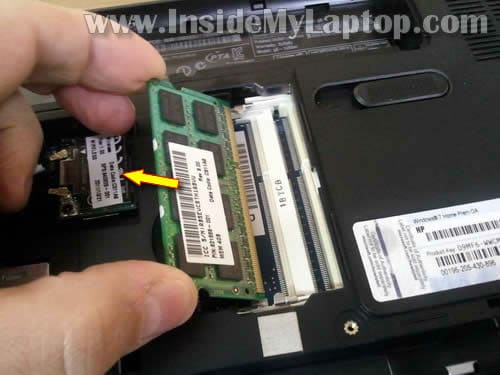
STEP 5.
Remove the memory module.
HP Pavilion g6 uses DDR3 memory.
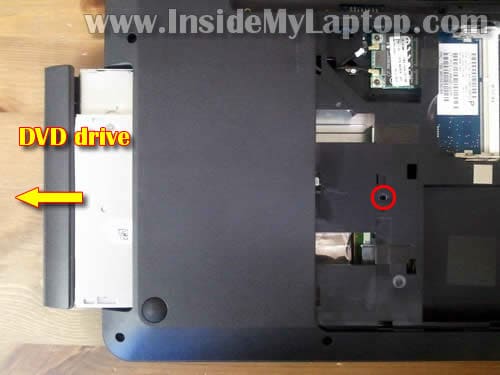
STEP 6.
Remove one screw securing the optical drive (DVD drive).
Pull DVD drive from the laptop and remove it.
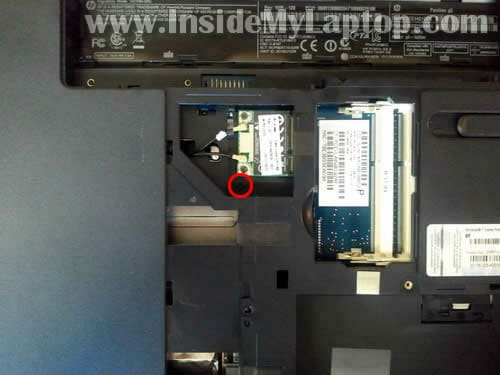
STEP 7.
Remove one screw securing the keyboard on the bottom.
This screw located close to the wireless card.
STEP 8.
The keyboard secured by five spring loaded latches on the top.
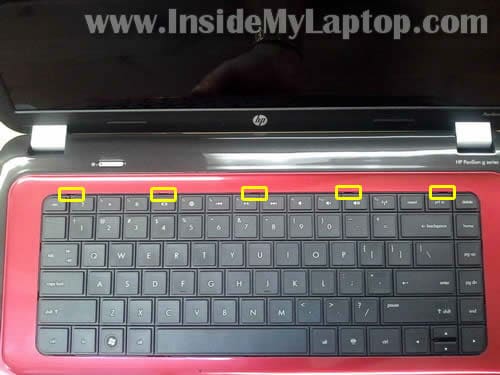
It could be tricky to release those latches. I’ll try my best to explain the process.
Using a small flat head screwdriver push the latch inside the case. At the same time lift up the keyboard a little bit.
When the keyboard lifted up it doesn’t allow the latch to lock again.
Do the same with all remaining latches.

STEP 9.
After all five latches release, you should be able to lift up the top side of the keyboard.

STEP 10.
Turn the keyboard upside down and access the connector.
You’ll have to unlock the connector in order to release the keyboard cable.

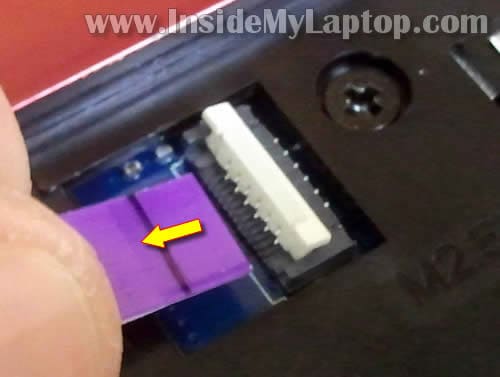
STEP 11.
On the following picture the keyboard connector shown in the locked position.
Carefully lift up the left side of the brown locking clip. It will open up at a 90 degree angle.

STEP 12.
After the connector unlocked, you can pull the keyboard cable.

STEP 13.
Remove the keyboard.
Replacement keyboards available here: https://ebay.to/38e1xKS

STEP 14.
Remove all screws from the bottom.
One screw (yellow circle) hidden under the rubber plug.
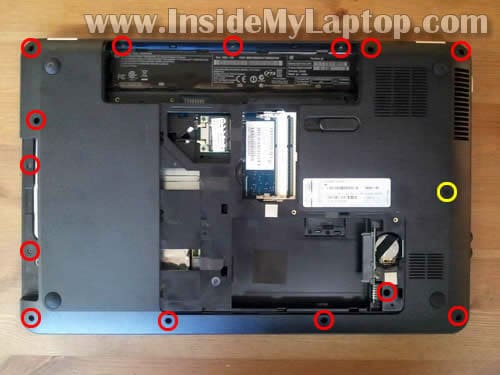
You can remove the plug with a sharp object and after that remove the screw.

STEP 15.
Remove six screws securing the top cover assembly.
Disconnect the power button cable and touchpad cable.

STEP 16.
You unlock both connectors the same way you unlocked the keyboard connector.
Lift up the left side of the white locking tab. The tap will open up at a 90 degree angle.

STEP 17.
Pull cable from the connector.
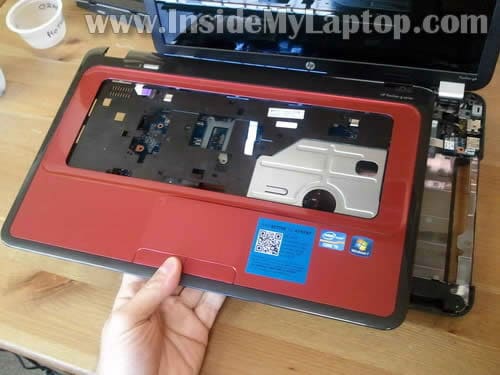
STEP 18.
Now you can start separating the top cover assembly from the bottom cover.
Insert a piece of soft plastic (I’m using the guitar pick) between the top cover and base and move it along the side.
Continue removing the cover with your fingers.

STEP 19.
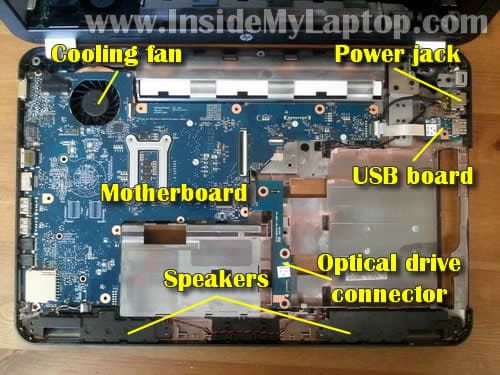
Remove the top cover assembly.
Under the top cover you can access the following components:
– cooling fan (mounted on the bottom side of the motherboard). In order to access the fan it’s necessary to remove the motherboard.
– laptop speakers mounted on the bottom.
– power jack which is attached to the power cable. If the power jack failed, you simply unplug the old one from the motherboard and plug in a new one.
– USB board.
– optical drive connector.
– motherboard.
In the next guide I’ll explain how to remove and replace the screen.
Andr6
I found it kinda hard to open keyboard latches. Finally I started doing this not from the side of the keyboard but from the middle part. I pushed the latch and lifted keyboard with a knife blade. Other than that replacement was easy.
Benjohn
Good tutorial, very visual 🙂
Julle
I opened my laptop with your guide (i cleaned it) and after it my latptop did NOT work. Then i opened it again… TA-DA!!! Now my computer is working again!
IML Tech
@ Julle,
Good job! Sometimes simple reseating connections works very well.
TechnoTech
Can you show me how to fix a broken key, whith this same model?
strikee
the spring latches that keeps the keyboard in got a bit messed up after pressing them in, the latches won’t lock in. help?
IML Tech
@ strikee,
Probably you pushed them too far. Try to fish them out with a needle.
john
You mentioned that you have a “HP Pavilion g6 base disassembly guide” but I could not find it on your website. Where is it? Thanks
IML Tech
@ john,
That’s the one right above the comment area. 🙂
What are you trying to achieve?
Haley
Thanks for the tutorial. Quick question, though– my computer keeps freezing on the HP start up screen, and in the HP tech support forums, it said to disassemble the laptop and “disconnect the front-panel memory card reader cable at the card reader itself– NOT the end that connects to the motherboard header” in order to fix this issue. That big ‘NOT’ scares the crap out of me, so I wanna make sure that I actually know what a memory card reader is before I go in there and start pulling stuff apart. Could you help me?
IML Tech
@ Haley,
I think that’s a long shot.
If the laptop freezes at HP logo, anything could be wrong: hard drive, memory, motherboard, etc…
Here’s something to try before you disassemble the laptop completely.
1. Try starting the laptop without hard drive.
2. Try removing memory modules one by one and start the laptop with only one module in place.
Can you bypass HP screen after that?
By the way, if you look at the last picture you’ll see that the card reader integrated into the motherboard. There are no cables. You cannot disconnect it from the motherboard.
Are they talking about the same laptop model as in this guide?
daniel
i have the hp G4 and this helped me a lot, thanks for the tuto.
Alex
Thanks for the help with the disassembly! Great guide! It’s actually my mother’s laptop and it’s a Pavilion G4, rather than a G6 so there was the odd difference but mostly the same.
Question is: Does ANYONE know ANYTHING regarding coffee damage? My mother spilt a bunch of coffee on the laptop a few days ago and she asked me to look at it. There appears to be quite a bit of coffee stain/damage on the casing of the laptop (mainly noticeable due to discolored metal) There seems to be a bit of coffee came in contact with the hard drive and a tiny bit on the cd drive. But nothing that would seem to harm it as it’s just a bit (so it seems) on the casing of either part.
The problem is that the computer will NOT start. AT ALL. The power cord when plugged in indicates an orange light which im assuming means it’s CHARGING, or that there’s a problem… one or the other! Nothing boots up at all it simply does NOTHING. My thought was the motherboard but at first glace it appears very very little to absolutely no coffee actually touched the motherboard…
My question is… any idea what might be damaged to cause the laptop to not even turn ON?
IML Tech
@ Alex,
When you spill something on a laptop you have to do the following:
1. Unplug AC adapter and remove battery. Stop using the laptop completely.
2. Disassemble the laptop and examine all internal parts.
on-off
how do i access the actual fan. You said i would have to remove the mother board. how do i do that? i;m sure there is something more than just unscrew all screws in sight, waiting for your reply. Also very straight forward guide it is awesome
Baztian
While inspecting the G6 battery slot region, a small shaving of excess plastic from the battery release slide mechanism fell into the internal compartment (likely the underside of the motherboard). I have yet to open my G6. Should I bother to retrieve the plastic shaving? Thanks in advance for the help.
IML Tech
@ Baztian,
Hard to tell. Theoretically, this piece can block the fan.
What if you remove all covers and DVD drive from the bottom and shake the laptop a little bit. Maybe it will get out.
mikeromania
sam questions “””””””””””””how do i access the actual fan. You said i would have to remove the mother board. how do i do that? i;m sure there is something more than just unscrew all screws in sight, waiting for your reply. Also very straight forward guide it is awesome
please give us an answer,i wanna clean up my laptopt,thanks
IML Tech
@ mikeromania,
After you went though all 19 steps and removed the top cover assembly, you’ll have to remove the motherboard.
1. Disconnect all cables connected to the motherboard.
2. Remove all screws securing the motherboard to the laptop base.
It shouldn’t be very difficult if you were able to get to the step 19.
Finally, lift up the motherboard from the base.
The can can be accessed on the other side of the motherboard.
Melissa
In Step 2, should the cover lift off easily? I removed the two screws, but it would not come off easily. Do you have to pry it with something? I have the hard drive from my previous laptop that died. I’d like to put that hard drive into this laptop to see if I can pull some files off of it. Thanks.
IML Tech
@ Melissa,
You can pry it with a screwdriver.
Most likely this will not work. The laptop will not boot properly with another hard drive.
Here’s what you can do:
1. Install old hard drive into an external USB enclosure.
2. Connect this enclosure to the laptop and pull files.
Take a look at this guide: https://www.insidemylaptop.com/recover-files-from-broken-laptop/
Syke
I have a HP Pavilion g series model number LZ519EA#ABU, which is different from the one above in article.
The problem being although the laptop is only 5 months only and it appears my CMOS battery has died, HP will not conduct anything on it under warranty because it was purchased at Comet and suggest it’s taken back to Comet for repair (for a CMOS battery). I need the laptop and can not afford for it to be away for up to 10 days.
Your diagram above shows the battery to be next to (above the HDD unfortunately it’s not on my model LZ519EA#ABU
Any advice or suggestions where this battery is likely to be and how to replace it would be greatly appreciated.
PS. I have asked HP for a worksheet to assist but they simply do not wish to know, there attitude towards it’s customers will ensure I never purchase another HP item.
IML Tech
@ Syke,
LZ519EA#ABU is the model number.
Do you have full laptop model name? It should be somewhere on the bottom. Probably on the same sticker where model number is located.
Here’s an example of full model name: HP Pavilion g6-1b34ca
Not just Pavilion g6 but g6-1b34ca.
I can to find the service manual if you provide the full model name.
IML Tech
@ Syke,
I think you have HP Pavilion g6-1187sa and here’s service manual for your laptop.
It shows a different location for the CMOS battery. It’s attached to the bottom side of the motherboard. It means the entire laptop has to be disassembled in order to replace the battery.
Take a look at the page 75. It shows the CMOS (RTC) battery location.
mikeromania
thanks alot i will try,and i have a pav g6-1016eq,this turorial is for all g6 series right?
IML Tech
@ mikeromania,
I’m not sure 100%. Sometimes HP makes some changes withing existing model line.
Here’s official maintenance manual for HP Pavilion G6 Notebook PC. Disassembly instructions start on the page 36.
mikeromania
@IML Tech ok thanks,i will try to clean my laptop:)
amila
thanx gays it helped me so much
Nadina
Steps really helped to get into this laptop. Just need to get to the fan to replace it. I can’t get the motherboard off though. I thought I took every screw out but it’s just not coming off. I need to replace it because almost every fan blade has broke off (someone is not owning up to hitting that side of the laptop).
Prasad
Brilliant. I will keep this for future use.
For now i want to try and replace the left mouse. Do i need to remove the top cover assembly as described above or will it pop off if i get a screwdriver under it?
The problem is the right mouse feels fine but he left mouse is too loose (wobble with the slightest pressure), It feels like there is a spring missing. It was like this from the day one.
Very annoying.
IML Tech
@ Prasad,
Yes, you’ll have to remove the top cover assembly and take a closer look at the button.
Most likely the button is part of the top cover assembly and it’s connected to the top cover via thin plastic bridges working as a spring.
I think in your case these bridges are broken and the button feels loose because it’s not connected to the top cover. If that’s the case, you’ll have to replace the entire top cover assembly.
alla
hey;could you please explain step 9 caus my keyboard won’t open!and thank you
IML Tech
@ alla,
1. Make sure the keyboard screw on the bottom is removed.
2. When you push on the spring loaded latch, at the same time you have to lift up the keyboard a little bit. You can use the knife blade for that, it’s thin enough to fit between the keyboard and laptop case. When the keyboard is lifted up, the latch will not lock back in place. After that move to the second latch and so on…
Finally, when all latches are pushed in you should be able to lift up the upper side of the keyboard and turn it over.
Frank
Can you do one of these to disassemble a laptop display cover. I changed the Palm rest from this imformation to red and I need to change the display cover but I have searched eerything on the internet concerning HP pavilion and NOTHING. Please.help me out here because the manual makes me nervous to the point that i might severely damage my laptop.
IML Tech
@ Frank,
You’ll have to go though all steps in the above mentioned disassembly guide and remove the palmrest assembly.
Then you disconnect display cables from the motherboard and remove screws from the display hinges. After that you should be able to separate the display assembly from the laptop base.
When it’s done, follow this HP Pavilion g6 screen removal guide.
After the screen removed you should be able to replace the display back cover.
Frank
So yeah if you could make one of these you can be a huge life saver if not please give me any tips or anything to help me out I want to get this done =[…
Frank
Ty two more questions I see no cables from the screen/hinges. That can actually be removed without tearing? And also the hinge has a screw inside correct? Sorry its just that this is more complicated compared to the steps you showed above
ftank
Hinges /screen to motherboard *
rank
Can you describe from the last picture in this page
I think it will ne clearer for me sorry again.
Dylan
Hi,
I recently purchased this laptop. When i turned it over I noticed that something that sounded like a loose screw was rolling around in the bottom left corner farthest from the screen. (the side opposite the optical disk drive)…. What is this moving, and should i get it replaced?
Maddy
Hello
Wow, you just stopped at the part i needed !!!
I know how to do this all
but please tell me
how to remove the motherboard to clean the heatsinks ??
I just dont know, do we have to necessarily remove the display screen then remove mother board or what ??
and the main problem, is how do i remove the 2 major wires (black) one at top left which connects the screen and one at bottom left (i think it connects the speakers)
Please tell me in detail
and wow, i had the same problem as the IML Tech guy (bridge breakage of mouse)
i got it replaced 3 times for free (its because of low build quality otherwise low quality material used)
Devin
The screws on the back panel of the laptop will not come out this is the exact same laptop that you are using please help!
Dai
Where i can find a keyboard for this laptop?
maatla
Wow thanx for that was a life saver…
Steven
thank you so much this was awsome.. it allowed me to get to my fan and remove the dambed hair that was stopping it from moving (was not even my hair *frown*) removing the motherbourd was tricky for those that done know.. remove the wirless card from underneeth as this acts like a pin to the casing.. also there is a hidden screw next to the left speaker on the motherbord itself.. and in my laptop thereare a few connectors that needed removing.. a monitor pin (looked like a small metal box) a mini usb plug.. like the standerd pc ones only smaller, a usp strip tag (remove like keybored ribben cable (rlkr)), power and hhd light (rlkr), sounds like a small 4 pin fan plug (wuite small, power connectors to wireless card.. (2 small metal pins)
flip over the fan has 4 clips and t screws open the 4 clips (these are around the fan casing,) and undo the crews.. be carfull.. the metal of the casing is very soft and easely bends and one of those two screws are nerly impossible to acsess without great risk.. I myself hust cairfully snapped this bit off but i suspect there is a way to remove it.. then the standerd 2 pin plug for a fan
I think that is all I did not deel with my monitor
steve
I have a G6 and I have just fitted a new lcd screen, but somehow I damaged the lcd ribbon cable, I just want to know do I have to strip the whole laptop just to fit a new cable or is there a quicker way as in other laptops I have owned as I could access the ribbon cable on the motherboard just by removing a couple of screws and lifting of a cover.
Syke
You may recall on February 27th, 2012, a was seeking assistance on how to replace the CMOS battery in my HP Pavilion g series model number LZ519EA#ABU.
Although I did attempt to replace it in March I was unsuccessful and due to commitments have been unable to try again until this week.
However, when I eventually removed the keyboard together with all other parts leaving only the bear motherboard I was amazed to discover there is no CMOS battery in my HP Pavilion !
I’m now fast coming to an end with this 12 month old laptop, however, before goes in the bin do you have any other idea’s which may assist in discovering why it will not keep time & date everytime it’s turned off ?
Many thanks
joe
i was wondering if the headphone jake was connected to the motherboard?
Chris Finnegan
Thanks mate! Just pulled my g6 down and gave it a cleanout, it was overheating. Works a treat the second time I put it back together;)
Cheers
Chris
rabi
really thank you
Cara
Does anybody know what the black and grey wires are for running from the main laptop to the screen, by the right hand hinge. I dropped laptop, have replaced screen and hinge although wifi playing up, everything else seems ok!
IML Tech
@ Cara,
These are wireless card antenna cables. They should be connected to the wireless card.
You can see them connected to the card in the step 14.
The wireless card located on the left side from memory slots.
Cara
Thanks,
WLan antenna, thought so, I’ve ordered a new set, is it necessary to go through all steps to get access to replace it?
Thanks
Cara
Clive Broughton
I was told by HP support that i need to replace my bios battery, however I have not been able to locate it. I have looked at several video clips & at your how to dissasemble slides. I don’t have a battery in the stuation shown in your diagram. HP laptop, pavillion g6-1031 TX.
Tim
Had this crappy notebook since summer 2011. Simply put. Its garbage. Overheating, Not a updated driver to graphic card since ages, not able to switch graphics adapter in bios.
Useless junk.
Next ill go back to iMac with a 27″ with SSD on 256GB and 3TB USB3 storage.
Never ever buy HP notebooks.
Martins
I have one question about this steps, did i need some thermal paste, if i want clean my cooler fan? After disassemble a HP Pavilion g6.
Thanks
Jim Lindsey
The two screws in the back cover will not come out. And so I can not get the back cover off. The screws will loosen and unscrew but not come out altogether. I’ve tried loosening them both and then gently prying at the cover, but nothing happens. Any helping hints?
Julie
I am having the same problem as Jim Lindsey. I try to get the two screws out but can’t and I don’t want to damage the plastic.
Maria
I’ve done all this and reassembled it but why when I turn it back on does my computer beep without anything popping up on the screen?
Africanwarfrog
Do I have to take the backing off to clean my laptop??
IML Tech
@ Africanwarfrog,
Do you mean cleaning the cooling fan?
If you can find an air compressor you can blow air into the fan grill on the bottom of the laptop. After that blow air into the fan grill on the side. If the fan not clogged too badly, this should be enough.
Stewart
I did all these steps, reason why is because i wanted to dust out my fan with a compressed air can. I never attempted to take off the motherboard, just left it as it is. So as soon i put everything back in place (screws, purple cable tabs, keyboard, etc.) I turn on the power, everything runs fine. I can clearly hear the fan running, but my screen just stays blank. And my CAPS LOCK button starts blinking. Any idea what might be the problem? Please reply back! I really want this to start working again for my homework.
IML Tech
@ Stewart,
Check memory modules. Maybe memory not seated properly.
Agzam
I followed all procedures and was able to take all components a part. This tutorial was very useful for exception removing memory card, there were two clips: right and left and you need to push them with flat screw crew driver(in my case i only had to do one). I know its not common but there should be pictures because i almost used force to remove it since one of the clips was stuck.
The personal question: I love this kind of job and i want to earn more. How do you call it? I also want to work on connections since i am replacing hdmi from mother board. Please let me know what is the name of trade that deals with this. My e-mail is in Agzam Akhunov facebook. I will right good feed back please help me find the name of trade
IML Tech
@ Agzam,
Laptop repair technician.
Kostas
I’m trying to open my G6 case to change my memory cards, I’ve unscrewed the screw that holds that case part (it’s only one screw, not 2 as in this guide), but I can’t seem to get the screw out. I supposed it wont go off, staying on the plastic cover, so i tryed to get that one off, but i can’t find out how… I suppose there will be something like clips? But where?
Any ideas on how to take it apart?
desposy
quite experianced amature would love to thank you for your guide. I got me in, the cooling fan inspected, loosened cleaned and now the “fan not working” error is gone, thanks
justin
I’m stuck at the first part. unscrewed the two screws on the part thats covering the hard drive/memory, but i cant find any way to pop the cover open.
Scott
Thanks so much for the guide. Was able to open and change the fan that had shown an error. However, upon reassembly, I am not able to start the computer. I get no power light and it shuts down after a few seconds.
I’ve tried a hard reset, cleaned and reinserted the memory module and checked for any missing connections. Still nothing.
Any ideas as to what might be the problem?
inrialis
@ Kostas
we have the same model or so it seems
you have to pull the cover away from the battery then it opens
MrsG
Hi, looked at this for fan error but when I saw how long a process it is, I tried the compressed air. This seemed to have worked, fan kicked in nice and quiet but after a while it started making a loud clicking noise and the error message is back, any advice please?
BeCool
thanks a lot 😉 now its not getting that much hot,, i removed lot of dust,, now the extra sound also gone 😉
Reader
I find very very difficult to remove the keyboard ! I push the little… tongues but doesn’t come up !
KAo
I’m just wondering, Can u put a link on showing how to put it back together, because i’m scared i can’t put it back together…
topgunturner
I spilt cola on the keyboard. It works fine but the space bar and some of the the keys stick.
Can I spray CRC CO contact cleaner (precision electronic cleaning solvent on the keys without doing any damage? Thanks
topgunturner
Without taking it apart that is?
dark5lalom
I have a g6 1104 AX i need to replace the left speaker, do i need to remove everything? (wireless card etc) in order to do this or can i skip up to it?
thanks!
steffan
hi friend.
im just asking what is the name of the motherboard for Model: g6-2146eo
Jeff
The guide helped me to replace keyboard. Thank you!
Dave
Helped me change a cooling fan. Best Buy wanted to charge me $250 to fix. Thanks for the info.
Naveen Verma
Great job dude!!
Kristina
Can anyone help with what kind of cooling fan I need for my HP Pavilion g6-1b50us? Thanks
nakk
wow thanx a really lot! just did it to clean my fan and its workd magic! my laptop was shutting down due to overheating. and thank u to all the other comments… hw to open the motherboard was a huge help! careful removin the keyboard tho! mine kynda ‘broke’ the clips… it cn b frustrating!
godswill
after inserting my memory card in my pavilion g6-1d70us notebook and copy my files from my memory card to my system and eject it out, all my files will be missing when i insert it back in my fone
jerson
Amigo una consulta quisiera saber si sabes el pinout de USB woard la k tiene la 6 salidas hacia la placa
Joe
tried this but there’s not much slack on the keyboard cable and i yanked it out by accident, now i tried hooking it all back together and can’t get the keyboard to work. plus the error says my cpu fan is still bad, which was the reason for taking it apart to begin with. guess its time for a new one
angel
excelente información, muy necesaria para no forzar los componentes, gracias, saludos desde Tucumán, Argentina,
vg
please explain how to open web cam parts
Charles Jim Amon
This is very helpful.. awesome!!!
gerry lamb
my g6 hp fan was overheating. I followed your disassemble instructions and cleaned the fan. When I put everything back together the fan works fine, but my optical drive won’t open and is not being recognized by the computer. Can you tell me where I might have messed up? Thank you your instructions where great.
IML Tech
@ gerry lamb,
1. Try removing the optical drive and reconnecting it again. There is a chance it’s just bad connection between the drive and SATA port.
2. Make sure the optical drive connector board (shown on the last picture) properly connected to the motherboard.
DrBjamin
I now have a new cover and a new keyboard for my Pavilion and only cost me $30. Instructions were simple and worked like a charm, THANK YOU THANK YOU THANK YOU!
AKSH
just want to know which screwdriver will open the back cover screws
Pete
Hello.I decided to replace my keyboard.
I have a “HP pavilion g6 series”lapdog, yes mine Is a dog.
I must have a one of a kind comp because I have watched 8 or more
videos on replacement and not one of the laptops seemed to be like mine.
The point where you place a flat head to press the release? I saw that your
comp has a slight well on your board. Mine has nothing visible.
I went In between the esc and ? but no way was I able to move anything.
It feels like my board Is glued In place. I did not follow your Instruction I admit.
I just saw your page just now. But I doubt anything will be different by following
your Instructions. I believe you can probably lift one end of your board without
removing anything. You obvioulsy cannot remove your board but It’s just as a test
to see If your board or mine releases on that end. I refuse to have It done by a shop.
I will try one last time. If I fail, I will break the board Into bits and then I will be able
to see what the hell Is holding It In there. My board Is trash anyhow.
All I have to do Is break It very carefully.
I have a replacement board I bought sitting here.The new board looks Identical to the old one
but I hope It will fit In.
It’s been very frustrating to see everyone removing the keyboard so easily and I can’t even get mine to budge.
I’ll look at the upper parts you show with yours and make sure I don’t break anything underneath.
By the way, you did an excellent job displaying the take apart process. Well done!
If you read my post and If you have a few minutes to blow. I would appreciate any suggestion that’s If I haven’t busted It up by then.
I have a Sony vaio that took a dive. That keyboard also needs to be changed but this HP Is so much easier to remove then the Sony Is.Anyway.
Happy days!
IML Tech
@ Pete,
It looks like HP just keep changing design of this model without changing the name.
I’ve seen many “HP Pavilion g6 series” with different design.
Can you tell me the model number, it’s HP g6-?????. Maybe I can find the service manual for you.
Muthukumaran
My hp pavilion g4 lap gets on and work fine when the charge is get full……bt suddenly aftr reaching 50% the laptop will cutoff immediately and when i press power button it will turn on and load thn suddenly cutoff……..then i test in AC power supply also this prblm is happened again again and again……i can disassemble fan,processor and optical drive with your knowledge and clean all device but again problem that problem will occur….wt the prblem is this???
rakib
My operating system is freezing and sometimes crashing.
And I’ve been experiencing it for about two or three months. I have installed new copy of windows several times but the after few days the problem shows up again and this time crashed. What may have been causing this? Does it have something to do with the RAM? Can any of u guys help?
I’m using Hp Pavilion g4. Core i5 2GB RAM
– Thanks in advance
It’s Rakib.
Carol
Thanks! I will try this. But will I lose any of my data in the process? Should i do a backup?
IML Tech
@ Carol,
It’s always good to have a backup.
Taking apart the laptop should not affect your data. It’s stored on the hard drive. If you disassemble and reassemble everything correctly, it should boot properly with all your data intact.
Rohit
Thanks lot for this guide.
My g6 was giving me keyboard problems
and I am able to fix it because of this guide.
Thanks a ton!
kumene Travis
good work. it helpful, thanks
hamada
after battery charge , charging led not switch off
what’s the wrong ?
know that
before disassembly the laptop was right
Austin
I’m having trouble removing the screws from the outer case of the laptop in step 2. Any help?
Alan
Hello, took my g6 in to have it looked at by a local company, they told me it was doa. I started tinkering around with it and found that where the hard drive slides into the sata slot, it is loose. If I pull the back end down about 30 degrees, it will come on and read the drive. I have looked for the part but I do not know what it is called or even if it can be replaced. Help Please.
Megi
After cleaning fan with this instructions, when I put cover back cable next to fan (on left side) loosing contact, display is green instead of black, somethimes there is no picture at all and keep restarting. What should I do?
Major Booboo
I have to say that I appreciate sooooo much what you do. I had a MAJOR accident in which a melted bowl of ice cream had been knocked onto keyboard/ into cpu. I didn’t notice what the dog had done for a while, so by the time I found it I though all hope was lost. I cleaned the outside and keyboard as best as I could, but the laptop wasn’t working. I found this instruction tutorial and figured I’d try my luck. Took some time and careful, precise cleaning, but all is well, mostly. I may decide to purchase a new keyboard, because, surprise, some keys are a bit sticky lol. But thanks a lot for getting me through the process with confidence and saving a lot of files and MONEY!! I owe you big time.
garthmicro
I am finding an unusual problem when disassembling an HP G6 laptop. I have removed the screw holding the DVD drive in place and the drive moves outward about a 1/4 inch but then it seems to catch on something and won’t go any further. I have pulled and pushed through the release access hole but it won’t come any further – it readily goes back into place and out again the same amount. I’m afraid of breaking it if I press much harder. Any suggestions??
garthmicro
Was able to get the DVD drive to “release” by lifting the drive slightly with a screw driver through the release access hole. Problem solved.
Brittany
I have a broken hinge on my laptop, and I need to enter my laptop to remove the metal fragments that have split from the hinge, as well as replace the hinge all together. I was wondering how I would go about removing the motherboard and whether the fan would be an issue considering it is on the left side next to the fan. Would you recommend me taking it to a professional or leaving it to a software tech(Me)?
Dillon
I have a g6-1d48dx and got a prompt that the fan wasn’t working. I disassembled it and took a can of air to the fan but noticed there was some caked on dust, so I cleaned it with some alcohol and a q-tip then reassembled the computer and now it wont start up. All the ribbons were inserted properly but in the step 15 pic there’s a little foil piece that doesn’t appear to do anything and underneath is the charging cable. Could I have damaged the foil piece? Or possibly the alcohol did something?
ray
does anyone know how too fix a Hard Disk – (3F0) BootDevice not found” Error Message for a hp g6 series laptop ?
Jane
Hi,
Thanks a lot for this amazing guide, I just changed a faulty power jack with your help! The only thing though is that now the DVD drive suddenly stopped working during the first time of using it again, plus the wifi signal is so weak that it only works when I am sitting next to the router. You have no idea how grateful I would be for some advice…!
Wifi connection…perhaps I didn’t connect the antenna properly…? But with regard to the Dvd drive, I have no idea….
Have a great day
Jane
PC Tech Medic
Hello,
Just want to commend you on a excellent website in my opinion, I have a business and occasionally hire interns, and people really eager to learn a skill to gain a job. I always check and monitor their projects once I train them, but I have noticed that when a newbie is working on a laptop independetly they work more confidently when they have one of your tutorials up to reinforce what they have learned. Thank you, we all Thank you! We wish you continual success, and keep producing the great tutorials!
PC Tech Medic
AJ
Hi. I apologize in advance for my “question dissertation”. Can you access the fan differently than the steps outlined. Had a minor (i hope) coffee spill on the key board and am getting the error “the system has detected that a cooling fan is not operating correctly”. I am okay at following directions but did not know if it would be best to take it somewhere to be cleaned; one worry would be that they find something else wrong and the cost to fix everything (or fake a problem to get more cash). We back up our files to an external HD sporadically but there have been recent documents that I need which haven’t been backed up. Can you pull out the hard drive and somehow download all of the files to somewhere if the computer cannot be fixed? Thanks for any advice you may have!!
jim berg...
your help in dis-assembly was GREAT! Trying to determine the cause of the HP g6 of a friend of mine being ABSOLUTELY dead! the power supply is fine. the LED on the power inlet lights up.
I was hoping for a fuse but none visible. Will now check voltage of output cable on power inlet. Other than that, I have no clue. Any hints?
Sondra
I have 3 laptops in my home and while only one is mine I know more about computers then anyone else here combined… Which doesn’t say much about their knowledge! One is mine (a Toshiba Satellite C855D-S5305 that’s barely adequate but all I have for now), one is an HP Pavilion g6 -1c58dx notebook that was subjected to some mild abuse when the owner got frustrated with it. It didn’t help that he s side wth the lid down and the system still on.. I assume some part or worse connection loosened. I got it to work once but he didn’t listen to my advice.. Today I decided to take it apart.. I got halfway and put it back together (I just didn’t remove the keyboard and I was almost posItive that the problem wasn’t with that). Long story is that following the majority of your steps fixed the “hard drive not found” or “boot disk required” and other such things.. Now I’m working on an HP 2000 that I can’t get working.. I was able to get into the user accounts and I refreshed the computer.. For a few minutes I thought I succeeded.. I was wrong. Now I can’t get into any user account.. Windows 8.1 system. I want to do a complete system restore but can’t get it to the point where I even could (maybe with a disk but unfortunately I don’t have one). Might have to bite the bullet and take it to the Geek Squad tomorrow. Worst part is that I’d probably be able to get a Chromebook for what they’ll charge me! And a Chromebook would be great for one of my start-up companies, Exquisite Sports Treasures on ebay or the photography business I’ve just begun to start.. So… You’e helped once… Ideas? I get to the page with one big picture, no user accounts to choose from or anything else.. If I can get it to work im hoping it will let me complete bs factory reset.. Is it possible that the horrible electric system in this house (blew out a top of the line surge protector the first week here and there are always electric shocks and surges everywhere… It’s crazy.. Anyway mainly my long story was just to say thank you and I wish I had money to donate for your clear and concise instructions.
Thomas
I know this is an older thread but man did it save me! My daughters laptop needed some upgrades and a good cleaning and this made getting inside to the fan sooo much easier!
Thank you.