
In the following guide I explain how to disassemble a Gateway NV series laptop. To be accurate, I’m fixing a Gateway NV53 (NV5302u). It also says model: MS2285 on the bottom.
I’m taking it apart in order to fix broken DC jack. The whole laptop has to be disassembled and motherboard removed.
Before you start make sure the computer is turned off and battery removed.
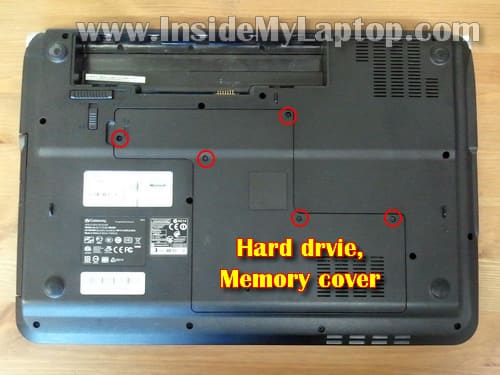
STEP 1.
Remove five screws securing the hard drive and memory cover.
Remove the cover.
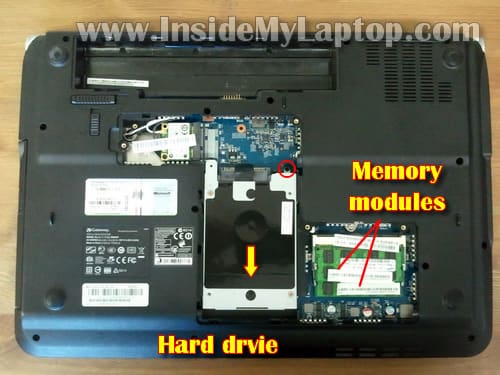
STEP 2.
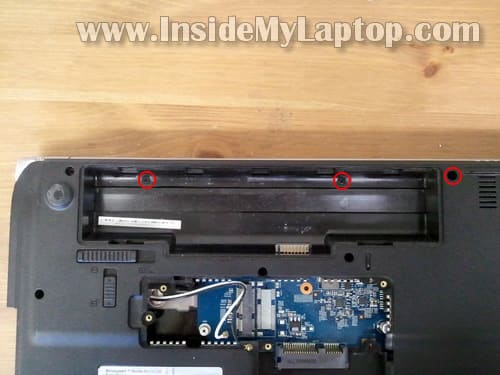
Remove one screw securing the hard drive. In order to remove the hard drive, slide it away from the battery compartment and lift up.
Gateway NV53 uses a regular 2.5″ SATA HDD.
Both memory modules can be accessed through the bottom cover. It’s not necessary to remove memory modules for the purpose of this guide.
Gateway NV series maximum RAM capacity is 4GB. It means you can install up to 2GB memory module into each slot.
You should use DDR2 800MHz, PC2-6400 SODIMM modules.
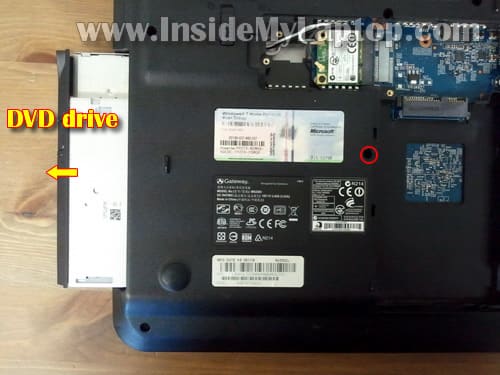
STEP 3.
Remove one screws securing the DVD drive.
Pull the DVD drive out.
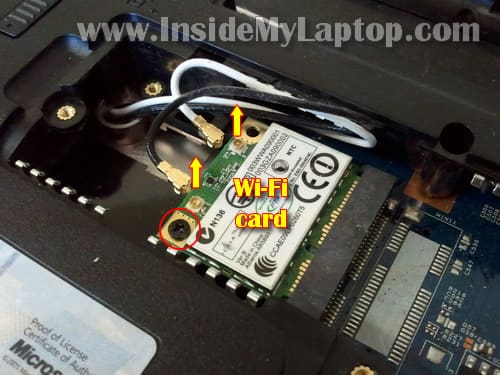
STEP 4.
Carefully disconnect two antenna cables from the wireless card. Simply grab the gold connector with your fingers and lift it up.
In order to remove the wireless card you’ll have to remove one screw and after that pull the card from the slot.
It’s not necessary to remove the wireless card for the purpose of my guide. You can leave it connected to the motherboard.
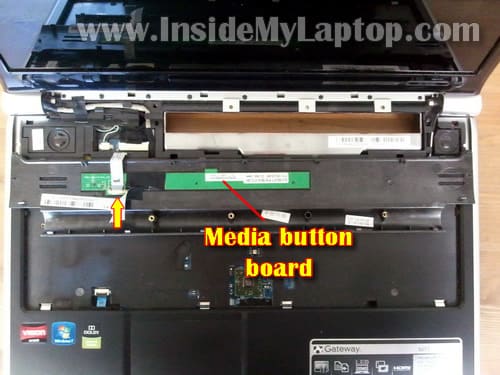
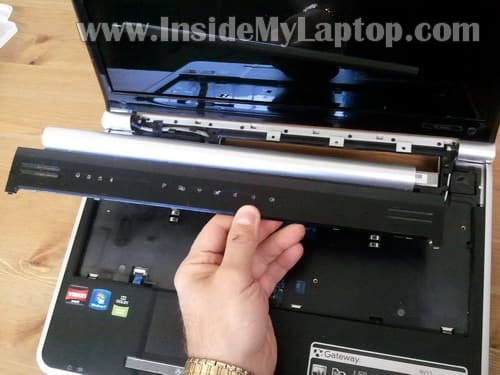
STEP 5.
Remove three screws securing the media button board cover.
STEP 6.
Lift up the media button board cover as it shown on the picture below. Continue separating it from the top cover with your fingers.
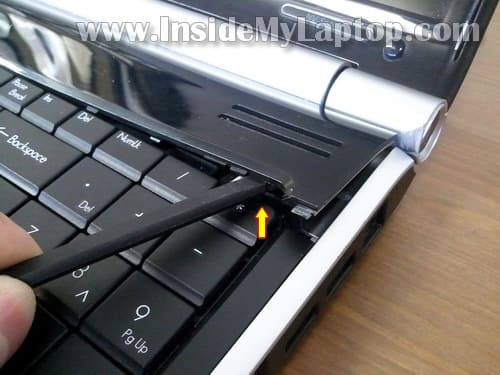
STEP 7.
Do not lift up the media button board cover too much, it’s still connected to the motherboard.
At this point we are not removing the cover, we just move it a little bit away in order to get access to the keyboard.
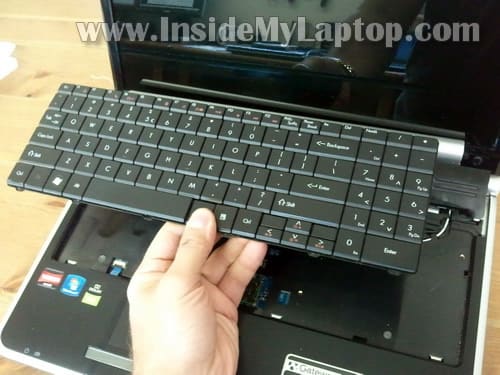
STEP 8.
Lift up the keyboard and place it upside down on the palmrest.

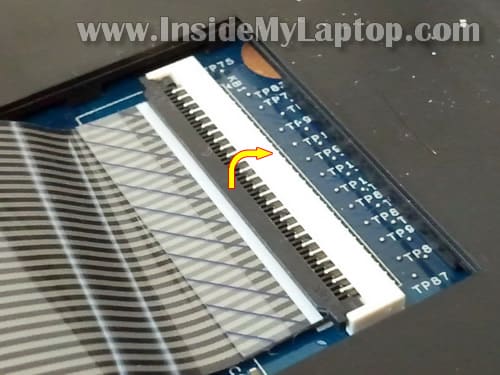
STEP 9.
Before removing the keyboard, it’s necessary to unlock the connector on the motherboard and release the cable.
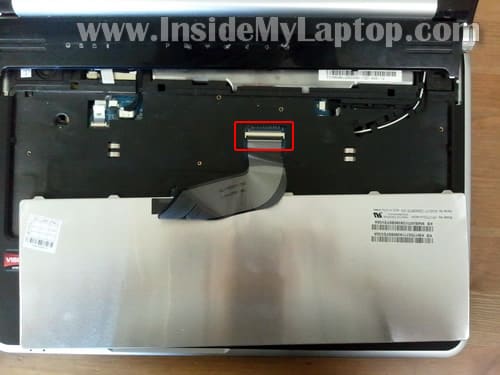
On the following picture the connector shown in the locked state.
To unlock the connector, you’ll have to lift up the left side of the locking tab (brown) so it opens up at a 90 degree angle.
Be very careful, do not break this connector or your keyboard will never work again. Do not apply too much force to the locking tab.
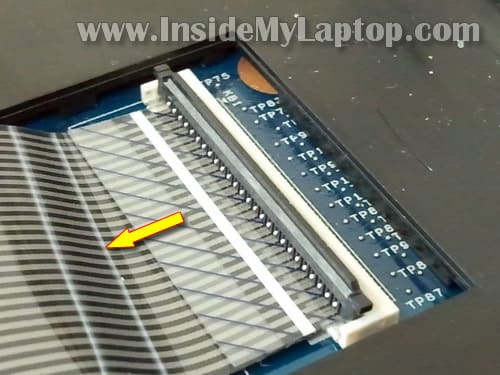
On the following picture the connector shown in the unlocked state.
Now you can pull the cable and release it.
STEP 10.
After the cable released, you can remove the keyboard.
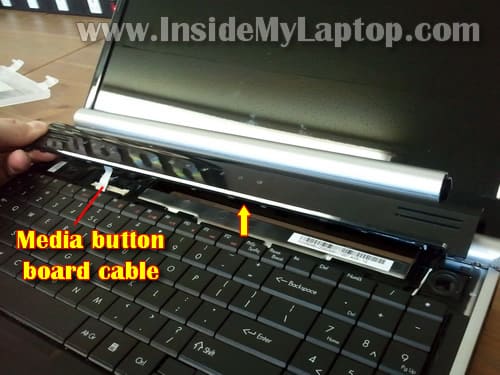
STEP 11.
Disconnect the media button board cable.
STEP 12.
Remove the media button board cover.
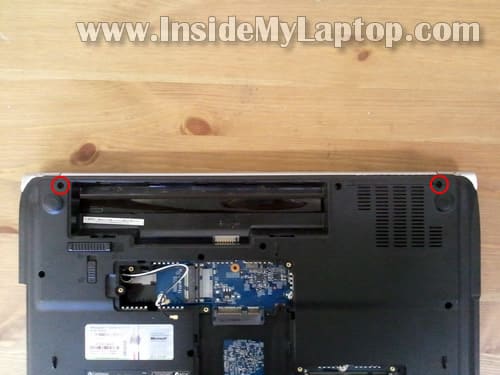
STEP 13.
Remove two screws securing display hinges on the bottom.
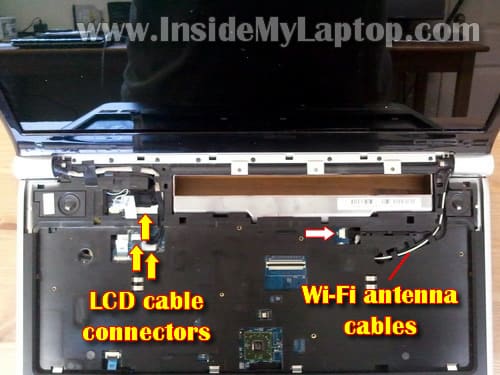
STEP 14.
Disconnect LCD cable connectors from the motherboard.
Pull wireless card antenna cables thought the opening in the top cover.
In some Gateway NV series you’ll have to disconnect one more cable. I pointed to the connector with a white arrow.
STEP 15.
Remove two screws securing display hinges.
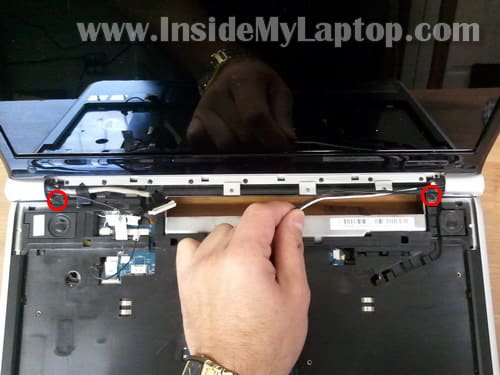
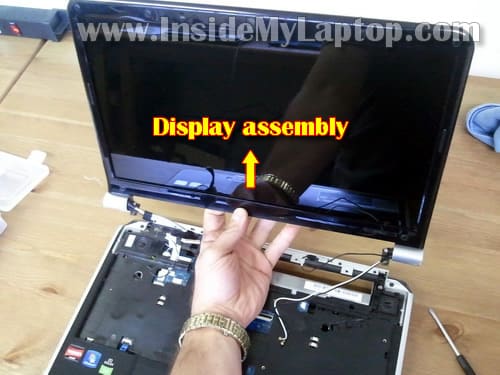
STEP 16.
Now you can lift up and remove the entire display assembly.
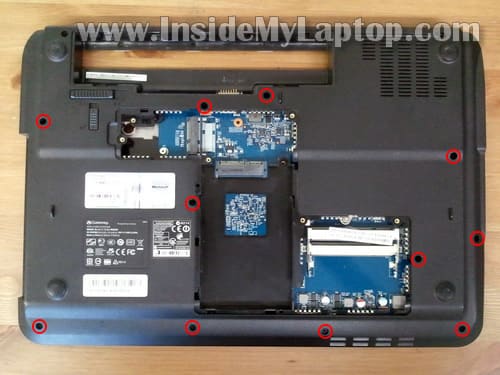
STEP 17.
Remove all remaining screws from the bottom.
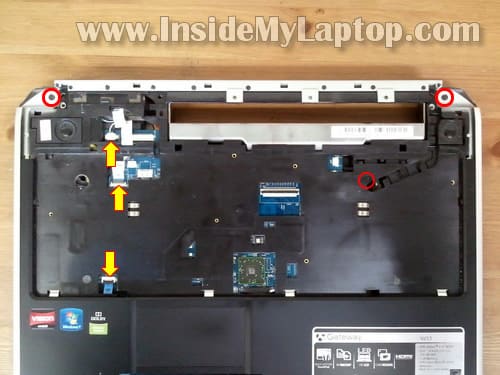
STEP 18.
Remove three screws securing the top cover.
Disconnect three cables from the motherboard.
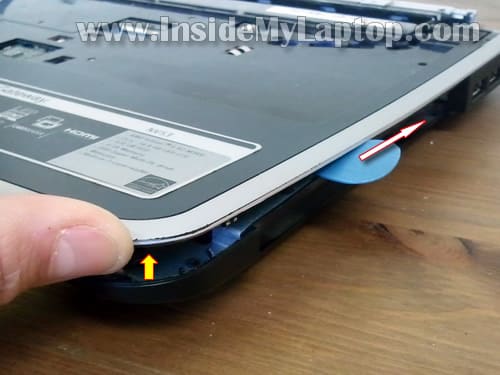
STEP 19.
Start separating the top cover assembly from the base.
I’m using a guitar pick in order to crack the case.
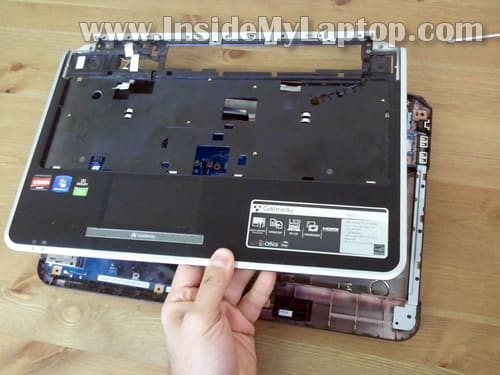
STEP 20.
Remove the top cover assembly.
STEP 21.
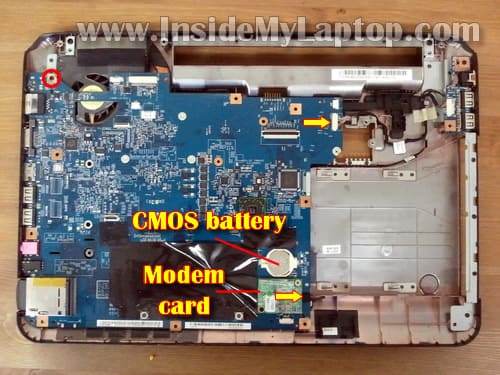
Remove one screw securing the motherboard.
Disconnect the USB board cable from the motherboard (top arrow).
Disconnect the modem cable (bottom arrow). You can leave the modem board connected to the motherboard.
Also, when the top cover assembly removed, you can get access to the CMOS battery.
STEP 22.
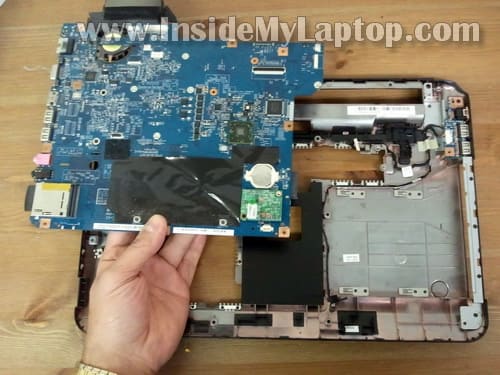
Carefully lift up the right side of the motherboard.

STEP 23.
Remove the motherboard.
STEP 24.
When the motherboard removed you can access the cooling fan assembly (heatsink and fan).
In order to remove the cooling assembly you’ll have to loosen four screws and disconnect fan cable from the motherboard. After that you should be able to lift up and remove the assembly.

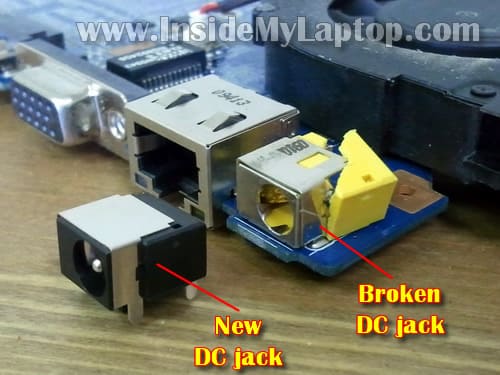
Here’s why I was disassembling the laptop. The power connector is broken and has to be replaced.
The DC jack soldered to the motherboard and if you would like to fix it yourself, you have to have soldering skills. It’s not an easy job for a novice.
elizabeth
I would like to know how to remove the power button from this computer. I need to replace the power button. That is broken on my computer.
Jess
Very good article! This is exactly what broke on my computer, so I’m guessing that happens a lot with this type of computer.
Where did you find the replacement DC Power Jack? How much?
IML Tech
Jess,
New DC jacks for Gateway NV series laptops available on ebay.
Benjamin
How did you know to replace the DC power jack?
I have the same laptop but it will not power on. When you press the power button the green LED light comes on and the cooling fan spins – no boot screen or any other signs of life.
IML Tech
Benjamin,
Probably in your case it’s not the jack failure.
Check memory modules. Try removing memory modules one by one. One of the could be bad.
marwan_zaid91
i just broke the connector of the keyboard by mistake, is that means i have to by a new keyboard, or i can ignore the connector and plug everything back without it !
IML Tech
marwan_zaid91,
The connector is not a part of the keyboard.
Greg Turner
Is there any info to repair a power jack on a Toshiba P500 mn# PSPGSU-0PK00W? Feels like it has busted loose inside and will no longer charge.
IML Tech
Greg Turner,
Take a look at this guide:
https://www.insidemylaptop.com/repair-damaged-power-jack-toshiba-satellite-l305-l355-laptops/
Not sure if you can use it on a Satellite P500 laptop but it might give you the idea.
Maybe you can replace the failed DC jack with a generic jack as it shown on this picture.
Chloe
Need Help! I have this same exact laptop, last night i shut it down correctly and when i woke up this morning its not turning on! The AC adapter is plugged in and the brick has the green light on. The battery charge indicator on the bottom left is blue which means the battery is fully charged? When i press the power button i get nothing, the laptop is lifeless. I have tried to unplug, take out battery , hold power 30 secs, & put back everything. I have also tried to remove memory, still nothing. I dont know whats wrong Please help.
IML Tech
Chloe,
If you have two memory modules installed, try removing them one by one. Test the laptop with each memory module separately.
Also, try removing the hard drive and start the laptop. A bad hard drive can halt the entire system.
Can you boot to the initial screen when the hard drive removed?
Lynn
Hi…I love all your information. You have helped me with many computers. I would like to know how do you fix the power button. My son broke mine and I don’t have the button any more. I just touch the power cables and it turns on. I also think by doing that Messed up my wi-fi cables. Is there a way to fix the cables. I had to put black tape around them.
Thank you
IML Tech
Lynn,
It really depends on the laptop model. I cannot tell because I don’t know what laptop you have.
How bad the damage is? Did you cut the cable? Can you solder it back together?
Lynn
Model is nv5378u….are the two wireless cords suppose to touch or not touch? (The ones by the power button) I put tape (black) around each one. The wireless signal is always picked up but doesnt always connect.
jose
hi, i’m trying to repair a gateway laptop. i replaced the dc jack, but the copper ring on the motherboard that goes to the center pin was missing. i soldered it anyway, but it didn’t work. i’m wondering if can solder a wire to another point of the motherboard to supply the 19v, but i don’t have way to find because the missing ring doesn’t let me measure anything to that point. i was guessing that the power button could be the right place, but i’m not sure about which pin.
thanks.
Jared
One of my locking tabs is cracked. Do you know of any place where I can purchase this tiny part without buying a new mother board. I also am having a problem fitting the keyboard and multimedia board snapping in place correctly. Is there a place thta i can buy scissor switches for keys instead of buying a whole new keyboard. Can you help?
IML Tech
Jared,
Can you use the cracked tab and secure it with sticky tape?
John
If you could email me with the speaker wire order. my connecter broke and I see a blue, white, and two blacks. What order do they go back in on the board? Thank you!
IML Tech
John,
Sorry cannot help here. I don’t have this laptop anymore.
Mark
Wow, I wish I had found this site about 5 months ago, could have saved me a head ache.
Problem, it was the power jack, that is fixed, now I am getting purple and green streaks across my screen. All drivers are up to date, plugged into HDMI and the purple and green streaks were gone. Narrowing the problem to the cable/cord that connects the LCD screen. Any info on where to get one and possible replacement procedure (looks pretty straight forward to me) would be appreciated. Or on the off chance the LCD might be dying?!?!?!
Steven
When I get done with fixing my friends laptop I am going to give this site some money. Thank You for the perfect instructions.
Pedro
In the step 18 on this disassembly instruction you did not mention what are for those three more cables to disconect from the main board, could you please tell what is for the top one on the lefth cable? . The situation the cable conector is broken, but the one on the mail board, how can I fix it?
Thanks
IML Tech
Pedro,
The very top one? I believe this is the speaker cable.
Cameron
In step 18 of this laptop disassembly, the very top left connection was stubborn and I guess broke on me at the wires. It looks as if the 4 pin connection still remains locked to the mobo, but the wires came out of it. Is there anyway at all to fix this or did I screw up big?
IML Tech
@ Cameron,
I think you can fix it.
Remove the connector, put wires back into the connector and plug it back into the motherboard.
As a last resort, you can remove the stuck connector and plug wires one by one directly into the motherboard. Just a guess.
Rick
I have this exact same trouble. Can you please tell me how to get a new jack.
Thank you
IML Tech
@ Rick,
Search on eBay. There are tons of new jacks there.
Don
These were perfect instructions. Unfortunately I found them after I had already figured out how to disassemble myself. Everyone seems to have problems with that top left wire in step 18. When pulling that, you have to make sure you pull the connector and not the wires. Now that I have soldered the new jack on and reassembled the computer, now it won’t power up at all. Any suggestions? I’m thinking need to just replace the motherboard.
outridder
HELP!
Awesome instructions BTW. Ended up pulling the wires out of the top connector on pg 19. Can anyone tell me the order of the wires? I have a Blue, White and Black. And everything else was going so well.
outridder
Correction to Help. Make that the connector in Step 18. I think I can salvage this if I know where the wires go in that top connector.
Jodi Manis
Holy crow! What an awesome site!!
My special needs daughter dropped my husband’s NV-5378u right on the power button. Looks like it bent the plastic hinge assembly and broke the power button.
I tried unscrewing the hinge to allow the power button to move more freely and even took the power button cover off. I tried touching the contact under the button cover and it makes the battery light come on, but it won’t actually power on.
I saw a place where I could buy replacement power button assembly, but they dont offer instructions on how to install and I am wondering if I might need to replace the whole pcs cover with hinge assembly, too. Or since it won’t boot is there another issue than just broken power button.
I’ve never repaired a computer myself, but I’m pretty handy like that and feel like I could do it if i had instructions. Can you help?
Tsav
Help!
I used this guide in conjunction with Gateway’s service guide. I had a malfunctioning power button that I replaced. I was careful removing wires, et cetera, but now the laptop won’t turn on. There aren’t even any status lights anywhere when I plug it into the wall.
I feel there’s something fairly obvious that I’m missing here. I went back and checked my work and nothing stands out. I even reseated all the wires I unplugged.
What’s puzzling to me is the fact that I receive no status lights at all anywhere with the unit plugged into the wall. It’s just dead to the world. I can’t imagine what I did wrong. I was careful with ESD protection and disassembly as well as reassembly.
I would be grateful for any help whatsoever.
Also, I’m aware that the new power button board may be defective, but I should at least get status lights with the unit plugged in. I am puzzled.
adam
My power button board (it’s the same model as the laptop above, ms2285) has become disconnected from the cable entirely, two red and black wires are exposed and the cap for the power button cable remains attached to the power button board, so I bought a new power button board cable and I am wondering If I need to follow all of the steps up to step 21 to replace the cable(specifically removing the lcd screen), in other words if there is anything less or more that I would have to do, do I even need to go to step 21 to get access to the power button board cable. Also how difficult is it to replace the power button board cable?
Rick
How do you know how much space to leave between the plug and the board when you solder it back into place?
Mark
Having an issue with the disconnect of the media button board cable STEP 12. Does the clip on the connection flip up like the key board connector or does it just pull on.
@mikeneedshelp
I’D JUST LIKE TO THANK YOU GUYS FOR KEEPING THIS SITE UP AND RUNNING. I’M A INTERMEDIATE PC REPAIR GUY AND HAVE FOUND A LOT OF THINGS HERE VERY USEFUL!! THANKS AGAIN!!
Naomi
John or outrider were you able to find the order of the wires? I am currently in the same stuck position – guidance would be of the greatest assistance if you have found this information! Thank you
mike
Aw man this is awesome, I’ve been putting this off for a year, and I was worried it would be incredibly daunting, but I just followed these instructions and got everything apart and cleaned my fan in less than 2 hours, this was awesome.
Michael
My dc jack is also broken, but is it needed to take out all the bottom components to reach the jack motherboard or can you reach it fine going under the keyboard? and what do you do to avoid static? please email me back thank you.
IML Tech
Michael,
It’s necessary to remove the motherboard in order to replace damaged DC jack.
Removing just the keyboard is not enough.
Do not touch internal laptop components with your fingers. You can use anti-static mat and wrist strap if you are paranoid about damaging the laptop with static electricity.
Joni
is there a step beyond #24?
it says “next step” and when i press it, i get an ad
IML Tech
@ Joni,
This guide has only 24 steps. Probably “next step” is part of the ad which is placed after the guide.
Sam
Nice but I need to replace the CPU in an NV55s03u laptop I got a faster A8-3500M how do I open it! Does it need to be entirely opened?
IML Tech
@ Sam,
In order to replace the CPU, it’s necessary to remove the motherboard.
After that you remove the heatsink (shown in the step 24), remove the old CPU and replace it with the new one.
Ed Mann
Hi, love your website. I have a Gateway NV52 series. laptop all of a sudden stopped working. When I plug in the AC power supply the red indicator charging light turns on but I can not hear the laptop turn on. When I remove the battery and plug in the AC power supply. the laptop still does not turn on. NO lights or noise at all. I was told it is the motherboard. Is that a good possibility. Any suggestions would help. Thank you.
IML Tech
@ Ed Mann,
Yes, this does sound like a possible problem with the motherboard.
Just in case you can try the following:
1. Test the laptop with each memory module individually. Maybe one of the memory modules is bad.
2. Test your laptop with another known good AC adapter. It’s possible your AC adapter failed and not providing enough power for the laptop to power up.
PlayIt
Hey, I have a NV53 with the following symptoms.
– No picture on boot
– No post beep on boot
– DVD sounds like its attempting to read on boot.
– Quick buttons at top right light up when pressed but I can’t get Numlock, bluetooth or any keyboard combination lights to come on. Im not certian if the keyboard is working or not.
Any ideas on what I should do next? I have already disconnected everything including ram / hd / keyboard and listened for a post beep. Nothing..
Thanks,
Chris
IML Tech
@ Playlt,
If you have two memory modules installed test the laptop with each one separately. Try different memory slots.
If the same problem appears with different modules installed, probably this is motherboard failure.
alex
in step 14 when i removed the lcd cable connectors… the little two pin connector broke off. could you tell me if its required for the screen to work…if so can i have it fix.
IML Tech
@ alex,
If it’s one of the little connectors probably the screen will work without it.
The LCD screen signal goes though the big connector.
Saad Helmy
Thank you very much for such AWESOME and detailed guide.
Shannon
My problem is when I go to plug my charger into the computer, once it touches the metal of the DC jack, the green light goes out on my charger and there is a faint click sound. Nothing works on my laptop now, is something shorting out with my DC jack? Do you think that replacing the jack will cure the problem? Appreciate any help you can provide on this one as my laptop is in pieces right now hoping to become whole again.
Regards,
Shannon
IML Tech
@ Shannon,
It’s hard to tell if this problem is related to the DC jack or AC adapter.
First, I would test the laptop with another adapter. If the problem still there, it’s likely you have failed DC jack.
The DC jack may be broken. The only way to tell is disassemble the laptop ant take a closer look at the DC jack.
joe
I have a nv52 that when plugged in the end of the ac adaptor plug and the dc jack in the machine get realy hot. The end of the plug has blackend a little. The charge light goes on and off when the lcd is open and the backlight dims with charging on and off at this time it gets realy hot. It can only be charged not in use to avoid heat. Could there be a bad power supply or jack?
IML Tech
@ joe,
It’s possible the DC jack has to be resoldered. Maybe the solder joint has a micro crack and it’s causing the problem.
Cannot really tell without opening up the laptop and taking a closer look at the jack.
joe
Thank you so much for the input and great directions. Do laptops have a power supply like in a desktop or is that all in the power brick? It would act like a power supply getting tired? But maybe it just a bad conction and the jack.
IML Tech
@ joe,
It’s in the power brick.
What is your symptoms? Not sure what you mean by that.
Shannon
I bought a new ac adapter and tried it with no luck. I disassembled the laptop and the dc jack is not broken like the pictures you show. Could still be a bad jack possibly? Before I go that route, are there other possibilities that you may know of? I tried starting up with the different memory modules removed one at a time and nothing worked trying it so I am thinking total power failure or a motherboard problem? I appreciate your response and look forward to getting this thing up an running again.
Thanks!
IML Tech
@ Shannon,
Yes, it’s possible. Sometimes you cannot see the damage because it’s just a micro crack in the solder joint.
You can try resoldering the jack. Try doing that without removing the jack. Just melt the existing solder and apply some fresh solder.
Most commonly this damage appears on the “+” connector which is connected to the central pin inside the jack.
Jessica
My laptop only displays a black screen. I have both blue lights that indicate power and charge, but no display. I have already tried unplugging it, removing the battery, and holding the power button. I also tried testing my memory modules, as well as starting the laptop without the hard drive. I thought maybe my fan was dirty, so I disassembled everything to clean it thoroughly. Is there anything else I can try, or should I resign myself to getting a new motherboard?
IML Tech
Jessica,
Have you tested your laptop with an external monitor? Can you get image on the external monitor?
Alex
Hey I’m having problems with step 18, the connection that seems to be connected to the speaker doesn’t want to disconnect- I feel that if I pull to hard it’ll break the connection. I’m thinking that the connection is glued? I tried swirling it to the sides but it still doesn’t come out. Your input?
IML Tech
@ Alex,
No, it’s not glued.
I believe it’s just a regular male-female connector.
Something like this one: https://www.insidemylaptop.com//images/Acer-Aspire-5534/aspire-5534-disassembly-17.jpg
Just don’t pull by the cable.
Remove the male part by the connector edges. Use your fingernails.
Alex
Thanks for your help, I managed to disconnected it, but a piece of broke off and the wires are know loose. Now I’m having the same problem as post #61, I followed the link that you provided- and did everything It said- but nothing. I assembled bare bone system and connected on piece of RAM and connected and HDMI cable to get output on my T.V. but I didn’t get any output. So know I’m sure it’s the mortherboard.
Johnny Doc
Thanks SO much for the help! I followed all of your steps and pretty much everything worked great! The only problem that I’m having is slipping the dvd drive back in. it seems to be stopped by the connector that it is supposed to fit into. Any ideas before I have to tear the thing apart all over again? I finished the assembly anyway and was pleased to see my new dc jack working and the laptop runnig great! I look forward to hearing from you and gope it’s simple!
ryan
wow!!! Crazy! Its completely apart. Fortunately our was under warranty and Best buy did it all for zero dollars.
Josh
Any idea where I can purchase replacement WiFi antenna cables? The cable got pinched and severed somehow in the laptop hinge. WiFi still works. I found this out when I disassembled to figure out why monitor is not working.
IML Tech
@ Josh,
You can buy wireless antenna cables for Gateway NV series on eBay.
Andrew
I am having trouble unscrewing a few screws. Im using a jewlers screw kit, but the screws will not loosen. Any suggestions?
Carita Buenrostro Valbuena
Hi, i have a gateway nv 54 and i want to know wats next to the touchpad on the left side, because the touchpad is too hot and is no working, i feel a little very hot bump on that side, somebody give me the laptop to me bcause they say the fan was not working, but i heard and i feel the air of the fan so dats no the problem, and im scared to open it! can i open just the top cover without moving the monitor or others things?
Sheng
Hi there I was wondering if you could help me.
I have a Gateway NV58 series, and I need to change a new hard drive, I have read how to open and replace the hard drive. my question is after i have put in the hard drive, and turn on the laptop will the laptop automatically restore it self, because when I brought the laptop it didn’t come with any CD’s (window 7 etc.)
Thanks
Sheng.
IML Tech
@ Sheng,
No, it will not restore itself. You’ll have to install Windows OS from the installation CD.
Senthil
Thanks, i had a broken power supply, now i replaced and it works. This link has a easy step by step to do that.
Thanks
–Senthil
Eric
I need help ???????
Please help me i have a gateway nv59 laptop and having trouble.
I am getting a white screen, but when i connect a extanel monitor it works.
I thought it was the screen and put in a new screen but thats not the problem.
As it works on a extanel monitor i think the mother board is good. What do you think the problem is.
Can you help.
Thanks
Eric
Sancho
@Johnny Doc –
I experienced the same thing, then took out a screw on the backside of where the DVD drive slides in, and it went in just fine. Best of luck.
Thanks for the help! I was able to resolve the issue in the fan thanks to your detailed instructions. All the best.
terri
Thanks for posting this. It helped me with checking how far water got into my laptop.
Kevin
Hey, so I’ve replace the DC jack in my NV series gateway. Found the task very easy. Computer booted up nicely and everything seems fine. After about 10 minutes of the laptop being on and sitting at the log in screen the left corner and trackpad area became incredibly hot to the point holding your finger on the area for a second was impossible. Any ideas on what could be causing this?
IML Tech
@ Kevin,
Maybe you forgot to plug in the cooling fan? Listen for the fan. Does it spin at all?
David Hooie
I have replaced the power button on an NV53 series and followed your excellent guide to taking the laptop apart. 1 Problem I had, when reassembling the laptop I connected a small black cable on the left side of the screen and then went to unplug it again to thread it better around the larger LCD cables. The end came off the small cable, I could see 1 red and 1 black wire but no idea which side went where. I reassembled the laptop and everything seems to work fine. Monitor, web cam, power, etc. It’s killing me to know what that wire was for! Can someone please tell me its purpose??
IML Tech
@ David Hooie,
Maybe microphone?
Trevor R
Hello,
First i would like to thank you for making such an easy detailed brakedown of all the steps.i had just finished putting my gateway back together using this great tutorial.
Finally my computer is running at a constant 55-60c compared to the 98c it was before i cleaned the pound of dust out of the fan and better yet. its not overheating anymore.
Thanks again! Keep up the great tutorials. it helped me greatly and im sure it will help others also
alex
i have a NV53A and it does not have a media board. the whole keyboard and case are one. im trying to fix my fan because its making this horrendous noise. i cant get the keyboard off because it seems like its screwed to the motherboard. is it a screw under the hardrive or am i missing something?
Star
Just wanted to say thank you! thank you! i’ve replaced my DC jack in my boyfriends Toshiba and now the power button on my gateway thanks to your guides!
Paul L
I have a Gateway NV53A that is giving me trouble when booting up and once it is running the system time/date keeps changing on me. Do you have any instructions on how to change the CMOS battery on that model?
IML Tech
@ Paul L,
Is it similar to the laptop shown in my guide?
You can see the CMOS battery in step 21. It’s necessary to remove the top cover (palmrest assembly) in order to access the CMOS battery.
Paul L
@IML Tech
I believe all NV series models are similar. Just to clarify my question. Can I just remove the keyboard and palmrest to get to the mother board, or do I need to remove the screen to get at it?
IML Tech
@ Paul L,
You’ll have to remove the display assembly as it shown in the step 16.
The display assembly mounted above the top cover. It means you cannot remove the top cover without removing the display assembly first.
Krantzstone
Would you know if the Gateway NV5922h has the video card soldered onto the motherboard, or if it uses an MXM (or compatible) slot where the video card can be removed/replaced/upgraded?
My dad has one, and is concerned about (me) frying the video card Iit does run a little hot) and I’d like to know if it’s at least possible for the end user to replace the card. This particular one came with a ATI Mobility Radeon HD 5650 1GB video, but I was reading that most manufacturers will solder the chip directly onto the motherboard because it’s cheaper rather than using an MXM slot. I can’t seem to find any detailed technical specifications about this particular version’s motherboard, but I figured since it’s the same Gateway series (the chassis looks exactly the same), the motherboard might be the same or similar.
Also, if anyone knows of any online retailers that specialize in affordable discrete video cards for laptops, please let me know. 🙂
IML Tech
@ Krantzstone,
I couldn’t find any info about that either but I really doubt that this laptop has a discrete video card. Manufacturers install discrete video cards only into very expensive laptops.
Make sure to use the laptop of a flat surface. Don’t use it on a bed, carpet, blanket, etc… There should be some space between the bottom of the laptop and desk.
Make sure the cooling module inside the laptop is clean. You can blow off dust with an air compressor or canned air.
william
Hello:
gateway MS2285 NV53
I turned on for 5 seconds and then go off, I feel disconnected because the temperature increases.
Is the processor or motherboard?
Excelent Irisvista Thank you very much.
Thank you very much.
ybk
i’ve tried to fix my nv58 powerjack, but after i installed a new one (and put everything back) the laptop will turn on for around 1 minutes and self shut off (similar to someone pull off the powercord). Anyone knows why?
Phil
I have a Gateway NV53 that is about to drive me insane.
The problem is it will not boot up consistently. Not really sure how to explain it, but there is power to the computer, the DVD drive will open/close, the blue lights on the power and battery light up, but the red lights (wifi, sound, etc.) don’t light. I can try for an hour or two, usually taking the battery out, unplugging the power supply, wait a few minutes and try again. Eventually it will work, but I’m not sure if it is just luck or what.
I’m using the laptop right now after messing with it for a couple of hours. I tried to boot it, and of course nothing appeared to be working, so a quick slap on the front edge of the laptop, and like magic, it decided to boot. No idea if the slap had anything to do with or if the laptop decided to just start.
Once it starts up, it runs flawlessly. Had it on for several hours without a problem. No weird sounds, nothing.
Thanks in advance if anyone knows what is going on here!
Ann
hi I came upon this site and I wanted to ask you if you can tell how to replace the switch and the fire thats inside the hinges of this same gateway lap top. What happen was I had to replace the screen and while doing that a part of the hinge broke where the little button was to power on the lap top, well that left the button and wire exposed and some how eventually the button broke off the wire so I am not able to power on the computer. If you can furnish me with the correct name for it also would be good, Thanks
william bradley
I purchaced this nv 53 from Tiger company it was a refurbed product it lasted 4 months and then died on me , I tried to get assistance from the company but that was hopeless , should I just give up on a hopeless case or spen some money to fix it ? Bill
sophia
the tiny black and red wires ,(up on top by led screen wires) are for the webcam, right? at 1st i didnt know cuz the sound and screen came on.. after installing win 7 ..i tried using cam and it gives errors like it ‘TURN ON CAM’ or ‘NO cam found”… thats the one that broke huh 🙁
Christopher B
@ IML Tech
First off, thanks for the great tutorial.
One problem: In step 18, the cable where the top arrow is in the pic broke apart as I tried to disconnect it. The motherboard marking says SPKR1. Is this the speaker connection for the main sound for the laptop or the internal beep speaker? Sorry I don’t know the correct terminology. Either way it’s broken so now I need to know where I can find that 4-wire connector. If it’s that internal speaker, I had it disabled anyway because it was annoying while the dc jack was beginning to fail. So if I don’t need it, I’ll just tape ends and leave it off.
Thank you for your input.
T Parker
My computer was dropped a couple of feet while plugged in and broke the DC jack. Computer would not boot at all after and I assumed it just did not have enough battery power. Replaced the jack and computer still will not power up. Shows no signs of power (lights, fan, etc.) No physical damage can be seen on the mother board. Tried booting without hard drive and Ram and no luck. Would you have any suggestions?
IML Tech
@ T Parker,
If the laptop shows absolutely no signs of light I would check the AC adapter. It’s possible when the jack got broken it shorted the adapter someshow.
Test the voltage.
Jason Herek
Hey what’s up dude,
Thanks so much for putting these up, they are actually better than videos to me. I’ve repaired over 30 laptops using your site man and its helped me keep food on the table for my kids so much appreciated. My question is, I recently took in a Gateway NV5207u Notebook pretty much identical to the one you took apart here, when the power button was pressed it gave the dreaded blank screen while the fan spins NO VIDEO to external VGA or to the LCD display prioblem. I figured well this probably is a GPU problem so I told the girl it was pretty much junk. Before putting it back together after tearing it completely apart, I reflowed both sides of the VIDEO chip. I than put it back together and POOF it turned on with the screenw working!! Now the problem is when it gets passed the bios GATEWAY screen it immediately says
PXE-E61 Media test failure
PXE-M0F Exiting Broadcom PXE-ROM
Operating system not detected
I know the hard drive works fine and I’ve put three other different hard drives in it that work fine to make sure it wasn’t the hard drive. I have no idea where to go from here. I would flash the BIOS because a lot of the BIOS options I’ve read about online aren’t there like the battery reconditioning option. Plus in the BIOS it doesn’t say there is a hard drive either?? Thats with no matter what hard drive I put in there it still says that, even a formatted one, or non formatter one… I really really need the info off the original hard drive so I ordered a hard drive reader. But I would also like to get this original hard drive working again without having to reinstall windows 7 over whats currently on it. I thought maybe you might know what causes this issue or maybe you could give me some pointers on how to flash the bios to fix this problem? Gateway is by far the worst company I’ve ever seen when it comes to service manuals.. THanks in advance for any help!!
IML Tech
@ Jason Herek,
Apparently, this is motherboard related problem. Enter the BIOS setup menu and try loading default settings. Sometimes it helps to detect the drive. If not, the motherboard is bad.
Sanmat
I had the issue with the power jack and it was fixed. But after that i hear loud noice from the sound card. I had to hit hard on any part of the laptop to stop the sound. Now i cant hear any audio beacuse of this issue. Any suggestions on this.
IML Tech
@ Sanmat,
Not sure what was causing the problem but I would disassemble the laptop again and make sure everything seated/connected correctly inside the laptop.
Shalom
hi, any time i switch on my gateway nv53 laptop it gives a beeping sound for about 5 to 20 seconds what do you think might be the problem?
Dw
If I am a novice how would I replace the jack since it is soldered on there.
Would it be best for me just to buy a new motherboard since I am trying to stay easy on the pockets.
Pete Borini
How much of the disassembly pictured here will I need to do to get at the fan in my Gateway NV79? It’s been shutting down unexpectedly a lot and I think it’s because I’ve never properly cleaned the fan.
IML Tech
@ Ptet Borini,
You can do the following.
Find an air compressor (or buy compressed air) and blow into the fan grill on the bottom until all dust is gone. After that blow air into the grill on the side.
OR
You’ll have to disassemble the laptop completely and access the fan as it shown in the step 24. For that you’ll have to go though all steps in the guide.
Morgan
I have a Gateway NV53a and its bottom case is broken between the fan grill and the DC jack. The DC jack must have been held in place by the bottom case because the DC jack slid back. The bottom case needs replaced and DC jack needs put back in place. I was wondering how to go about that.
IML Tech
@ Morgan,
The DC jack is soldered to the motherboard, correct? You’ll have to replace the jack.
In order to replace the bottom case you’ll have to go though all steps in this tutorial and remove the motherboard. After that transfer all other parts from the damaged cover to the new one and assemble the laptop back together.
Bob
Great site photos and instructions are clear’
For the most part I don’t like to work on laptops but this is for the daughter so what are my choices?
the Problem:
computer: gateway ms2285 and is probably a nv as it has the extra plug.
the problem: things went great until I got to step 18 the small pug in the top left (three wires one blue one white 1 sleeve) refuses to unplug. I have put as much pressure on it as I dare but it refuses to budge. I noted that the wired side on the plug has some factory installed adhesive on the wires with about the same rubbery properties as automotive weather stripping and I suspect that some of this material is under the plug and it is effectively glued in place.
the Question:
Can you think of a work around for this. I have no idea where these wires go or what they do.
I will look forward to your input thanks,.Bob
https://www.insidemylaptop.com/images/Gateway-NV-disassembly/fix-gateway-power-jack-21.jpg
screen 18
JHPArizona
Hi,
To repeat others, GREAT tutorial. I have a problem though and could not see the part in the pictures. While I was disassembling, I was turning the case over to get the screws out, one at a time. I do this from having loosened all the screws on laptops and turning over to get the screws out and having to chase them all over the place. So… I do it one at a time now. This has worked well up till now. One time when turning over the case, a metal bracket fell out of the case and I could not determine from where. In writing this I think I just found out where the bracket came from. I was originally going to ask if you had any idea where it might have come from but now want to ask if you have picture of the CD drive. I now think the bracket was attached to the back of the CD drive. I probably stayed in place for a while and as the rest of the screws were removed it finally slipped out of place. And yes, at some point I did hear a rattle in the case but did worry since I was taking it apart. Thought it was a loose screw or some other foreign object but now… think it was the bracket.
Thanks, Jim
IML Tech
@ JHPArizona,
Unfortunately, I don’t have this picture. If the optical drive doesn’t have any bracket attached to the back, most likely your loose metal bracket has to be attached to the drive. Normally all laptop optical drives have this bracket. It helps to secure the drive to the laptop case.
You can search on eBay site for “Gateway NV DVD bracket”. There is one bracket listed at this time. You can compare if it’s similar to yours.
JHPArizona
I did not see a reply to your question Bob and hope I get a reply. I will make a stab at an answer to your question but … I would have to disassemble my case again to be sure. I also suspect that since your post was two months ago, that you have solved the issue one way or the other and my solution is for future readers…I would suspect the answer to your question depends on what you are trying to accomplish. If you are replacing the DC jack, most likely not. If you are just looking to clean the system or replace one of the ancillary boards, probably yes if you are VERY careful. I believe that the need to remove the connector is due to the fact that the wires are routed through holes in the top case and you will not be able to remove the top case completely, i.e. held captive by wires. This will make all remaining steps difficult and greatly increase the chance of breaking the wires or connector. I had problems with a few connectors too. My suggestion is to try using an awl or very tiny screw driver such as eye glass screw driver. Very carefully apply pressure to each side edge of the connector while supplying firm but not heavy tug on the wires. Make sure you do not slip with the tool and scratch the motherboard. If you do slip and rip any land on the MB you will have much bigger problems and most likely need a new MB. I have used this technique successfully several times.
Best of luck,
Jim
juztsteve
Great tutorial. Don’t need this right now …but in the future. Anyway, thought that you may be able to help me with something else. You see, after I disassembled the nv5207u laptop I found out that there was a cable lock tab like the one in step 9 but more specifically one of the ones in step 14. Any help finding these tiny parts would be greatly appreciated. Thanks.
Sheris
Hi I have the same problem as Phil on #92, except that mine is not working at all, i just don’t see where your reply was so i decided to ask you again. I took it to somebody, opened the of my laptop and said that it is the motherboard. Is that right?
Ronald Settle
Is the lid switch inside the DC jack? Or is it the small semiconductor with 3 connections on the top side of the motherboard above the DC jack? The semiconductor is in line with the magnet behind the screen bezel when the lid is closed. How would I disable the lid switch, which seems to be stuck and won´t allow the computer to boot? I´ve tried cleaning the area.
IML Tech
@ Ronald Settle,
No, it’s not. The DC jack is just a connector for the AC adapter.
I’m not sure where the lid close switch located but most likely it’s somewhere in line with the magnet inside the display.
I don’t know if you can disable the lid close switch. Why do you think your problem is related to the switch? Probably it’s something else.
Ronald Settle
I have the same symptoms as some other people I´ve seen in forums. When I press the power button, the blue light comes on, the fan starts and I hear the DVD drive. The screen stays black. After 5 seconds the fan turns off and no more noise is heard. I checked the screen with a flashlight, but no there is no faint image. The blue power light stays on. If I leave it on, the case gets warm at the CPU. I tried taking out the battery and holding the power button for at least a minute each time. I tried removing and reinstalling the memory cards. I tried leaving them out.
The computer started normally a couple of times, each time after sitting for day or two. Once when showing it to a computer tech. He wanted to reinstall windows and I don´t remember what else and charge me more money than I currently have. So he didn´t really know what the problem is as far as I could tell, after checking it out.
IML Tech
@ Ronald Settle,
Try removing memory cards one by one. It’s possible one of them failed and the laptop will not start normally because of that.
If one of the memory cards failed, the laptop should start properly when you remove it.
Charles
I have an NV59 and it was working fine until last night. No power light lights up but it works fine off the battery. I’ve tried with a second adaptor and no luck. Laptop is apart but the DC jack is not shattered as in your picture. I’m going to try resoldering the connector but I would have thought I could make it beep by wiggling the plug it it was just a bad solder joint. Ideas?
IML Tech
@ Charles,
It’s hard to tell without testing it.
Are you sure you have a good functional AC adapter?
If the adapter is good, it’s either DC jack problem or there is something wrong with the motherboard.
I would try resoldering/replacing the DC jack first. If this doesn’t help, probably this is motherboard relate failure.
Charles
@IML Tech,
I tried resoldering the jack. I worked for a few minutes but then beeped and the jack lost it’s continuity again. I think I may have damaged the wireless connections as well as it is intermittent there too. May be time for a new laptop.
IML Tech
@ Charles,
Maybe the problem is inside the DC jack?
Try replacing the jack, not just resoldering.
If the battery still doesn’t charge after that, most likely this is motherboard related failure.
In this case it’s not worth fixing.
Charles
@ IML Tech
Wireless is OK, I didn’t get the wires properly seated the first time. Now the question is should I get a new motherboard or give up and get a new computer. It looks like the Core i5 is still a current processor and I like the Windows 7 OS better than Windows 8.
Computer works fine on battery and the AC adaptor is OK as well (I have two and they charged the dead battery overnight).
Charles
@ IML Tech,
Looks like I got it the second time around. Thanks for all you do here.
tracy bench
I took my nv53 apart thinking the power button was bad but found that the whit wire running from the screen to the inside of the computer is broken in 1/2. Will I need a new screen or will this be able to be fixed?
IML Tech
@ tracy bench,
I guess you are talking one of the Wi-Fi antenna cables shown in the step 4.
Try using the laptop with only one antenna cable connected to the wireless card. This could be enough to get a strong signal in your location.
mike
Hello,I have a Gateway NV 76 and when I turned it on the Gateway image appears on the screen and then it goes black and then the gateway appears again and goes back to black and keeps repeating this process without going to the windows startup screen and then the desktop.wanted to know if removing the CMOS battery would correct this problem or if you have any experience what is causing this?thank you
IML Tech
@ mike,
Removing the CMOS battery will not hurt but I’m not sure if it can help either.
Before you disassemble the laptop try this.
1. Remove the hard drive and test the laptop.
2. Remove memory modules one by one and test the laptop.
Can you get a stable image on the screen without hard drive or with different memory modules installed?
Juan carlos
Buen dÃa tengo una lap Gategay ms-2288 de INTEL, pero ya no enciende nada ya le probe varios cargadores y no se si sea el jack o si de plano la mother ya no sirve, y estoy seguro que estas de intel no necesitan el rebaling. Que puedo hacer ya busque por todos lados la mother y nadie la tiene, solo me la venden para AMD y no me gustarÃa cambiar de intel a amd, el procesador ya lo probe en otra mother de otra lap y si funciona. Gracias, espero respuesta.
IML Tech
@ Juan Carlos,
Have you searched for a replacement motherboard on eBay?
Bob
I have an NV55S Gateway laptop – it appears I would need to go through this whole process to get to the network connection. I have no lights on it when it is plugged in (and the cable is good). Is there any other way to test it? Do I need to replace the whole mother board?
Thanks
IML Tech
@ Bob,
Yes, you have to disassemble the laptop to get to to the Ethernet connector
No, you don’t have to replace the whole motherboard. Just use a USB Ethernet adapter instead. Plug the network cable into the adapter and adapter into the USB port and you are ready to go.
This adapter cost about $10 on Amazon.
Liss
For the last pictures @ Step 9, my computer is in need of one of those black pins(gateway nv79) they clip from the outside on the sides though, are there individual ones anywhere?
IML Tech
@ Liss,
I doubt you can buy this part separately.
Chami
When I connect the power jack shut off my charger…please tell me what happen it? and how to fix it…
IML Tech
@ Chami,
It’s hard to tell without testing the laptop with another known good power adapter.
This could be failed DC jack or motherboard issue.
Chami
my laptop model is getway ms2285…..
Steven J Malm
Hi IML Tech,
You’ve been supporting this thread for about 3 years, it’s good to see some of us old-timers are still around. 🙂
I received one of these that had had the dc jack replaced about a year ago. The brick supplied had some chew marks and was flickering, so I tried a known working brick. It took a charge and booted up fine. I set it aside to bench test a 2nd time before returning it to it’s owner.
When I connected the working brick as before, the light in the brick toggled on/off, and I could smell an acidic odor from the laptop though there was no smoke.
When I disassembled as to your awesome instructions, I noted the clean solder joints had a white corrosion similar to a car battery. (I suspect they used acid-core solder). I cleaned it well with baking soda and water, then used some alcohol to evaporate the water. I note that they could have used less solder on the connections, and there is barely enough gap between them. A visual inspection of the dc jack has it looking clean inside and out.
When I put it back together, it showed no changed and the acidic burning smell still occurred.
Would you suggest I replace the jack another time, or is it more likely a board level capacitor that is the culprit, or do you know something else that I don’t yet?
Also, for those that have had issues with the speaker wire, blue in the middle, white on the outside. As for removing it, I used 2 jeweler sized flat screwdrivers, to pry gently on the sides of the connector, where one would normally use their finger and thumb on a larger connector … hope this helps.
Steven
Tracey
Hi I have my gateway notebook NV78 taken to put a new DC Jack on. I took the computer apart and just gave the motherboard to replace the dc jack . They replaced the DC Jack and gave me back the motherboard and when I went to put the computer together I followed all the instructions to put it back together. When I went to plug it back in the red light (charge light) did not come on. With the battery in and it plugged in when I press the power on button an only the light blue for a few seconds then turn off.still with no charge light. So I unplugged it, took out the battery held down the power button for 30 seconds to drain the computer completely. I plugged it back in to check and it still did not show a charge light. Only when I put the battery back in and held down the power button the blue light will come on for a few seconds and then shut off. So did I do something and not connecting it back properly? or is the DC Jack done wrong? My charge cord has power to it it does have enough amperage 18 to 19 which says it’s got power. How do I tested DC to see if it’ was done right? I’m at a loss? What could be keeping it from not getting power.
IML Tech
@ Tracey,
It’s hard to tell what is wrong without testing the laptop.
Could be bad DC jack repair, failing motherboard or improper assembly.
Here’s what you can try.
Take it apart to bare bone system as shown in the step 21. Connect an external monitor via VGA port. Plug in the AC adapter and try turing it on.
If you can get basic video on the external screen and the laptop stays on, start assembling it back together.
If the laptop doesn’t turn on, probably it’s ether bad DC jack repair or failed motherboard.
Joe
Just wanted to say thanks for this very clear walk-through on disassembly. I’ve successfully used it twice now, and it’s been a time saver.
julian
Hello,
at Step 18 it is saying “disconnect three cables from the motherboard”. What are these cables for?
Can you give me a name for’em? My friend droped her Laptop and broke one of the plugs on picture 18 (it is the one on the left side, on the right side from the speaker) there are 4 tiny cables on that plug. I attached them from left to right on the broken plug: blue, white, black, red. If the laptop isn’t moved the cables stay attached. Is this the right order?? Can you tell me the name of the plug or the cable? Or can you give me the right order?
Since she droped the laptop, the laptop is shutting down after some time on its own. I hope you can help me the laptop is a packard bell EasyNote TJ75.
with best regards Julian
Amosis55
Reply to comment 142 Julian. Those wires are for the onboard speakers. The plastic clip broke, inside the receptacle on mine but I use the speakers on the TV anyhow.
Kathleen Dombrowski
Hello,
Thank-You so much for your detailed instructions. I am replacing fan and heatsink on a NV5378u and everything went well until step 14. LCD cables, the 2 white connectors released fine but the small black wire would not release and it pulled out of male end. Male end released and crumbled. Can I strip those wires and insert ? can I order the male plug end? what advice? I have an old Dell Latitude D600 for parts, would something from it work? Also, because I appreciate this so much I am leaving a contribution in the Money Jar via PayPal.
Thank-You, in advance, Kathleen
IML Tech
@ Kathleen Dombrowski,
First of all, thank you for supporting my site.
I think you are talking about the microphone cable. You can buy this cable on eBay very cheap.
Just go to eBay and search for “Mic Cable 23.42249.001”
Is it the correct part?
You can remove the black connector from this cable and use it in your laptop. In this case you don’t have to disassemble the display in order to replace the hole cable.
Hopefully it helps.
Jim
I just got a new motherboard for my NV52 laptop ( the last one stopped charging battery, replacing DC Jack the battery didnt charge, so a new motherboard was bought was it was thought the whole motherboard was the problem), after reinstalling all components and connections, laptop wont boot up at all. The motherboard is the same as the one it replaced, but upon pressing power button nothing lights up at all, just trying to charge battery w/o turning it on yields nothing as well (no light indicating charging battery). Ive tested power of AC Adapter and that is giving me correct output but upon plugging in laptop the battery does not charge. On old motherboard the battery stopped charging but it still booted up as long as the battery had power. Any ideas?
IML Tech
@ Jim,
It’s really hard to tell what is wrong without seeing the laptop. Make sure it’s assembled correctly.
If it’s assembled correctly, it’s possible you got a defective motherboard.
Test the motherboard outside the laptop case. All you need is the motherboard, RAM, CPU and power button. In this bare bone configuration you should get at least a Logo on the external screen.
Michelle
I cannot thank you enough. I thought I was going to have to buy a whole new laptop. Shew! Bought a power port thingy for $5.62. Took the laptop apart. Did the de-solder and re-soldering part with the help of a friend. VOILA! My laptop actually works. I am truly shocked and so very thankful for your dis-assembly instructions. All my best to you and those of you who understand electronics.
Tony
Followed all the steps, replaced the DC jack and then tried to reverse everything. Got as far as step 3 but the DVD drive won’t go back in. The bracket isn’t bent and the connectors look fine. Help!
Tony
I fixed it. The problem was that in step 17 you show removing the screw that holds the DVD drive – so I replaced it at that point of the re-assembly. You should remove that one red circle in step 17.
John Brewster
I’m repairing a Gateway P5WS6 charging port. The internal port broke loose and came out with the charger. There’s four wires, two black and two red. I can solder but I’m not sure where they go?
Kathie
Is there an alternative way to charge this type of laptop without taking it completely apart and re-soldering the DC? Mine broke off inside of it, and I really don’t have the money to take it in for repairs right now. These are very descriptive and easy to follow instructions, but I have no soldering skills or any experience working on computers. I’m afraid I’d mess it up. Is my only option to get it repaired at a computer repair store? I don’t really want my computers hard drive tampered with. This computer has my photoshop and flash software installed. Any help would be appreciated.