
In the following guide I’ll be taking apart a Gateway P-series laptop.
In my case I’m taking apart a Gateway P-6825 but the guide should work for the entire P-series line.
If it fits any other Gateway model, please mention the model number in comments after this post.
First of all, turn it off, disconnect AC adapter and remove battery.
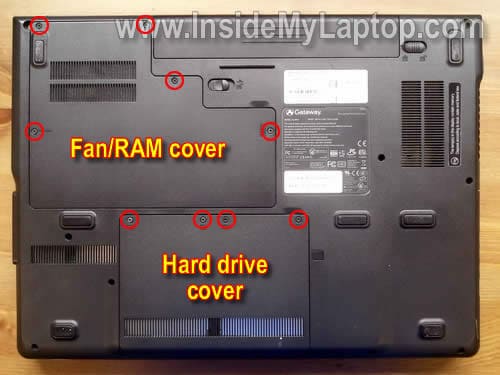
Many major internal components can be accessed if you remove two covers from the bottom.
There are five screws securing the fan/RAM cover and four screws securing the hard drive cover.
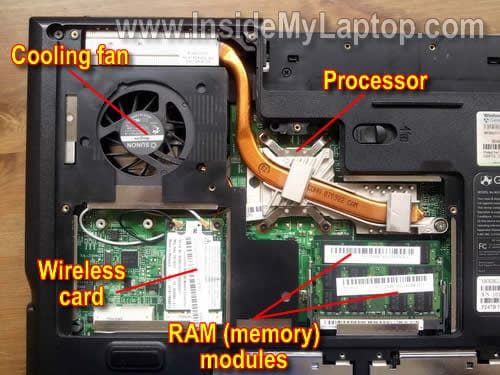
Under the fan/RAM cover you’ll find both memory (RAM) modules, wireless card, cooling fan and processor (mounted under the heat sink).
Removing this cover will not allow you to replace the cooling fan, but you’ll be able to clean it. I suggest using compressed air for cleaning the cooling fan and heat sink.
Also, removing this cover gives you access to both memory modules and makes it very easy to replace/upgrade memory.
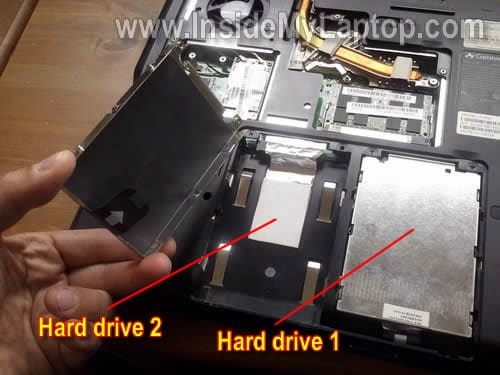
Under the hard drive cover you’ll find two hard drive bays.
In my case I had only one hard drive installed.
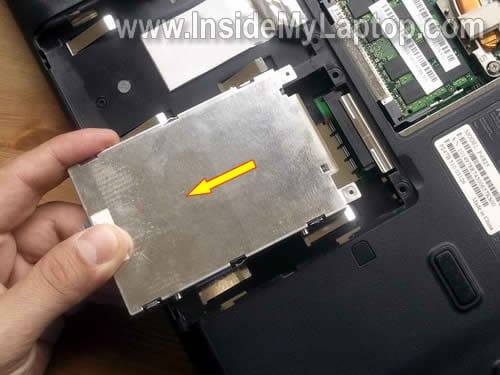
In order to remove the hard drive, slide the entire hard drive assembly in the direction shown by the yellow arrow.
In my case I had to use some force because the hard drive was fitted very tightly.
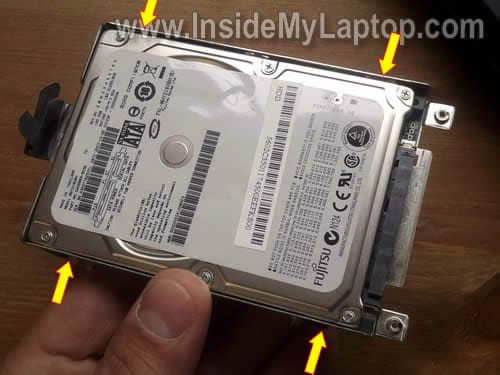
When the hard drive assembly removed, you can remove four screws securing the hard drive to the caddy.
After that separate the hard drive from the caddy. Now you can replace the hard drive with a new one.
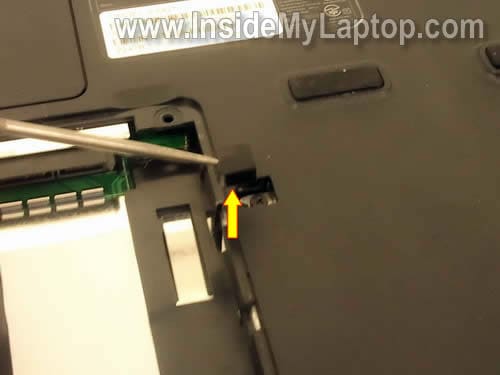
Using a sharp object remove the rubber cover located on the right side of the hard drive bay.
This cover hides a screw securing the DVD drive. Remove the screw.
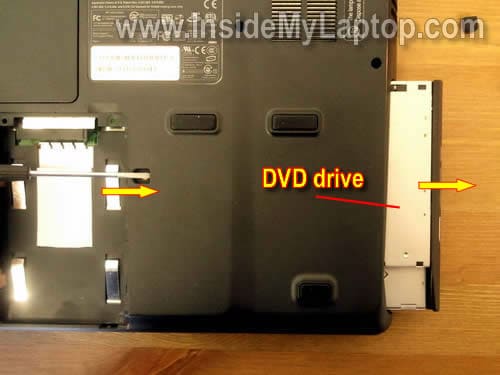
Now you can slide the DVD drive to the right and remove it.
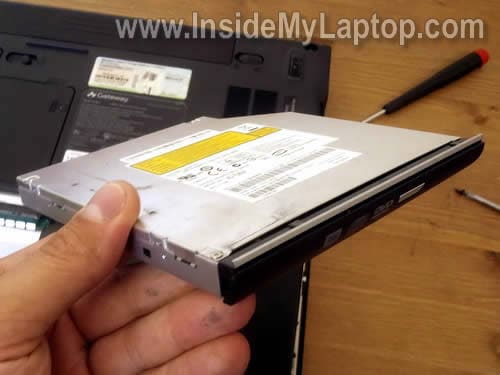
The DVD drive has been removed.
In the following 10 steps I explain how to remove the keyboard.
It’s not necessary to follow all previous steps in order to remove the keyboard.
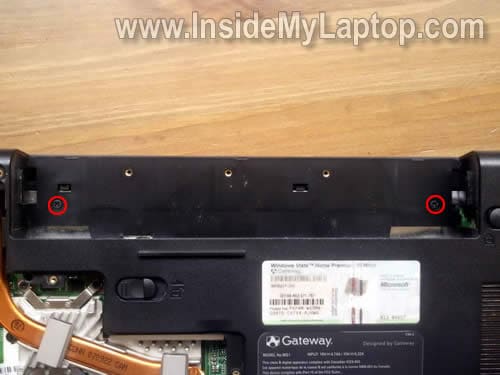
Remove two screws securing the power button cover in the battery bay.
Carefully lift up the right side of the power button cover.
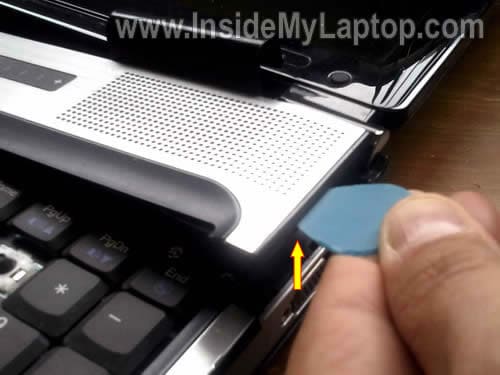
Continue removing the power button cover.
Be very careful. There are two cables connecting power/media boards to the motherboard. Do not lift up the cover too high.
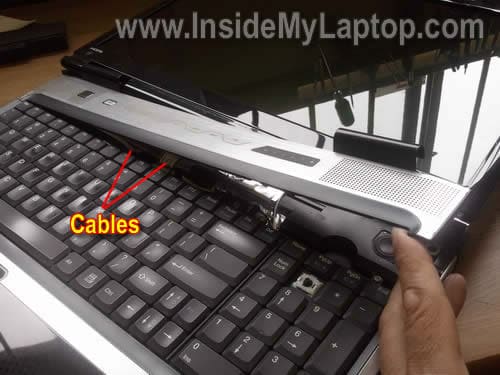
On the following picture you can see two cables.
Try not to disconnect them from the motherboard or power/media board.
Ideally, these cables remain connected after you remove the cover.
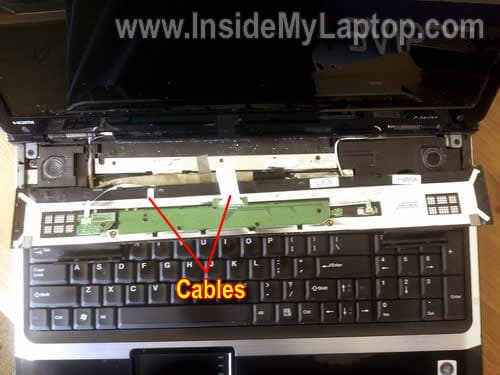
Remove five screws securing the keyboard above the function keys.
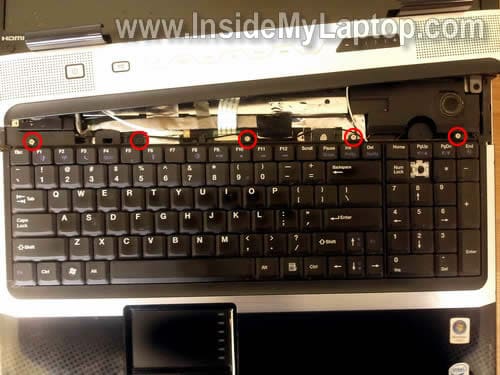
Lift up the top side of the keyboard and move it towards the display.
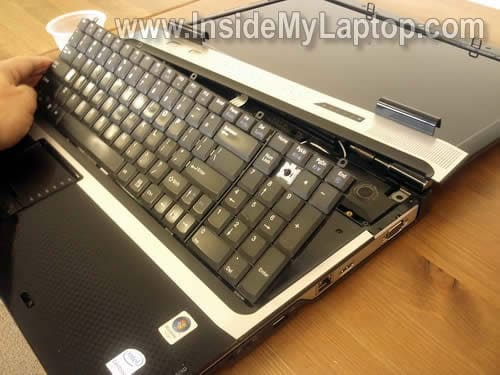
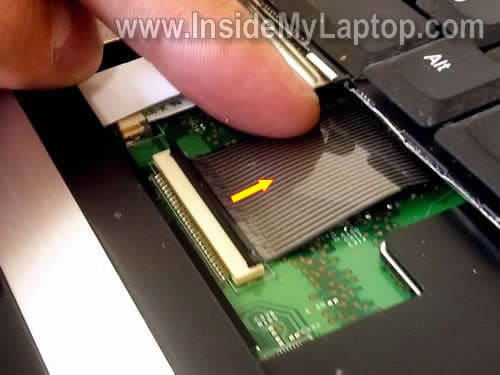
Now you can access the cable connector.
Before you remove the cable, you have to unlock the connector.
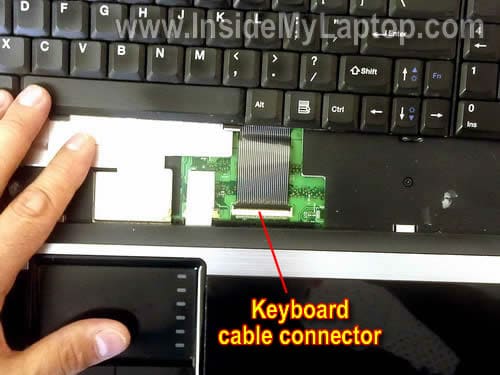
Flip the right side of the brown clip up so it opens at a 90 degree angle.
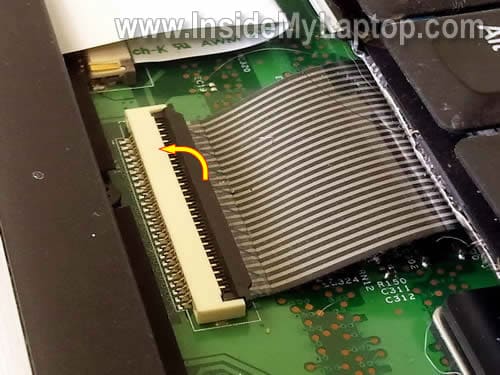
After the connector is unlocked, you can release the cable.
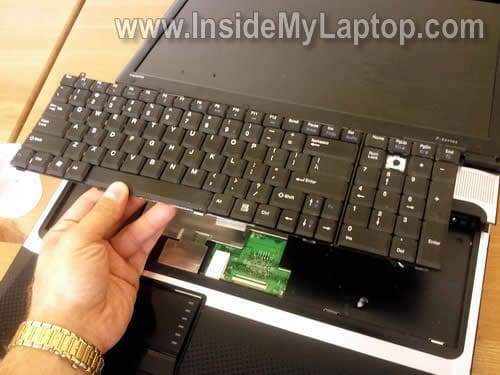
Finally, remove the keyboard and replace it with a new one if needed.
Michael
Thank you for the guide.
I have Gateway P-6312 and it same as yours. I didn’t know how to replace the DVD burner. It was easier than I thought.
Now waiting for a new drive.
Ranju V
Thanks for this guide. I had asked a question on the superuser.com forum on disassembling a P-series laptop sometime back here – http://superuser.com/questions/90588/how-to-disassemble-a-gateway-p-series-laptop (and somebody posted a link to this page there) and was looking for a way to get to the graphics card as I think it needs some cleaning. I got as far as removing the keyboard but didn’t feel comfortable going further. Thanks for your detailed guide though!
IML Tech
Ranju V,
I don’t know if in your laptop the graphics card is a discrete module, but in my case the graphics card integrated into the motherboard.
There is not much you can do with the integrated graphics card (cannot be removed, replaced, upgraded). I guess if it’s getting hot, you can reapply thermal paste under the heat sink.
Ranju V
Thanks for your comment. Yeah, I’ll look into that. I was trying to get to the graphics card to clean the fan and the vents in case there’s dust accumulated there but overheating on the 6860FX seems to be a common issue as I find that other people have complained about it as well.
John
hi, can u make a tutorial how to replace the fan for Gateway MT3707. i really want to change my fan so bad
Sam
Thanks for this guide! As with Ranju, I found the link through the superusers website, and the step-by-step instructions with pictures proved very helpful. Unfortunately my issue was dust blocking my fans on my P-7805u and this guide stopped short of what I needed get to them to clean them. However I found another one that covers the additional info I needed: http://forum.notebookreview.com/gateway-emachines/382408-gateway-fx-disassembly-guide-covers-all-17in-fx-notebooks.html
Highly recommended if you need to get deeper into your system! I was able to clear out the dust (on both fans) and my system started operating normally again.
@John Not sure how similar your model is to the P-series, but this guide definitely gets you deep enough to change your fan… if you end up needing to. In my case the fan quieted right down once it was able to cool the system normally again.
IML Tech
Sam,
It’s not necessary to disassemble the entire laptop in order to clean the cooling fan.
Just remove the heatsink (shown in the 3rd picture) and blow off the fan with compressed air.
Thanks for the link.
marc
Hi,, this is my exact laptop…What would be the fastest processor I could swap into this? And I assume I could swap in a wireless N card as well…What’s your opinions.
Thanks marc
Kris
I have a P-6860FX and every six months I need to clean out both vents because of excessive lint and dust build up. I take a vaccum hose and place it directly on the INTAKE port for both cooling ports (one at a time). Then I put my face up to the EXHAUST port and blow as hard as I can while still holding the vaccum host to the INTAKE port. This basically blasts out all the lint and dust that have built up inside the computer on the fins and fan blades. This works extremely well and my laptop can run games again without overheating. Good luck! 😉
roy
how do i replace the lcd screen
IML Tech
roy,
I don’t have LCD screen replacement guide for P-series but you can use this one as an example: https://www.insidemylaptop.com/remove-lcd-screen-from-gateway-mt6704-model-ma7/
Shouldn’t be much different.
J. B.
We need to replace the CPU fan on our P-6100. We have the replacement fan.
How do we get to it after removing the keyboard?
IML Tech
J.B.
Disconnect and remove the display assembly.
Remove all screws from the laptop bottom.
Remove all screws located under the keyboard and disconnect all cables under the keyboard.
Separate top cover from the bottom.
Take a look at other disassembly guides on this site. You’ll get the idea. All laptops are disassembled same way.
J. B.
Thank you for the advice on replacing the CPU fan in our P6301; it went perfectly! Please receive our donation for your help and thanks again.
Nate
A poorly thrown PS3 controller broke the LCD screen on my P-7805U FX. Can I replce it with a P-7811 FX screen? The specs all seem to be the same except for the 7805u has a WXGA+ (1440×900) resolution and the 7811 has a WUXGA (1920×1200) resolution.
IML Tech
@ Nate,
I cannot tell. The new screen with higher resolution might require a new cable.
You can try replacing just the screen and if it’s doesn’t work or the image looks weird, you’ll have to transfer the video cable too.
Heavensangel
Hi,
Appreciate the information as how to disassemble this particular laptop. Wished that you instructed and showed how to replace the hinges and LCD panel. This is my weekend project that I need to work on.
Also, could you please tell me what kind of tools you would recommend to disassemble this laptop?
Thanks for all your hard work! Have a nice day!
IML Tech
@ Heavensangel,
Take a look at this laptop as an example.
https://www.insidemylaptop.com/replace-lcd-screen-inverter-dell-inspiron-1525-laptop/
The guide explains how to access and remove the LCD screen.
After you disassemble the display panel you can figure out how to remove the hinges.
Nate
@ IML Tech,
I got the new WUXGA monitor. I intalled it, but when I turned the computer on I got nothing. It just stayed black like it wasn’t getting power, eventhought I could hear the computer booting up. Thinking I might have broken the inverter or video cable during installation, I re-installed my old screen and it still got power. So tried again with the new screen, but still can’t get power. Do I need to get an inverter and/or video cable? Obviously I’m a noob, so if I do need one or both, how do I go about finding the right ones? Thanks for your help.
———————————-
@ Nate,
Can I replce it with a P-7811 FX screen? The specs all seem to be the same except for the 7805u has a WXGA+ (1440×900) resolution and the 7811 has a WUXGA (1920×1200) resolution.
I cannot tell. The new screen with higher resolution might require a new cable.
You can try replacing just the screen and if it’s doesn’t work or the image looks weird, you’ll have to transfer the video cable too.
———————————-
A poorly thrown PS3 controller broke the LCD screen on my P-7805U FX. Can I replce it with a P-7811 FX screen? The specs all seem to be the same except for the 7805u has a WXGA+ (1440×900) resolution and the 7811 has a WUXGA (1920×1200) resolution.
IML Tech
@ Nate,
Probably you need new video cable.
Are you sure the new WUXGA screen is in a good working condition?
Bryan
How do you get to the power plug-in port to remove and replace?
saurabh
i hav burned ma screen panal of sony wio pcg71811w hw much it will cost
Joe Carella
The hinges on my P series laptop are frozen. Any ideas?
ROBERT
CAN YOU PLEASE TELL ME WHAT TYPE OF CMOS BATTERY I NEED FOR MY GATEWAT P-6825.
AND ALSO WHERE EXACTLY IS IT LOCATED AND HOW DO I REPLACE IT.
THANK YOU SO MUCH,
ROBERT SANTINI
IML Tech
@ Robert,
I believe this laptop has a regular 3V CR2032 CMOS battery.
I think the CMOS battery located under the wireless card.
To confirm that remove the bottom cover and remove the wireless card.
Cal
P-6312 keyboard replacement procedure confirmed!
Be very careful opening the power button cover. There are 3 separate tabs that you need to clear.
Joe Danel
@IML Tech
Both hinges in my machine broke, (the part that binds the lower, and upper parts). could you please advice if I have to disassemble the screen frame in order to change them
( changing the whole hinge) or could I do a quick, unexpensive fix, and how to do this ? Thanks in advance.
Joe
IML Tech
@ Joe Danel,
Probably similar to this one:
https://www.insidemylaptop.com/replacing-failed-lcd-screen-gateway-mt3000-series-laptop/
Joe Danel
@IML Tech, thanks based on your answer then there’s a likelihood that I would have to take the screen frame apart. Though my question is if the part that binds the lower and upper parts of the hinge is (are rather, both are broken) broken can I make some sort of cheap fix , and how do I do that ? Thanks again.
Joe
IML Tech
@ Joe Danel,
You’ll have to replace them. I cannot recommend any alternative cheap fix.
Joe Danel
@IML Tech, Thank you.
Mathew P
Hello
Thanks for the info , very helpful.
Tony Cota
Wow! Very useful and easy to do. Thanks!!
patrick
Hello. This is my exact computer and I’ve been told that when I play games on it the computer isn’t recognizing the graphics card so I will need to reseat it. How can I do this? Or is there another fix I could try?
IML Tech
@ patrick,
The graphics card built into the motherboard. You cannot reseat the card.
Check your game specs. Probably the game needs a more powerful graphics card.
Cristian
I have almost the same notebook I opened it took everything off,but now IDK where the 2 screen cables are connected on the bottom of the notebook can you send a pic or something?
Anatoly
Hi, how i can reset cmos bios? Unplugin battery under wifi module not helped(
Maybe there is some places which i need to short? Some contact pads?
Anatoly
My model is p7805u fx