In this guide I explain how to disassemble an Acer Aspire 5742 series laptop.
In my case I’m taking apart an Acer Aspire 5742-6682 model.
Also, this guide will work for Acer Aspire 5742z.
Make sure the computer is turned off before you start the disassembly process.
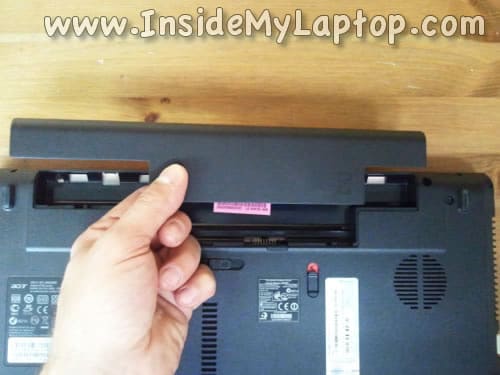
STEP 1.
Unlock and remove the battery.
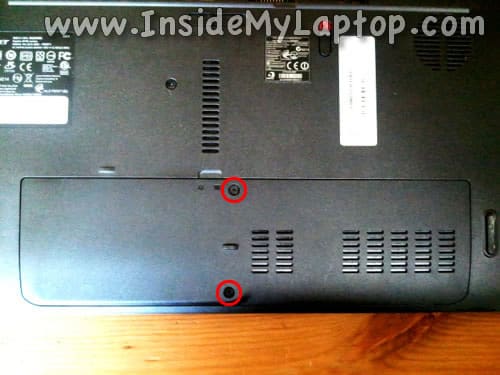
STEP 2.
Remove two screws securing the hard drive/memory cover on the bottom.
Lift up and remove the cover.
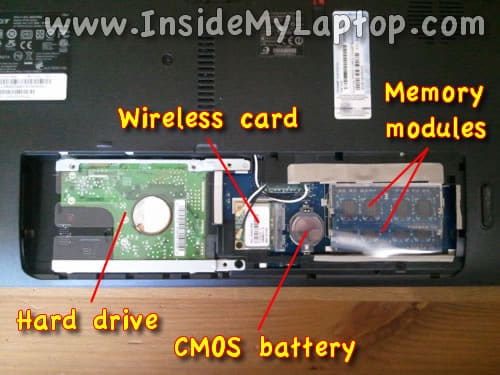
Under the cover you’ll get access to the following components:
– Hard drive.
– Wireless card.
– CMOS battery.
– Both memory modules.
This laptop can handle 8GB (2x4GB) DDR3-12800 SODIMM memory modules.
STEP 3.
The hard drive assembly secured by one screw located in the lower right part of the mounting bracket.
Remove one screw securing the hard drive.
Slide the hard drive assembly to the right to disconnect it from the motherboard.

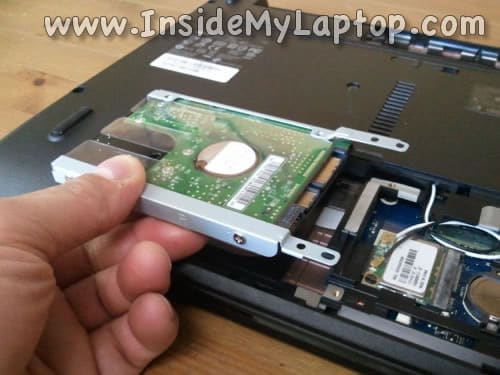
STEP 4.
Lift up and remove the hard drive assembly.
Acer Aspire 5742 comes with a regular 2.5″ SATA hard drive. This hard drive can be replaced with any other large capacity 2.5″ SATA HDD or 2.5″ SSD.
Upgrading this regular 2.5″ SATA hard drive to a 2.5″ SATA solid state drive will improve laptop performance significantly.
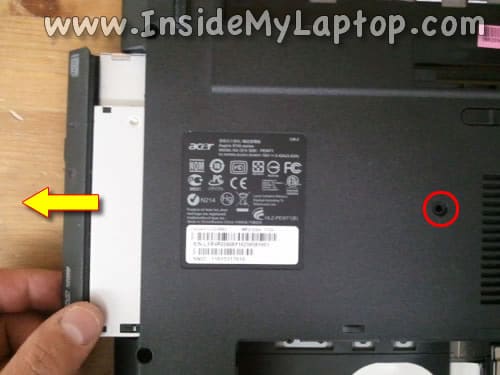
STEP 5.
Remove one screw securing the optical drive.
Pull the optical drive to the right and remove it.
STEP 6.
NOTE: in order to remove and replace the keyboard it is not necessary to go through the previous disassembly steps. Just follow instructions in steps 6-11.
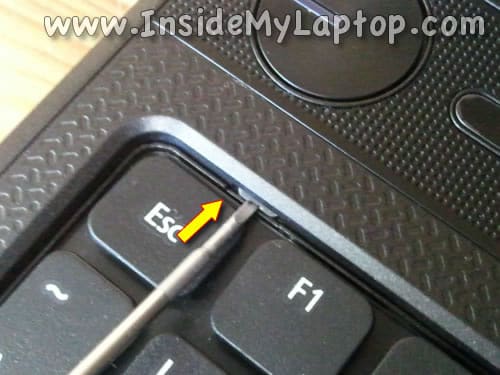
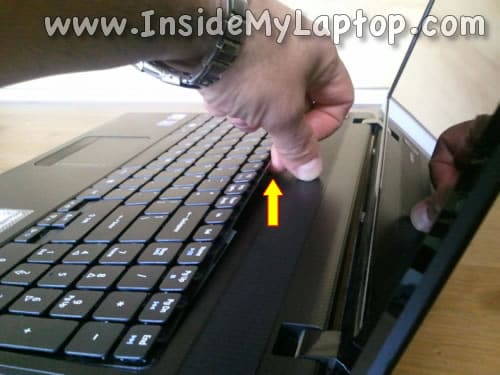
The keyboard secured to the top case by six spring loaded latches.
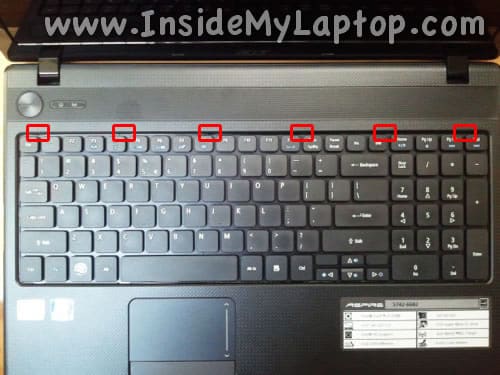
In order to remove the keyboard it’s necessary to push on each latch with a small screwdriver and at the same time lift up the keyboard a little bit so the latch doesn’t lock back in place.
STEP 7.
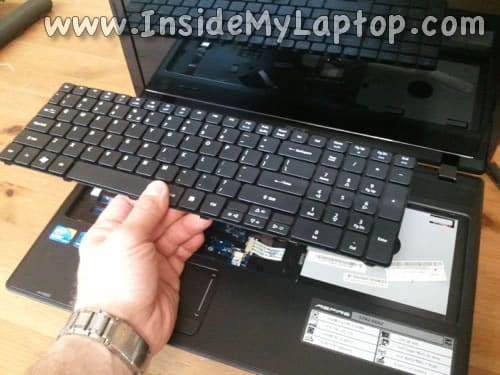
After all latches unlocked you can insert your fingers under the keyboard (close to LCD screen) and start removing the keyboard.
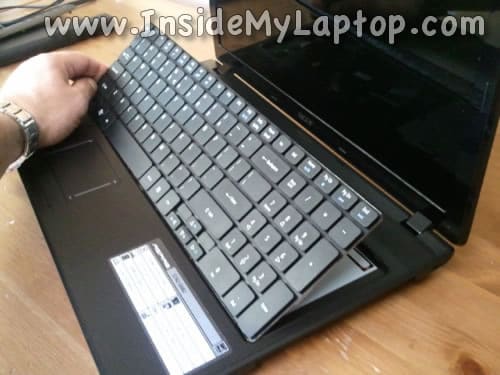
STEP 8.
Continue removing the keyboard and place it upside down on the palmrest.
Be careful. The keyboard still connected to the motherboard.
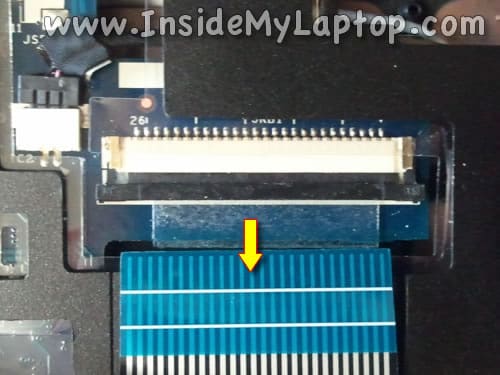
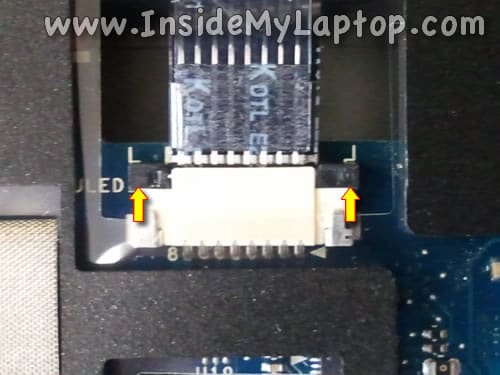
The keyboard cable connector located under the keyboard.
Before you remove the keyboard it’s necessary to unlock the connector and release the cable.
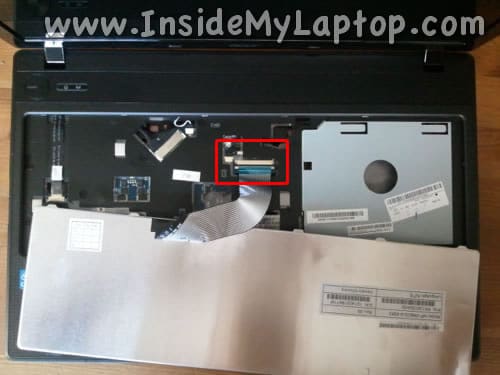
In the following two steps I explain how to unlock the keyboard connector.
STEP 9.
Very carefully move the retaining tab about 2 millimeters to the shown direction.
The retaining tab must remain connected to the connector base.
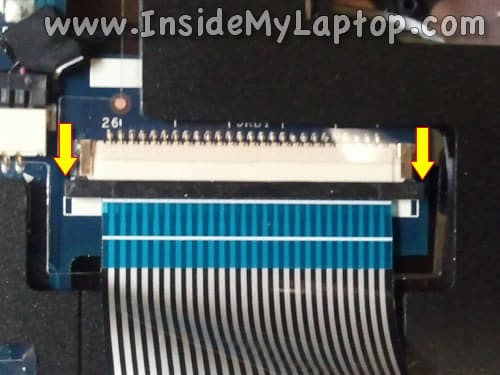
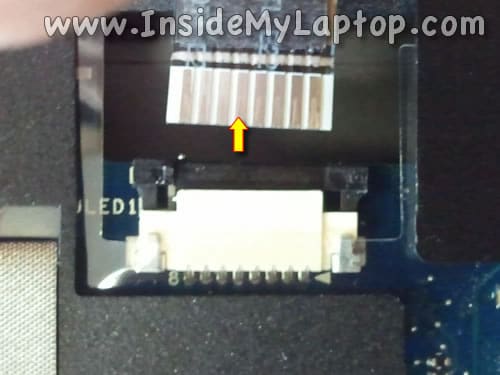
STEP 10.
On this picture the connector shown in the UNLOCKED position.
Now you can pull the keyboard cable from the connector.
STEP 11.
Remove the keyboard.
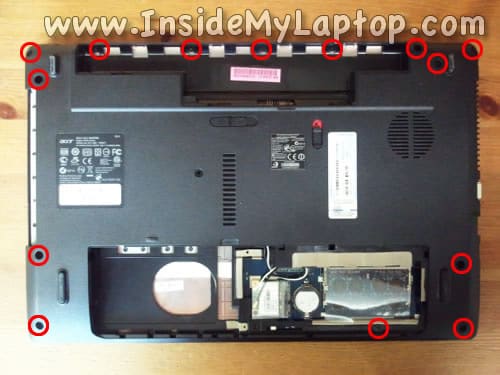
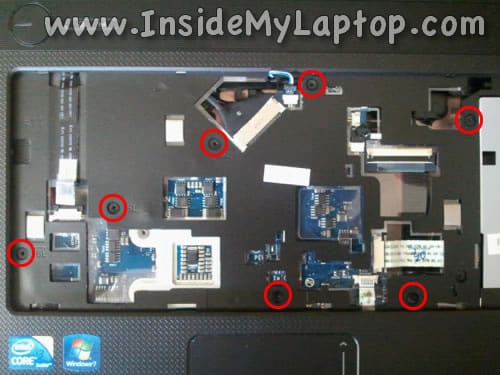
STEP 12.
Remove all screws from the bottom.
STEP 13.
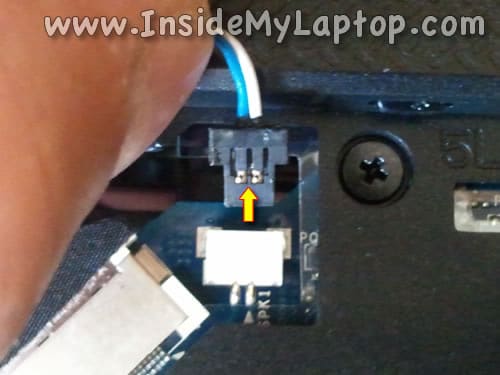
Disconnect three cables from the motherboard (left to right):
– Power button board cable.
– Speaker cable.
– Touchpad cable.
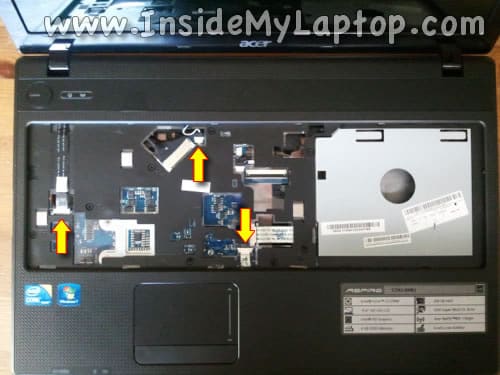
Disconnect the power button board cable and touchpad cable same way you disconnected the keyboard cable.
Unlock the connector by moving the retainer about 2 millimeters to the shown direction.
Pull cable from the connector.
Here’s how to disconnect the speaker cable.
Simply unplug it form the motherboard.
STEP 14.
Remove screws securing the top cover (palmrest) assembly.
STEP 15.
Start separating the top cover assembly from the bottom cover.
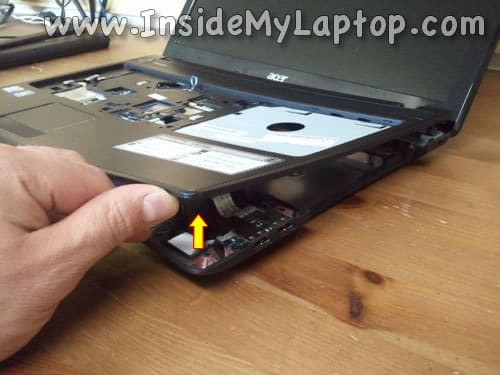
STEP 16.
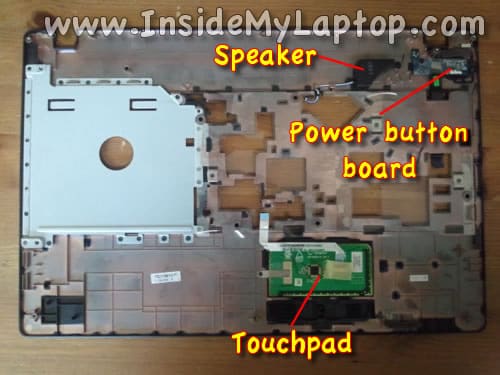
Remove the top cover assembly.

On the bottom side of the top cover assembly you can access the following components:
– Speaker. I was very surprised to find out that Acer Aspire 5742 has only ONE speaker installed.
– Power button board.
– Touchpad.
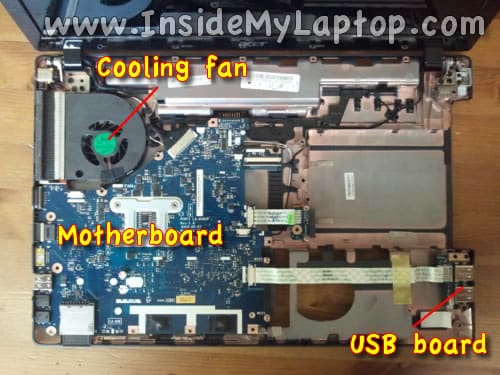
After you remove the top cover assembly you’ll get access to the motherboard, USB board, cooling fan, DC jack and other internal components.
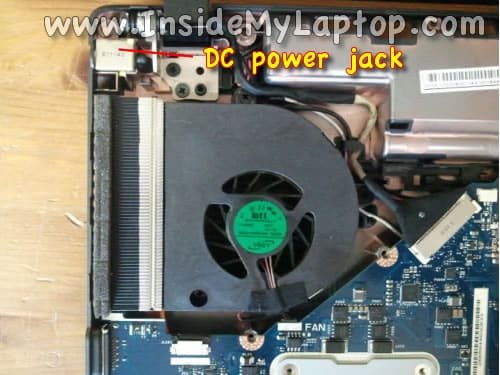
Acer Aspire 5742 has a DC power jack harness which can be replaced without soldering if the jack fails.
The cooling fan also can be easily accessed and replaced or cleaned after you remove the top cover assembly.
James Harman
I am learning to repair what I can as I am disabled and little or no income. I have read that a dv4 is prone to video problems. I assume it has to do with the chipset. Is this correct and what can be done to repair the motherboard chipset or bypass with a video card?
Frank
I have a ACER 5733 and I found this page very helpful. I believe that the power jack is bad do you have instruction on how to replace?
Thanks Frank
IML Tech
@ Frank,
In order to access and disconnect the power jack harness you’ll have to remove the motherboard.
Take a look at this guide for Acer Aspire 5741 laptop. I think this will be similar to Acer Aspire 5733.
At the end of the guide I explain how to remove the motherboard. There is a chance it will not be 100% the same for your laptop but you’ll get the idea.
Good luck.
dj
i have an acer aspire5742g , i’m having trouble in taking apart the keyboard..please help
IML Tech
@ dj,
What exactly you are having a problem with?
Chris
Thanks mate,
I had to replace my keyboard (coca-cola) and the video on youtube was useless. Your clear instructions are much better. They confirmed there was no screws holding the keyboard in place.
Saji
Hi I have an acer aspire 5742-6863. I had to disassemble it to clean the cooling fan. After reassembling it the microphone doesn’t work! Everything else is working fine except for the microphone. Although,when I open the recording device it has a green tick beside it showing that the microphone is recognized.
What do you think the problem might be?
Thanks
Eduard
Hi,
Great guide, I’ve got a question – I’m experiencing problems with my Acer Aspire 5742G. I believe that the problem is a faulty DC Adapter. My question is in order to change the DC Adapter will I have to remove the motherboard or it’s less complicated?
I would greatly appreciate any help. Maybe you have a guide on that ?
Kind regards
Eduard
Randy
Thank you very much you have just solved my over heating problem. I’ve got another question with my Acer Aspire 5742G . The battery indicator just continously blink. Could it be my faulty settings? or Could it be my battery problem? Please advice.
Thanks.
Mal
I am trying to install a bluetooth module. Where does this get placed and where does it connect. I was having issues getting the bluetooth to work, only to find out my computer never came with the module only the software, which obviously was pointless. Help please.
Arya
Friend, This is very useful guidance. I know some about desktops. I have Compaq CQ42 laptop and developed a problem. It works well with a compatible battery replaced recently. But when using audio or internet or any other application within few minutes, every task start hanging (system becomes very slow), audio distorted, MB gets over heated, fan sound is audible. But surprisingly if I connects power cord to charge, at this moment almost every application resumes to normal speed, except audio distortion. Is compatible battery a problem (it is ideally giving 2+ hours backup)? Or motherboard has developed any problem, Any hint please?
Ruwan
Thanks.. Great tutorial..
Chuong
Thanks for the disassemble guide. I have a question, the internal speaker failed, I opened it up, unplug and plug back in speaker cable but still the same, is it likely to have speaker failure or it is Mainboard fault. Thanks a lot!
Clemens
Hi Mate,
thank you for your Guide.
This is so usefull and helpfull.
One question before I start disassemble the Notebook:
Do you remember if the Notebook have a MXM B Interface wich make it possible to change the GPU?
Kind regards from Germany
IML Tech
@ Clemens,
No, it doesn’t. The GPU is built into the motherboard and cannot be replaced.
Jon
Hello, I love this site – best instruction I’ve seen yet! My computer has been overheating lately (to the point of shutting down) and have had some success in this situation with other laptops just by vacuuming out all the dust, etc. Do you know of any known issues like this with this model, or can you recommend any addition action to take? Thanks so much!
IML Tech
@ Jon,
I don’t know any known heat related issues with this model.
If vacuuming out all the dust doesn’t work and the laptop still overheats, try removing the top cover as it shown in the step 16 and blow off dust with and air compressor.
Chris
For this step You’ll need:
Thermal Paste (Arctic Silver) works great!
Rubbing Alcohol
Lint Free Cleaning Cloth.
If your computer is still Overheating after cleaning out the dust with a Vacuum or Compressed Air you may need to Remove the Fan from the Processor.
After the fan is removed from the Processor you’ll need to apply Rubbing Alcohol to the Lint Free Cleaning Cloth.
Next you will need to Clean off the Old Thermal Paste from the Processor and Heatsink that touches the Processor (The Heatsink should be on the under side of the Fan).
Once the old Thermal Paste is removed wait for the Alcohol to dry.
Once Dry apply a Pea sized drop of Thermal Paste to the Processor Core (right in the center).
Replace Heatsink/Fan and secure.
Follow steps for Disassemble in reverse to put your computer back together.
This should take care of your Overheating Problem unless it’s an Infection causing the computer to shut down, such as the Trojan:DOS/Aluron.J infection does!
Hopefully it’s just the Thermal Paste needing replaced.
jessica
i’m needing to replace all the usb ports. how do I get to those? and replace?
IML Tech
@ jessica,
Take a look at the picture in the step 16.
In the failed USB port located on the left side it’s a part of the motherboard. In this case just forget about it and use two port on the right side.
If you are talking about USB ports on the right side, they are located on a USB board (it’s a separate module, not a part of the motherboard). In this case you’ll have to replace the USB board.
Khanyie
hey guys. i have been through 3 technicians with my USB ports not functioning properly… its a 5742g i5 cpu and i was wondering if its possible to buy a new motherboard and keep my processor without having problems?
MARTIN
Acer 5742g ( CPU I3 380m), it possible to change the GPU? . I5 560m ?.
IML Tech
@ MARTIN,
You cannot change the GPU. It’s soldered to the motherboard.
Adam
Hey,
I’m using a 5742G and have found that having the screen positioned at certain angles results in the colours changing and the image distorting, so I’ve purchased a replacement screen cable, but cannot see a section in your instructions here for replacing the screen cable.
Have I missed it, or is there instructions elsewhere to accomplish this?
Thanks.
IML Tech
@ Adam,
In order to replace the display cable you will have to remove the top cover as it shown in this guide (step 16).
After that you will have to take apart the display panel and remove the screen. Take a look at this guide for the screen removal instructions.
When the top cover and screen removed, you should be able to replace the display cable.
Wangaih
Thanks Man, this was really helpful to me. Again, thanks!
Cristian Diaz
Please i need help, my laptop is a Acer Aspire, and it shutdown alone, and begin to restard alone. I had opened before (6 months ago) , and i clean everything. Does this will keep happening?
IML Tech
@ Cristian Diaz,
Can you hear the cooling fan working? It’s possible the laptop shuts down by itself because the fan failed.
Also, I would test RAM. You can use Memtest86+ for testing. A faulty RAM module also can cause shutdowns.
msk
can i open the top only to access fan????? Urgent!
msk
Also where is heatsink??
IML Tech
@ msk,
In order to access the fan you’ll have to go though all disassembly steps shown in the guide. There is no short cut.
The heat sink located under the motherboard. If you want to replace thermal grease on the CPU, you’ll have to remove the motherboard.
Hayley
Hello,
I’ll be replacing the USB board in the next few days, which parts need disassembling before I can start? Just the keyboard and top cover?
Thanks!
IML Tech
@ Hayley,
In order to replace the USB board you will have to remove the top cover (keyboard/palm rest) assembly.
Basically, you will have to go through steps 1-16. There is no shortcut.
Hayley
Thanks, all fixed. This site is really helpful!
FeliMT
Where do I connect a bluetooth module?
Thanks.
Ash
Where abouts it the Bluetooth Module?
Stephen
Great stuff, exactly what I was searching for. Cooling fan in dire need of a ‘Spring Clean’.
Much appreciated.
matheos
I need one motherboard for acer aspire 5742 good price please
danno
Good details except for pulling the ribbon cables for keyboard, power, speaker and touchpad out. I detached the keyboard, but I think it’s not going back in – the ribbon cable on the keyboard is just ribbon – connector broke off and appears broken as well. That’s okay though, I usually have an external keyboard connected anyway.
Now I’m too afraid to disconnect the other 3 cables as depicted in step 13 because I don’t really understand how they work.
I’m just trying to get to the fan because I’m sure it’s clogged with dust and cat hair. A simple YouTube video is enough to make it overheat and shut off however if I put a fan on my desk point it at the laptop it won’t overheat.
Needless to say it takes up too much space on my desk and is too loud and is just not a good solution.
Bazz
I just put a new hard drive in this lappy and a new clean install of windows 7 for my brother in law and what a nightmare it shuts down , after a quick google this lappy is prone to overheating. Thanks for the tut it’s getting a good clean tomorrow.
Sandeep
I have acer aspire 5742. I followed all the steps to clean the fan. But on assembling again my laptop does not start anymore. Can you plz help out with this problem? Both the lights near the power button does not glow.
Chris
Very clear instructions. My laptop now has a new keyboard fitted and much fluff has been removed from the cooling fan! Thank you!
Lois Schrier
I have a Acer#5742-6674.
It is getting very hot. Am I supposed to clean out the fan from dust?
How do I go about this?
THANKS!
Lois
alisson
Thanks my friends !!!!
Tech-wannabe
Thanks for the guide , I donated you $10. ( my paypal is tied to a different email)
My victim is Acer 5742-7120. I have on alphabet character.
THINGS YOU DID NOT TELL ME
Do not open & close the cover/screen with some of the screws removed. open it & then leave it open. I closed the lid to return to work from the bottom. When I turned it back over & opened it, the hing mounting bosses on one side broke out of the bottom of the case 🙁
I loosened the hinge nut with a 7/32 nut driver, but case is broke. I may attempt a repair with epoxy if I ever have to go back into it.
I had to remove the fan, to remove the power port from the case, and remove the motherboard as the power cable plugs into the underside of the motherboard.
After removing the power cable, I checked it for continuity with my multi-meter, all wires “good”, plugged into power supply, all contacts had correct voltage. I unplugged power, used a large safety pin as a tool & bent the contacts on the motherboard end of the power cable down a little bit. re-assembled, that problem is solved. 🙂
You might want to leave the keyboard for last in the re assemble process, you can fire up the computer & make sure the connections are all working, before snapping the keyboard back in place. ( or, just remember to push the cable retainers back “in” before you call it done, saves taking the keyboard back off when the mouse & keyboard are unresponsive 🙂
Thanks again, & good luck to others … CE
PS .. If your machine is _exactly_ the same as mine, the power cable/toroid assembly is exactly 7 inches long. I took pictures, but don’t know how to upload.
Ravi
Hi Tech-wannabe
I ran into the same problem as you- broke the left hinge mounting boss. Could you please let me know how you resolved it?
Bruce
Hi
I only need to replace the fan – is it necessary to take out the hard drive, optical drive, etc from the other side of the laptop?
many thanks
eric
I have to replace the audio jack on my 5742acer aspire, but I can’t find one to buy anywhere. I have tried Ali Express twice and both times they sent me the wrong part. The add was for a jack for a 5742 with a picture, but what they send is a piece of plastic with no jack at all. I have got 50% refunds. Anyway the problem is finding a place to buy the jack for the motherboard. Help needed.
spotify95
@Bruce – In order to replace the fan, it looks like you’re going to need access to the motherboard. Meaning that, basically put, you’ll have to go through all of the dis-assembly points shown.
This is why I have decided not to look into the overheating problem my laptop has – it is also an Acer Aspire 5742 series. The 5742s are prone to getting very hot. And replacing the heatsink will result in having to get access to the motherboard.
Why are modern laptops so difficult to repair? When I repaired the fan/heatsink/thermal paste on my 8 year old Packard Bell MV46, all that was required was the removal of the back cover. No motherboard access required.
Peter Bramwell
Thanks for a terrific guide stripped it all down and cleaned the fan and reseated the heat sink I was having overheating shutdowns now works as good as ever. I fix my desktop PCs but never a laptop, but the step by step walk through made it straight forward. Thanks again…..brilliant
ioescu
Buna ziua,
Am probleme cu functia F3 activeaza/dezactiveaza wireless.
Cate o data activez inainte de a intra w7, alta data nu sau uneori intra automat in wireless.
Cand functia nu este activa nu gasesc adaptorul in Device manager, iar in activitate o gasesc.
Care este problema si cum o pot remedia.
Va multumesc.
Nonu
Hello,
I have problems with the function F3 activates / deactivates wireless.
Once I activate before entering w7, another time it doesn’t or sometimes it automatically goes into wireless.
When the function is not active I do not find the adapter in Device manager, and in activity I find it.
What is the problem and how can I remedy it.
Thank you.
nonu
IML Tech
Probably you have failing wireless card. I would try replacing it first.