In this guide I explain how to disassemble an HP Pavilion dv7 notebook.
This is my first disassembly guide for HP pavilion dv7 series.
To be precise, I’m taking apart an HP Pavilion dv7t-1000 model.
I found that HP Pavilion dv7 notebooks come in different body types. If your computer doesn’t look like one shown in this guide, check out:
– dv7-4000 series disassembly guide
– dv7-6000 series disassembly guide
– dv7t-3000 disassembly guide (also works for HP dv7-2000).
Before you start, turn off the computer and remove the battery.
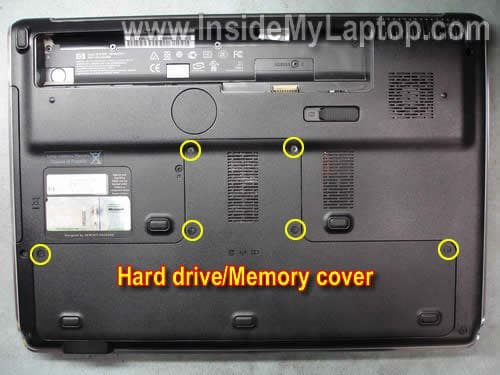
STEP 1.
Remove (loosen) four screws securing the hard drive and memory cover. Remove the cover.
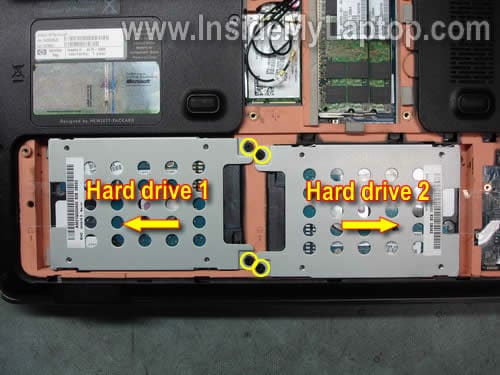
STEP 2.
Remove four screws securing hard drives (two screws per hard drive).
Slide the HDD 1 to the left until it’s disconnected from the motherboard and remove it.
Slide the HDD 2 to the right until it’s disconnected from the motherboard and remove it.
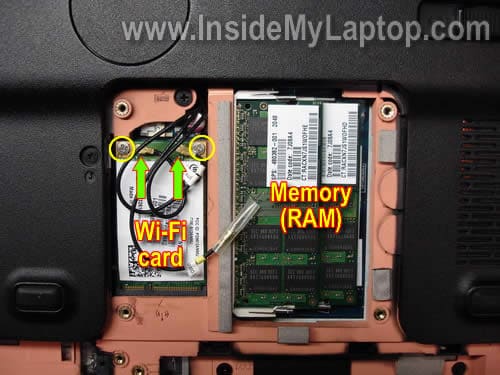
STEP 3.
Remove both memory (RAM) modules.
Disconnect two antenna cables from the wireless card. These laptop has three antenna cables but only two are used.
One of the antenna cables connected to the main contact on the wireless card and the second one is connected to the auxiliary contact. All three antenna cables are labeled.
Remove two screws securing the wireless card. Remove the card.
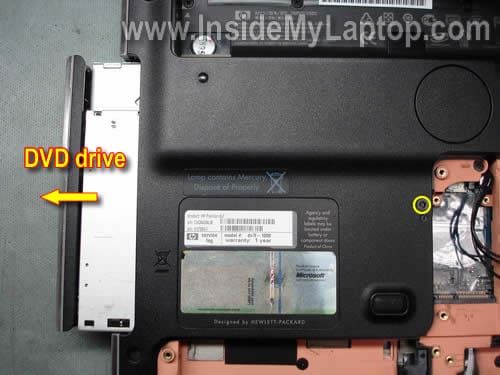
STEP 4.
Remove one screw securing the CD/DVD drive.
Slide the CD/DVD drive to the left to disconnect it from the motherboard.
Remove the CD/DVD drive.
STEP 5.
Remove all marked screws from the bottom case.
The green circled screw secures the keyboard.
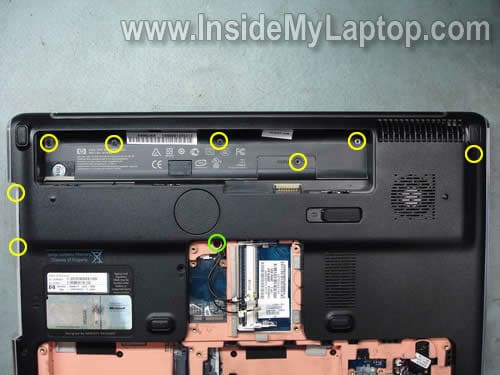
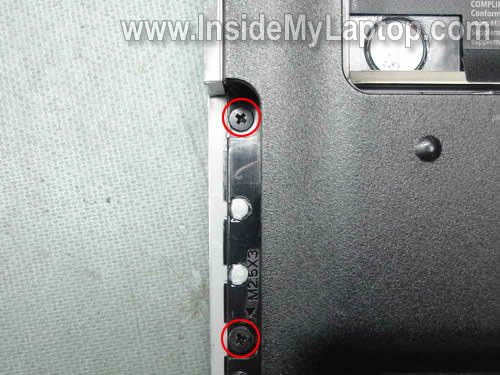
Don’t forget to remove two screws hidden in the CD/DVD drive bay.
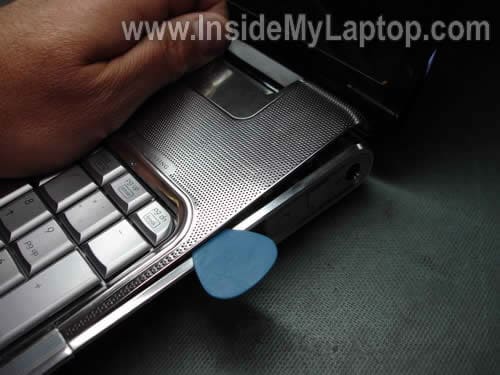
STEP 6.
Start separating the speaker cover from the top cover.
You can use a guitar pick as a case cracker. Insert the guitar pick between the speaker cover and case and slowly move along the side.
STEP 7.
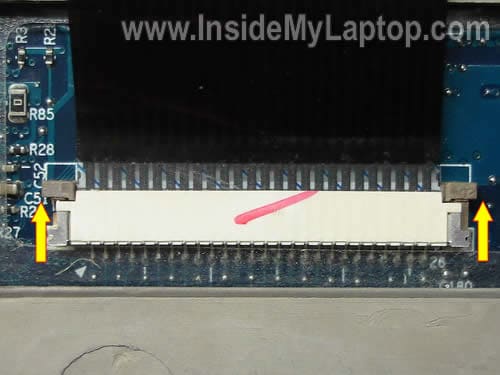
Lift up the speaker cover. Be careful, it’s still connected to the motherboard.
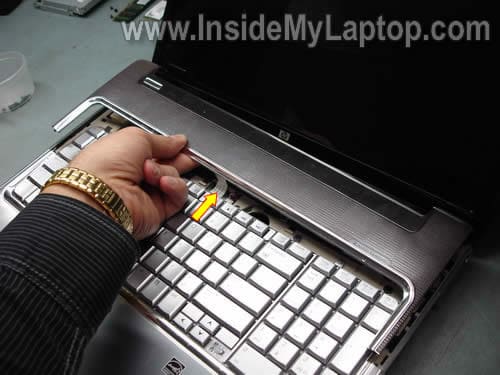
In order to remove the cable, you’ll have to unlock the connector first.
Move the brown clip about 2 millimeters in the direction shown by two arrows. The clip must stay attached to the connector base.
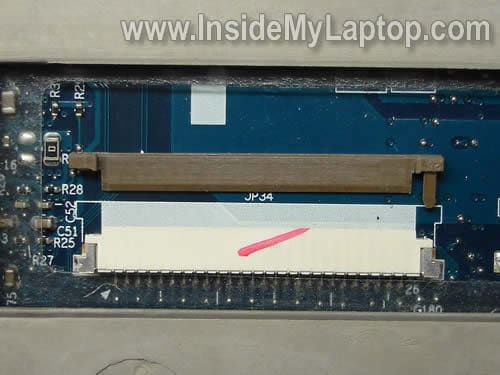
On the picture below the connector is shown in the unlocked position.
STEP 8.
Now you can remove the speaker cover.

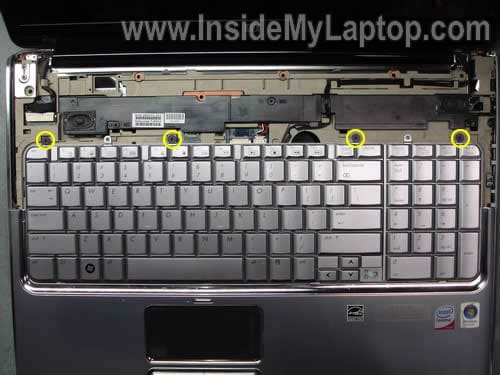
STEP 9.
Remove four screw securing the keyboard.
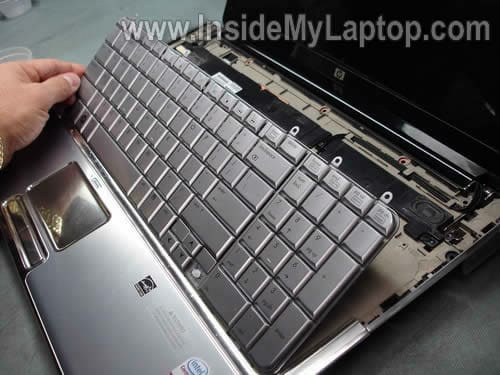
STEP 10.
Lift up the keyboard from the base and access the cable connector underneath.
Replacement keyboards available here: https://ebay.to/2UEtrM9
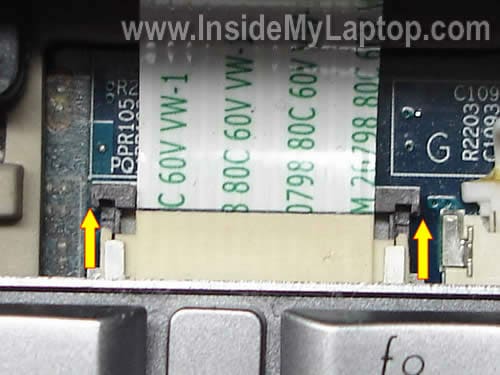
STEP 11.
Carefully unlock the keyboard cable connector.
Move the brown clip about 2 millimeters in the direction shown by two arrows. The brown clip must stay attached to the connector base.
If you damage the connector, the keyboard will not work.
Well… I broke the connector.
As you see, the left pin on the brown clip is missing.
It’s still possible to use this clip to lock the connector.
STEP 12.
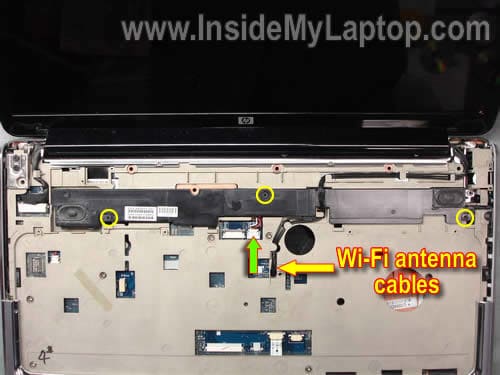
Pull Wi-Fi antenna cables though the opening in the cover.
Remove three screws securing the speaker assembly.
Disconnect the speaker cable (green arrow) from the motherboard.
STEP 13.
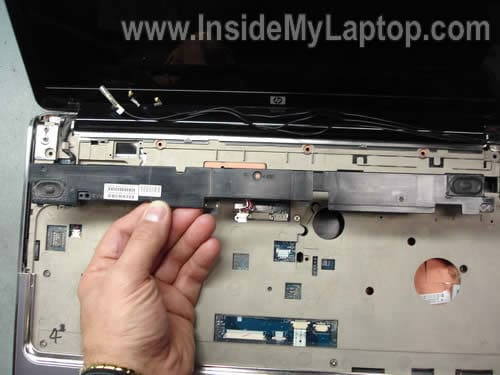
Remove the speaker assembly.
STEP 14.
Disconnect the video cable from the connector on the motherboard.
Remove six screws securing display hinges (three screws per hinge).

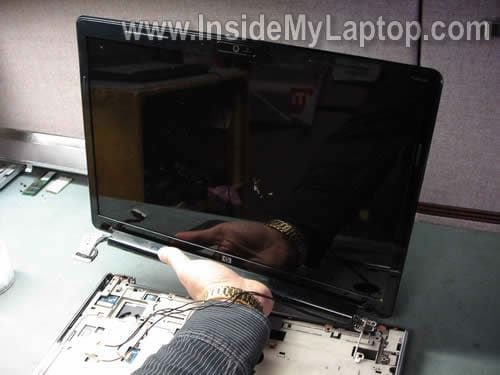
STEP 15.
Separate the display assembly from the notebook base.
In the next post I will explain how to remove the screen.
By the way, it’s not necessary to separate the display panel assemble from the base in order to take it apart.
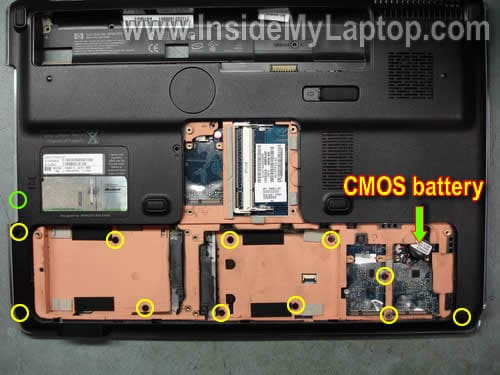
STEP 16.
Disconnect and remove the CMOS battery.
Remove all marked screws from the bottom. The green circled screw is hidden in the CD/DVD drive bay.
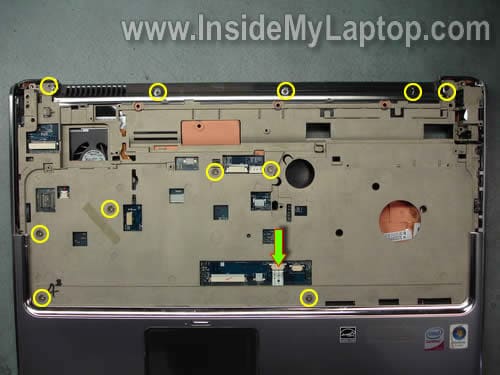
STEP 17.
Remove all screws securing the top cover assembly.
Disconnect the touch pad cable from the motherboard.
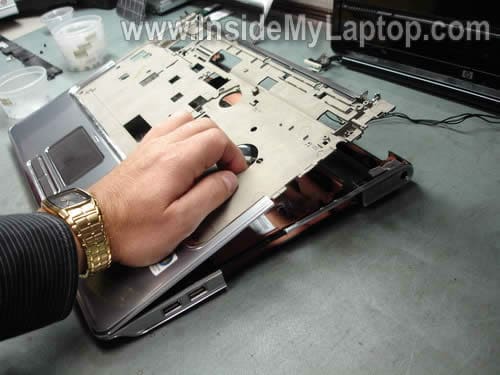
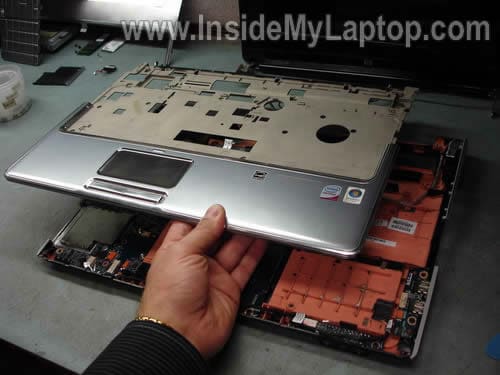
STEP 18.
Start separating the top cover assemble from the notebook base.
You can use same trick with the guitar pick shown in the step 6.
STEP 19.
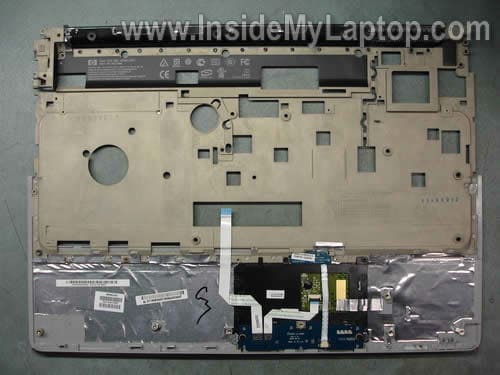
Remove the top cover assembly.
Here’s the back side of the top cover assembly.
STEP 20.
Disconnect the USB and audio board cables from the motherboard (green arrows).
Disconnect the cooling fan cable from the motherboard (yellow arrow).
Remove four screws securing the motherboard.

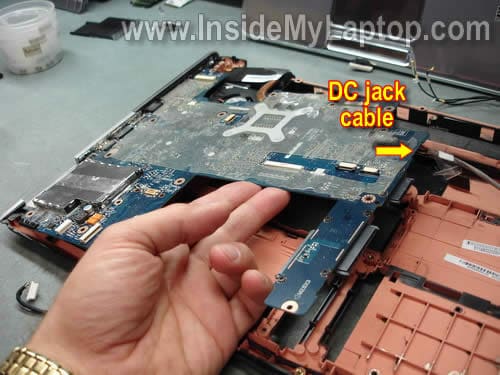
STEP 21.
Lift up the right side of the motherboard as it shown on the picture below and disconnect the DC-IN jack cable.
STEP 22.
Remove the motherboard from the notebook base.

On the opposite side of the motherboard you can access the processor (CPU) when the heat sink is removed.
Replacement motherboards available here: https://ebay.to/2UFviAh
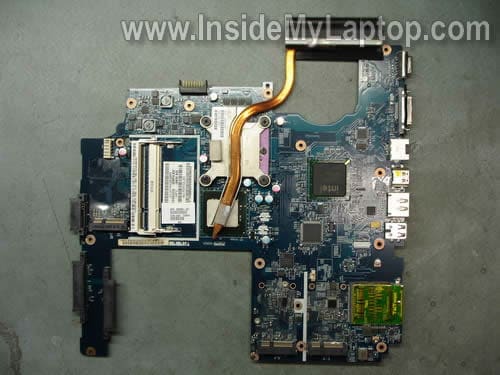
By the way, the best way to find a replacement motherboard is searching by the HP part number. The part number should be located on a sticker in the memory compartment. The HP part number looks like XXXXXX-001.
Here’s the bottom case without motherboard installed.
The USB board, audio board, cooling fan and DC-IN jack are mounted on the base.
The DC jack attached to a harness.
New DC jacks available here: https://ebay.to/2SzrgXC
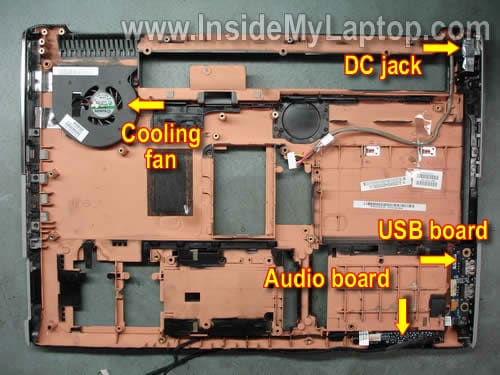
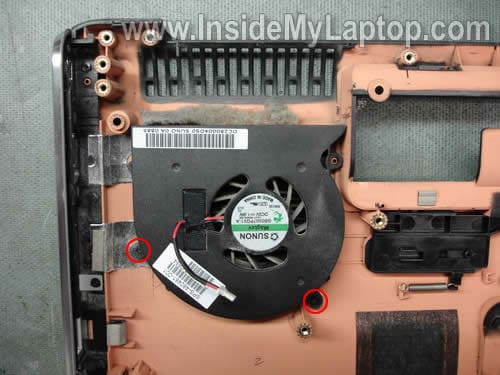
In order to remove the cooling fan, simply remove two screws securing the fan.
As you see, the cooling fan is dusty and has to be cleaned.
Replacement fans available here: https://ebay.to/31LQKFg
UPDATE:
There are only two fans listed in the service manual for HP Pavilion dv7 series. They are listed on the page 27.
488885-001 for notebooks equipped with AMD processor.
480481-001 for notebooks equipped with Intel processors.
Sivakumar.R
The contents are so good. I am trying to learn lapop repair. Your site is very useful. I have tried to donate some money. I do not have credit card .I have only visa debit card. I am from India.
I would like to get emails about the product updates and drawings. Also the necessary tools list to repair laptops. I am working as an technician
Mario
Fantastic! I love this site. Thanks for sharing its knowledge and experience.
Mario – Brasil
M.A.
Hi,
thank you for very helpful instructions.
I need to replace USB board (2 USB sockets), which is at the right side of laptop.
Is there a way to replace it without disassembling top side of the laptop? Can you give me an instruction, please? I’ve got the same laptop model.
Thank you in advance,
IML Tech
Ðœ.Ð.
You cannot do that without removing the top cover assembly as it shown on the step 19.
The USB board is mounted inside the laptop and the only way to get access to this board is removing the top cover.
Rik Finlayson
Thank you for the wonderful Website. I have an HP Pavilion DV9700 laptop. It’s a great laptop except for one flaw. I hate the HALF-SIZE Right Shift key. I wondered if a keyboard from another HP laptop would work in this model. For instance, the HP Pavilion DV7 keyboard seems near the same size and has a full size Right Shift key. I wondered first if the form factor for other keyboards would work, as well as the plug compatibility. Is this possible?
Thanks,
-Rik
IML Tech
Rik Finlayhson,
I really feel your pain! I work a lot with Toshiba laptops and one of them (Satellite P105) have same small Shift key. I just totally hate it. I wouldn’t buy this laptop only because of that.
I don’t know. HP doesn’t provide any information about keyboard compatibility between different models. You’ll have to try.
Keeme
First let me say “I LOVE THIS SITE!”. I have the dv7000z 1000 and the issue was a blinking power light in front. No light at the side connector power. Bought a new power supply and same issue. I sent the board in to one of these ebay “will repair your hp motherboard” places and they said it was a chip and that the video chip was bad as well. 120 bucks later I get the board back, assemble and same blinking light. If I pull the battery no light at all. If battery is in it will actually power up for a few seconds. When I pull the power connector out the light at the connector flickers once. Is there any hope?
Lost
Dana
Your website is incredible!
Anyway, trying to clean I followed the steps to 15 where I stopped and reassembled the laptop. When pressing the START no LED lights. What can be? I can see LED for power and battery at lower left botton of the notebook
Ron
I have a HP Pavillion dv7. It has a remote that is supposed to be in storage on the lower left hand side. One of the kids popped it out and tried to put it in, they forced in in backwards. Now the remote is stuck and sticking 2″ out of the laptop. What is the best way to remove this?
Don’t really want to disassemble the entire laptop to get to this.
Great Site.
Thank You,
Ron
Kat Sharp
I ended up smashing my monitor at a camp I was working at this summer. Thanks to this manual I was able to replace it myself with no issues! 🙂 Unfortunately now that that is fixed another one has promptly sprung its ugly head. My cooling fan is wither dead or stuck. Either way it’s no longer working and it only takes about 15-20 mins for it to overheat to the point I need to shut down.
So I have a few questions:
1. Is there a way I can test to see if it’s officially dead?
2. Short of going through every step and disassembling my baby… is there a shortcut to getting directly to the fan?
Kat's Dad
One thing Kat did while she had the laptop apart replacing the LCD display was to blow compressed air into the fan exaust port to “clean” the dust out of it. Unfortunatly this blew a killer dust bunny back into the fan jamming it. This is what caused the fan to “fail”. These fan motors do not have much torque. Not enough to dislodge said dust bunny. I used a 2.5 horsepower shop vac over the fan intake sealing the hose compleatly over the intake to suck the dust bunny out. Problem solved.
Maren
I replaced my keyboard using your instructions! Worked fabulously. I have one question… I’m stuck with 2 screws…a long one and a short one and don’t know which one goes where. Could you please tell me if the screw securing the CD/DVD drive (pictured in step 4) needs the long screw or the short screw? I’m scared to break something by putting the wrong one in the wrong place…
IML Tech
Maren,
How can I tell? 🙂
If you have two extra screws, just secure the CD/DVD drive with a short one.
angel
IML Tech, I suggest finding the laptop manual on HP’s website. In the manual you will find a section titled “screw listing” which tells you where each screw goes.
IML Tech
angel,
Sure.
Here’s the service manual for HP Pavilion dv7 Entertainment PC.
The screw listing section starts at the page 111.
Charle
Amazing advice, I was checking different ones on fixing three non functioning keys on the keyboard. I had no idea what it took to clean a keyboard until reading this site. I guess I’ll live with the del, left and right arrow keys alone.. Timid comes to mind..but thanks for the education.
Kudos to those that are not..
Vinko
Hey there, what a great site! It has been supper helpful and I love it.
I just have one small issue (and please nobody laugh at me): I am stuck at step 2. Literally stuck. I removed the screws for the all the covers on the underside, but the covers will not come out! They are just stuck! Really stuck! And I do not want to just rip it out! Any body have a problem like this?
IML Tech
Vinko,
Are you talking about hard drives in the step 2. You’ll have to slide the left HDD to the left and the right HDD to the right in order to disconnect them from the motherboard. After that you can lift up and remove hard drives.
Vinko
Did I say step 2! I meant step 1!
What I meant to say was that the cover is stuck. I removed the screws for the covers and I can’t take them off! I have not even gotten to the hard drives. It feels like the covers are glued or screwed onto something else from underneath.
IML Tech
Vinko,
Nope, there is no glue.
If all screws are removed, insert a piece of soft plastic between the hard drive cover and base and try lifting up the cover. You can use something like a guitar pick.
Don’t worry, you will not damage anything.
Vinko
Alright, I will try that. I feel awful that I got stuck at step 1! And last week I completed disassembled my old dv9000 without a problem!
m0l0ch
Great Site! Just the thing i was looking for!
Got a DV7-1093eo and the fan @ upper left corner makes so damn much noise!
Any one who could tell me what to replace exactly before i start ripping the laptop apart!
Much appriciated site!
IML Tech
m0l0ch,
If the fan makes noise, you’ll have to replace the fan shown on the last picture.
m0l0ch
Thx, just figured it out! Stupid me!
so i can use any dv7 cooling fan as replacement or does it have to be model specific?
IML Tech
m0l0ch,
When I search the HP site for a DV7-1093eo manual, it takes me to the same manual as for any other HP Pavilion dv7 series laptop.
There are only two fans listed for this model:
488885-001 for laptops equipped with AMD processor.
480481-001 for laptops equipped with Intel proessors.
Fans are mentioned on the page 27 in the manual.
You’ll have to figure out which processor you have installed, AMD or Intel, and after that search for a new replacement fan by the HP part number I mentioned above.
m0l0ch
Thx for the quick response. i got an intel.
Looking for 480481-001
Thank You Sir!
Daniel
Great website and great advice but one question: I need to fix the power jack and cant seem to figure out where the red/white/black/yellow wires go on the jack since its not color coded. Any help? Thanks!!
Liz
So, apparently HP does not have a replacement fan for the DV-7 AMD processor, the 488885-001 part…this is a silly question, but does anyone know if you can use the Intel fan as a replacement part (obviously there would not be two different parts if they were interchangeable, but I am just hoping it would work)? Or does anyone know how to find this part?
Liz
Forget the question I just asked…We opened up our laptop and found the fan for the Intel processor installed instead of the fan for the AMD…apparently these ARE interchangable…FYI
IML Tech
Liz,
Thank you for this info. I posted your comment in the main post. I guess you are not the only one having trouble finding a new fan for AMD processor.
Kat
Ok…this may be a stupid question: but How can you tell which hard drive is the main C drive? I’m looking into upgrading my D drive and I don’t want to inadvertently pull out the Main one. Is it safe to assume that “Drive 2” is “D:”?
IML Tech
Kat,
Take a look at the step 2.
The left hard drive is the main one (drive c).
The right hard drive is the second one (drive d).
Michael
Thank you so much for this clear and detailed guide for my computer! I had a nice wall of dust blocking the exaust of the heatsink (basically just like yours, but stuck to the heatsink instead of in the fan exaust) and would never have gotten through all of this without your help. Now just to put it all back together……….
Allan Gladsden
Absolutely fabulous job of walking someonel through the entire disassembly process. A few heart-thumping moments when I almost stripped a few screws. One suggestion: what I needed most was the actual model number of my motherboard to order a replacement. I could’ve saved 90 minutes work by LOOKING at the labels under the memory stick. You may want to add an introductory sentence about that. Maybe something like, “If all you need right now is the motherboard number, you can find that under the memory sticks.”
IML Tech
Allan Gladsden,
Thank you for your suggestion. I added it to the post.
Martijn van der Klip
i have an DV7 1199ed myself,
the upgraded version of the shown one,
at step 20 !!, do not forget to remove the subwoofer speaker from the top left side BEFORE you lift the mainbord,
the cable is VERY short and will snap off the jacket easily,
you be warned,..
also, a difference i noted with my laptop, i have a geforce 8600 in it, it is also connected to the flat heatpipe shown on the second last picture, (the open intel chip there is replaced by a nvidia one under a third copper heatplate
also, on the backside of the mainbord,
there will be another counter-bracket for the applied pressure on the gpu (a triangle form fyi)
i opened up my comp and i saw a huge square and triangle, i tought i was opening a playstation lol 😀
anyway, the whole reason i opened up my laptop is to see if i could improve cooling, because the fan was spinning very hard (dust clogs up)
but also due to very bad thermal conductivity of the standard cooling paste,
i removed all the cooling paste from the cpu, and the cooling PAD from the gpu (no paste??? just a thermal sticker..)
i applied OCZ freeze on the cpu, (heat signature showed a near burndown on my cpu silicon)
and did that proportional (they did MASSIVE ammounts of paste on it.. like enough for 5 cpus with ease)
oh on a side note,
the cpu CAN be safely removed from the socket,
so if your CPU dies, or you want an upgrade,
you can just replace it, but dont think a standard socket is gonna work (too much heat for the laptop)
i have reassembled my laptop,
and the fan is just about… silent??
even with heavy burnin of the new coolants, the fan barely spins up,
the temperature of the cpu dropped noticably, as well as the gpu’s temps
IML Tech
Martijn van der Klip,
You can replace thermal paste on the CPU but I wouldn’t recommend removing the cooling pad from the GPU.
Allan Gladsden
If I have a dv7-1129 laptop with the 486542-001 MB. Research indicates the only difference between mine and the 486541-001 MB is the Northbridge chipset and the video chip. Could I replace by bad …542… with the …541… MB?
IML Tech
Allan Gladsden,
I cannot tell if your old processor will work fine with the new chipset. I would use the same motherboard.
Stephen
Great pictures and discription. I opened my laptop because it was not getting power. I think i fixed it the white wire coming of the DC board was bad. I put a new wire in and hooked it back up but i was curious do you know if both the white and red wire are to be carrying 18 volts? The white wire, i am hoping i remember the colors right, the white wire was only 26 or 28 gauge wire, couldn’t read it for sure while the red wire was a 22 gauge wire. I don’t want to chance having the DC board be running to much current and burn out the motherboard.
Zlatko
Hello, My HP Pavilion DV7 lights and fan momentarily come on when you press the power button. The power supply is plugged in. I have removed the battery, HDD, CMOS battery, memory to remove any residual keep alive power. Nothing, still the same. Any clues ie is it a dead battery?
Gonz
Hello, there!
I found this link very useful, but first off I have 2 questions.
1. I have a HP Pavilion dv7-1245dx Entertainment Notebook PC. Consequently, is my laptop considered to be part of the HP dv7 series?
2. Now, if so the reason why I was searching for a link like this (very useful) is the following: I’ve had this guy for a year and have had no issues. It works perfectly, runs like a dream, has never shut down on me, etc…’That said, it has been heating up more than normal the last month or so. My first thought was to eliminate any programs/files I do not use and defrag the computer. That has not helped, as the computer still heats up.
Asking a few friends/experts here and there, most have proposed the possibility that the fans might have collected dust and therefore have to work extra hard to cool off the computer but in doing so actually do the opposite: heat it even more (with all the dust). Do you think that if I opened up the laptop and cleaned the fans of any dust, the problem (e.g.: the heating up) will be solved?
Thanks in advance for your help.
Gonz,
New Jersey
mike
Hi.
I need to clean the fans in the laptop.
do i have to totally disassemble everything in order to get to them or is there a quicker way.
i have tried compressed air already and the fans are still running loud.
Thanks
IML Tech
mike,
Maybe the fan is bad and has to be replaced.
There is no quicker way. The fan is mounted inside the laptop. You’ll have to disassemble the whole thing and remove the motherboard.
Lee Z.
I can also confirm the fan situation with the DV7 model. I had a DV7 AMD model brought to me with a bad fan. Took it apart and it did have 480481-001 model in there. Replaced with the same model and working great.
Ralph
Excellent guide!! I have one addendum for you – in step 20. My DV7 came with a modem, which is screwed down to the board just above the green arrows pointing to the USB and audio connectors. The wire dives down underneath somewhere and goes all the way to the phone socket over by the power connector. I found that I could leave the wire attached to the modem and just remove the two screws that hold it down.
If anyone’s interested, the TV tuner socket turns out to be a second mini-PCI socket. I proved that to my satisfaction by putting a second wifi card in it… I haven’t run the antenna for it yet, though, but even without an antenna it picks up my nearby AP.
Cboyd
Great site and will try this but have one question my kids spill my coffee on it and it still works fine but the screen in the bottom right looks brighter and is stained. My question is can I take the screen apart and clean it with out having to get a new one? Just annoying to see it with the color variations on it.
IML Tech
Cboyd,
It’s not easy to disassemble the LCD screen.
I’m afraid you’ll have to replace the screen.
Ltotal
My PC is not starting up. there is just a blink on the power indicator and media pad only. these happened after i fix the fan.
david
my brother in law has the same laptop his screen would blink and turn off he took it to some guy then the screen wouldn’t turn on at all yesterday he brought it to me i check if all the hard drives and everything is ther and hard drive 2 was missing now
IML Tech
david,
Are you sure the laptop had 2 hard drives before? Some models come with only one hard drive installed.
Allan Ares
My Pavilion DV7-1451nr isnt charging, the power LED on the laptop isnt turning on, we got a new AC adapter for it thinking that was the case, and it wasnt…it isnt the battery, a guy was telling us it could be the solder or something, not too sure what he said, if it were the solder, or something else (i know its the power) I can’t find anyone who would be able to fix it, would that be something i could fix myself, if so how difficult do you think it would be? id rather not take it in to get fixed seeing as it is i dont have the money nor the patience for it lol. anyway, the laptop doesnt turn on, its not getting power, the LED doesnt turn on when i plug it in, could it be the solder, or what else? Just so i have my options open for something worse.
IML Tech
Allan Ares,
Most likely motherboard failure.
Apparently, the guy was talking about solder joints about the DC jack and motherboard, but in this model the jack is not soldered to the motherboard, it’s attached to a power harness.
I think you’ll have to replace the motherboard. How difficult it is? Take a look at the guide.
HELP
“Remove one screw securing the CD/DVD drive.”
i really cant remove this one, is there any way to solve this problem? thx
IML Tech
HELP,
Why? Is it stripped?
HELP
I think so, and this screw is totally different from others, it’s silver and a lot smaller. None of the screwfriver works. What can I do if it really stripped? T-T….
kitty
My screen went black on me yesterday. It still powers up, but nothing beyond that. I was going to send it away to have it fixed. However, I needed to get my information off of the HD. Is there anyway I can get the info off without completely taking it out?
Ive removed the cover (like in your first step) but I was wondering is there a quick way to access the information off of the HD?
Thanks
jay
my hp pavilion dv 7-1275 dx power is not working.i is just blinking. how can fix the poblem?
IML Tech
jay,
There is no universal solution.
1. Make sure the AC adapter outputs correct voltage.
2. Check memory modules. Try removing modules one by one. Try reconnecting memory modules.
Ilmars Dinduns
Beautiful!!!
Thanx soooo very much…
Never before opened a laptop, did this only because i spilled tea with aaaaLOT of sugar inside and one of the HardDrives was acting badly…. but since i got that out decided to fiddle around a bit….
Wonderful Guide…..
Great Job, sir!!!
ERM NET
I found your article very useful. One question, I replace the LCD panel and it works. The problem is that the new LCD has 3 antenna cables and the old one use to have 2. And I can’t connect the cable 1 to connector 1, or cable 2 to connector 2.
Xavier
Thank you alot.
My friend spilled some beer on his computer, nothing was wonking even with a new hard drive.
But i followed this tutorial, cleaned everyting inside the laptop, removed the keyboard (it was not working properly) and plugged an usb keyboard and now everything is working again.
Hp told me they needed 600$ to repair it. Cost me 100$ mostly because of the new hard drive.
Again, thanks 🙂
joseph
Nice guide. by the way, is there any shorter(easier) process to expose the fan just for the purpose of cleaning it? thanks mucho
gby
thak you very much, i wish to clean the fan, it is getting hot very fast last week, and make some noise too
technical service here takes at least 4 days to do
David Sexton
The dv7-2200 is quite a bit different from this model. I’ve torn many down and thank you for covering the high points of this series.
badowner
thank you so much for this tutorial. i’m getting one blink error and this will really help. anyone know wher i can get a AMD Turion X2 RM-70 Dual-Core Mobile Processor? the error codes say CPU failure
danny
I took my laptop apart following these instructions only up to step 16, then put it back together again. Now, it freezes up on me after using it for about 20 minutes, then won’t reboot. I opened it again just to make sure I put everything back in place and everything seemed to be okay. After doing this it worked again for about 20 minutes, then freezes again and won’t boot up. Any idea on what I could have done wrong? If anyone can help I’d really appreciate it. Thanks!!!
IML Tech
danny,
Not sure what’s wrong but your description sounds like heat related failure.
Take a look at the cooling fan. Does it spin at all when you turn on the laptop?
Felipe
Thanks so much for this excellent guide! My laptop was getting very hot and the fans would run at high speed a lot, so I opened it up and cleaned the airways. Now it’s back to normal. Couldnt’ve done it without this guide, thanks!
rinus
Hi there,
It was a matter of time before someone took the risk and opened the thing. I’ve spend days to try unmounting the keyboard; know i understand why. Thnx a lot!
Adrien
Thanks thanks thanks and many thanks !
This topic was very useful for me to access the “Dead” power connector.
Adrien (from France 🙂 )
Shervon
Whilst I was trying to clean out my hp pavilion laptop I think I may have accidentally killed the fan. I could not get past Step 9 as only the laptop keyboard screw was stuck and I could not remove the laptop. So I tried used a can of compressed air on the vent on the back of the laptop near the monitor.
I got some dust out but I spotted a huge dust bunny that is resistant to the can of compressed air. I re-assembled the laptop but now it won’t come on. The led lights come on but I get a black screen. Worse thing is the fan starts but after a few seconds stops leading me to believe that the fan’s motor may have been destroyed by the compressed air.
I am getting 2 schools of though on the compressed air fiasco. Many friends tell me that this is impossible as compressed air will not damage the fan but 1 or 2 friends’ say that it can happen and refer me to the The Laptop Repair Workbook which says that some fans may be damaged if you spin them beyond their operating RPM’s.
Can anyone tell me why the Laptop will not come on. Key factors are powers up lights come on, hard drive spins but fan stops working after a few seconds and the entire time I get a black screen..
ErinG
Hi there,
Just used your helpful guide to clean and examine a rattling fan. In reassembling my laptop, I followed the directions backwwards until everything was back in place. I turned it on, got LED lights, but the screen remained black. I thought that I had left something unhooked or unplugged, so I took it apart once more to make sure everything was connected and in place. After second reassemble, my laptop won’t turn on at all.
What could be causing this? Everything (but the fan) was working previous to me taking it apart.
Thanks again for your helpful guide and a hopefully helpful response!
David
Hi IML Tech, great tutorial, I love the detail. I have a slight problem however. I’ve got a dv7-1428ca I believe. The fan is running fine except its running at full speed all the time and the laptop gets really hot and shuts down sometimes. I feel air going IN AND OUT of the intake. Is it dust blocking the way out? Do I need to take it apart? Side note : I dropped it a while back and broke the LCD screen inside and managed to replace it but the fan hasn’t been working like it should since.
IML Tech
David,
Yes, most likely dust blocking normal air flow and laptop overheats.
No, it’s not necessary to to disassemble the laptop.
Find an air compressor (you can use shop-vac in air blowing mode) or use compressed air and blow air inside the air intake on the bottom of the laptop until all dust is gone. After that switch direction and blow air into the grill on the side. Switch air direction a few times until the cooling module is clean. This will fix your problem.
David
Hey it’s me again haha I bought a air duster and did what you said, I saw a cloud of dust come out of the intake as I was shooting into the exhaust. But as I turned on the laptop again it was very quiet and went black screen after about 5 minutes. Now, when I try to turn it on, it just goes black screen and shuts off once in a while.
IML Tech
David,
Turn off the laptop, unplug AC adapter and remove battery. Wait for a few minutes, plug the AC adapter and try turning it on.
If it doesn’t help, try reseating memory modules.
godbluff
You sir, are a great human being. To take time out of your, what I will assume is a very busy and active life, and posting this great guide. I attempted to take apart my dv7 yesterday prior to seeing this and I recognized that I needed the info you present. I see there are others on here having the same heating problems. The cleanout of the fan area seems to improve the situation. I recommend to clean it every day for at least a week. I was having shut off and on for a while and it gradually got worse. After a thorough cleaning the problem is getting less frequent.
Again, it is unselfish people like you who make this world more tolerable. Thank you, from fellow dv7 users.
gabriela
thank you very much
i did the procedure because my laptop was getting hot very fast , over 75 grades.
after clean the fan with a brush (it had only some dust and one hair), it is worst the problem with temperature. im thinking about call technical support. I think fan is not working now.
your procedure is ok, i think i mde something wrong or fan was near to die.
thank you very much
dv7 owner
thank you so much for this tutorial. i’m getting one blink error and this will really help. anyone know wher i can get a AMD Turion X2 RM-70 Dual-Core Mobile Processor? the error codes say CPU failure
got the same error did the cpu fix it?
IML Tech
dv7 owner,
You’ll find lots of them on eBay. They are not expensive.
Kat
Hey there~
I used this page before to replace my busted monitor. But alas there is a completely different problem now… now there isn’t any charge going to the battery. I have a new adapter and at least it still works even though it HAS to be plugged in. I plan to get the battery tested in the next day or so, just to rule that possibility out, however HP tech says it’s a hardware malfunction! Unfortunately I’ve had this laptop for just about 2 years now so it’s out of warranty. They claim it’s the motherboard, however, I find my DC jack extremely loose and can easily jostle my adapter when it’s plugged in. So my hunch….the DC jack needs to be replaced.
Now I already ordered the part itself so my actual question is this; Can I at skip any of these steps to avoid anything else going wrong when i access the DC jack cable??? That small cable is ALL I need to get to.
IML Tech
Kat,
Nope, you’ll have to follow the guide step by step. You can skip removing memory modules, but that’s it.
I would test the laptop with another battery before taking it apart. It’s possible your battery is bad.
Jon
Hi, nice article by the way. I’m having a problem with the RAM on my dv7, I bought it with 4GB installed but it quit starting a short while ago. I look at the way the status light were blinking and thought one of the RAM modules may have gone bad. Turns out the computer will work normally when either one of the RAM modules is installed by itself, but it won’t when both are installed together. Do you have any idea what may cause this to happen? Thanks.
chris F
Doh! I wish I would found this walk through last week.
I messed up step 7-8. The connector came loose from the motherboard.
What can I do?
scotty
I have a dv7-2185dx model HP pavilion dv7. My fan is noisy, I’ve cleaned all the vents with an air compressor and installed BIOS update but it’s really noisy. The HP chat support people told me I needed part #516331-001 fan/heat sink assembly for a UMA graphics subsystems memory system.
They also told me I could buy the part from them for a mere $50-$70. I’m looking online for something more reasonable but I’m having trouble locating the part using that number which is all I have. Help! I’m seeing fans for notebooks available for a fraction of that cost but I can’t be sure they’ll work in my machine. Any online suppliers you’d suggest? And how to get a comparable part
Brian Kim
Anybody figure out how to fix the black screen problem? I’m having the same problem – the LEDs light up and my fan spins for a little bit, but I get nothing on the screen.
IML Tech
Brian Kim,
1. Remove the AC adapter, battery and wait for a few minutes. Now plug the AC adapter and try turning it on again.
2. If you still have no video, try removing memory modules one by one. One of the modules could be bad. When you remove the bad module, the laptop should start properly with the remaining good module.
Behemothxp
I recently had to replace my DCD drve on my dv7-1150eg and cleaned the cooling fans, now I have two smaller problems, maybe you can help?
First: the new drive doesn’t have the outer casing of the HP drive and I can’t get the exterior off the old drive, is there a trick to it that I don’t see?
Second the bass is now a lot softer and more metallic, I took it apart once more to check if I had disconnected any cables but it’s still more metallic and not as loud as before :/
Thank you for your amazing guide.
IML Tech
Behemothxp,
Are you asking about the face plate?
There are a few plastic latches securing the face place to the drive.
Open up your old drive with a straightened paper clip and take a closer look at the front plate. There should be three plastic latches. Two on either side and one in the middle. Carefully release them with a small screwdriver, remove the face plate and install it on the new drive.
Not sure about this one. Maybe you accidentally damaged the speakers?
adrian
Hi, Im trying to replace the inverter on this same laptop. Any idea on how to get to it?
IML Tech
adrian,
Sure. I explained it in a different guide for this laptop. Here it is:
How to take apart HP Pavilion dv7 display assembly.
Follow steps 1-6.
Andy Webster
Greetings !
I was getting frequent shutdowns without warning. Installed core temp and saw CPUs running at 105’C
After using a vacuum cleaner to suck the dust out of the vents, my DV7 would not start up and gave a 4 blink error. I removed and replaced the RAM then got a 3 blink error.
If not for your excellent guide, I would never have got the top cover off.
It was surprising just how much force it needed, and I wouldn’t have been game to do it without your tips.
Your info stopped me from doing any more damage and with your help i was able to dismantle completely, clean the fan and heat sink of a big pile of dust and fluff (even after the vacuum there was still heaps).
Got it back together and working, core temp says I am now cruising at 50’C idle to 80’C busy.
Thanks heaps, you are a LEGEND!
Person
thanks!! you have no idea how much this helped me. Dust had been feasting on my laptop for a while now. finally got it cleaned.
IML Tech
Person,
I have the idea. That’s why I’m creating all these manuals. 🙂
Behemothxp
@IML Tech
Thanks I found the latches (I tried other latches and a few screws.. thought too difficult) and now I have a new DVD drive which fits into my laptops design ^^ and yeah I guess I did, thanks a lot =)
Josh Dubois
Dear IML Tech,
I followed this guide to take apart my laptop up until step 19 and just cleaned it out from there, I put the laptop back together without a problem. My computer works perfectly fine, WiFi works, touch pad works, touch buttons work, ect.
I just have one problem, my fan doesnt work and I never unplugged it, therefore when i have my computer on for around 30 minutes it will shutdown due to it over heating. Should I take it apart past Step 19 and see if it disconnected? Or do you have any solution to this problem? Thanks for the great guide and hopefully you know how to fix my problem.
IML Tech
Josh Dubois,
How exactly you cleaned the fan?
Did you remove anything at all from the inside of the laptop?
Hanneke Boonstra
Beste IML Tech,
Misschien kunt u mij helpen. Ik heb de hp dv7110ed laptop. Het probleem is dat ik geen stroom krijg. De adaptor en de batterij zijn goed. Wat kan het probleem zijn?
IML Tech
Hanneke Boonstra,
Are you sure the AC adapter is good? Did you test it with a voltmeter?
If it’s not adapter or battery, most likely it’s either bad DC jack harness or motherboard failure.
You can try replacing the DC jack harness. If it doesn’t help, most likely this is bad motherboard. In this case the laptop not worth fixing. A new motherboard is very expensive.
Vladimir
Thanks a lot for such a detailed manual. You saved me a lot of time figuring out how to disassemble my laptop.
I have done writing about how I fixed a power problem with my laptop on my blog where I put a link to this nice manual. If you are interested, I can send a link to you. I just don’t know if you permit links in the comments, and I didn’t find any other contact information.
Thanks again.
Max
Thanks so much, it took me some time to take it apart and put it back together. However i fixed the overheating problem. I used Antec formula 5 and ran a 3D mark test, the comp didnt even heat up. Just shows how shitty the stalk is. Thanks again! Btw first time taking a laptop apart
DV7 Owner
I had to replace Fan on my dv7-1135nr and this guide was awesome…by the way both processors use the same FAN the difference is the heatsink i spent hours searching for the part # for my AMD processor and finally found out that they are both the same so dont be affraid to order 480481-001 it will fit both as long as your heatsink still usable….good luck.
dv7 owner
Ok i finally have my new fan in laptop but after putting everything back together i got nothing but a BLANK SCREEN and LED’s blinking 4 times after an hour of online searching found out it was one of the RAM modules not fully pushed in place….i hope it helps someone.
IML Tech
If a laptop doesn’t start after reassembly and gives you beep error, memory modules would be first thing to check.
I’m glad you were able to figure it out.
chris
Recently my computer has stopped charging. I dont know what happened i shut it down and tried to power it back up and it kept constantly shutting down. Ive tried using a friends power cord to see if that was the problem and its not giving my computer any juice. same with my own power cord. It was running off of the battery for awhile before it totally died so i know its not a heat problem. Any advice you can give me to fixing this problem
bitsweep
A thousand “Thank You”‘s for this guide! An unexpected drop killed the SATA on my HP, and a depot repair was ridiculously expensive ( they wanted $300 to look at the thing since it was out-of-warranty, a local shop wanted $200 + costs for motherboard). So thanks to your guide and a refurb motherboard from eBay, and my HP is up and running like a champ.
Without these instructions, I would surely have had one hell of a time getting the thing apart properly, and probably would have borked up something in the process.
It was also a great opportunity to clean the “fuzz bunnies” out of my fan and heat-pipe.
Kudos,
-S
SunDown
I took apart my laptop a few days ago because the fan was stuck and needed to be cleaned. After putting the laptop back together the screen keeps shutting off on me if i move the screen forward even an 1/8 of an inch. I can move the screen back no problem but when i move it forward it shuts off on me. I have to close it all the way, wait for the laptop to go in sleep mode then open again. Its getting really annoying.
Any idea how to fix that problem? Do i need to take the LCD screen apart to reset something? or is there a sensor that detects when the screen is open or close? Thanks for any help you can give me.
My other problem after taking apart the laptop is that now it locks up on my from time to time, screen seem to lock up first then the whole system follows. The screen does one of those old nintendo dirty game screens then locks up. It wasnt doing that before being taken apart. I have scan for virus with new updates and nothing is found. I wonder if its related to the screen issue.
Thanks,
D.
Pippoe
IML Tech,
i have a DV7, and when i turn it on, all the lights go on, and my fan too. But screen stays black/blanc… no logo no bios no nothing…
After 5 secs it turns off.
Any ideas? motherboard or video i think ..? 🙁 … R.I.P.?
Tikler
Thank you so much for this guide. I searched and found several but none as good as this one. With the still pictures of every stage I was able to put every screw in its original place. One thing I suggest to those out there about to tear your lap top apart is to draw a diagram on a piece of paper of the stage you are at and tape each screw to it’s position as there are several different size screw within the lap top. Doing that insured me a perfect repair and cleaning and no problems after it was all put back together.
Thanks again IML Tech!!
Tikler
mike
mike Says:
June 8th, 2010 at 6:19 am
Hi.
I need to clean the fans in the laptop.
do i have to totally disassemble everything in order to get to them or is there a quicker way.
i have tried compressed air already and the fans are still running loud.
Thanks
Harris
Hello there!Can i ask you something?Recently when i was played my favourite game on pavilion dv7,i was got little angry because in the game when i pushed the numbers of keyboard to spawn the selected item(in game), the game was late to corrispond so i pushed a little rough the keys 1 3 6 7 in my anger,this can cause something to my motherboard?or something else below,it have passed a day and laptop works fine.How i will understand in future if something goes wrong with hardware?
thnx,Harris
Pavel
I am so relieved to have found your site, as the HP user manual seems to be less than helpful when it comes to cracking these units open.
I currently use a DV7-1014CA, apart from some battery issues and debris crawling under the bezel screen, I recently ran into this huge pain.
You see, today I decided to clean the vents out with some compressed air. I blew the air into all the vents, and made sure the battery was out, along with the power being off.
Now at first it seemed to have done wonders, the fan was no longer super loud… Until I realized the fan had decided to stop turning on all together!
This was not an issue until AFTER I had used the compressed air on my laptop.
Unfortunately I’m out of warranty so there’s little to nothing that HP will do (not that they had offered to do much anyways) apart from pay their outlandish prices for minor fixes. They suggested I update the BIOS, which did nothing, even after I told them this was a fresh incident.
Do you by any chance have any idea what would have caused this or how to fix it?
I think if nothing else I will have to open her up and do a little frankenstein work, but I’m hoping something less drastic can fix this.
Many thanks in advance
IML Tech
Pavel,
Was it making loud grinding noise before the cleaning? It’s possible the fan was dying and cleaning it with compressed air killed it completely.
Try blowing air into the fan again. Does it spin at all? Maybe the heatsink was clogged so badly that dust bunnies blocked the fan after you used compressed air.
It’s hard to tell what is going on without looking at the laptop.
Blaine
I accidentally disconnected the speaker panel cable from the mother board, i reconnected it but now my laptop won’t start or come on at all.. please help!
thankyou
~Qwa
IML Tech
Blaine,
I don’t think this is related to the speaker cable.
Did you remove memory modules while taking apart the laptop? Make sure both memory modules connected properly, try reseating them.
Pavel
“Was it making loud grinding noise before the cleaning? It’s possible the fan was dying and cleaning it with compressed air killed it completely.
Try blowing air into the fan again. Does it spin at all? Maybe the heatsink was clogged so badly that dust bunnies blocked the fan after you used compressed air.
It’s hard to tell what is going on without looking at the laptop.”
Thanks for the reply.
There was no grinding at all prior to the cleaning, it seemed to be working fine despite the loud noise during intense use. I tried blowing more air in, and even using a vacuum to try to clear it but nothing seems to fix it. Guess I’ll be ordering a replacement fan and opening it up after all.
RObert Q
Good Evening, one of my neighborgs broke her HP dv7 and it wouldnt start at all, i checked the power and the battery is good and even tried the method to hold the power button down and release the charge and nothing.
if I replace the mother board with a new one, will it work perfectly with the windows it has already? and if not, is there a way to save the info from that Hard Drive?
IML Tech
RObert Q,
Most likely yes if your replace the motherboard with an identical one which has same HP part number.
Here’s how you can access and backup data from the hard drive. https://www.insidemylaptop.com/recover-files-from-broken-laptop/
Will Bean
My power jack is fine – I get full power – about 19 volts at the mother board. battery does not charge and my HP dv7 will not run when plugged in with or without battery. If I put a charged battery in my laptop the computer runs perfectly. whats wrong?? I can’t figure this out.
Will
Jeff Z.
Jeff Z.
I have the same problem that Will Bean Has. The laptop works great as long as I charge the battery. On my other hp laptop. When I plug in the power supply,
the power indicator doesn’t show any charging.
can this be the charging system on the motherbroad?????
Scott C
Thanks so very much for this tutorial. It allowed me to clean out a thick coat of dust from the CPU fan area. It took me 1.75 hours to complete, start-to-finsh; however, now our laptop doesn’t overheat quickly. Thanks, again!
Paul Feldstein
Thanks for your very helpful instructions. Your diagrams really helped as did your warnings about taking care with the connectors. The fan on my dv7 died and I was able to remove and replace it at minimal cost in one evening.
Roope
is there any way to do the fan cleaning without disabling the entire laptop? what if i drill some holes between fan intake and exhaust holes and use wacuum to suck the dust bunnies out? (sorry for my bad english)
IML Tech
Roope,
Buy a can of compressed air and blow into the fan grill on the bottom. After that, blow air into the grill on the side. Switch direction a few times until all dust is gone.
This should take care of your problem.
Do not drill holes. There is a good chance to damage the fan or fan wires. I’ve seen it happening before.
You can suck the dust bunnies out without drilling anything. But your vacuum creates lots of static and can spark the motherboard (some people mentioned that in comments).
Instead of sucking out the dust, turn your vacuum into the blowing mode (if there is such an option) and blow air into the grill. Again, some people mentioned that static from the vacuum can kill the motherboard but I think blowing air (from the vacuum) is relatively save.
Matt
My laptop fan stopped working, so I found this blog post through Google.
I have just disassembled my laptop, fixed the fan and reassembled the laptop… Fan is spinning again and everything works perfect.
I sent a €5 donation (If I had more money I would have sent you some more)….
Anyway, thank you! 🙂
IML Tech
Matt,
Thank you for your kind donation.
Jeff
I had to replace the base of my DV7-1285DX. Your instructions were perfect!!!!! Thanks so much!!!
dalguard
Does anyone know where the lid position sensor is on the dv7? I am trying to fix my sisters DV7. The back-light will not light. I have tested the Back-light itself it works fine when connected to another notebook. So its not that. I have put in a new inverted and video cable. So it must be that the computer doesn’t know the lid is open. How the hell does this notebook know when lid is open?
IML Tech
dalguard,
I believe this laptop has a magnetic lid close switch. There is a small magnet inside the display panel. When you close the display, the magnet activates switch located somewhere inside the laptop base.
You can open up the display assembly and look for a small magnet. Then you close the display and find out where the switch is located.
Alternatively, you can try using a small magnetic screwdriver. Very slowly move it along the side of the display panel and where it sticks to the bezel, that’s where the magnet located.
It’s possible that your problem has nothing to do with the lid close switch. This could be motherboard related failure.
By the way, can you get image on the external monitor when the video cable disconnected from the motherboard. If not, it’s a good chance of the motherboard failure.
Gazza
Great guide! Too bad I found it AFTER i dissassembled everything to replace the fan on my DV7-1094eo.
Anyhow, i replaced the fan because the old one was sounding really bad, like a bearing was broken. BUT the new fan sounds worse! I may have got a broken one but is there anyone who have replaced the fan and can tell me what i’ve done wrong 😉
IML Tech
Gazzan,
If the new fan works but sounds bad, most likely the new fan was defective.
TonyL
This really helped when I was trying to get to the keyboard to clean under it. Previous owner had spilled something sticky that got into and under keyboard but not onto the motherboard thank goodness. But I have a couple of questions. I am wondering what the slots next to the 2nd hard drive slot are for. I see them in your shots where you take out the CMOS battery. Also, I have a line (sometimes 3) in one spot on the screen going from top to bottom… varying in color. The only constant is that if I squeeze the display casing at the top of the line(s) and they go away. The case does seem to have a little space at that point. Are there connectors along the screen edges that are supposed to catch and one may be broke???
IML Tech
TonyL,
Probably in some expensive dv7 models these slots are used for TV tuner module and maybe WWAN card.
Sounds like LCD screen failure. You cannot fix these lines, just use the screen as is. There is a chance you’ll get more lines overtime.
TonyL
Almost forgot…. model number is DV7-1129wm
jay
I have a dv7-1020us and it quit charging. I bought a new plug and installed it and now the lightning bolt on the front flashes like its charging but when I turn it on it starts up for a second and shuts back down, Also if I take the battery out of the unit it will not turn on at all. Could it be my motherboard be possibly bad?
Ricky Ray
I am having trouble getting the keyboard loose. It seems to be stuck near the second screw mount and down about an inch down.
Wayne
I have a HP Pavilion dv7-3065dx notebook, PRODUCT #: VM238UAR#ABA. My CPU fan is making all sorts of noise (I tried cleaning it) and I am trying to identify the correct CPU fan to replace it with, but coming up with different part numbers. I want to purchase the fan before taking the laptop apart. Can anyone help with identifying the correct part # for the fan? Thanks!
IML Tech
Wayne,
Here’s a quote from the HP service manual:
I believe they are talking about video memory.
Discrete – dedicated video memory.
UMA – shared video memory.
You’ll have to figure out what time of video memory you have in our laptop and use the right fan.
Bill
I have a 480365-001 DV7 system that has me completely stumped. Original complaint was a broken charging port where it had been kicked out and a little cosmetic damage occurred on the bezel near the ports. Ordered a port and installed, with no success. The PC had minimal battery strength and would come up successfully so I knew the cpu/mb and all were good. Thinking I had a bad part I ordered a second (oem). I also thought maybe it was a bad battery, the PC never would post without a battery, not sure if one is needed to boot at all.
Well, the second part arrived and I installed, double checking everything. No charge again! Port tested fine on volt meter, so the only logical fault I could think of was a bad charging circuit on the MB. I ordered a new MB and waited for its arrival. I installe dit and completely checked everything for seating and hook ups. Guess what, still no switch from DC to AC when the charger is hooked up. I tried three different chargers with all the same result.
My question is, could it be possible the second MB is bad? It is a manufacturer refurbished and arrived in a sealed anti static bag. The chances of it having identical issues as the previous are crazy but I guess not out of the realm of impossible. Is this condition a huge issue for HP and DV7 models? Is there any other way the charging circuit could be affected?
Peter
Hi,
Thank you for this site it has helped me safely strip my dv7.
I had 2 problems, one was overheating and switching off, ambient room temp around 40 degrees celcius. The other was the system shutting down whenever the laptop was moved. I decided to order a new motherboard which I received today and replaced the old one. In the process of doing this I have used Arctic silver thermal paste which may help the overheating problem. The fan and vents were only slightly dusty. After replacing motherboard the computer still shut down when moved. Out with the torch ang magnifying glass and eventually found that the flat 4 wire cable from the power switch (on the back of the speaker panel) was cutting into the chassis when any pressure was applied under or on top of the outside case. Rerouted the cable 1cm to the right and all is now fine. Appears to be a manufacturing fault. Now I have a spare motherboard in case something else goes wrong. haha.
Many thanks
Chris
Great site here. I have my dv7 apart on the table only due to this site.
I have a 1034ca which does the following whether its plugged in or just on battery:
I press and release the power button, the light on the power button turns on for about 3 seconds and then shuts off. Nothing else turns on including the fan, hds or screen.
Any ideas? My vent and fan were very dirty, so I am kind of leaning towards that something overheated.
Thanks, Chris
IML Tech
Chris,
1. Test the AC adapter. Make sure it outputs correct voltage.
2. Try removing memory modules one by one.
3. If AC adapter is fine and the laptop fails same way with each module, most likely this is motherboard failure.
Chris
Chris here again.
Well all cleaned up and back together but same problem. The plastic on the underside of the motherboard was warped and it looked like from heat.
I checked the power bar and I’m getting 19.4V so I don’t think it is that.
Its unfortunate I don’t have spare laptop parts around to see exactly what is ruined.
This whole HP line has very poor cooling so if you’re reading this and have owned your computer for over a year I highly suggest following these steps and cleaning your fan and heatsink fins.
This computer used to overheat and lockup often. A hard reboot would fix it. I think it killed itself when I closed the screen the other day (used to put it asleep) and when I came back the fan was spinning hard. So beware that your computer is actually sleeping when you close the lid and not cooking itself. I am guessing the designed lock up and shutoff feature didn’t work while I had the lid closed.
Well HP goes to my ‘poorly designed’ list (I should have figured that out from my HP printer) and I think I’ll try a new Sandy Bridge Asus when they come out. From what I have read, those guys do a proper job of cooling.
Chris
Yoshi
Ok so firstly in my experience problems with overheating are not limited to one brand of laptop. Advances in IML Technology such as in the Intel i7 namely CPU automatic speed adjustment (Turbo Boost Technology), the smaller core size, quad cores and lower voltages all help to reduce heat. At the end of the day this won’t make a difference once we start running more demanding applications or games, the laptop will still get hot. In my experience often the temperatures allowed before the laptop will power off or shutdown are often more than ideal. Here’s the best ways to avoid heat:
1) Install an app like speedfan. It’s free and easy to use. After installing I reccomend placing a shorcut in the Startup folder of your programs under the start menu so that if runs automatically each boot. Go into the options and select the hottest component to be the one displayed in your tastbar, moving the mouse over the temperature/speedfan icon on the taskbar will show you all the temps. Anything over 60 degrees C is more than ideal.
2) Limited space inside a laptop means the dust builds up and can make a massive change to temperature. I’ve seen a Toshiba laptop report over 90 degrees C before cleaning out the dust from the heat sink fins that was so thick it was like a blanket! After cleaning it was around temps were 40-60degrees C. If using your laptop everyday I’d strongly recommend using either a can of compressed air or a gun fitted on an air compressor to blow in the vents where the heat sink fins are. If using a can don’t keep holding the trigger till you get cold liquid. Also if you haven’t cleaned your laptop in a very long time and compressed air doesn’t clean it out then consider a complete disassembly and use an old toothbrush to clean it out.
3) Using an external laptop cooling fan(pad) in my experience can quite easily reduce temps by around 10degrees C. I just use a cheap fold out design sold on ebay. These work even on my 17.3″ laptop. The good thing about this fold out design (or an X shape) over a square shaped plastic pad that covers the whole area under your laptop is that there is more room for airflow. On those really hot days I just aim the fan in my room so it blows air at me and under the laptop. I then watch the temps on speedfan drop 🙂
4) Changing to a better thermal compound on your CPU and GPU can reduce temps but also void your warranty. I recommend waiting till out of warranty before thinking of doing it. Also make sure you’ve done all the steps above because they usually should make a much bigger difference in temps! If you’re going to do this then it’s a fair bit of work disassembling the whole laptop to do it so don’t settle for any old generic thermal greese. These days even premium products like Arctic Silver III have been superseded. You don’t need to pay big bucks either. From all the reviews I’ve read lately GELID GC-EXTREME Thermal Paste seems like it is getting the best scores and probably one of the best thermal compounds on the market. It goes for around 8bux US plus shipping from ebay. Lastly there is a bit of technique to applying thermal paste that can make a big difference. The best way to think of it is this… The best heat transfer is metal to metal or the CPU or GPU core contacting the heatsink. The thermal compound is to fill in and remove any tiny air spaces between the CPU or GPU core and the heatsink. The thermal compound has better heat transfer than air spaces but the aluminium or copper heatsink has better heat transfer than the thermal compound. Put a very thin layer of thermal compound on the CPU or GPU core then place on the heatsink and lightly push down on it while moving it around in a circle or back and forwards to get rid of air and excess thermal compound and get as best metal to metal contact as possible.
Bri M
Thank you so much for having this up and with all of the helpful pictures. Thank you so much for the assistance with me changing my laptop fan.
Tom
Will I need thermal paste if I want to replace the cooling fan? And what should I use to remove the old paste (lens cleaning wipes ok? they seem to be just soaked in rubbing alcohol). What do I attach the wrist strap to? Will it help if I use rubber gloves instead?
Also, I suspect I have a graphics accelerator card in place of hard drive 2, does that change anything significantly?
JoshB
kind of off topic but i may find an answer faster with this, can anyone please tell me if its possible to upgrade my cpu on my pavilion dv7-1245x? just in case my cpu is AMD Turion(tm) X2 Dual-core mobile rm-72 2.10 GHz. im not really good with computers and any help would be appreciated! thanks 😀
Mike
Hi all! I need some help really badly. I originally set out to disassemble my DV7 to clean my speakers and cpu fan. I got all the way up to step 9 and failed at it miserably! The keyboard screws were on really tight. I kept trying to unscrew the farthest one on the left until it got stripped. I then decided that maybe if I just continue the steps the keyboard screws will loosen up. I then completed steps 12-16 and part of 17. I returned to the keyboard screws and found nothing had changed. I then reassembled the laptop and was happy enough with the fact that I was able to clean the speakers. Does anyone know of a good way to remove stuck screws that’s safe for my laptop? Can anyone recall if you have to unscrew the keyboard screws in a clockwise or counterclockwise fashion? Please help – the sounds my fan is making are driving me nuts!
IML Tech
Mike,
You can use a screw extractor.
Alex
Hello, i’m having trouble with quick touch buttons, sound is clicking and other things…and i want to disable this quick touch panel, i read in another thread that i need to release an ribbon cable, but i don’t know what ribbon. I need just power button to work, if you know how to do that please help me.
p.s: sorry for my English
IML Tech
Alex,
What if you uninstall “HP Quick Launch Buttons” software. Does it resolve your problem?
Ian
I have a question I want to replace the fan on my DV7-1448dx which is the AMD fan 488885-001, however, I cannot find the fan anywhere!!!! Where can I find this fan so that I can replace the old one?
Thanks,
Ian
IML Tech
Ian,
I searched for the AMD fan and couldn’t find it either.
I don’t know why HP listed two different fans for AMD and Intel CPUs. I think that you can try using “Intel fan” in your laptop. Just a guess.
Alex
No, software is not the solution…i tried but fail, i know because i put “ubuntu” on it and the same problem, searched on internet and all with hp dv7 that have same problem said that it is hardware problem, it’s caused by static…and solve this problem only shut down, remove battery and hold down power button for 30 seconds. I don’t want every time to do this…i want just to disable touch panel, but i don’t know how, what ribbon cable to release.
P.s: thank you for your reply.
Kirmes
Hi,
i has the problem with the HP Pavillon dv7-1125eg that i cant repair my OS Vista (Factory Default) and the Battery Error 601 appears.
Now i got the Solution for HP Battery Problem and install own OS. In Windows Setup format or delete the Ramdisk Partition (in this are all drivers and the Notebook-install-lock for own OS.
If you done this:
Download all Drivers for your Notebook and install Windows (or your OS choose). Then for the Battery Error just download the HP Battery Check tool and start it after installing all drivers. Then use the Battery Check Tool to calibrate the Battery.
Some error occurs at Bootup : Replace Hard Disk 0001 (just ignore it, because this error occurs with formatted and deleted ramdisk 🙂
Best Regards
thibout
Hi, thanks for this tutorial. it’s a shame i don’t read it before opening my hp pavilion dv7.
My problem is the following : power led don’t light on when I connect the power cable to my mother board. power supply is ok as i already test it with another pc and with a battery ok, the laptop don’t power on also !
I am afraid the motherboard is dead but is there a way to quickly test it ? if I remove everything connected to the motherboard (ddr2, hard drive, screen) except power cable should the power led light on ??
Best regards and thanks for your help !
IML Tech
thibout,
Unfortunately, there is no quick way to test the motherboard.
This could be the DC jack harness failure. If you have a voltmeter, you can test if motherboard gets any power thought the DC jack harness. Test voltage on terminals where the DC jack harness plugged into the motherboard. If there is no voltage, replace the harness.
If the motherboard gets power but will not turn on or light up power LED, most likely there is a problem with the motherboard.
Most likely removing these parts will not make any difference.
thibout
Hi thanks for your quick answer. Then power led don’t turn on after a check of DDR memory or a screen test ?
Do you know if a DC jack failure could explain the fact that with a full battery, the laptop don’t turn on ?
Best regards,
Armand
thibout
I checked red and black nets where the DC jack harness plugged into the motherboard and I have 19.4 V. So I guess power jack is ok.
But motherboard still dont power on and power led also don’t power on. Nothing is connected to the motherboard. Even the screen.
Do you know if screen could be needed to test motherboard and power on led ? As I first disassemble my laptop to repair a screen problem maybe is there something wrong in the screen and not in the motherboard ?
regards,
Armand
Alex
Hello again,
I need to know if it is a possibility to disable completely the quick touch panel, and only power button to work. Please help me to resolve this problem.
Thanks.
Cam
I replaced the power jack in the computer and put it back together and the display won’t come on. The computer starts and everything else seems fine, but the display doesn’t… well, display. The light on the back is glowing, so it seems that it’s getting power, but on the front: only darkness. I double checked where the display plugs into the motherboard and it seems okay.
Does anyone have any ideas? Thanks :-S
Markus
Wow what a great step by step guide with such clear pictures for instructions. Thank you so much, it saved me possible damage. Even though myself i used to work in a repair centre, every laptop is different.
Unfortunatelly when i removed the cover one little plastic piece about 2×2.5 cm which looks like a frame fel out that i could not figure out where it belongs. Any idea?
I think it came from the righthand upper corner, but seems not a too important piece as everything else is hold very good together.
Thanks and God bless
ian
Im having issues with my laptop not booting. Read somewhere else that disconnecting the HD may help reset. Followed your guide and dixlsconnected the hardrive, the wireless unit. Both rams and removed the battery from the right of the HD. Let it sit for a 1/2 hour like that and put everything back together… only problem now is my display doesn’t work at all. Laptop turns on and caps lock light flashes ( never did that before) but the screen doesn’t work at all. Any thoughts?
Mike
Is there some easy way of internally dusting a DV7 without disassembly, for regular maintenance? Tearing the thing apart every four weeks is just asking for trouble.
Jukka
Thanks a bunch! Got the fan cleaned and oiled.
James
Can you give me the part number of the DC Jack in? I need to replace mine.
IML Tech
James,
I just replaced a damaged dv7 jack about 5 minutes ago. 🙂
For some reason HP doesn’t have part number for the DC jack harness in the service manual. I believe this jack is a part of the cable kit: 480474-001
If you need just the DC jack harness, you can buy it on eBay. A new DC jack harness for dv7 notebook cost about $10.
James
Thanks! @IML Tech 😀
Daniel
i got a question i can seem to find the answer for. i looked everywhere!!! ok recently i fell on the ground and i had to turn my comouter to the side to get on it to call for help. well i think i knocked something loose in a cable or card. i think the brown looks like real skinny blue bars. its not all over the place just where certain colors should be. when i move my laptop in certain directions the lines dissapear. then when i set it down again they reappear. now these lines are not all over the place just where the color brown should be.
so if i watching a video eveything brown is blue. what shouold i do???
IML Tech
Daniel,
First of all, I would test laptop with an external monitor. Take a look at the external image. Does it have same problem?
If the external monitor works fine and the problem appears only on the internal screen, it meas the video card works properly and there is something wrong inside the display panel.
It could be one of the following:
1. Bad connection between the video cable and motherboard. You can try reseating the video cable connector on the motherboard.
2. Damaged video cable. Try moving the video cable while the laptop is turned on. If moving the cable affects image on the screen and brown changes to blue or vice versa, it’s possible the video cable is bad. Try replacing the cable.
3. LCD screen failure. It’s very likely that when you dropped the laptop, you damaged the LCD screen. If that’s the case, you’ll have to replace the screen.
I cannot tell what exactly is wrong without testing the laptop.
daniel
thx i will try iy, oh i didnt drop the top i just fell and had to turn it on its side to see it and use it lol i knocked my back out agin 🙁
Roope
Hello again, the air duster did not work for me so iam taking my laptop apart just one little guestion. I have the model with the subfoofer (on the round pach between battery and wifi card) is there any things that i sould know about, wires or securing clips or something.
thanks
(sorry my english)
Kristin
I just replaced the fan–thanks so much for your tutorial. It’s quiet and working like a charm now. My problem is that my wifi card seems to not be working now that everything is put back together. I switched the antenea back and forth trying to make sure I had them in the right place, but either way, it doesn’t work. Any ideas?
IML Tech
Kristin,
I assume the antenna cables connected to the wireless card, right?
Take a look at the device manager. Can you see your wireless card registered in there? Maybe the wireless card just disabled?
There shouldn’t be a problem if you assembled the laptop correctly.
David Mercado
When I disassembled the unit a square black rubber piece came out.
3/4″ x 1/2″ flat on one side, hollow inside, 3/4 of it has a wall around edge where it is hollow.
Where does this go back in?
Could not find a picture of it on here.
Nor find it on any of the pictures here.
Thanks for a great uninstall tutorial.
Willie Stovall
I have an HP DV7 in shop. In trouble shooting I found that when the lower memory slot is filled, the unit will not post. I’ve tried different memory cards in the two slots but the lower one causes the failure all the time. The unit power on, light and CPU fan run, but will not complete post. I have also tried two other motherboards with the same symptoms. Do you know of any recalls, on this model, or corrective actions to cure this?
Thanks Willie (AKA: Laptop Willie)
Roope
Thank you IML Tech, i finally had some time to clean out the fan and heatsink area. In my computer i had some tecnical difficulties, i have the dv7 1060eo model with subfoofer and addictional cooling for the more minor prosessors at the motherbord, so it was intresting. Some things that i noticed was that the connector from motherbord to subfoofer was VERY short like only one centimeter. Also the closest screw to the air exhaust was really tight (Step 17). But thanks for the awesome quide you are the best.
Roman
Laptop turns on, fan turns on and in 3 seconds off and caps lock and num lock light flashes, but the screen doesn’t work at all. Any thoughts?
Mike
Thanks for the step-by-step. I’ve still got a problem with my fan though. I have a DV7-1135nr. The fan was making some awful noise, so I ordered a new fan from the HP website (480481-001). Followed the guide and had no problem replacing it, cleaned out the dust bunnies and reassembled it. When I started up the laptop though, the new fan doesn’t turn on, and after about 15 minutes will shut itself down. Took the laptop apart again to insure that everything was put back together correctly, and no change. I’ve got the AMD processor, and from what I’m reading, the fan they sent me was for the Intel processor. Is this what the problem is or is there something that I’m missing?
Joe
Considering the fact that the number one reason most people(or at least my number 1 reason) would want to open up their laptop is to clean the fan, it would be nice if you started by showing that first because I’m pretty sure one doesn’t take 22 steps to get to it. My dv7-1232nr is driving me nuts by idling at 90 degree C, it has shutdown on me twice. Is there an easier way to clean the fan? I heard compressed air works but I want to see it with my eyes that the fins are indeed clean.
IML Tech
Joe,
You’ll be surprised, but it takes all 22 steps to get to the cooling fan. The fan mounted under the motherboard.
Try cleaning the fan without disassembly. Buy a can of compressed air and spray it into the fan grill on the bottom.
andrew delaine
hi thanks for the site its great, i just bought a brand new motherboard because the caps and numb lock were flasing four times which means graphics controller not functional. but once i put the new one in it just did the same thing again, any ideas weather its a motherboard problem or something else? i did manage to get it working for a short time by taking one of the RAM sticks out of the primary slot but now that isnt even working. any info would be great cheers Andrew
IML Tech
andrew delaine,
If you are getting exactly same problem with a new motherboard, it must be something else.
Do you have two memory module installed in the laptop? Have you tired removing them one by one and testing the laptop with each memory module separately (in each memory slot)?
It’s possible one of the memory modules is failing.
riders of storm
thanks a ton for the step by step procedures,my lap top core temp was hitting 92 C,opened up and found the heat sink was blocked with thick layer of dust,double the amount from the last picture,cleaned it, now the temp is steady at 65C in high performance mode.Thank you once again for the step by step procedures
andrew delaine
yes it is a 2 memory module. i did get it working briefly by doing exactly that but as soon as i closed the laptop and went to turn it on again it went back to the flashes. i did mage to get it in safe mode but once again it just went to the flashes and now what ever i try it just doesnt work. is it possible its the RAM memory sticks themselves??
IML Tech
andrew delaine,
It’s unlikely that both memory modules failed at the same time but I guess possible.
The only way to find out if the problem is memory related is testing the laptop with known good memory modules.
John
Maybe you could help, since you know your way around this computer. Mine won’t boot at all. It turns on and the fan runs for a couple of seconds, then it just goes quiet and stops. No video of any kind (even tried an external monitor). The error code lights next to the caps lock and above the number pad just blink once every 2 seconds but they never stop. When I read about the error codes, they are supposed to blink between 1 and 6 times then stop. So, using your procedure to take the computer apart (which is fantastic!), I just replaced the mother board. I get the exact same result as the old motherboard. I have tried booting with and w/o the batter, the RAM, the HDD, and nothing provides any different response. Any ideas?
IML Tech
John,
Have you tried removing memory modules one by one? It’s possible one of the memory modules is bad.
John
When trying to remove the keyboard, mine didn’t come off as easily as shown here. They had a piece if 2-sided tape, about 2 inches long, sticking the keyboard to the frame, underneath the Q, A and Z keys. I had to hold the right side of the keyboard up, and stick a long, thin screwdriver in there to pry it apart without permanently bending the keyboard.
John
Tech,
Yes, I have tried using only one DIMM. I have tied each DIMM in each slot. Every possibly combination. I don’t have a recovery disk, but I tried booting off the Win Vista disk, and the first time I tried, the monitor came on, let me select a user and got me to my normal desktop screen, but just sat there thinking and never allowed me to do anything else. The wireless made a connection, so I checked to see if my other computer could see it from the network, but it couldn’t. So I had to hard boot the laptop again, and it has not even shown me a display of any kind since then. It will spin the CD drive with the Vista OS disk in it, and act almost as if it’s trying to do something, but nothing ever happens. I’m wondering if it might be that the processor is dead. Is there a way to test it? It’s the AMD turion 2.
IML Tech
John,
Your description sounds like a problem with the motherboard, not the processor.
By the way, take a look at the comment 78 in this post (his name is also John).
https://www.insidemylaptop.com/take-apart-hp-pavilion-dv5-laptop/
Hi had a very similar failure with hi HP Pavilion dv5 laptop and he tried replacing the processor. It didn’t help.
tim
have an hp pavilian entertainment pc laptop all the sudden heard a sizzle the nothing no power or led lights had to replace the battery before all this would not charge worked for a day then this happened any ideas or a cheap place to get it fixed i live in Topeka,Ks
John
Tech,
I appreciate the feedback. However, I have replaced the motherboard with a new one, and get the exact same situation. Yes, this is the same situation that the John on the dv5 board seems to have. I really need to get to the data from this computer, so I have a cable to connect the HDD, whcih I have removed, to my other computer. However, I’m finding that it is not plug & play as advertised. I can see the HDD and it gets assigned a letter, but I can’t access anything. All I see is a folder called HP Recovery, which I can’t access. I need to try to take ownership of it.
Beyond that, I’d like to not throw away a $700 2.5 year old computer. Since I’ve replace the MoBo, and I get the same problem, what else could it be? The only things that don’t get replaced when you replace the MoBo are the HDD and processor (and the wireless card).
I had even tried to boot from a WinVista OS disk (original MS disk) and it didn’t work. I may take the HDD to BestBuy or somewhere and have them pull the files off it if they can.
Any chance you could ask the other John if he fixed his issue and if so, how?
IML Tech
John,
It’s really hard to give a good advice without testing the laptop.
When I have to troubleshoot a laptop with a weird problem, I take it apart down to the barebone system: motherboard, CPU and memory and test with an external monitor.
It’s possible that in your case this is CPU related failure but again, this is just a guess.
You are looking at the wrong partition. Usually HP laptops have two partitions: main partition and recover partition.
Take a look at the hard drive in the Disk Management utility. Can you see main partition in there?
Remove the wireless card. Disconnect laptop display cable from the motherboard. Leave only motherboard, CPU and memory. Test it with an external monitor. If the problem still there, I guess this could be CPU failure.
Not really. You can leave your question in the comment area. Maybe he will get back and answer it.
ARTY
think!!!!thinks lot my trouble is solve!!!!!grassiass!!!!!!
Pete
Oh God, it takes 22 steps to get to my fan? My laptop is working okay, it just been heating up a bit quickly lately, and I’d like to properly clean the fan, but while your guide is perfectly clear I’m just terrified that I’ll be unable to put it back together again properly.
Did no one at HP seriously consider that making the fan accessible would be a bright thing?
Tim
My DC in had a pin that broke and because of this page, you saved me well over $160!!! Thank you so much for taking the time to put this information out there for us. Very helpful and very much appreciated!!! I hope Karma will find its way to you!!!
Jeremy
Thank you very much for this guide. Was able to disassemble my laptop and finally clean out my fan as this has been causing my computer to overheat a ton. I’m embarrassed by how much dust was actually taken out, lol. But it’s all clean now and I was able to put everything back together and she runs great now.
Thanks again!
Radek
I got as far as trying to remove the speaker cover but I couldn’t manage it. I cracked out both sides with a pick like you said but the middle section seemed really strongly attached to the motherboard and it felt like it would break if I had used more force. Is it possible I have a different dv7 model to yours?
yabbi
Thanks very much for this info. I took it apart, then put it back together, now the keyboard doesn’t work. There are 2 micro ribbon cables that need to go back, but I don’t know which way is ‘up’ with them, because I took it apart on Thursday, and put it back together on Sunday. Any hint on that would be helpful, as I start to unscrew the whole damn thing again. Thanks.
Stephen
Thank you soo much, i have had such a hard time finding a dv7 dissasembly explination, just wondering, is it necessary to take off the monitor and such just to access the fan and the heat sink? Having a serious overheating problem, reaches 110 degrees in little or no time. i’m thinking i need to clean the fan, and maybe reapply the thermal paste to the heat sink?
Mel Baker
Greetings,
I noticed a few users had trouble after re-assembly with no boot/panel lights flash once. This has happened to me also on a pavilion dv7 1448dx. I also see you had no response to these comments. Could it be that this is a DOA situation? Any comment at all about this, it is a friends machine so I am responsible for any damage.
Thanks
IML Tech
Mel Baker,
There is no way I can tell what is wrong because I don’t know if the laptop assembled correctly.
In most cases the laptop will not start because or incorrect reassembly. Something simple like loose memory module or incorrectly connected cable.
Doug
I have a 17″ HP Pavilion Entertaiment Laptop Model # DV7-3079WM. It is 17 months old and runs windows 7.
Over the past few months the unit has been getting ‘hotter’ than normal and it sounded as though the fans were working overtime. I eventually got a cooling stand to use it on but last week the laptop started turning itself off. Now it reliably turns off within 5 to 45 minutes of being turned on and cannot be turned back on again for awhile. [It clicks on, buttons light up and then it clicks off immediately.]
I managed to run virus, spyware and malware checks and nothing turns up so I’m confident this is not the problem. I installed Core Temp and watched it prior to the laptop turning off and did not notice elevated temperature readings so I’m not sure it is overheating… especially since it turns off sometimes after only 5 minutes.
I’ve decided to open up my laptop using your guide but ask if you could PLEASE tell me what parts you would look at to remedy this issue! THANKS!
IML Tech
Doug,
Sounds like overheating problem. To be honest, I don’t think that cooling stands help a lot.
Laptop overheats when the cooling fan and heat sink get clogged with dust. You can see the cooling module in the step 20. It’s located in the upper left corner.
Before you disassembled the laptop try cleaning it with compressed air.
Blow compressed air into the fan grill on the bottom of the laptop and after that blow it into the grill on the side. Do it until the dust stop coming out.
Test the laptop after that. It should take care of the problem.
Alexch
Hello , i used this guide to clean the cooling system of my laptop.But i am having a hard time , identifying which is the correct side of the fan cable molex.It fits in both sides.I am surprised that none had that problem.
Melinda
Thanks so much for this page, I used it to replace the motherboard in my parents HP DV7 1132nr. It’s working like a charm now!
Scyen
Hey, im having a problem with the pin set on my power button cover( or you can see the part im talking about on step 8) the problem im having is that the pins cracked while i opened the pannel. im having a hard time trying to reconnect them but now i just want to figure out what pin(s) are the ones to turn the computer on. if you have any information on what pins that i need to repair the power button or if you know someone who could help me that would be great. thank you.
Syen
( or you can see the part im talking about on step 8 ) *
ruscully
John
have you tried putting the drive in a usb inclosure? then run a chkdsk or sfc /scannow?
sounds as if the os partition is corrupt. Let me know if you have fixed it.
Brandon
Amazing! Tools required: Small phillips screw driver, credit card (worked better than guitar pick for me, was only hard part prying off speaker covering.) Patience.
Replaced a DC power jack I bought off ebay through your link for $6.95. Worked perfectly. Took me about 2 1/2 hours though! Had this guide up, and small pieces of paper marked with the number of each step, placed all the screws / pieces from each step on the associated piece of paper.
At the end, worked backwards.
Again, thank you, probable saved me $150.00.
9ja
hi. . . my hp dv7 wont boot. . . wen i turn on the power all i hear is the fan n the cdrom working. .. . the screen remains black, the harddisk dont work. . . but wen i removed the hdd and tested in noda laptop, it worked fine . . . wat could be the problem? n wat can i do???
IML Tech
@ 9ja,
Possible memory failure. Maybe one of the modules failed.
Try removing memory modules one by one and test the laptop with only one module installed.
Joe
This page has been of major help. My MB went out and through this page I was able to easily and properly disassemble that laptop and send my MB to this repair guy on Ebay and I got it fixed for $50 saving me hundreds. Thanks a lot for that. I feel obligated to donate a little something if you take donations. I have 1232nr which slightly different from this one. When I was putting it back together, there is this wire running from the Ethernet port beside where the charger plugs in and I can’t figure out where it plugs in on the MB. I took about 15mins looking for it and decided to give and not have the ability to use the ethernet port(I’ve owned the laptop for 2 yrs and I’ve only had to use it once). The problem is that now I don’t have the ethernet capability or wireless network capability. I expected the not to have ethernet capability but not wireless. Could the wireless not working be connected to the ethernet cable no being plugged in? And where does the wire running from the ethernet port connect to?
zackary
Wow thanks for this guide! i spilled soda on my laptop and i was able to take it apart and clean it and now it works just fine aside from a few sticky keys. without this guide i wouldn’t have been able to do it
Scot
ENORMOUSLY helpful!!! THANK YOU.. My wife’s laptop runs like a charm now.. and is now the quietest computer in the house… Great directions. Really, I cannot say enough. Thanks again. Scot
Lori
I had my laptop Hp pavilion DV7-126FWM updated from vista to win 7.. I am not sure that all things are working as they should and when i play my world of warcraft game the screen will freeze go black then show my desktop then the game will show back up, however it does not do this all the time.. I have been told could be my motherboard, video card,, not enough memory so i am a little at my wits end…. also i have my laptop up on a laptop holder with built in fan but when playing my game the whole left side of comp gets extremly hot.. can u possibly help me out here
Ed
Hello, any tips on getting the Screen apart? I have lots of Dust in mine for some reason..
Kind Regards
Ed
ilker ö.
Superb!
I will donate soon…
Ovahp
Got a lot of questions/issues… I have the 1245dx model running vista 64-bit. All my issues started after a month or so of gaming. The first issue was a error that caused the game to be non-responsive, (display driver atikmdag stopped responding and has recovered.) after reading I tried updating that driver and several ideas I found, but nothing worked and still got that error. Then my comp started freezing or giving error when playing any video. now my computer is completely unresponsive. After a startup I got a blue screen stating “A problem has been detected and windows has been shut down to prevent damage to you computer.” Since then when I turn on the computer the media bar lights will lit up and act like it’s starting but the screen stays black and comp then powers back off. If anyone has suggestions of what my prob might be and if it’s fixable/worth fixing. I’m not that computer technical so be very detailed please. Thanks for your help.
Lisa Gruver
We just want to replace the bottom of the case where it was dropped, a small part where the power cord is connected is cracked, I hate looking at it. Do we have remove all the parts to replace that bottom casing?
Thanks!!
ajdonal
I have a dv7 4069wm notebook that currently will not physically open due to the left hinge prying open the bottom of the laptop. (HP Support of course cant do anything because 1) my warranty is expired by 8 days and 2) even if it wasnt theyd declare it customer damaged.) how do i know how the hinge is 100% broken, and how do i fix it. =[ im not THIS pc savvy and am nervous to break something. very good guide btw
bo
Excellent directions. My laptop was overheating and shutting off after just a few minutes. I was able to remove quite a bit of dust rom the fan assembly and now the laptop is running MUCH coller. Thank You!
Dagonsin
Well, this is awesome !. THX!
Kat H
I have a HP pavilion dv7 1038ca, My fan just suddenly started to make an almost engine revving kind of sound. I thought it was dirty so I went out and bought some air blew it through the fan underneath as well as in the back but it is still making that noise. I just replaced the hard drive & ram in December so I’m really hoping its not that again. I don’t want to take it apart because it looks complicated and I would really hate to break something else. Do you think it might just be the fan? Please any info would be much appreciated!
Thank You.
Kat
Serika
Cant thank you enought, you saved my weekend. My fan had jammed beacause of the dust and with the help from this i got it working again. All my work is on this laptop, i would have been lost without your instructions. So thank you a million!
Remik
Thanks, you saved me a lot of time with this step by step instructions. Fan is now cleaned and working fine 🙂
Amy
Hi- I am putting my laptop back together and don’t know where to hook up one wire! It is located just above the hard drive bay- it’s black and looks sort of twisted. The end is also black…if you can help that would be great. Fabulous directions by the way!
Amy
By the way, “Ovahp” I also have a dv7-1245dx and I also experience the num and cap locks blinking 4 times with a black screen. Just took it apart to see if that helps….otherwise I am out a lot of money- just happened after the warranty. Go figure.
Angel
Amy, That black cable is to the built in dialup modem, on the top side of the motherboard, the side thats shown in step 20, right above and to the right of the usb connectors theres a piece with 2 screws that you can remove, if you remove it you’ll see on the underside is a place for that black cable and a piece that connects straight down onto the mobo. just plug that in and screw it back down and you’re done. i have a similar model as you i guess, so i was confused why this guide made no mention of that black cable
Aaron
THANK YOU IT WORKS PERFECT!!!
ktan
Would this method work for an HP dv7t laptop? Specifically an HP dv7t-2000? I’m not sure how similar the dv7 series is to the dv7t series.
Thank you!
Cman
I had to get a new fan for this laptop, and followed the instructions all the way. :0 Only issue I have upon putting it back together is that the following keys on the number pad do not work:
123789+ and Enter
Meanwhile, 0.456/*- and Num Lock work. Why? 🙁
Josh T
Had to replace my fan…this helped a ton. Thanks
Phing Chov
Awesome guide! Very much appreciated…
Ed Podowski
This is great! Thank you for posting it. I have someone’s HP DV7 Laptop and they had cut out the AC/DC Power Jack off of the wiring harness. I purchased a replacement DC jack, but I could not find one with the wiring harness attached, so the replacement needs to be soldered to the original wiring harness. I found a manual online at http://h10032.www1.hp.com/ctg/Manual/c01918142.pdf but it does not show which wires should be attached to which terminal leads. Do you know of any resource which could tell me this? Thank you!
Kevin
This post came in handy when I cleaned my dv7-1135nr, thanks! Sadly however, I fear I waited too long to clean laptop and it suffered permanent damage. I’ll run sc2 for an hour or so and my laptop’s screen will flicker then goes black. I reboot and it tells me my hard drive has multiple errors on it. It goes to fix the errors, than it locks up about 75% through hd repair. I reboot again. The screen than flickers and goes black before the windows logo appears. I leave my laptop go for a few days and load up a freshly reformatted hd. I update windows and begin playing with temps going past 170 F. After a few hours my laptop freezes up and has memory errors once again. I believe its my CPU. Do you agree? If so what are some good upgrade options for a new CPU that this mother board can handle? I hear it is not possible to upgrade the GPU, is that true?
Sotos
i made a mistake at step 7-8!! i pulled hard and i think that detached all of it…now i cant open my laptop probably because it cannot connect very well!!I didnt put glue yet to fix it as i try to see if this is the problem that my computer cant open!!!I tryed only to press it to connect with my finger but i press the power button and it doesnt work at all!!!Any suggestions to fix it or open my laptop?thanks
Michael
Wow! Hard to believe you must completely disassemble the computer to this extent just to clean the dust ball off the cooling fan and heat sink. I did it though, and only had two screws left when I put it back together. Thanks for the helpful info.
miguel lopez
hola.. disculpa tengo un problema con una lap top pavilion dv7-1247cl prende pero no manda señal al monitor ya la destape cheque piezas y todo esta bien al parecer alo mejor tiene problemas con el chip te video ya se soldo. quisiera saber que puedo hacer??
Robert
I have a hp dv7 1129wm with amd 2.1ghz processor i want to know can I upgrade the processor listed in service manual
Richard
After replacement of the fan in a dv7, the battery does not fit properly after reassembly (too tight and pops out easily). I’ve partially disassembled, and reassembled with the battery in place, but the problem recurs after the screws in the battery compartment are replaced.
A rubber bumper piece that did not appear to be essential had fallen out from somewhere near the left hinge during disassembly and had not been replaced, but I don’t know if this is relevant. In any event, I’m not sure where that fits.
Any thoughts on the matter?
izzy
i need to replace my cpu on my hp pavilion dv7-1267cl. can you show me how to do it on that exact model. please and thank you for your help if you can or cannot do it
IML Tech
@ izzy,
1. Loosen four heatsink screws shown on the second picture in the step 22.
2. Lift up and remove the heat sink.
3. Turn screw on the CPU socket into “Open” position.
4. Lift up and remove/replace the CPU.
When you assemble everything back together don’t forger to apply new thermal grease on the CPU.
https://www.insidemylaptop.com/apply-thermal-grease-laptop-processor/
Dave
I have used your guides before and found them to be extremely accurate, with superb pictures.
I will not forget this help you have provided, and will donate what I can as soon as I can.
Your site has been bookmarked for further reference and as a payment reminder!
PREESHY ATE IT!!
Aaron
This is a great guide I love it! I have one problem, I can’t seem to remove the screws connecting my keyboard. They are deforming when I try to twist them and not moving at all. Do you have any suggestions on what I could do?
wackaman
Hello,
first many thank´s for this great Guide.
Now I have a question about Upgrading my CPU P8400 to a Q9100 in my HP-DV7 1045eg.
Mainboard is Compal 30F4, Bios is F2D
The Q9100 use the same Voltage, has the same FSB and Multi, but the TDP is 45 by Q9100 and only 25 by my P8400.
Has anyboddy tried out this, a Q9100 in this Latop/Mainboard?
THX.
James Gallup
This is an awesome guide. My DV7 1232nr runs but if I do something intensive such as watching videos or playing games, it will shut down. I assumed that the fan needed to be replaced and ordered a new one. Before the fan arrived, I followed your guide and took my computer apart and found the dust ball blocking the intake so I cleaned that out. When I turn on the laptop, I hear the fan kick in for about 5 seconds and then it turns off. Will replacing the fan fix the problem or do I just need new thermal grease and/or heat sink? The fan just arrived today so plan to change it out but wanted to know if you thought something else would need to be replaced.
Johnny G
All I can say is that it is absolutely insane to have to literally take apart the entire laptop to be able to clean/oil up a whirring fan. I was able to do that in like 5 min on my desktop. I assume they do this so you get a new comp instead of fixing it?
Also, does anyone know what something like this would cost to have someone else clean/oil up? I may just keep tapping it or eventually dealing with the noise instead of actually oiling it (It doesn’t seem dusty, I think with all the moving it around the fan either got jostled outta place or needs to be oiled up). There is NO WAY I could do all that without breaking something lol.
IML Tech
@ Johnny G,
Before you disassembled the laptop try cleaning up the cooling fan with compressed air.
Just spray air inside the fan grill until all dust is gone. This might fix the problem. Doesn’t take much to try.
Johnny G
1) I read through all these posts because this fan is driving me nuts and I think I’m gonna have to risk it and try and replace it. Wish me luck that I don’t destroy the comp in the process, lol. I have to wait for the fan anyway.
2) After reading through the posts, I noticed people mentioning that when they turn on the comp, the LEDs, fan, etc will all start but the screen will be black. I have had this happen about 5ish times on my dv7. From what I gather, it is a power issue that occurs mostly due to some problem with the system coming out of sleep mode.
What you do is remove the battery, unplug the laptop, hold down the power button for 30 (or 60, I forget) seconds, then replace the battery, plug in the comp, and turn it on. It has worked for me every time. I guess it discharges extra power or something that causes the screen not to turn on. I hope that works!
IML Tech
@ Johnny G,
This could be memory problem. Maybe one of the memory modules is failing and causing the problem. You can download and run Memtest86+ utility. Make sure it makes a few passes. I usually let it run overnight. If you see some errors in the morning, probably you have bad/failing memory. Test memory one by one and find out which one is failing.
Tim
I found your instructions on how to disassemble laptop in the dv7 series (mines a dv7 1245dx)
my screen went black 2 days ago . It powers up but OS doesn’t start up the fans try to start and the dvd drive sounds like its trying to run. then Caps lock and number scroll indicator lights blink in a 2 seconds then one blink sequence. I followed reseating HD and RAM protocols and also the unplug and remove battery ,hold down power button for 30 seconds too ! to no avail research shows CPU may be culprit but the quick fixes i’ve seen say i need to bake my motherboard in my oven. Have you heard of this ? And how difficult is it ? I’m at a loss
IML Tech
@ Tim,
Have you tried removing RAM modules one by one? One of the modules could be bad. Test the laptop with only one module installed. Try both modules in both slots.
Probably not the CPU but GPU (graphics processing unit). Failed GPU is a known issue with some HP laptops. Not sure if that’s the case with dv7 series.
Baking the motherboard suppose to resolder the GPU back to the motherboard. Again, I don’t know if there are known issues with the GPU failure in HP dv7 series.
Tim
Thanks for the advice i tried just each RAM in each slot alone and i got the same result. I have been disauded to try and disasemble my laptop any further because to be honest i wouldn’t know what i’d be looking for. I don’t know a GPU from the CPU. It all seems like something i’d be unable to fix. But i still want to do something i feel helpless and at the mercy of something that just goes out so damn quickly like a really expensive light bulb. I’ve only had the thing a little over 2 years. I don’t really want to stick it away in the closet.
IML Tech
@ Tim,
In this case I would recommend doing this repair yourself.
Tim
One last question if i may . On the pictures you have here is the CPU showing so i’d know what i am looking for ? thanks once again !
IML Tech
@ Tim,
The CPU located under the heatsink. You can see the heatsink on the second picture in the step 22.
In order to access the CPU it’s necessary to remove the heatsink first.
Tim
Sorry to keep asking so many questions but i haven’t really ever fixed a laptop before. My desktops always were so much easier to figure out. If this is indeed my CPU that’s causing my problem what would i be doing and looking for. Something to resolder or is this a replacement operation. Thanks again for all the information you’ve given so far it has all been invaluable to me.
IML Tech
Tim,
If you have never done it before, probably it’s better not to disassemble the laptop. Pavilion dv7 is not the easiest laptop to disassemble.
As I mentioned before, the CPU is located under the heatsink. It’s seated in the socket. No soldering needed. In order to remove the CPU you’ll have to turn the locking screw (located on the socket) into the open position. After that you can remove the CPU and replace it with a new one.
Tim
Thanks for that advice i will think long & hard before i decide to do this myself i guess only as a last resort ( nothing else to lose) maybe i’ll find someone who’ll repair it at a reasonable price ?
Bill M
Is the graphics card upgradable? In other words, can it be removed and replaced with a different card?
IML Tech
@ Bill M,
I don’t think so but I’m not sure 100%.
In my example I’m taking apart an HP Pavilion dv7 laptop and it has integrated video card – it’s fused into the motherboard. In this case the video card cannot be removed/replaced/upgraded.
I don’t know if all laptops in dv7 line come with integrated video cards, maybe some of them have a discrete one but I doubt it.
Bill M
Sorry, I should have added that I have the Pavilion dv7t Entertainment PC.
Bill M
Thanks for the advice
Tim
Hello this is Tim again. I’ve been pondering wether to try and replace the CPU on my laptop and was curious if i were to look for aew one what kind would i need ?
IML Tech
Tim,
Cannot tell. All laptop model using different CPUs.
You’ll have to look up specifications for your laptop and find out which CPU you have installed.
Tim
I went to the HP site and found the product specifications for my laptop i didn’t find anything for a CPU specifically but the micro processor is a (AMD Turion X2 RM-72 Dual-Core Mobile Processor) is this what i’m looking for perhaps ?
IML Tech
@ Tim,
CPU = processor.
Yes, AMD Turion X2 RM-72 Dual-Core Mobile Processor is the CPU.
Michael
Great article – helped me SO much when I had to change a CPU fan in a DV7. Thank you so much!
Michael
Hello! Great Tutorial, helped me alot getting mainboard replaced. I have a 1029eg, which uses the mainboard 486541-001. My problem is that from one day to the other (Notebook was only used stationary), i got black screen during after turning on, and 4 times blink codes (chaps-lock+Numpad LED), which tells the onboard GPU is malfunctioning. Warranty period has passed just a few months, HP tells the replacement costs to be almost buying a new one. So I bought a refurbished mainboard from China. I received it and after reassembling i got the same 4-times blinks. I returned it and got a new one today, installed, which did again the same error code. Now I am not quite sure what to do, since i don’t think that 3 mainboards all have same error, the 2 replacements are 100% tested before sending. How are your experiences of trustability of those sources?
Does this error code comes also if the LCDdisplay is not working? And how do I test? Kindly thanks for your soon answer
Best regards
IML Tech
@ Michael,
I would suggest taking the laptop to bare minimum and test it this way.
All you need is the motherboard, processor and memory. In this configuration it should stat and show video on the external monitor.
If there is no video, it’s either bad motherboard (probably not because you already replaced it 2 times), processor or memory.
RAFAEL
My computer keeps turning off suddenly without waring. battery is dead so its not the battery;
any idea what would be the reason
IML Tech
@ RAFAEL,
Is it turning off while running multiple programs? Could be overheating.
Try cleaning the cooling fan. You can do it with compressed air. Blow air into the fan grill until all dust is gone and test the laptop again.
Peter
Disassembled my old laptop today. Quite a job, but thanks to this I managed to fix the problem. Fan was full of dust, laptop became overheated very often. Problem solved now, thanks guys!
Manos
thank s a lot my friend!!!!nice work!!
**keep up…. 🙂
Kevin
FYI, be careful when ordering fans based on the search engine on the website. Mine is a Pavilion Entertainment PC, AMD, 3173 in the model number. I ordered the fan, and after I got it all torn apart, discovered it wasn’t the right one.
My laptop uses a 3-lead fan assembly for the wiring, and it’s model is 535442-01. I found a new one on Ebay for $50. Something to keep in mind.
Alex
Your tutorial was really helpful, but i stopped at step 20. I have HP DV7-2190en. On this model keyboard connection cannot be removed. but that’s not the problem. After screwing ALL screws, i can’t lift the motherboard. It seems like glued to the bottom. and, furthermore, a fan, if I try to lift my motherboard, lifts with motherboard too. what to do? I want to remove all that dust, that my PC worked better and faster, because CPU, according to task manager, shows me about 50% when no programs at all is running. I use Win7… so maybe you can help?
IML Tech
@ Alex,
There is no glue. Probably you forgot to remove some screws.
Just buy a can of compressed air and spray it into the fan grill until all dust is gone. This should be enough.
CPU runs at 50%? Probably this is OS related issue.
Backup data and reinstall Windows 7. Cleaning the CPU fan will not help in this case.
James
Thanks so much for the walk through on this! I had an overheating video card that was causing a BSOD unless I disabled the video driver. Using your great instructions, I fully disassembled my laptop for the first time ever and replaced the heat sink. Video display is back to normal!
Matt
I just wanted to say thank you for this guide! I printed it out and used it to clean my fan. It was VERY dirty and my laptop was overheating . Now it’s running like new again. Thank you very much!
Rherb89
Just wanted to say thanks I had a DV7 and the Fan was making a terrible noise and I new it had to be clogged with dust,cat hair,dog hair…. and after following your guide I had it apart and cleaned and together in one day… Thanks allot…
Mike
Hi,
I’ve got a dv7-4061nr that begins to boot, but then stops making any progress on the boot after several seconds. You can hear the fan fire up and then back down to it’s “normal” running level. The LED on the power button is lit steadily, as are the LEDs for power and hard disk on the right side. The caps lock blinks slowly on and off. There is never anything at all on the display – no BIOS information, no cursor, no flickering, no anything, just black, as if the video cable were disconnected.
I’ve tried connecting a known good monitor to the VGA port and then booting but got the same result.
Battery and power supply seem fine.
Have gone through the “hard reset” procedure HP recommends several times with the same result.
How do I isolate what’s wrong?
Thanks
IML Tech
@ Mike,
Try minimizing the laptop as much as you can. Remove the battery, hard drive, DVD drive. Maybe even wireless card and keyboard. Try turning it on. If the problem still there, try removing memory modules one by one. Test the laptop with each memory module separately.
If the laptop still doesn’t boot and does the same thing, probably this is motherboard failure.
Drew
@ Mike
Hey Mike,
After replacing my screen I noticed the same symptoms, after looking back over everything, I noticed that my RAM wasnt completly inserted. Try removing and re-inserting the RAM back into their slot.
Hope this helps.
You can contact me on Twitter if you need more assistance. (@stonehenge1861)
Drew
Jes
Many thanks for your tutorial. Your HP wasn’t exactly like mine (I’ve got a DV7 3165dx), but close enough to be a useful guide.
The purpose of the disassembly was to clean the fan. After peeling off all the necessary components, I finally reached the fan. It was very dirty, and I’m happy to report that after a thorough cleaning to rid it of lint and cat fur, it’s now running great.
My question is this: Is there any way to effectively clean these fans without going through this arduous process? If anyone has any ideas, please let us know.
Thanks again for taking the time to put up your tutorial!
IML Tech
Jes,
You can maintain your fan clean using compressed air.
Just spray air into the fan grill on the bottom once in a while and you’ll be fine.
Geoff
Followed this guide and replaced a faulty fan. Had a heart stopping moment when it wouldn’t boot up, but reseated the RAM modules firmly – and right as rain. Thank you IML Tech dude this was TOPS 🙂 Got to admit tho, poor design to have to pull an entire laptop apart just to get at the cooling fan!
Charlie
What a great tutorial!! I was dreading replacing my DC receptical but now have one ordered and very confident about disassembling the unit
alfred
i have a hp pavilion dv7 and anytime i switch it on it becomes so hot and will go off. does any body has a solution for me? or how i could solve it
IML Tech
@ alfred,
How much time it takes for the laptop to get hot?
If it get’s hot right away, check the cooling fan. Make sure the fan turns on. It’s possible the fan failed.
If the laptop gets hot after a while or when you are running multiple programs, check the heat sink. It’s possible the heat sink is clogged with dust and the laptop overheats. Try cleaning the heat sink.
Mardi
Hey,
My boyfriend recently disassembled his HP DV7 following this guide. The laptop was ok before this, but would shut off after a few minutes of running the pc. Underneath, it did not feel very hot at all, but was showing signs of overheating. (Turning off fully etc)
After the dis assembly, the laptop light for the AC/Power adaptor likes to flicker and not stay on, (note the battery is not functional and the main power source for this laptop is the Ac adaptor) but the main problem is that the Laptop turns on, and lights up, but there is a black screen and the Caps Lock + Num Lock flash 4 times.
I’ve researched this and it appears this means the Graphics Controller is not functional.
My question is, did he happen to miss a wire, or connect something wrong in the re assembly? Or is it possible, the graphics controller went out beforehand from it’s turning off of the whole system- like an overheat.
Thanks, any response would be greatly appreciated. 🙂 Really hoping his laptop isn’t totally shot, because I feel bad about showing him the idea of cleaning his cooling fan. (Yes there was a bit of dust there too)
– Mardi.
IML Tech
@ Mardi,
Maybe this error message is memory related? Make sure both memory modules plugged in correctly. Try reseating them.
Rich
Your pictures and simple step-by-step descriptions are great, I wouldn’t have endeavored without it. However, I found several discrepancies (problems) while disassembling my dv7. I checked several sites — same info. One is that the DVD door should be open to remove it. One site offered an ingenious solution, but I didn’t try it, I had my own. But, the major problem so far — I haven’t finished disassembly to replace the microprocessor so I can’t say only — is a doozy. Please check your steps or refer to HP’s Maintenance and Service manual for the dv7. I found it on the web without going through the HP site.
Tracy Alexander
Thank you for this wonderful illustration!!! You helped my 13 yr old son take apart my laptop, clean the fan, and put the whole thing back together again! Thank you!
karl
Where i can get a replacement for a locking clip?
IML Tech
@ karl,
I doubt you can buy it separately.
Bluto
Fantastic instructions. My hp DV7 1260us had black screen on boot up (dead CPU according to single flashing led). Followed dis-assembly instructions replaced Turion CPU and cleaned fan. Wow lots of dust in the heat sink by the fan. Guess that’s why the CPU burnt out. reassembled and booted right away. Saved buying a replacement laptop. Total cost $40 for new chip.
Dude you rock
NotaTech
So I have half the disassembly done and I have two stripped screws that will not budge. I am about to call a tech out. What should I do, and would a tech even step in at this point and take over?
Stefanie Röhling
Hallo Ich habe eine folgende Frage an euch ist Der HP PAVILION DV7 einfach aus einander zu nehmen ich wollte den Lüfter da reinigen da dreck von Kind reingedrückt wurde
Bitte um Rasche Antwort
Danke
Frau Röhlibng
IML Tech
@ Stefanie Röhling
If I understand correctly, you would like to clean up the cooling fan.
Here’s what you can try. Buy a can of compressed air or find an air compressor. Blow air into the fan grill on the bottom of the laptop until the dust stops coming from the side. After that blow air into the grill on the side of the laptop. This should be enough to clean the cooling fan and heatsing. Do not keep the air nozzle too close to the laptop or the fan will spin like crazy and you can damage the bearing.
If you would like to remove the fan, you’ll have to disassemble the entire laptop and remove the motherboard. The cooling fan mounted to the bottom case of the laptop as it shown on the last picture.
Eric Westerlund
My HP D7 Pavillion I bought 14 months ago has
Gone completely dead. No power, no sign of life.
From what I am reading here , it seems to be an overheating
Issue . My tech expertise is on the lower end of the scale ,
However the advice offered here is quite encouraging .
I don’t want to screw up the D7 . Please advise me
What might help. Many thanks.
IML Tech
@ Eric Westerlund,
First, I would test the AC adapter. It’s possible your AC adapter died and the battery doesn’t have charge.
Test it with a voltmeter. If the AC adapter shows no voltage (or wrong voltage) this could be your problem.
I don’t think this is overheating related issue. If laptop overheats, it still should start fine when it’s cold. You said the laptop is completely dead, so it’s either power related issue or you have motherboard problem. Also, could be failed DC jack.
bari
fan problems in dv7 are common since the amount of airflow is just barely sufficient to coolthe processor and vid processor and the continuous high temp causes the fan housing to warp, and interfere with the fan, thus seizing the fan blades and replacement of fan if you have the thing apart is wise if not essential
Magnum
I bought and installed an Intel fan in my AMD processor laptop and it now runs smooth. I can confirm it works! Thanks for posting the guide!
UrmasK
That’s a nice checklist. Helped a lot. Thanks!
Doug
Looks like when my projector fell while doing a presentation it hit the corner of my screen. When I turn it on now it looks like a cracked window. I have seen replacement screens but not sure if thats the whole assembly? How far do I need to dis-assemble the lap top in order to replace the screen assembly? Thanks again for a great presentation.
IML Tech
@ Doug,
You don’t have to replace the whole display assembly, replace just the screen.
I explained how to replace the screen in this guide:
https://www.insidemylaptop.com/remove-lcd-screen-inverter-board-hp-pavilion-dv7-notebook/
Marco
Ciao a tutti, questa guida mi è tornata molto utile grazie, ho riparato il mio pc.
X il problema che riguarda la non accensione dell’hp pavilion dv7 anche con alimentatore collegato, guardate questo video, vi spiega come fare:
http://www.youtube.com/watch?v=In5JoDVlZ0Y
Il mio pc con la batteria funzionava ma con l’alimentatore non dava segni di vita, è bastato fare un ponticello sul connettore d’ingresso come spiegato sopra….
ciao,
Marco
Levin
Thanks so much for your tutorial. I have a dv7t-1000 and was able to muster the cajones to successfully replace my rattling fan. Other than missing a few screws during disassembly, everything went great.
One thing that wasn’t on your tutorial for this specific model (and maybe others) is that when you remove the top cover (step 17-19) there is an additional plug to disconnect that leads from the motherboard to some sort of sensor located between the power button and the QuickPlay button on the top cover. (If you look at the step 17 picture, you can see the cable routing just to the right of the cooling fan window). As I was being cautious, this wasn’t a problem, but you could rip off the plug if you weren’t expecting it and pulled too hard on the top cover.
Thanks again for taking the time to do this.
Levin
Melissa
I used your tutorial approx. a year ago to replace my dv7-1428ca fan, which had stopped working.
I found the replacement fan (480481-001) to be noisy on and off from the start, (far noisier than the original ever was) even though it was an exact replacement. Now, a year later, its having trouble cooling my computer despite blowing it out repeatedly with an air compressor and its very loud all the time. I even bought a really good laptop cooling pad but the fan still runs non stop and the cooling pad fans has to be turned up to full to keep my laptop at a reasonable temperature.
Looks like I have to replace the stupid fan AGAIN. My question is, has it been confirmed that the 488885-001 and the 480481-001 fans are the same? I had hoped that maybe the 488885-001 was more powerful so I’d stop having this problem if I bought one. But I then read about the 481481-001 being the replacement.
Thank you so much for your tutorial, it was extremely helpful and likely will be again when I replace the 2nd fan. This fan nonsense is so disappointing though, I likely won’t be buying another HP again!
Thanks,
Mel
IML Tech
@ Melissa,
Google search for this part number brings nothing. This is not a valid part number. Probably a typo.
Alice
Thank you for the great site.
My computer is not recognizing AC power. It came up and said battery was at 1% then shutdown. Had a friend try my cord in his computer, he said the red light came on but he didn’t try charging his battery as it was already charged. Thinking this means it is the power jack, but after reading through your site, it could also be the motherboard. Would replacing the motherboard also take care of the power jack? Should I replace the fan while I have it apart? Not sure that I have a problem, just noticed that most of the issues have been with fans.
Do I need to get numbers off the motherboard itself to know what to order? Do you have a good site to order the motherboard or power jack?
Very scared, but considering trying this myself… Thanks again.
IML Tech
@ Alice,
The power jack harness and motherboard are two different parts. If you have a problem with the DC jack, replacing the motherboard will not fix anything. I would definitely try replacing the DC jack harness first. Disassemble the laptop, unplug the original DC jack harness from the motherboard and replace it with a new one. If it doesn’t help, probably this is motherboard relates issue.
Do not replace it if the fan still works fine. Just clean it up.
Motherboards are very expensive. Try DC jack first. You can find many new DC jacks on eBay.
Good luck. If you decide to take it apart, make notes. Keep track of screws. Make photos.
A.
could you tell us the pll(in order to overclock it) if there is so we dont need to open our laptop to find out ? Also dont start saying about cooling issues
Paul
Thank you very much for this tutorial.
It really helped me cleaning an old dv7.
Susan
Very helpful. Thanks
Aubre
I was experiencing the loose dc jack and laptop not recognizing the battery or charging. Replaced the dc jack and am still having the problem. at least now I can use with adapter plugged in but really want to resolve the battery issues. Any other problem solving
Randall
Thank you. For taking the time to post this information And thanks you again for the precise manor of your presentation. Your simple discriptions of each step made a stressfull situation (for those of us who over think everything) as stressless as could be. Just to get my diggs in A sarcastic Thanks to HP for putting a component they new to be faulty in the most difficult to get to area of this models build.
Moving on I wanted to add so info I discovered in my continuingly lengthy search to deal with my cooling fan issue. Cleaning this fan is essential. I regularly brushed clean or compressed air cleaned mine to prevent this “Fan failure” and yet here I am. I found that in regards to the Noise issue its important to keep this fan lubricated. Which not only applies to the axle shaft but also to the blades them selves as quite often the Noise you’re hearing is do to friction points between the fan blades and its own stupid housing. In the postings I found regarding this they all recomended using a Qtip swab and swiping lube oil along the edges of the blades as this would lubricate those contact points with the housing. I have yet to try this so I cant say for certain that this is the final answer you seek. Reason being, that no matter where I looked. I could never find a posting that suggested a market brand oil nor any lubricant listing that stated in its usages fan lubrication. They all just seem to drone on none stop about heatsink adheasing (which is not what I need) save one.
Which doesnt even look like a registered product so I am reluctant to order it.
Do You have a brand you can suggest for Fan lubrication. And please dont say 3in1 oil. lol
Thanks again for this walk thru Ill be using it as a check list each time I have to do this to make sure I dont miss a step. Hopefully that wont be to often. lol
Josh
Thanks for the tutorial and I had a question about the screws at the motherboard. For some reason they do not want to go back in and they are the correct ones. They just seem to not make contact with the threads at all.
Laura
Thank you so much for taking the time to put this website together! My series dv7 is a bit different than photos here, but I referenced this constantly through the process of replacing the heat sink and fan. Your site gave me confidence!
DJ
This tutorial is the best! It doesn’t leave out a single step.
I just had one question. I had to replace the motherboard, and now that I’ve put everything back together, I notice that I didn’t reconnect the cable for the network jack. Trouble is, I can’t seem to find where it goes. Can someone help me on this?
Thanks!
DJ
Found it! It’s actually the phone jack, and it plugs into a smaller board underneath the motherboard. Problem solved!
Sammy
The Laptop I just took apart was an AMD Processor but it had an Intel Fan as well. How Often do these fans go out? This is the 2nd Laptop given to me to fix that the fan has gone out in it.
Rachel
I just replaced a failed/faulty dc jack thanks to your disassembly tutorial. It was fantastic and so easy to follow. I have two entirely new issues though. First the screen is blank, completely black. Secondly, the caps lock and num lock lights flash together. They flash slowly, four times. It doesn’t. Appear to be booting up (but then agaIn the screen is black).
Do you know if a DX-1240US is supposed to have two hard drives? I only had one and my concern is that HP did not replace one of them when they worked on it.
Any thoughts? I am desperate! HELP!!!!
IML Tech
@ Rachel,
First of all, I would check laptop memory. Maybe one of the modules not seated correctly. Try reseating memory modules. Test the laptop with only one module installed.
Cannot tell. I guess it depends on the configuration of the laptop. Yes, it has connectors for two hard drives but maybe your laptop was configured with only one hard drive.
Rachel
I found on HP’s site that the description of that error code is “graphics controller not functional”. Suggestions?
Rachel
Ok, disregard everything from my last two replies. I opened it back up and switched and/or plugged in the two RAMs (which I don’t think were plugged in all the way anyway. Now the computer boots up but my keyboard and pad don’t work. I was going to open it back up again and make sure everything is plugged in but then my computer said i had 0% power remaining despite being plugged in. That’s when I noticed the new DC plug that I just installed that appeared to be working (for a half a second I guess) is inop.
I’m at a loss! I am still curious about the one hard drive though. Not that i think that has anything to do with this issue but because my computer has never been the same since it’s two visits to HP. Hhmmm.
Malik
Hi….Great tutorial…I have an hp 6v7 6154NR laptop and i Can find its replacement fan/heat sink. The manual says
For use only with computer models equipped with an AMD processor and a graphics subsystem with
UMA memory
639404-001
This is also written on the fan when I opened it up. My laotop has an AMD CPU…Can u suggest hat to do about it or can i use any alternate fan…thanks
danielle
while on step 7, the brown clip came entirely off and i’m unsure of how to reconnect the speaker. does the brown clip go in first or does the white strip go first?
IML Tech
@ danielle,
1. Insert the cable back into the connector.
2. Push the brown clip back in place.
3. Secure connection with sticky tape.
deborah
I ordered a replacement fan for my HP dv9700 (dv9925NR). Got it from HP, the guy told me “any lay person can install this”. Right. Not without a LOT of guidance. Do you have a different tutorial for a 9700 model? Or will this pretty much work for me to follow this? We did take apart the laptop, installed the new fan, put it back together. Powers on, then powers off. Diagnostic says ‘no IDE device’. We are in the process of completely disassembling again, and will follow your guide to make sure we don’t miss anything when we put it back together again. Any suggestions for the different model we have??
Thank you. Wish we had this the first time we took it apart!
IML Tech
@ deborah,
Yeah, right. It’s easy if you have a few years of laptop repair experience.
Here’s HP service manual for HP Pavilion dv9700 notebook.
Notebook disassembly instructions start on the page 46. It should help. Fan module removal shown on the page 101.
Vegard
Thank you! This guide is the best! My lap top is back up again after cleaning CPU.
We used labelled tea plates to separate all screws.
Vegard.
Allan
here is the YouTube video for this http://www.youtube.com/watch?feature=player_embedded&v=AaOFyC63LAc
zach
Once put back together, it seemed like I had no power to the screen. I disassembled it again and everything was plugged back in. Did I miss somethin?
Malik
Hello
I asked a question but haven’t got a reply yet. Can someone be king enough to reply please….I am desperate….
Hi….Great tutorial…I have an hp 6v7 6154NR laptop and i Can’t find its replacement fan/heat sink. The exact part number as manual says
“For use only with computer models equipped with an AMD processor and a graphics subsystem with
UMA memory
639404-001” , I cant find this part……
This is also written on the fan when I opened it up. My laotop has an AMD CPU…Can u suggest what to do about it or can i use any alternate fan…thanks
IML Tech
@ Malik,
It’s possible that HP updated the part number. I’ve seen it happening before.
Try calling “Spare Parts Warehouse” and talk to sales rep. They have access to all HP parts and most likely can help you to find the correct part number.
brian
On step 7 when putting all together it did not power on so i went looking for loose connection. the speaker connection on step 7 is completey off the board. can it be repaired? i manually hit the connection on the board and powers up right, so i have to reattach the whole connector to the board any advise
John
I have had this DV7-1245dx for 3 years now. For the last year and a half, the fan has been screaming non-stop when the computer is on. It would get so hot, one could fry an egg near the power button. This resulted in poor performance and frequent spontaneous shut offs. I literally had to prop that corner (under the power button) up with something just so I could use the computer for a while before it shut off. THANK YOU! Your directions and pictures were perfect. A local computer shop wanted $100 to take this thing apart and clean it. With your instructions (and another site (with instructions only, no pics) I was able to take this bitch apart myself and air it out. I found a chunk of dust near the fan (blocking the fins) that looked like dryer lint after drying a whole load of new towels! I am broke now, which is why I couldn’t afford to take this to the computer store. As soon as I can, I will donate to you. Thank you so much!
Tseos
Hi, thanks for incredible instructions.
I have this problem: I followed all the steps, i cleaned the fan and when i connect everything back, the laptop is not working 🙁 It turn on, i can hear the fan working but the screen is black… I opened it again, i removed everything from motherboard, dvd, ram, usb etc and still nothing… And i have some experience with laptop repair… Please help me to solve this problem. Is it possible to made damage in cpu or motherboard? How can i understand if something is damaged? Thanks
Furthur'96
I am interested in removing the motherboard, cpu etc from my dv7 17″ laptop. Unfortunately, this laptop has serios issues with overheating (AMD Turion x2) processor and I know they run hot. My current setup has me running a 32bit version of XP and other than using to watch movies, check e-mail, it can’t do a thing without running way too hot. I have CoreTemp installed and the two cores run around 78-81 centigrade. What I’d like to do is remove those parts, put them into a micro atx case and use it solely as a media center but with lots of cooling. The design of the of the dv7 is flawed in that there is one fan and almost no vents. With a table fan blowing straight at the only fan, it’s just barely ok… Can anyone help? I’m sure this has been done before so if anyone has any thoughts or suggestions PLEASE, PLEASE, PLEASE help.
Geno
Just wanted to say thanks for this. My wife’s HP Pavilion DV7 overheated, shut down, and we discovered the fan had quit working. The laptop is about 5 years old, but other than the fan issue, there’s no problems, but we were looking at at least $100 bucks to have someone fix the fan (and everytime I’ve done that, they “find something else wrong” that costs more. I was about ready to throw in the towel and move to a new laptop or an iPad.
We found this site, gave it a try and discovered the fan was stuck due to dust and cat-hair. Cleaned it out, put the laptop back together, and (first time) no power…. then I went back over the procedure and saw I had skipped re-connecting the speaker bezel to the motherboard (so the pwr switch was disconnected). Second time no touch-pad (also had missed the re-connection). Third time was a charm and it’s running perfectly, fan is working as good as new, and I just saved myself a lot of money.
My advice…. keep each screw with the section it is used for… there are LOTS of different sized screws and getting them all back into the correct hole is a nightmare if you don’t label or tape them near where they came from.
Thanks again!!!
cmos
thank you for your perfect job with the instructions.
Help us keep the plan obsolesce away.
Greetings from Hellas. (Greece)
Kim
I have a dv7 hd lcd (1980×1620) can this be installed in lieu of the non hd lcd? Or do I need an inverter? or will the screen not be “hd” because of other hardware / software incompatibilities? HP can’t answer… I have spoken to 6 people andhey can’t tell me if I need other parts or tell me if I will get the 1980 x 1620 resolution not…and is there a tutorial anywhere showing how to instal the new lcd screen?
Kim
Found the lcd tutorial… Now I just need to know if the glossy screen (not 1980×1620) with the matte finish (1980×1620).. HP ARE IDIOTS…..
Renee
THANK YOU!!!! The instructions were flawless. I removed about a 1/4″ of “felt” blocking the fan and heat sink. My computer was running so loudly and hot that I couldn’t stand it. Now I have to really listen to hear the fan noise. Runs like new.
Dan
Step 18 – 19 I cant get the the top cover off , it is stuck in the lower left corner and I dont know how to take it off. PLEASE help. I have came so far not to be able to clean my fan it is frustraiting
kondicykel
oooh i though that it was way easier to clean fan… like 5 min job
it took 1½ hour to clean and assemple it hehe…. thx to you!
without this is would have been lost cuzz i though i could just remove the backplate…
everything works nice and seems solid.. but i forgot 4 screws somewhere.. hmm 😛
julie larson
Thank you so much for this information. My hp laptop started overheating and shutting down. I thought it was a goner. Thanks to this website I was able to take it apart easily, and find a big ball of dust blocking the fan. I cleaned the dust, put the laptop back together in reverse order and now she is purring like a kitten. Thank you for saving me the time, hassle and expense of taking it to a computer repair store. You are awesome.
jenny
i was woundering if the pr508 is melted does that mean i need to buy a whole ne mother board or can i just change the chip dought it but trying my luck
Kontroll
Thank you very much! Amazing how silent my dv7 is now. No fan noise, no heating problems and no shutdowns…. Perfect instructions.
scott
***IMPORTANT FOR SOME HP dv7 MODELS***
My model had an additional connector that needs to be disconnected at step 17. Using the picture provided in step 17, It is located at the 5 o’clock position from the opening in the top cover assembly that you can see the fan through. it is directly next to the 4th screw from the left that you need to remove. I failed to notice this connector and I pulled the entire connector off the motherboard by accident. I’m not sure what it does, but it links to kind of a small metal box that sits under the top plate directly to the right of the power button when the laptop is fully assembled. I have just reassembled my laptop and so far nothing seems different, but I will post if I figure out exactly it is that I have broken.
I dunno if this was mentioned before, so I apologize if it has.
hugo garant
It worked perfectly I don’t have problems anymore with my fan. But I now have problem with certificate (No information is available to indicate whether that certificate can be trusted. ) while I am on internet or when I try to play an online game, did somebody got the same problem ? thank you
IML Tech
@ hugo garant,
I don’t think this is related to the fan repair. Sounds like software related issue.
Sophie6790
Hi, I did everything said on this page, but now my wifi is not working. I can’t put it to “on” the light is always red (suppose to be blue when activate). Other things like sound, volume, etc are working but not the wifi button. Is there something I can do? I’m pretty sure I put the two wires correctly back in place on the card… Help me please!
IML Tech
@ Sophie6790,
Did you remove the wireless card during the disassembly process? If you did, try reseating the card. Remove if from the slot and install back in. It’s possible the card is not seated correctly inside the slot.
George
Hi I have a laptop FIC motherboard ty640/ ty040 ver: 0.4 does not start, boot for 10 seconds and off, without image, I remove the ram and now turns on but no image shows, only the lights from the front, any help?
IML Tech
@ George,
Maybe one of the RAM modules is bad? Have you tried installing memory modules one by one and test the laptop with each module separately?
Bill
I replaced a dodgy cooling fan, great guide. The guitar pick was a great idea, worked for me. The hardest part is the keyboard connecter, one of mine cracked, but I got it back together and somehow it held in place. Laptop works now like it’s brand new.
Mali Brown
I completed the guide, cleaned the fan, and it works fine now except the wifi. i have reconnected it many times, and fear my days of wifi are over and must resort to the ethernet cable at all times. Is there anything else i can do?
IML Tech
@ Mali Brown,
How it’s failing? No wi-fi signal? Card not detected?
Check the device manager. Can you see the wireless card listed in there?
Check if wi-fi antenna cables (shown in step 3) connected to the card.
nikki
Oh crap.. I have extra screws.. my touch pad doesn’t work.. i get the invalid server certificate message.. it would be nice to know what each screw looks like and where they go..
IML Tech
@ nikki,
What is your full laptop model number. HP Pavilion dv7-????
I can send you a link to the official service manual with all screws shown.
Nikki
that would be awesome! pavillion dv7-1245dx
IML Tech
Nikki,
Check out this service manual. Removal and replacement procedures start on the page 47.
nikki
I fixed it! Thank you so much for this tutorial. a clip fell out on the touch pad easy fix 🙂
Oh and future reference to the server certificate error. CHANGE YOUR DATE AND TIME BACK!!
Dale Baker
Off topic,but could someone tell me what the GUID should be on a DV7-4732US
Philip
1. What is the slot between the CMOS battery and 2nd HDD for?
2. What’s the safest ppowerful processor I can upgrade it to?
3. I heard its possible to upgrade the graphics. is this true and how?
Liviu
Hi! Ihave a laptopDv7-2250ez and I need Service manual.
Tanks.
Bill Deville
Success!
Followed the directions.
Got scared S***less at step 22. Got fan from Ebay vendor. Reassembled.
Everything worked as before.
First step was to bookmark this page in an obvious place so I would know how to put it all back (days later).
I used a magnetic bowl to place the screws in groups (by step) in a circular pattern starting at a paperclip for a marker.
It DID take hours. I was SO SLOW, (being careful).
You should have seen my smile when it powered up and worked.
Thank you.
remei
Incredible! , they know that the cooling fan will be dusty in few years and we will have some problems, Why don’t make it like Mac, easy opening and clearing? I will try to open and clean it, thanks for all this explanation. I hope no get in troble after that.
IML Tech
@ remei,
Before taking it apart try blowing off the cooling module with compressed air. It can help if the heatsink not clogged too badly.
kostas
Hi,
Very helpfull tutorial.
I have a Pavilion dv7-1199ev, can i follow this tutorial to disassemble my laptop or should i wait for a more specific one ?
Also i am dealing with a graffic card overheating problem. Is this problem caused only from a possible dusty fan ? Or should i avoid overloading my graffic card with heavy programs or games ? (Specifically i noted a graffic-card temp of 93 C and 3 times my laptop shuted down suddenly 🙁 ).
IML Tech can i ask you a favor ? Is it possible for you to send me the officila service manual of my type ?
Thanks in advance
IML Tech
@ kostas,
Here it is: service manual for HP Pavilion dv7-1199ev.
Pekka Järvilehto
Hi. I have a 4-year old DV7 1060 eo, which has been disfunctioning recently. The problem is that when I start up, the display will remain blank -nothing happens. I’ve been reading local chats on these Pavilion (typical) faults and one comment suggested using a hair dryer at full speed for a couple on minutes near the air vent where the fan is located.
I tried it and my laptop started up but next time without any heating nothing worked again. I called an IT repair firm, they recognized the fault as a type fault and said the fault lies with the soldering of the graphics card to the motherboard -nothing doing; go and get a new laptop. The hair dryer effect works as the heat enlarges the motherboard and the connections work but when the laptop cools down, you are faced with the same problem -nothing works.
Is there any other solution to this problem than buying a new laptop? The dv7 cost me 1100 dollars back in 2008 and I think for such a sum a machine should work longer than just four years.
Yours,
Pekka Järvilehto
Helsinki
TwinDragon
Hello,
I have a
HP DV7-1245dx 17in
AMD Turion X2 64bit
ATI Radeon HD 3200 Graphics
I have a blank screen. Once in a while it will come back and work for a day or two, then quits working again. I am able to attach a external monitor and use the laptop.
I did have a fan issue and blew the main fan out with canned air and the fan is working and quiet, but I do think I need to disassemble it and do a thorough cleaning.
My question is:
Could the graphics card be overheating and need to be cleaned out? A friend thought that the attached monitor would be driven by the ATI graphics card and the external monitor would be driven by the motherboard graphics.
Thanks for any advice.
TD
TwinDragon
Oh,
Someone else said it could be the inverter for the monitor.
Thanks, again.
TD
NSK
Hello,
I have a refurbished HP Pavilion dv7-1133cl that I bought from TigerDirect and about a week after the 3 month warranty expired the power supply brick got very hot and then stopped charging the battery or running the PC, I bought a replacement PS and that would not charge or power the PC either, then bought a new DC jack but that not the problem either still won’t work.
At this point I’d be happy just to get the battery pin assignment so I could at least for the time connect directly to the pins where the battery connects as use it as a desktop.
Thanks, NSK
NSK
Hi again,
I forgot to mention that the HP Pavilion dv7-1133cl continued to boot and run off the battery but would not charge or run with original or replacement PS.
The battery is now dead and rather than buy a stand alone charger and just run it off battery would like to just bypass the battery and connect directly from the PS to the battery connector.
Thanks again.
Noob
The fan broke down. So I bought a new one, followed the steps. Then in the end I felt a little tickle at my thumb when I was, very carefully, manipulating the mother board. Changed the fan and put everything back together, plugged the power cable in, and the little light lit itself (where the power cable comes in). But then when trying to start it… nothing…
Apparently I ruined the mother board trying to replace the fan… not worth it…
—>>>SO BE CAREFUL TO NOT TOUCH ANYTHING ON THE MOTHERBOARD<<<—
Duncan Y
I have the same issue as at least one other of the posters here (I didn’t scan ALL comments…there could be more). It’s the “screen doesn’t display properly” problem on a 5 year old dv 7. According to the other poster, he found someone who told him it was a defect in a lot of DV 7s. There is a soldering problem between the graphics card and the motherboard that pops up with age. Once the lappie heats up, the connection problem goes away and the display is proper again. I don’t have a fix in the works yet. I’m thinking I’ll have a pro dissassemble the graphics card from the MB and resolder it or install a new one. Meanwhile, it is still usable by letting it run for about 5 mins after cold boot, then reboot. Most times this works…sometimes it takes a longer warm up time.
T-Rex
Hello i have an HP DV7 1245dx which is returning a bad CPU error code it is an AMD that is socket 478 can i replace it with a similar intel CPU
IML Tech
@ T-Rex,
I don’t think so. If your laptop had AMD CPU originally you’ll have to replace it with a compatible AMD CPU.
UTL
Thank you for helping me disassemble my computer!
One note I have is that all three of the screws that are hidden under the CD drive can be removed at the same time (the earliest time) without consequence. I understand that the hold different things together, but this helps keep track of so many screws.
Mark Schmeling
These are fantastic instruction. Replaced hinge and cooling fan in HP Pavillion dv7-1245dx. Only problem I had was the 4 small keyboard screws in step 9 were too tight. First screw stripped out head. Used small needle nose pliers to loosen screws, then used screw driver.
Thank you for the help
Steve
Very helpful instructions. I have not begun the job as yet, and I have a question. The HP Maintenance and Service Guide does not mention removing the wireless card, RAM modules, or the CMOS battery. Why is this recommended in your instructions?
sakuan
Hey IML Tech, I found the details of the disassembly pretty informative, recently I have ran into an issue with my hp pavilion dv7 1245dx. Once powered on I get a complete Black screen, the fan only stays on briefly but the LED lights on the touch panel remains on along with the Blinking (Caps Lock and Number Lock lights). I am thinking it is a possible RAM issue so upon removing each memory chip and replacing them individually and powering the laptop on. Stil the same results. Can you assist in a solution. Everything else has been working fine prior. Thanks
PR
Excellent instructions. HP Pavilion dv7 1270eo noisy fan was replaced with no problem. I had AMD processor, but the fan inside had Intel part number 480481-001, like the new one I put inside.
Afterwards I looked the old fan: Sideplate is fixed with four very tiny Phillips screws. After removing them, the propeller can simply be lift off and cleaned and some oil is easy to put to the bearing. Note that propeller plades are very weak, handle with care. Unfortunatelly I didn’t check if the bearing of the new fan was properly lubricated.
Claudiu I.
I have followed your instruction for an HP Pavilion DV7 1103ef. It works. 🙂 Thank you!
Also bookmarked.
Ðндрей
Прошу Ð’Ð°Ñ Ð¿Ð¾Ð¼Ð¾Ñ‡ÑŒ! У моего ноута HP Pavilion dv7 вырван Ñ ÐºÐ¾Ñ€Ð½ÐµÐ¼ power connector. Кто оÑведомлен о раÑпиновке проводов на плате?
Wes
Thanks a lot! I have a dv7-1150us and it worked great. I do work on laptops, but i haven’t taken hundreds apart, and a tutorial like this cut my time in half. I would of sent you some money but i’m doing this pro-bono for a missionary. If i use any of your tutorials for a client ill send you something for sure.
Thanks again!
Robert P Trautwein
Thank you, thank you, thank you! Am appreciative for the info – very accurate and helpful.
B. Beeman
Thank you so much for this info. I’m about to replace my fan.
Question: Is there a better keyboard on the market that I could replace mine with?
It works, but I’ve never liked it. I’d rather have the newer DV7 type keyboard.
Again, Bless YOU for making this guide. It will save me much time.
robert kehring
Pictures and article was perfect,i used step by step to change fan went great , Thank you rob.
Katie
I followed your wonderful directions to help a friend out. Now the Beats and bass wont work. Have you come across this? And if so, how do I fix it?
IML Tech
@ Katie,
Did your laptop have a separate subwoofer? Maybe you forgot to connect it to the motherboard?
Katie
As for the sub-woofer, not that I noticed. Where might it be?
IML Tech
@ Katie,
Take a look at this dv7-4000 series for example:
https://www.insidemylaptop.com/images/HP-Pavilion-dv7-second-guide/hp-pavilion-dv7-complete-disassembly-24.jpg
There are two speakers in the lower left and right corners and subwoofer in the upper right corner.
PL
Please help. I have dv7-4053cl laptop and it’s out of warranty. There has no picture after power it on. On the keyboard, the Caps Lock key is blinking once a while and keys of F11 and F12 has red light on. I did disassemble it and clean the fan, heat sink and processor. Any suggestion to fix the laptop. Thanks.
IML Tech
@ PL,
Did you check if memory modules seated correctly?
zois
Thank very much from Greece, great help, the fan was very very noisy and after cleaning – lubricating works perfectly.
Gina Jordan
Do you have instructions on how to clean and lubricate the cooling fan? I wish the design made it easier to reach such an often failing part, rather than having to take apart everything to get to it 🙁 But your instructions are a huge help. Mine is a DV7 1280 and has chrome strips around the 2 sides and front. Am not sure how to get those off. Thanks!
IML Tech
@ Gina Jordan,
Unfortunately, there is no easy access to the fan. It’s mounted inside the laptop under the motherboard. You’ll have to go though all above mentioned disassembly steps. The fan removal shown on the last picture. But do not lubricate the fan, just buy a new one and replace the failed fan.
Rodney Hambrick
I need help with the replacement instructions to replace the touch pad om my HP pavilion dv7/ 1135nr laptop. thanks
Jordan Hardy
First off, great tutorial! Thanks for taking the time to post it. One question though, would you be able to post one for the DV7-7121NR? it’s pretty new and haven’t been able to find much on it. I need to open it up to clean it out and check about replacing the APU. Thanks in advance!!
Dimitris
Great tutorial. Using the tutorial I just disassempled a dv7 and then repaired its DC jack by soldering 2 broken wires on it. Thank you so much !
Josantonio
Muy buen tutorial, aunque ya lo habÃa hecho con otros un poco a ojo, me sirvió para recordar loas pasos y no “cagarla” ni romper ninguna pestaña. Gracias magnÃfico trabajo, lo guardaré en marcadores. Un saludo cordial.
Mel
I have a DV-7 4150EA which has progressively got hotter and hotter over the last 2.5 years. The processor (i5 M480M) sometimes hits 105 degrees C when doing video processing. I am surprised my laptop has not died. Anyway today I found your instructions and followed them. It was a bit scary when it was completely dismantled. I was worried that I would never get the laptop running again. I found a lot of dust and fluff inside the fan housing which I cleaned out with a brush and plenty of blowing. I reassembled and much to my surprise the laptop started up normally (slap on the back). The temperature is definitely running a little cooler than before – perhaps around 5 degrees C on average. This laptop always ran quite warm even from new. The main benefit is the reduction in constant fan noise which was driving me mad. It seems rather quiet now. Just wanted to thank you for the excellent instructions. I would not have dared try it without. The design is crazy in that the entire machine has to be dismantled to clean the fan housing – that’s ridiculous since this is a maintenance job that will need doing from time to time. Once again thanks for the excellent instructions.
John Kurrle
Just curious, would it be possible to replace the USB 2.0 ports with USB 3.0 ports? I love my laptop, but this is one limitation that is really irritating to me. If so, what usb 3.0 compatible part would I order to fit a Pavilion dv7-1285dx?
Nick
Hi, Thanks for the great tutorial.
My laptop kept shutting down after just a few minutes. Turns out there was a whole load of dust in there and I think it was overheating. The only problem is the screw I have left at the end to secure the DVD player is tiny and doesn’t seem to reach to screw in. Is there a knack to this or have I put the wrong screw in somewhere else? I thought I was quite careful to keep parts and screws grouped together.
Iskicrowhill
🙂
Jim Dunlop 1mm Tortex guitar pick.
My favorite too!
MG Shanks
Perfect breakdown of the DV7! This helped me so much – Thank you!!
fightwind
thank you so much I could clean my fan my hp dv7 1035 em already 7 years old and he still has long years ahead of him … very studied this tutorial hat to send to hp! 🙂 Ca them be good
thank you again!
Xavier
Many thanks to you !
You are my hero. People like you make world better.
Kiss from my mother in law 🙂
Gary Farrell
Thank you for your posts. Very comprehensive instructions and I am going to attack my DV7-1175nr to clean it up and fix the DC jack that appears to have a broken connection.
Robert Miller
Thank you for the comprehensive instructions.
I have not been able to get past the step of removing the keyboard as two of the screws are stuck and I ended up stripping the ends while trying to remove them; very easy to do. I have a screw kit coming and will return to disassembling my laptop when it arrives.
My issue is the LED lights on the keyboard and the speaker cover are very dim (about one quarter intensity) after assembling the laptop and I was wondering if the ribbon cable can be inserted too far. I do not see any exposed wires for the cable as they are all in the connector, but I wonder if they are too far inside the connector.
Thoughts?
IML Tech
@ Robert Miller,
You cannot insert cables too far. I don’t think that’s your problem.
Make sure the laptop assembled correctly. This could be some kind of grounding issue. Not sure what exactly causing the problem.
Shane
Thank you so much for your method for deconstruction, my laptop was overheating and shutting down when stressed (mostly while playing games).
I followed your method, with a few adjustments for a few random added attachments that required removal, but I know I would not have come close to taking apart and then reassembling my system.
Crossed my fingers once I put the last screw back in and powered up, to my utmost joy it booted up perfectly and I have been playing for hours on end without any overheating or shutdown issues.
Thank you again for your excellent instructions.
amateur
I’ve been searching for something like that quite long! And as i found it and followed all your steps, i can only say: WONDERFULL!! Thank you 1000000 times!
need simple
need easiest way to tighten dc jack only
IML Tech
@ need simple,
There is no easiest way for that. The jack is mounted inside the case and you’ll have to remove the top cover to access it.
David C
Just used this guide, it worked great!! Also, I have an AMD system but had the Intel fan number. I replaced it with the same Intel fan and it works flawlessly.
IML Tech
@ David C,
I’m glad it worked for you and thank you for mentioning that Intel fan works with an AMD system.
I’ve been asked this question before but didn’t know that you can do that.
Sébastien
Two words :
Thank you! 🙂
I’ve found this laptop in my flatshare’s house (480481-001 version), the guys was saying that it won’t work properly anymore because of the RAM (lol!). Thanks to your instruction i’ve realised that the stuff needed just to be cleaned up and changed the heat past.
Now i have a brand new laptop with a fresh Windows 8.1 installation! Works perfectly! I only sense that the nvidia gpu is still running a little bit hot (i guess because this Gproc’s clock is not working as a Centrino and it fixed on the motherboard too far from the fan so i had to underclock it ).
I will make a donation as soon as i get some money! promise!
Sébastien. (from France)
suzut
22 steps?
BOYCOTTE HP FOR EVER
IML Tech
@ suzut,
How many disassembly steps did you expect? 🙂
In order to remove the motherboard you’ll have to go though many disassembly steps with any brand, not just HP.
Mr. Jussi Rautanen
This page has been a great help for me. I managed to service my motherboard and now it is working well.
Pete in Fullerton
Q: My upper memory card does not lay flat as shown in the pictures. Is there a trick to reinstalling it?
Great website, much better than the video I used to reassemble the unit!
(Received this unit totally apart in a big box)
Bought a new cooling fan and installed it, need to take it apart again as it is dead. Now I can try to use those 12 left over screws <;)
IML Tech
@ Pete in Fullerton,
There is no trick, it’s the same as the lower memory card. Just make sure it’s plugged all the way into the slot and after that push down until it’s locked by the slot locking mechanism.
Is this memory module detected by the BIOS? If yes, probably just leave it as is.
Pete in Fullerton
Thanks to this site, I reassembled the laptop and started installing Windows 7. Used up most of the extra screws, also. <;) The system overheated and shut down after a few minutes – it seems like the replacement fan was not working, as I could not hear any sound or feel any air coming out, and the right top on the case got really hot.
Is there a way to check these fans? The plugs are so tiny, it doesn't seem possible they could draw the .4-.5 A @ 5V stated on the stickers. Plus I cannot get a 5V source to the fan to check it. I tried ganged batteries, but again, the wires are too small to input the power.
IML Tech
@ Pete in Fullerton,
Why did you replace the fan? Did it fail?
It’s possible you have a problem with the motherboard, not the fan.
I would try another one and if it doesn’t work either, I assume it’s the motherboard.
Pete in Fullerton
The unit had overheated and shut down due to lint etc in the cooling fins, according to my son. who gave me the unit apart in a box.
To check the fans, I used two very fine sewing needles and a 6V lantern battery- determined that the original fan worked fine, the replacement was DOA.
How frustrating, but now the assembly work is much faster.
Thanks so much for this DIY. I looked and a number of them on the web and this is by far the best – especially about the little brown retaining clips for the ribbon cables.
Jerry Ledesma
Hello this is VERY helpful. I ran into a bit of a problem… The screws about the keyboard, only ONE came out. The other screws did not twist at all and now the screw driver has no grip on them because they have stripped away. What do you think I should do?
IML Tech
@ Jerry Ledesma,
Try using a sharp flathead screwdriver instead of Philips screwdriver. Sometimes I use this technique on stripped screws. Also, I heat up a striped screw using a soldering gun. It helps to soften locking glue on the screw thread and makes it easier to remove.
Nick M.
Very useful. I have a DV-7 2180 and there are some obvious differences, but this helped me take apart & put back together the laptop.
Thanks 🙂
Mr. M
The sad part is you have do all this to clean the fan. The good part is this is super information. Thank you a lot and may life bring you joy.
Dennis
Thank you very much for the guide. I have taken apart many laptops but this one had many screws. Was able to fix the overheating by removing the layer of dust buildup on heatsink near fan and cleaning/adding new thermal compound on CPU/north bridge.
Janice Beddingfield
Thank You for this tutorial! I used it last year to replace the keyboard in my dv7t and again last evening to totally disassemble the laptop to attempt to clean the fan. The laptop would turn off within 30 seconds to 10 minutes (depending on how it was being used).
When I researched the possible reasons in the ‘events log’ I kept seeing critical faults relating to over heating. I figured ‘nothing ventured nothing gained’ – so I found this tutorial (again) and got to the fan (note – manufacturers really should have a separate compartment just to access this critical element!) – long story short, after 3 1/2 hours, I cleaned the major lint ball from the fan and build up on the vent, reassembled the laptop and viola! – it’s working like a charm!
I am NOT a computer technician – this tutorial is a testimonial to your documentation (and computer) skills! Thank you!
Pete
My HP Paviliion dv7-1135nr’s processor is dead [confirmed with 2nd & 3rd opinions]; I would like to replace the CPU AMD Turion X2 with same type CPU if I could locate one or a suitable replacement that would enable me to use my Vista Home Premium OS; however, if I cannot find a replacement; since this laptop is both 32 bit and 64-bit compatible I am open to advisement on listening to all possible options.
Terry of Astoria
Thank you for this clear and concise guide. It was VERY useful while I disassembled this dv7t-1000 HP computer. The machine overheated while Clonezilla Live was busy imaging my hard drive. I had been flummoxed by HP Windows Vista’s “sleeping” while installing Windows Updates. I was like “WTF?” I had set the sleep settings to not sleep but HP Vista simply slept IN THE PROCESS OF INSTALLING UPDATES. Later, I’d wake ‘er up and wonder why she had gone to sleep.
I was able to install Windows, configure it, and then install Ubuntu 14.04 just fine.
When I attempted to clone the system drive, though, Clonezilla Live (linux) shut ‘er down complaining of overheating.
Having dealt with these dv-series HP laptops before, I figured there would be a thick pad of dust, amounting to a piece of FELT behind the heatsink’s cooling fins.
After following your guide down to the bottom, and checking inside the heatsink/fan area, I found that I had been RIGHT. The piece of felt was there, composed of all the dust, lint, and animal dander accumulated over the years.
I simply removed the dust pad, cleaned the fan, and reassembled by following backwards from the bottom up your disassembly instructions. there was only ONE SCREW left over! LOLOL!
in step 17, I had another cable right next to the touchpad cable, to disconnect. Maybe it was the fingerprint sensor. You could add that if you want, but it was very easy to remember.
THANK YOU AGAIN, very much for making this one. Clonezilla has now finished successfully cloning the hard drive onto the spare drive which this PC has. One dv7t-1000 is back on the road again. With your help, I have vanquished the heat problem!
John
Thank you so much for your step by step guides. I’ve disassembled my dv7 and my wife’s dv6 a few times each to clean out all of the dust thanks to these guides. One thing I would suggest to anyone trying this out is to really keep track of where each screw goes. There are many different sized screws so I make crude schematics to keep track of them. I’ll have one sheet of paper for for each picture that has you taking out a bunch of screws. I’ll make a crude drawing of the shape of the bottom of the laptop or the keyboard (depending on which step I’m on), mark on the drawing where the screw came from, then put the screw on the drawing in its correct place. For the removed hardware (hard drives, Wi-Fi card, etc.) I’ll put the screws back into the hardware screw holes. It takes a little extra time to do all of this, but it makes reassembly quick and easy!
Behar Haziri
hello,
i have the same laptop listed above, but the screen in my laptop is a bit different.
a wanted to open the screen and clean the dust gathered inside.
do you have any instructions on how to do that?
my model is 1080ez
best regards
Ken
I used this guide to disassemble my DV7-1275dx so that I could upgrade its stock P7450 CPU to a P8700. As mentioned above, I used a soldering iron to heat up stuck screws. A word of caution: be careful not to overheat screws that are in contact with plastic such as those shown in step 17.
John
I was hoping to find an exact model of my old laptop – hp pavilion dv7 1135nr – so I could install my hard drive and use it like my own. However, I think my laptop case is in much better condition than most that I have found on the internet. I am now wondering if I could find a replacement processor (AMD Turion X2 64). I did not see any photos or instructions about removing/replacing a processor for this laptop. I am open to any advice on salvaging my laptop otherwise I may remove the hard drive and install in one of my desktops.
Yarek
I really love your guide! This is one of the best (photo) Service Manual I have been working with. Definetely I will save your site to my “favorites”
Marc
Merci beaucoup pour vos explications, je suis novice et j’ai réussi à démonter mon PC sans problème.
Lucian
I have a HP Pavilion dv7-1270 us, 17”. The touch pad is not working anymore. Can I replace the touch pad ?Please send me a link where I can buy a touch pad for my laptop. Thank you !
Ethan
Awesome guide. Answered almost every question I had about my dc power jack suspicions. Mine is loose and I have to wiggle the wire really aggressively to get it to connect and just recently it began to wiggle itself loose when I move the laptop. One question though: Does the dc power jack mount to the bottom of the chassis or to the flimsy plastic trim on the sides? (the plastic trim on the sides of my laptop aren’t very well connected anymore). Thanks again.
Ben
Great Guide ! Managed to give my laptop a very good cleanup with your exhaustive explanations. Thank you ! Fantastic work !
Kennneth
Does anyone have the part numbers for the fans and the best places to purchase them at? Thanks in advance for your time and help.
Morgan
I have a hp pavilion dv7t 7000 and the configuration of the bezel assembly is different than all of the available tutorials and the service guide offered on HPs website suggest.
There are two points on the bezel that I cannot release. The guides suggest there is a screw cover but that appears to be untrue with this model. Do you know what I can do to release the last two clips/screw/or what ever is keeping the bezel on?
Shazo
Thank you for the step by step tear down!!
I came across this old laptop at my fiance’s house and immediately fell in love with the smooth, sleek keyboard and display. The MS Vista install was trash and the battery is dead (expected) along with a slow thrashing HD but most notably the fan was constantly SCREAMING! I installed an SSD and installed Fedora 31 which runs great but the fan was completely obnoxious. I checked BIOS settings but could not slow down the fan. I decided to take it apart with these instructions and found about 1/4 thick layer of cat hair and dust choking in the inside of the fins for cooling. I peeled it off, blew it out, and reassembled and now the fan and me are happy! Thank you!
IML Tech
You are very welcome Shazo! I’m glad to help.
Bogdan
https://www.youtube.com/watch?v=ZT0ovCntxbs
Maybe this can help!