
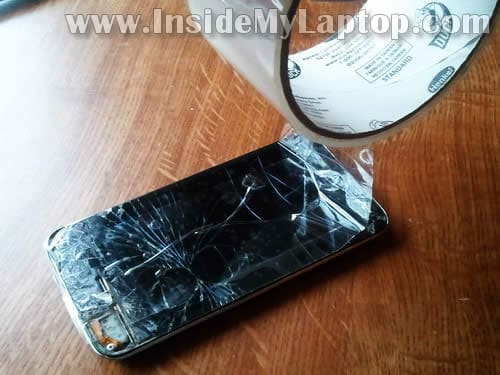
In this post I show how I replaced broken screen on my son’s iPod Touch 4th generation (with camera).
It was cracked very badly in many different places making it hard to use.
I have never fixed any iPod before. This was my first iPod related repair.
For this repair you’ll need the following:
1. New iPod Touch 4th generation screen. The entire assembly (with glass and digitizer) available on eBay.
2. A metal spudger.
OK, let’s go through the replacement procedure step-by-step:
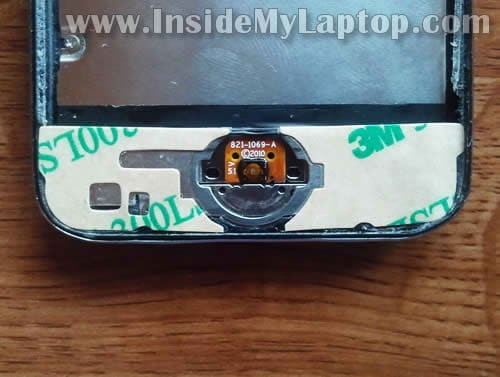
STEP 1.
Power off the device.
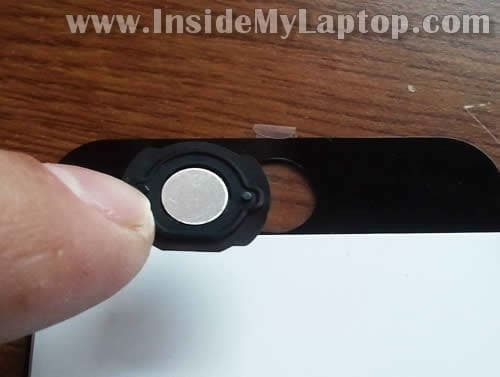
I applied some transparent scotch tape on the cracked glass to keep all broken pieces together when you remove it.
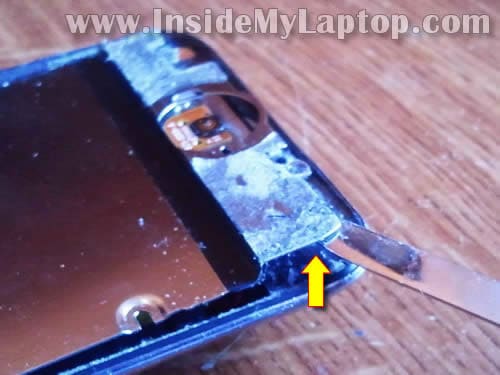
STEP 2.
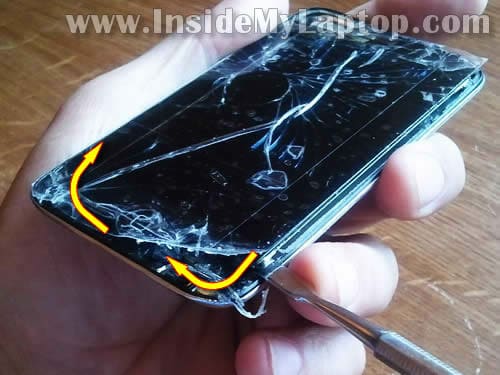
Start separating the old screen from the bottom cover using a metal spudger.
Carefully insert the spundger between the screen and cover and slowly move it along the side.
You should insert the spundger on the bottom of the iPod (where the home button is located). It’s explained very well in the video I mentioned at the beginning of this post.
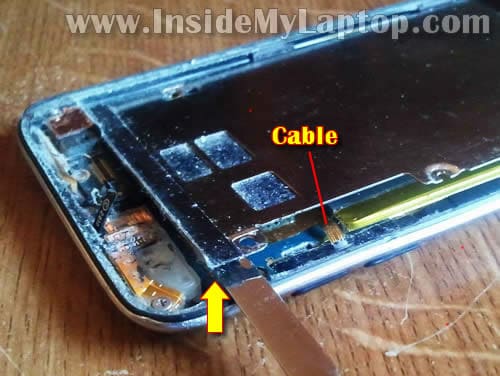
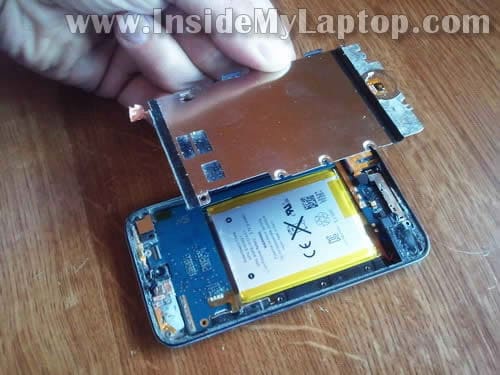
STEP 3.
Separate the broken assembly from the iPod bottom cover.

There are two cables connecting the assembly to the circuit board:
– the digitizer cable.
– the screen cable.

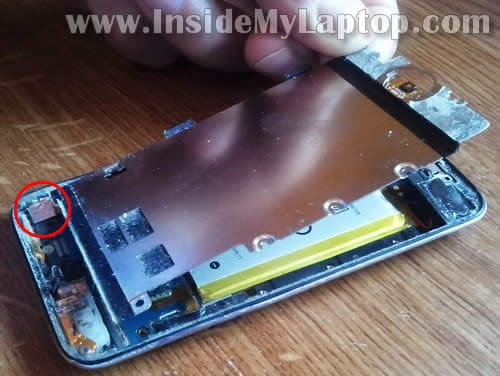
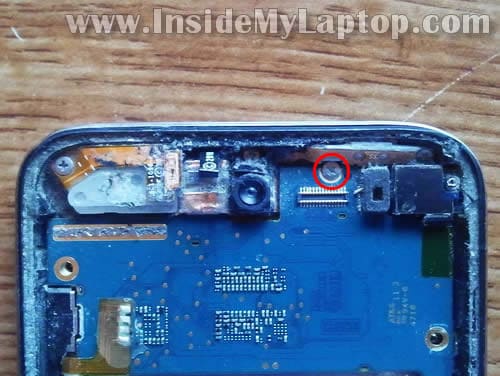
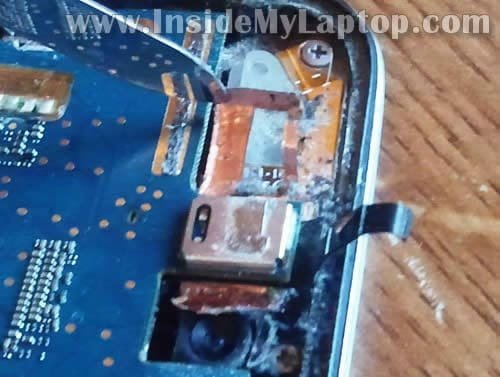
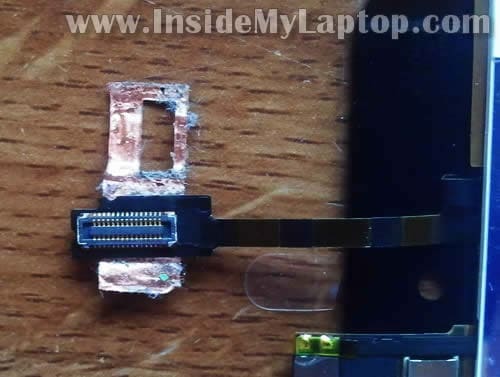
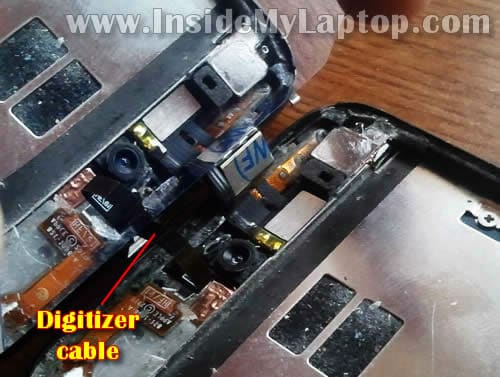
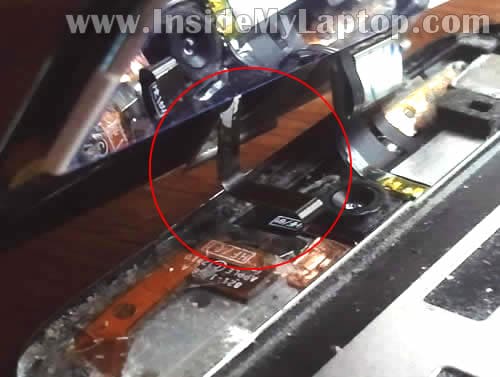
STEP 4.
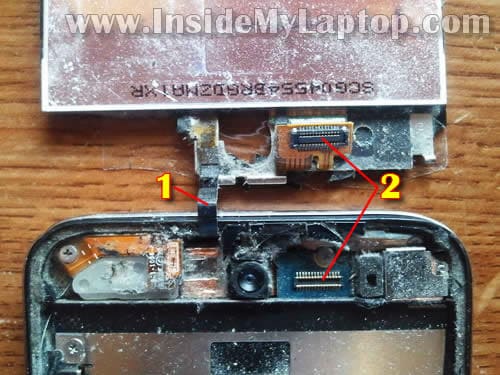
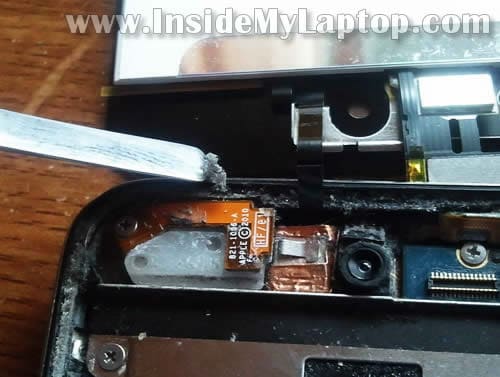
Here’s a close up picture of the cables.
Cut the digitizer cable (1). The new new digitizer cable comes with the new assembly.
When I lifted up the broken screen, the cable (2) got disconnected by itself. If it doesn’t disconnect by itself, you can unplug the cable connector using the spundger.
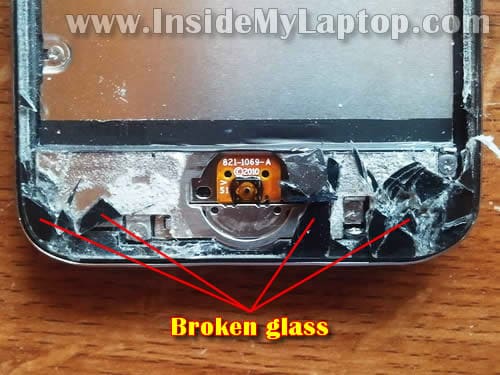
STEP 5.
Remove the home button from the cracked glass. You’ll have to transfer this button to the new glass later.

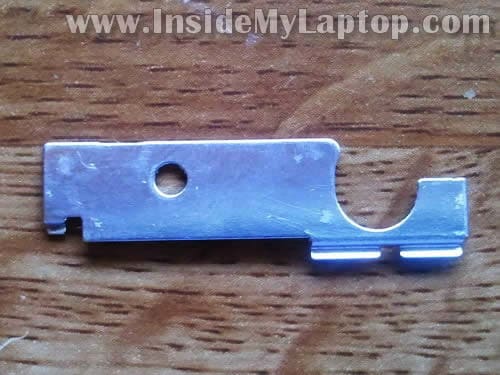
STEP 6.
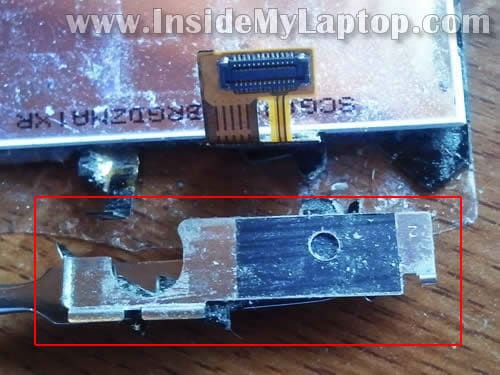
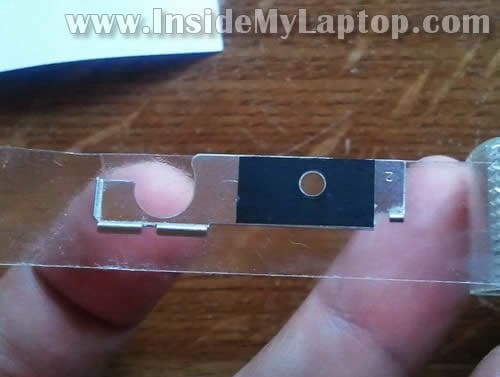
Separate the metal bracket from the cracked glass.
This bracket attaches the screen assembly to the iPod cover. You’ll have to transfer the bracket to the new glass.
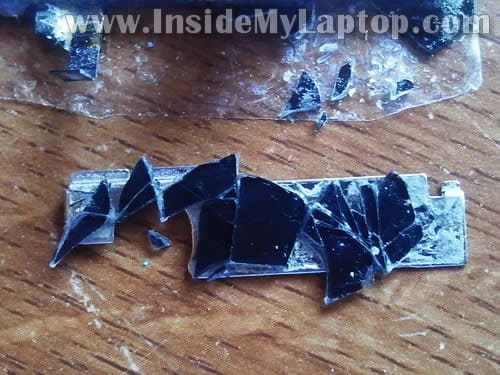
STEP 7.
Remove all broken glass from the bracket.
STEP 8.
Clean up the bracket. I’ll be applying new adhesive to the bracket when it’s ready to be transferred.
It’s not necessary to remove the old adhesive if it’s still in good shape and sticky.
STEP 9.
I had many pieces of broken glass stuck to the bottom cover.
Lots of broken glass on the top.

and on the bottom.
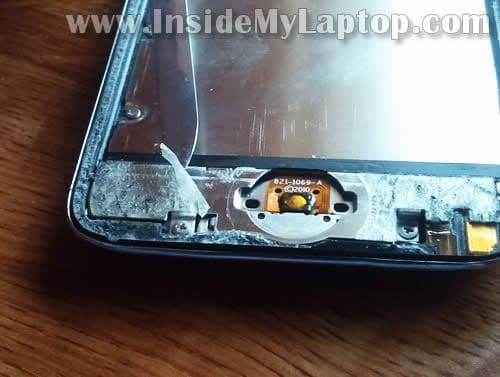
Remove all broken glass from the bottom cover.
NOTE: it’s very important to remove ALL broken glass pieces from the iPod.
If you forger to remove a piece, you can crack the new screen while installing it back into the iPod.
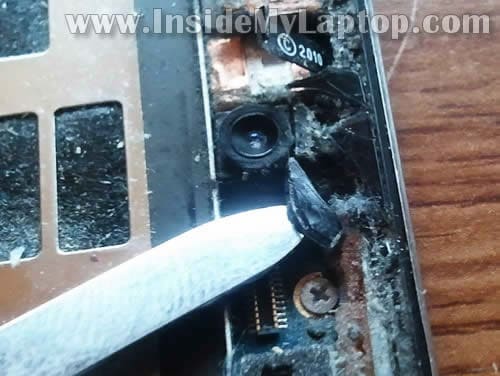
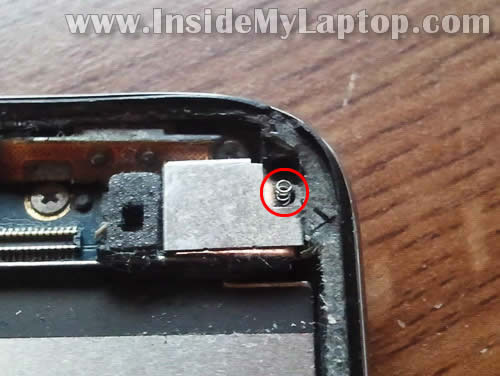
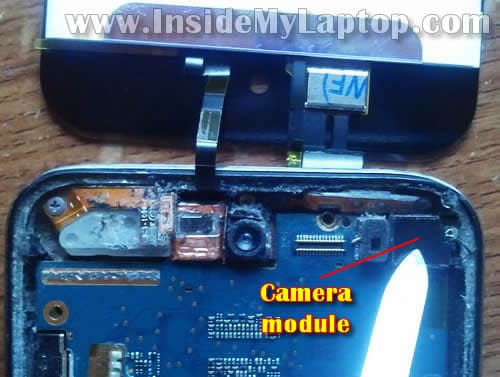
While looking at the internal iPod components very closely I found a small spring located by the camera module bracket. I’m not sure about the purpose of this spring, but be careful and do not loose it.
I just thought it’s worth mentioning.
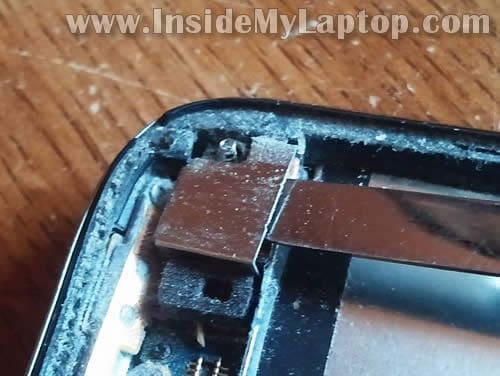
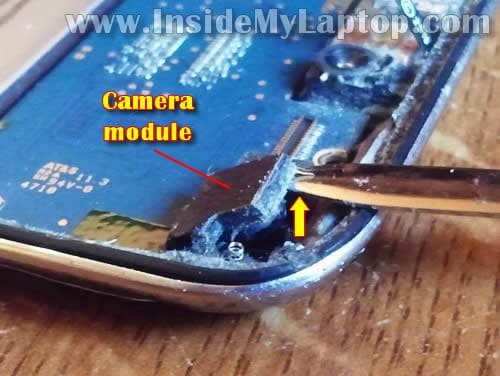
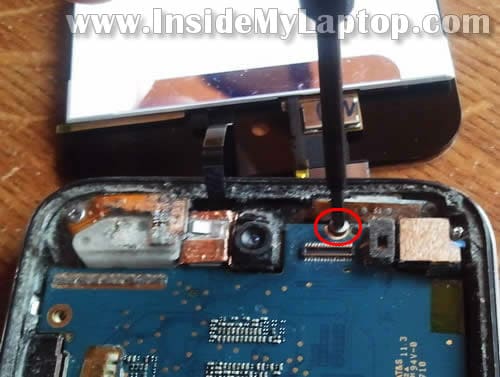
STEP 10.
Insert the spundger between the metal bracket and camera module and lift it up.
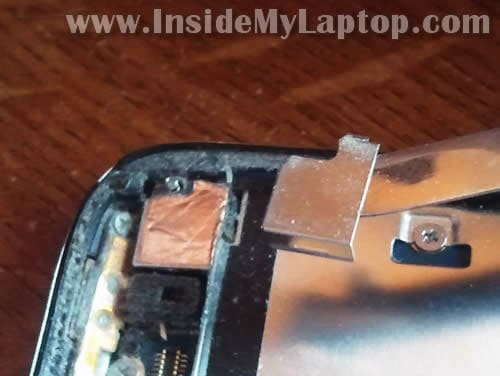
STEP 11.
Remove the camera bracket.
STEP 12.
Remove eight screws securing the metal plate.
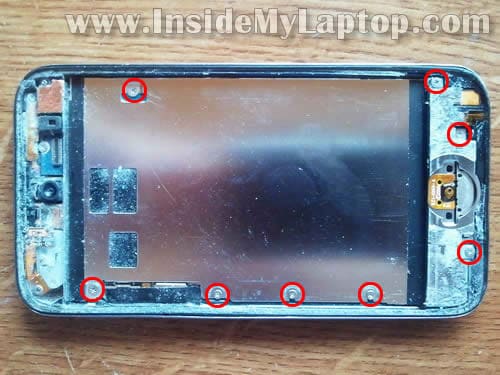
IMPORTANT: keep all screws organized. All screws have different length.

STEP 13.
Now we’ll start removing the metal plate.
Insert the spundger between the plate and iPod bottom cover (on the left side from the home button) and carefully lift it up.
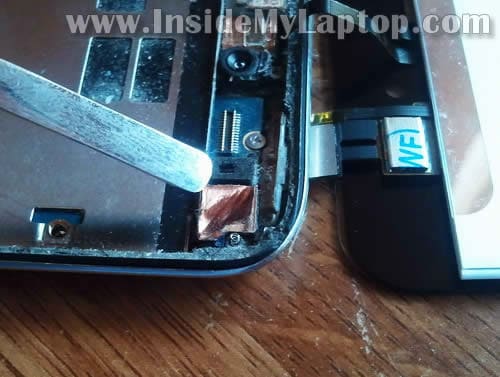
STEP 14.
Now insert the spundger on the other side of the metal plate. Look the the following picture to see where I inserted the spundger.
NOTE: there is a ribbon cable on the right side of the spundger. Do not damage the cable!
Make sure the cable doesn’t lift up when you remove the metal plate.
STEP 15.
Continue removing the metal plate.
There is a shielding foil connecting the metal plate with the camera module.
STEP 16.
Unglue the shielding foil from the camera module.
STEP 17.
Remove the metal plate.
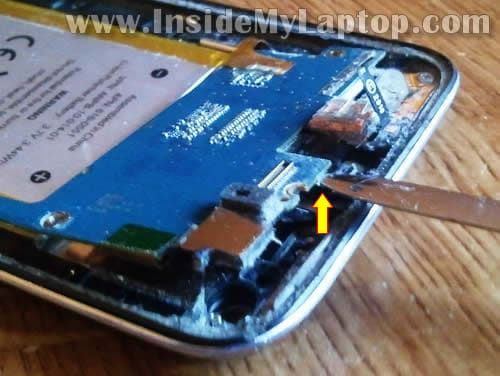
STEP 18.
Remove one screw securing the iPod circuit board.
STEP 19.
Carefully lift up the camera module as it shown on the following picture.
Do not try to remove it. Just lift up as it shown.
STEP 20.
Now you should be able to lift up and separate the circuit board from the bottom cover.
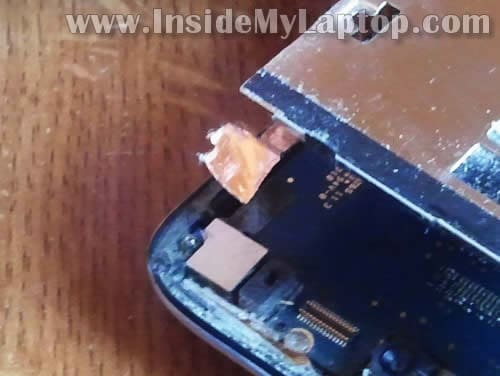
We’ll have to lift it up just enough to unplug the old digitizer cable and plug in a new one.
STEP 21.
Unwrap the shielding foil (this foil attached to the digitizer cable connector).
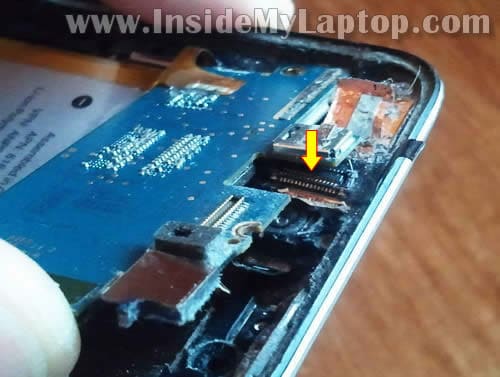
STEP 22.
Lift up the circuit board and unplug the old digitizer cable connector.
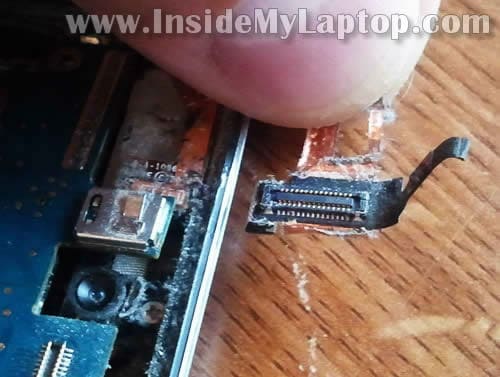
STEP 23.
Remove the connector.
If you remember, this connector was attached to the cable (1) we cut off in the step 4.
STEP 24.
Remove shielding foil from the old digitizer connector.
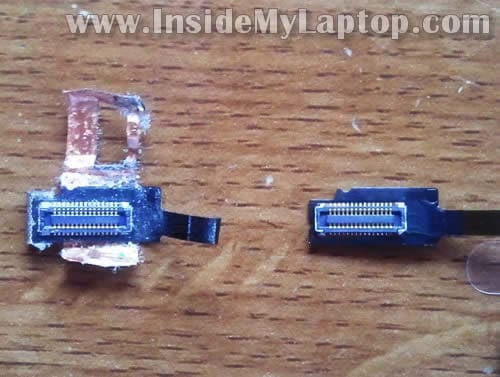
STEP 25.
Transfer shielding foil to the connector on the new cable.
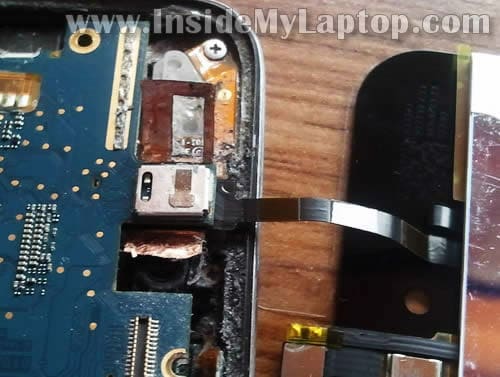
STEP 26.
Carefully lift up the circuit board and insert the digitizer connector under the board.
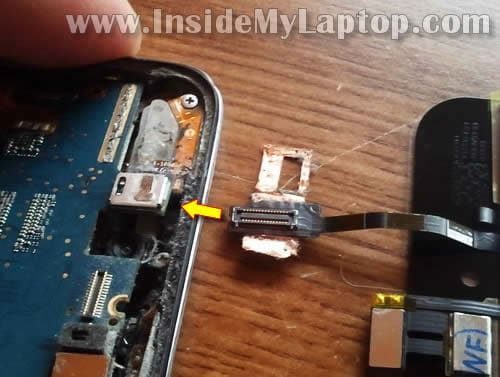
STEP 27.
Position the digitizer connector so it’s located right under the connector on the circuit board.
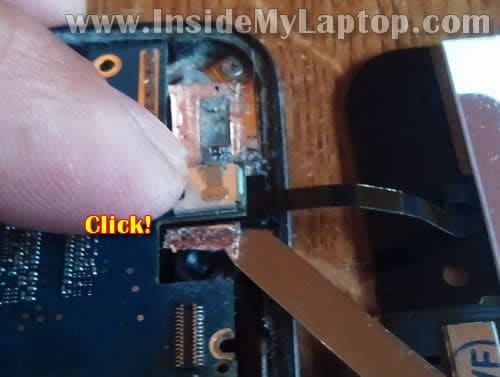
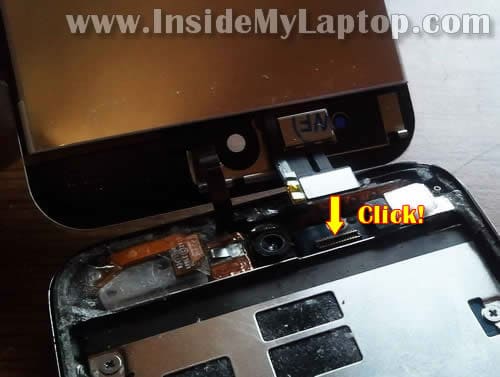
STEP 28.
Insert the spundger under the digitizer connector and at the same time apply some pressure on the top of the circuit board.
If both connector positioned correctly you’ll fill a click when the digitizer connector gets connected to the circuit board.
STEP 29.
Wrap up the shielding film the way it was before.

STEP 30.
Carefully seat the circuit board back in place. You’ll have to guide the digitizer cable so it doesn’t get damaged while you are installing the circuit board.
Position the camera module back in place.
STEP 31.
Install one screw securing the circuit board.
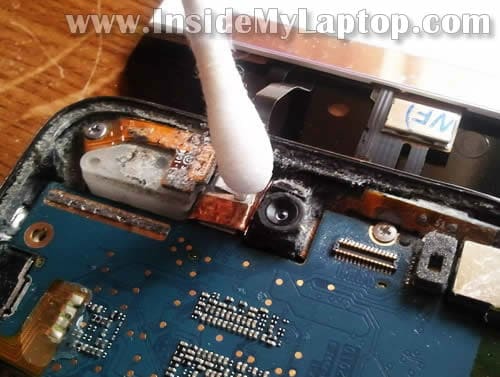
STEP 32.
In my iPod Touch the front facing camera was very dirty. I cleaned it up with a cotton swab and alcohol.
STEP 33.
Install the metal plate back into the iPod.

STEP 34.
Attach the shielding film to the camera module.
STEP 35.
Install eight screws securing the metal plate.

STEP 36.
Position the camera bracket above the camera module.
Push on the bracket until it clicks back in place.

STEP 37.
Install the home button on the new screen assembly.
STEP 38.
As you remember, I had to clean up the mounting bracket in the steps 7-8.
This bracket has to be glued to the new assembly. I didn’t have any special adhesive for that so I used regular double sticky tape.
I applied sticky tape on the bottom side of the bracket and then cut it off (shaping the bracket) with a sharp knife.
STEP 39.
Glue the metal bracket to the new screen assembly.

STEP 40.
Inspect the iPod case again and remove all broken glass and old adhesive tape (if it’s not sticky anymore).
STEP 41.
My screen assembly came with some adhesive tape so I decided to replace the old adhesive on the bottom part of the iPod.
I removed the old adhesive.
And applied new adhesive.
STEP 42.
Remove white paper securing the new digitizer.
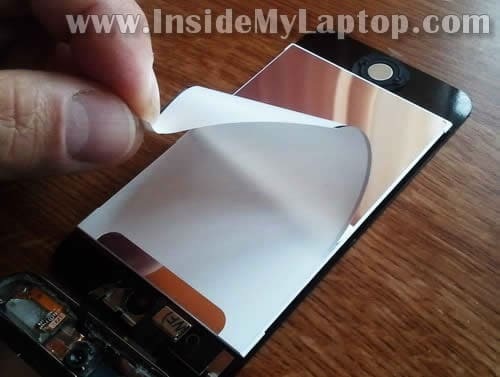
STEP 43.
Lift up the new assembly and position it above the iPod.
Now you’ll have to connect the screen cable back to the iPod circuit board.
Do not apply too much pressure. If the connector positioned correctly it has to click back in place relatively easy.
STEP 44.
After the cable connected back to the circuit board you’ll have to route the digitizer cable.
Here’s how to fold the digitizer cable before installing the screen assembly back in place.
STEP 45.
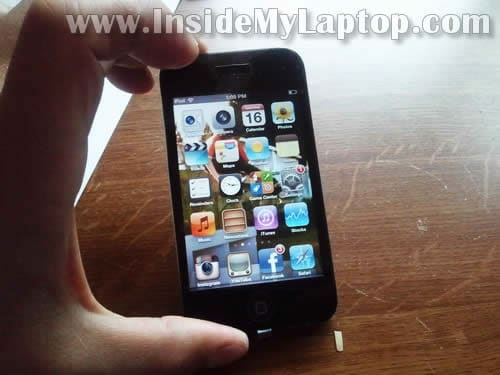
Before you snap the new screen back in place, turn on the iPod the test it. Make sure the digitizer works properly.
Finally, snap the new screen back in place. First, align the top side, make sure it’s seated properly. Second, apply some pressure on the bottom side of the screen until it seated back in place.
I do not claim that my guide is perfect. It was my first iPod Touch 4th generation repair but I hope it would be useful for other DIYers.
Andre
Do you know the screwdriver size?
IML Tech
@ Andre,
Not sure about the size. I was using one that came with the replacement screen I purchased from eBay. It’s a really small Philips screwdriver.
Maybe Philips #00?
Sarif Brock
Doing this made for one of the most stressful hours of my life. Still, I wouldn’t have done it without this post, so thank you!
IML Tech
@ Sarif Brock,
You are correct. It was not an easy repair for me either even though I’m experienced with this kind of stuff.
Does Not Wanna Show
Hi I Was Wondering Could You Fix Mines And How Much Would It Cost And Do Have A Number I Could Call??
IML Tech
@ Daes Not Wanna Show,
No, I don’t do repairs at home but check out the video at the beginning of the guide. Those guys repair iPods. You can get the contact information in there.
wannado
Is the quality of the screen you purchased on ebay the same as the original ? If so do you remember the sellers name. I don’t want to get a screen with less resolution.
IML Tech
@ wannado,
I don’t know yet. 🙂 It still works.
It’s same resolution as the original one.
Yes. I bought it from paylessauction.
Andrew
Hey good guide. Not bad at all. It helped me fix an iPOd 4th gen today. Ya what a lot of work. Sheesh but it’s done and I made a few bux.
paul
Just wanted to say what a good guide, however a little tip for others the oem tape that you can buy with these screens can often cause the screen to lift after a few weeks, leading to the digitizer ribbon becoming damaged , I have always found using epoxy glue the best way to go, just be sure to use a fine tip spreader, then mix the glue in a dish, run the glue around the black rim only, then place some plastic spring clamps in each corner until the glue has dried, you can pick these up for just a few pound, once dry you can easily clean any glue on the outer rim with some surgical spirit
mik sarg
hi i have manage to pull the foil of back of screen still got it how do i re apply any ideas thanks
Jules
Thanks, I have been searching how to repair my son’s xmas present for nearly a year now.
I managed to order an ipod touch 4 gen screen repair kit including the digitizer and opening tools on ebay.co.uk for a price of 24euros including delivery to France.
Eagerly awaiting arrival of kit so I can repair the ipod as per your instructions.
Jules
Thanks, Got to step 15 & 16 – removing the metal plate but unfortunately the right hand side was glued solid and bought up the black plastic in the corner and broke a blue wire (not the red). Son aged 13 was disappointed but has decided he wants an iphone instead. Well worth a try to fix a €260 ipod touch for €25, but unfortunately didn’t work out for us. I agree with Sarif, wouldn’t be possible without this guide unless you do it for a living. Well worth a try, thank you.
Merari Salazar
This guide looks so helpful! I’m in the process of getting my cracked iPod touch repaired and I’m looking for easy tutorials and I think I found one! 🙂 THANKS A LOT! I hope it works out for me and I don’t mess it up. I’m only 17 ha ha! 🙂
Laura
Thank you! Total success.
Heather
This looks very helpful but if I decide I am too afraid to go for it myself.. I am not seeing/hearing the contact info you refer to for someone who repairs ipods.
luis santos
Hi i replaced the screen got it to work now it was time to screw in the screws and now it dont work doesnt even charge what did i do wrong??
Stuart
Fantastic guide, very well laid out and good explanation of the steps, my daughter’s IPod now works and everyone is happy, thanks for your help.
Pablo
I just had a question my after following the guide my ipod doesnt want to start and it wont even make interface to my computer
email me with an answer please
Nathan
Just for info make sure you remove all broken glass, on your pictures there is a piece of glass left around the front facing camera. This is easily missed (I’ve done it). This will cause problems getting the top of the glass flush.
Anne
I can’t get step 43. It won’t click.
Angela
Well, didn’t work, followed exact details, screen fits on just fine, but will not turn on, goes to white screen 1st, now nothing. This was the biggest mistake ever! I wish I had just took it somewhere to have it fixed, at least then it wouldn’t be my fault why it doesn’t work. Spent over $400 for an ipod that’s only 3 months old, I should of just lived with the cracked screen, at least it was working before I took it apart. Sucks, I’m still paying on this with a credit bill and have no ipod touch.
Michael
Hi – I recently cracked my screen and was horrified that I would loose all my data when I went to get it repaired. I sent it to one of those repair sites online, ipodrefresh.com and they fixed it without loosing anything, pics etc.
I would give them a try..!
Paul
Thanks for the tip.
The wifes 3 month old ipod works again.
The worst part of the job was getting rid of all the tiny shards of glass.
marco
hello,
I replce the screens but front camera wont work, any suggestions this happens all the time
bryan
To the person with the white screen issue, sometimes you need to do a reset. Hold the power and home button down untilll the unit reboots. You will not loose any data. I had the same issue.
Adams
Hello, can I ask you? I crashed my iPod yesterday, more hardly than yours. But touch screen is working, everything is working good. Should I change only Touch screen part, or LCD and touch screen?
Jesse
I was able to fix my iPod but when I tried turning it off it didn’t work so I turned it off from the inside now it doesn’t turn on anymore. is there anything I can do to fix it??
David DeFilippo
I got it all back together except for closing the body.
I can get the screen on and reset by buttons .
I can see the touch screen but none of the buttons work.
Does this mean a damaged cable? Which one? Long one or short?
IML Tech
@ David DeFilippo,
It’s possible the digitizer cable (connection shown in the step 26) not seated correctly. Or the digitizer cable is damaged. I would check the connection first.
da
i did this and the screen isnt lighting up but the ipod is on any help?
IML Tech
@ da,
Could be bad connection between the screen cable and logic board.
You can see this connector in the step 4 (connector 2).
Try reseating the connection.
evanoshinov
I am in the middle of a screen repair, i took the old screen out and bought a new one on ebay. it says its for a ipod touch 4 4th generation. is there a difference in screen sizes if there is an extra 4 on the item? i just wanted to know if you encountered this when buying a new screen.
IML Tech
@ evanoshlnov,
I don’t think there is any difference. Some sellers call it iPod Touch 4 screen. Other sellers call it iPod Touch 4th generation screen.
Fisher
Okay I did a repair on my iPod and it works and all but i bought the screen and the adhesive off of Ebay and when i did the repair my ipod screen sticks up a little bit and i put pressure on it and it didn’t work so i used a new adhesive and it still stuck up so i put it face down on a flat surface and put heavy stuff on it and it stayed down for about 2 minutes and then came back up when i tried to see if it worked better please help.
clare
HI, my daughters ipod touch 4th gen was cracked exactly the same as your sons! We have replaced the glass and digitiser with parts from ebay and it all looks okay but we cant swipe the screen to unlock the ipod? Can you give me any idea why this might be and what we can do to remedy it – my daughter would be forever grateful – thanks
andy
replaced my kids ipod screens worked at first now wont power on any suggestions
MNL
Thanks for this guide. Very clear and with more detailed photos than anything on Youtube. Just a hint to others: I saw somewhere that if you heat up your ipod case with a hair blow dryer, the adhesive loosens and many of the removal steps become easier.
As for me, I learned this hint one step too late. Up on Step #16, my copper shielding foil was stuck on too tight. The adhesive was stronger than the foil itself so, when I tried to separate the two, the foil ripped. If I feel brave again, I’ll dive back inside my ipod and replace the camera module (it’s very inexpensive) but I think just a little of that hair dryer trick would’ve prevented the rip in the first place.
Thanks again!
serf
I have changed the screens on 3 iPod 4g. None of which will power up or acknowledge charger. Have you had any issues like this and if so can you tell me how to fix this.
James
Repaired it, but when I tried to turn it on, the screen was white. What trouble shoot should I do?
joshua salazar
on step 14 what happens if you damnage that cable and what is its name so i can but another one
David
Very nice set of instructions. Be sure to watch the video first.
I would add that this job is not for the faint of heart and it requires patience. I just fixed 2 of these things for my grandsons and they are now pretty happy. A smile and a hug is worth quite a bit!
The first one took me a couple of hours and the second one was a little over an hour. Most of the time is spent releasing the screen and cleaning all the glass particles…. make sure you get it all. I relied heavily on my bi-focals and a large magnifying glass. Using a hairdryer to warm up the glass would probably make the adhesive release easier.
Instead of a spudger I used an exacto knife. These things are sharp and be sure you don’t cut yourself!
I also bought them the special cases with rubber corners.
The 2 little connectors are a challenge. Make sure they are seated before you put everything back together, this would explain the black screens.
Both of the Ipods I replaced the screens on had dead batteries. Plug in the charger and you should see a dim image of a battery. Once the battery charges a little then the screen will be bright and you can turn the Ipod on.
Thanks again for a nice set of written instructions with pictures. It was a huge help.
David
Anirudh
Hello Sir,
My Screen isnt broken but Bottom part of it has come out and i can see light through it can u tell me how to fixit
Jason
If you change the screen and all you have is a white screen now, hold the home button and power button until it turns off, then it should show the apple logo and your all set. sometimes you can overload the backlight circuit inadvertantly by shorting out the connector, holding the home and power button forces a full reboot and fixes the issue….
April
I feel dumb asking this but is there a method to getting the 8 tiny screws to come out because I’ve been sitting here for 15 minutes trying and I’ve only gotten one screw loose!
IML Tech
@ April,
There shouldn’t be any special trick but you need a good screwdriver that fits the screw very tightly.
April
I’m using the one that came with the kit and I’ve gotten 3 out of 8 so far but man these things aren’t coming out! Thanks for your response though!
Vanessa
I just had my screen replaced and it worked for maybe an hour, now nothing but a white screen. I have tried to reset the device many times and still nothing. Any suggestions?
IML Tech
@ Vanessa,
I believe the screen might turn white when it’s not getting any data signal from the logic board.
Did you replace the screen yourself? If you did, check the cable between the logic board and the screen. Try reconnecting the cable.
Vanessa
@ ILM Tech, I did not replace it myself, therefor I don’t have the tools needed to take it apart and look it over. Thank you for your response.
IML Tech
@ Vanessa,
Than don’t try it yourself, you can make it worse. As I said, this could be just connection related problem or possible screen failure. Don’t blame the technician, this stuff happens. Take it back to the place where you fixed it. Maybe they can help.
April
Replacement was successful except for the fact that the outward facing camera is a little fuzzy now. Any idea why?
IML Tech
@ April,
Maybe some dirt got inside during the disassembly process?
Lorraine
I brought a new screen twice and didn’t work
IML Tech
@ Lorraine,
Sorry to hear that but it’s possible you have a problem with the logic board or connector.
anon
i replaced the screen, but it is not responding when i touch it
Jenni velazquez
I have found that the screwdrivers that come in the kits are not always that great…but, I picked up a 16 in 1 screwdriver…the size u need for these screws is 000mm…but…wow!! What a difference it makes…the other screwdrivers where stripping my screws…and then I noticed, I didn’t even have an X anymore…off to Home Depot I went…wow, it made a big difference!! Also, these directions are similar enough to the iPad mini…the mini is slightly easier…but, it has 16 screws holding the metal plate…and the battery under the plate is magnetized so u have to fight to keep the screws going in the direction of the holes…but, I would definitely recommend spending the $7 to not screw up your screws
Leahhh
We took up the cracked screen and we watched the video but we still dont understand
Why we take up the part above the silver Back And Were Having
trouble
richard
thank you very much for taking time and making this giud it was really helpful because i baught my mom an ipod for chrismas that was 10 dollars because the screen
Matt penman
What happens If the shielding protector breaks around the digitizer?
Daniel
Hi, I recently broke my ipod gen 4 screen and saw this and was wondering if you could tell me what package you bought. Also my home button and power button don’t work and was wondering if the package came with those buttons
Laura
I got parts off of ebay, did everything, & upon getting to end, I can not get screen to snap back into backing. I don’t want to crack ne screen. I know, when taking it apart some black material, along border came off. Is this a type of glue, which I can possibly replace, w/more, or could I have bent the backing, making it not possible, now, to put it back together?